教程:将 ASP.NET Core 应用连接到 .NET Aspire 存储集成
云原生应用通常需要可缩放的存储解决方案,这些解决方案提供 Blob 存储、队列或半结构化 NoSQL 数据库等功能。 .NET Aspire 集成简化了与各种存储服务(例如 Azure Blob Storage)的连接。 在本教程中,你将创建ASP.NET Core,该应用使用.NET Aspire集成连接到Azure Blob Storage和Azure队列存储,以提交支持工单。 应用将票证发送到队列进行处理并将附件上传到存储。 你将了解如何:
- 创建一个基本 .NET 应用,该应用设置为使用 .NET Aspire 集成
- 添加 .NET.NET Aspire 集成以连接到多个存储服务
- 配置和使用 .NET.NET Aspire 组件的功能来发送和接收数据
先决条件
若要使用 .NET.NET Aspire,需要在本地安装以下各项:
- .NET 8.0 或 .NET 9.0
- 符合 OCI 的容器运行时,例如:
- 集成开发人员环境(IDE)或代码编辑器,例如:
- Visual Studio 2022 17.9 或更高版本(可选)
-
Visual Studio Code (可选)
- C# Dev Kit:扩展(可选)
- JetBrains Rider 使用 .NET.NET Aspire 插件 (可选)
有关详细信息,请参阅 .NET.NET Aspire 设置和工具,以及 .NET.NET Aspire SDK。
浏览已完成的示例应用
本教程中示例应用的已完成版本在 GitHub上提供。 项目还构建为 Azure Developer CLI的模板,这意味着,如果工具 azd up,则可以使用 Azure 命令自动执行 资源预配。
git clone https://github.com/Azure-Samples/dotnet-aspire-connect-storage.git
设置 Azure 存储资源
要阅读本文,您需要具有对包含 Blob 容器和存储队列的 Azure 存储帐户的数据贡献者访问权限。 确保具有以下可用资源和配置:
在本文中,需要使用模拟器在本地开发环境中创建 Blob 容器和存储队列资源。 为此,请使用 Azurite。 Azurite 是一种免费的开源跨平台 Azure 存储 API 兼容的 server(模拟器),可在 Docker 容器中运行。
若要使用模拟器,需要 安装 Azurite。
- Azure 存储账户 - 创建存储账户。
- 名为 fileuploads 的 Blob 存储容器 - ,还需要创建一个 Blob 存储容器。
- 名为 票证的存储队列, - 创建存储队列。
在 Azure CLI 或 CloudShell 中运行以下命令,设置所需的 Azure 存储资源:
az group create --name aspirestorage --location eastus2
az storage account create -n aspirestorage -g aspirestorage -l eastus2
az storage container create -n fileuploads --account-name aspirestorage
az storage queue create -n tickets --account-name aspirestorage
您需要将以下角色分配给您已登录到 Visual Studio 的用户帐户:
- 存储 Blob 数据参与者 - 分配 Azure RBAC 角色
- 存储队列数据贡献者 - 分配 Azure RBAC 角色
Azure Developer CLI 使你能够使用模板系统预配和部署 Azure 资源。 本教程提供了一个 完整的模板,用于预配所需的 Azure 资源,并包括已完成的示例应用程序代码。 运行以下命令来初始化并运行模板:
运行
azd auth login以登录到 Azure:azd auth login运行
azd init克隆并初始化示例模板:azd init --template dotnet-aspire-connect-storage运行
azd up来配置 Azure 资源。azd up出现提示时,选择预配资源的订阅和 Azure 区域。 模板将为你运行并完成以下任务:
- 创建启用了 blob 和队列服务的 Azure 存储帐户
- 创建名为
fileUploads的 blob 存储容器 - 创建名为
tickets的队列 - 将以下角色分配给运行模板的用户帐户。
- 存储 Blob 数据贡献者
- 存储队列数据贡献者
操作成功完成后,有两个选项继续前进:
- 选项 1:在模板 .NET 目录中运行
src示例应用以试验已完成的应用。 - 选项 2:使用前面的部分逐步生成示例应用,并将其连接到 Azure预配的
azd资源。
创建示例解决方案
使用 .NET Aspire 或 Visual Studio CLI 创建 .NET 项目。
- 在 Visual Studio顶部,导航到 文件>新建>项目。
- 在对话框窗口中,搜索 Aspire 并选择 .NET.NET Aspire 初学者应用程序。 选择 然后。
- 在 配置新项目 界面上:
- 输入
AspireStorage 的解决方案名称 ,然后选择“下一步”。
- 输入
- 在 其他信息 页面上:
- 取消选中 使用 Redis 缓存(本教程不需要)。
- 选择 创建。
Visual Studio 创建一个新的 ASP.NET Core 解决方案,该解决方案结构化为使用 .NET Aspire。
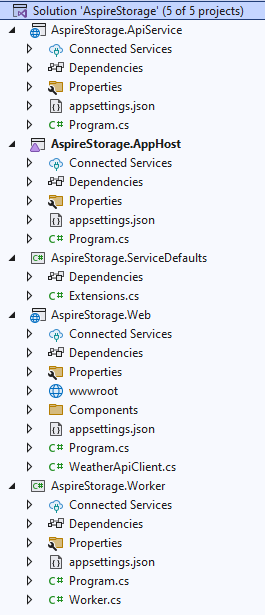
该解决方案由以下项目组成:
- AspireStorage.ApiService - 具有默认 .NET.NET Aspire 服务配置的 API 项目。
- AspireStorage.AppHost - 一个业务流程协调程序项目,旨在连接和配置应用的不同项目和服务。 协调器应设置为启动项目。
- AspireStorage.ServiceDefaults - 一个共享类库,用于保存可在解决方案中的项目中重复使用的代码。
- AspireStorage.Web - 一个作为您应用程序前端的 BlazorServer 项目。
添加 Worker Service 项目
接下来,将 Worker Service 项目添加到解决方案,以便在消息添加到 Azure 存储队列时检索和处理消息。
- 在解决方案资源管理器中,右键单击 AspireStorage 解决方案节点的顶级
“添加 新项目” 。 - 搜索并选择 Worker Service 模板,然后选择 下一步。
- 对于
项目名称 ,请输入AspireStorage.WorkerService ,然后选择“下一步”。 - 在 其他信息 页面上:
- 确保已选择 .NET 9.0。
- 确保在
流程编排 中选中 注册,然后选择 创建 。
Visual Studio 将项目添加到解决方案中,并使用新的代码行更新 Program.cs 项目的 文件:
builder.AddProject<Projects.AspireStorage_WorkerService>(
    "aspirestorage-workerservice");
Visual Studio 工具添加了此代码行,以将新项目注册到 IDistributedApplicationBuilder 对象,从而启用业务流程功能。 有关详细信息,请参阅 .NET.NET Aspire 业务流程概述。
完成的解决方案结构应如下所示:

将 .NET Aspire 集成添加到 Blazor 应用
将 .NET AspireAzure Blob Storage 集成 和 .NET AspireAzure 队列存储集成 包添加到 AspireStorage.Web 项目中:
dotnet add package Aspire.Azure.Storage.Blobs
dotnet add package Aspire.Azure.Storage.Queues
AspireStorage.Web 项目已经配置好以使用 .NET.NET Aspire 集成功能。 下面是更新的 AspireStorage.Web.csproj 文件:
<Project Sdk="Microsoft.NET.Sdk.Web">

  <PropertyGroup>
    <TargetFramework>net9.0</TargetFramework>
    <ImplicitUsings>enable</ImplicitUsings>
    <Nullable>enable</Nullable>
  </PropertyGroup>

  <ItemGroup>
    <ProjectReference Include="..\AspireStorage.ServiceDefaults\AspireStorage.ServiceDefaults.csproj" />
  </ItemGroup>

  <ItemGroup>
    <PackageReference Include="Aspire.Azure.Storage.Blobs" Version="9.0.0" />
    <PackageReference Include="Aspire.Azure.Storage.Queues" Version="9.0.0" />
  </ItemGroup>

</Project>
下一步是将集成添加到应用。
在 Program.cs 项目的 文件中,在创建 AddAzureBlobClient 后,但在调用 AddAzureQueueClient之前添加对 builder 和 AddServiceDefaults 扩展方法的调用。 有关详细信息,请参阅 .NET.NET Aspire 服务默认值。 提供连接字符串的名称作为参数。
using AspireStorage.Web;
using AspireStorage.Web.Components;

using Azure.Storage.Blobs;
using Azure.Storage.Queues;

var builder = WebApplication.CreateBuilder(args);

builder.AddAzureBlobClient("BlobConnection");
builder.AddAzureQueueClient("QueueConnection");

// Add service defaults & Aspire components.
builder.AddServiceDefaults();

// Add services to the container.
builder.Services.AddRazorComponents()
    .AddInteractiveServerComponents();

builder.Services.AddOutputCache();

builder.Services.AddHttpClient<WeatherApiClient>(client =>
    {
        // This URL uses "https+http://" to indicate HTTPS is preferred over HTTP.
        // Learn more about service discovery scheme resolution at https://aka.ms/dotnet/sdschemes.
        client.BaseAddress = new("https+http://apiservice");
    });

var app = builder.Build();

if (!app.Environment.IsDevelopment())
{
    app.UseExceptionHandler("/Error", createScopeForErrors: true);
    // The default HSTS value is 30 days. You may want to change this for production scenarios, see https://aka.ms/aspnetcore-hsts.
    app.UseHsts();
}
else
{
    // In development, create the blob container and queue if they don't exist.
    var blobService = app.Services.GetRequiredService<BlobServiceClient>();
    var docsContainer = blobService.GetBlobContainerClient("fileuploads");

    await docsContainer.CreateIfNotExistsAsync();

    var queueService = app.Services.GetRequiredService<QueueServiceClient>();
    var queueClient = queueService.GetQueueClient("tickets");

    await queueClient.CreateIfNotExistsAsync();
}

app.UseHttpsRedirection();

app.UseStaticFiles();
app.UseAntiforgery();

app.UseOutputCache();

app.MapRazorComponents<App>()
    .AddInteractiveServerRenderMode();

app.MapDefaultEndpoints();

app.Run();
using AspireStorage.Web;
using AspireStorage.Web.Components;

using Azure.Storage.Blobs;
using Azure.Storage.Queues;

var builder = WebApplication.CreateBuilder(args);

builder.AddAzureBlobClient("BlobConnection");
builder.AddAzureQueueClient("QueueConnection");

// Add service defaults & Aspire components.
builder.AddServiceDefaults();

// Add services to the container.
builder.Services.AddRazorComponents()
    .AddInteractiveServerComponents();

builder.Services.AddOutputCache();

builder.Services.AddHttpClient<WeatherApiClient>(client =>
    {
        // This URL uses "https+http://" to indicate HTTPS is preferred over HTTP.
        // Learn more about service discovery scheme resolution at https://aka.ms/dotnet/sdschemes.
        client.BaseAddress = new("https+http://apiservice");
    });

var app = builder.Build();

if (!app.Environment.IsDevelopment())
{
    app.UseExceptionHandler("/Error", createScopeForErrors: true);
    // The default HSTS value is 30 days. You may want to change this for production scenarios, see https://aka.ms/aspnetcore-hsts.
    app.UseHsts();
}

app.UseHttpsRedirection();

app.UseStaticFiles();
app.UseAntiforgery();

app.UseOutputCache();

app.MapRazorComponents<App>()
    .AddInteractiveServerRenderMode();

app.MapDefaultEndpoints();

app.Run();
借助额外的 using 语句,这些方法将完成以下任务:
- 向 DI 容器注册 Azure.Storage.Blobs.BlobServiceClient 和 Azure.Storage.Queues.QueueServiceClient,以便连接到 Azure 存储。
- 自动为各自的服务启用对应的健康检查、日志记录和遥测。
AspireStorage.Web 项目启动时,它将在 Azurite Blob 存储中创建 fileuploads 容器,并在 Azurite 队列存储中创建 tickets 队列。 当应用在开发环境中运行时,这是有条件的。 当应用在生产环境中运行时,假定已创建容器和队列。
将 .NET Aspire 集成添加到 Worker Service
工作服务处理从 Azure 存储队列中提取消息进行处理。 将 .NET AspireAzure 队列存储集成 集成包添加到 AspireStorage.WorkerService 应用:
dotnet add package Aspire.Azure.Storage.Queues
在 Program.cs 项目的 文件中,在创建 AddAzureQueueClient 后并且在调用 builder之前,添加对 AddServiceDefaults 扩展方法的调用:
using AspireStorage.WorkerService;

var builder = Host.CreateApplicationBuilder(args);

builder.AddAzureQueueClient("QueueConnection");

builder.AddServiceDefaults();
builder.Services.AddHostedService<WorkerService>();

var host = builder.Build();
host.Run();
此方法处理以下任务:
- 向 DI 容器注册 QueueServiceClient,用于连接 Azure Storage Queues。
- 自动为各自的服务启用对应的健康检查、日志记录和遥测。
创建表单
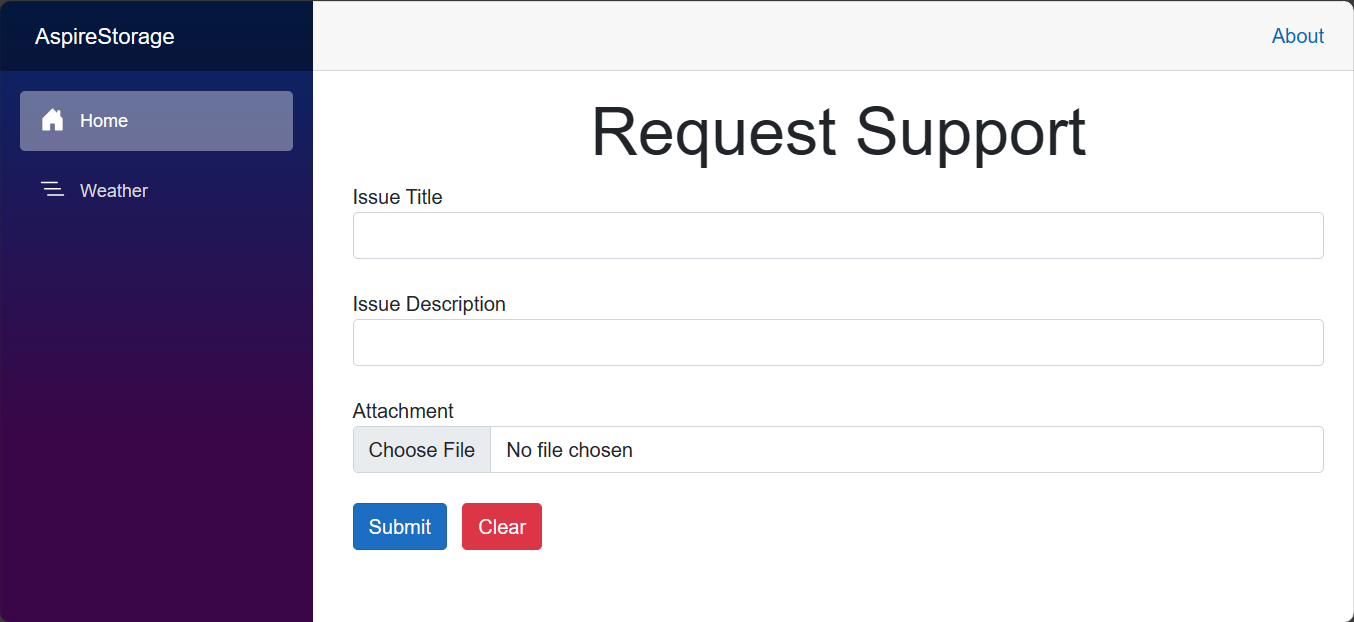
应用需要一个表单,使用户能够提交支持票证信息并上传附件。 应用使用注入的 Document将 IFormFile(Azure Blob Storage)属性上的附加文件上传到 BlobServiceClient。
QueueServiceClient 将由 Title 和 Description 组成的消息发送到 Azure 存储队列。
使用以下 Razor 标记来创建一个基础表单,并将其内容替换到 AspireStorage.Web/Components/Pages 目录中的 Home.razor 文件中:
@page "/"

@using System.ComponentModel.DataAnnotations
@using Azure.Storage.Blobs
@using Azure.Storage.Queues

@inject BlobServiceClient BlobClient
@inject QueueServiceClient QueueServiceClient

<PageTitle>Home</PageTitle>

<div class="text-center">
    <h1 class="display-4">Request Support</h1>
</div>

<EditForm Model="@Ticket" FormName="Tickets" method="post"
          OnValidSubmit="@HandleValidSubmit" enctype="multipart/form-data">
    <DataAnnotationsValidator />
    <ValidationSummary />

    <div class="mb-4">
        <label>Issue Title</label>
        <InputText class="form-control" @bind-Value="@Ticket.Title" />
        <ValidationMessage For="() => Ticket.Title" />
    </div>
    <div class="mb-4">
        <label>Issue Description</label>
        <InputText class="form-control" @bind-Value="@Ticket.Description" />
        <ValidationMessage For="() => Ticket.Description" />
    </div>
    <div class="mb-4">
        <label>Attachment</label>
        <InputFile class="form-control" name="Ticket.Document" />
        <ValidationMessage For="() => Ticket.Document" />
    </div>
    <button class="btn btn-primary" type="submit">Submit</button>
    <button class="btn btn-danger mx-2" type="reset" @onclick=@ClearForm>Clear</button>
</EditForm>

@code {
    [SupplyParameterFromForm(FormName = "Tickets")]
    private SupportTicket Ticket { get; set; } = new();

    private async Task HandleValidSubmit()
    {
        var docsContainer = BlobClient.GetBlobContainerClient("fileuploads");

        // Upload file to blob storage
        await docsContainer.UploadBlobAsync(
            Ticket.Document.FileName,
            Ticket.Document.OpenReadStream());

        // Send message to queue
        var queueClient = QueueServiceClient.GetQueueClient("tickets");

        await queueClient.SendMessageAsync(
             $"{Ticket.Title} - {Ticket.Description}");

        ClearForm();
    }

    private void ClearForm() => Ticket = new();

    private class SupportTicket()
    {
        [Required] public string Title { get; set; } = default!;
        [Required] public string Description { get; set; } = default!;
        [Required] public IFormFile Document { get; set; } = default!;
    }
}
有关在 Blazor中创建表单的详细信息,请参阅 ASP.NET CoreBlazor 窗体概述。
更新应用程序主机
AspireStorage.AppHost 项目是你的应用的协调器。 它负责连接和配置应用的不同项目和服务。 协调器应设置为启动项目。
若要将 Azure 存储托管支持添加到 IDistributedApplicationBuilder,请安装 📦Aspire.Hosting.Azure.Storage NuGet 包。
dotnet add package Aspire.Hosting.Azure.Storage
将 Program.cs 项目中 文件的内容替换为以下代码:
using Microsoft.Extensions.Hosting;

var builder = DistributedApplication.CreateBuilder(args);

var storage = builder.AddAzureStorage("Storage");

if (builder.Environment.IsDevelopment())
{
    storage.RunAsEmulator();
}

var blobs = storage.AddBlobs("BlobConnection");
var queues = storage.AddQueues("QueueConnection");

var apiService = builder.AddProject<Projects.AspireStorage_ApiService>("apiservice");

builder.AddProject<Projects.AspireStorage_Web>("webfrontend")
    .WithExternalHttpEndpoints()
    .WithReference(apiService)
    .WithReference(blobs)
    .WithReference(queues);

builder.AddProject<Projects.AspireStorage_WorkerService>("aspirestorage-workerservice")
    .WithReference(queues);

builder.Build().Run();
前面的代码添加了 Azure 存储、Blob 存储和队列,并在开发模式下使用仿真器。 每个项目会为其依赖的资源定义引用。
using Microsoft.Extensions.Hosting;

var builder = DistributedApplication.CreateBuilder(args);

var storage = builder.AddAzureStorage("Storage");

var blobs = storage.AddBlobs("BlobConnection");
var queues = storage.AddQueues("QueueConnection");

var apiService = builder.AddProject<Projects.AspireStorage_ApiService>("apiservice");

builder.AddProject<Projects.AspireStorage_Web>("webfrontend")
    .WithExternalHttpEndpoints()
    .WithReference(apiService)
    .WithReference(blobs)
    .WithReference(queues);

builder.AddProject<Projects.AspireStorage_WorkerService>("aspirestorage-workerservice")
    .WithReference(queues);

builder.Build().Run();
前面的代码将添加 Azure 存储、blob 和队列,并定义每个依赖于它们的项目中这些资源的引用。
处理队列中的项
当新消息放置在 tickets 队列中时,工作服务应检索、处理并删除该消息。 更新 Worker.cs 类,将内容替换为以下代码:
using Azure.Storage.Queues;
using Azure.Storage.Queues.Models;

namespace AspireStorage.WorkerService;

public sealed class WorkerService(
    QueueServiceClient client,
    ILogger<WorkerService> logger) : BackgroundService
{
    protected override async Task ExecuteAsync(CancellationToken stoppingToken)
    {
        var queueClient = client.GetQueueClient("tickets");
        await queueClient.CreateIfNotExistsAsync(cancellationToken: stoppingToken);

        while (!stoppingToken.IsCancellationRequested)
        {
            QueueMessage[] messages =
                await queueClient.ReceiveMessagesAsync(
                    maxMessages: 25, cancellationToken: stoppingToken);

            foreach (var message in messages)
            {
                logger.LogInformation(
                    "Message from queue: {Message}", message.MessageText);

                await queueClient.DeleteMessageAsync(
                    message.MessageId,
                    message.PopReceipt,
                    cancellationToken: stoppingToken);
            }

            // TODO: Determine an appropriate time to wait
            // before checking for more messages.
            await Task.Delay(TimeSpan.FromSeconds(15), stoppingToken);
        }
    }
}
在工作服务能够处理消息之前,它需要可以连接至 Azure 存储队列。 使用 Azurite 时,需要在工作服务开始执行消息队列处理之前确保队列可用。
using Azure.Storage.Queues;
using Azure.Storage.Queues.Models;

namespace AspireStorage.WorkerService;

public sealed class WorkerService(
    QueueServiceClient client,
    ILogger<WorkerService> logger) : BackgroundService
{
    protected override async Task ExecuteAsync(CancellationToken stoppingToken)
    {
        var queueClient = client.GetQueueClient("tickets");
        while (!stoppingToken.IsCancellationRequested)
        {
            QueueMessage[] messages =
                await queueClient.ReceiveMessagesAsync(
                    maxMessages: 25, cancellationToken: stoppingToken);

            foreach (var message in messages)
            {
                logger.LogInformation(
                    "Message from queue: {Message}", message.MessageText);

                await queueClient.DeleteMessageAsync(
                    message.MessageId,
                    message.PopReceipt,
                    cancellationToken: stoppingToken);
            }

            // TODO: Determine an appropriate time to wait
            // before checking for more messages.
            await Task.Delay(TimeSpan.FromSeconds(15), stoppingToken);
        }
    }
}
工作服务通过连接到 Azure 存储队列,然后从队列中提取信息来处理信息。
工作角色服务处理队列中的消息,并在处理后将其删除。
配置连接字符串
必须将 AspireStorage 和 AspireStorage.Worker 项目配置为连接到你之前所创建的正确的 Azure 存储帐户。 可以使用每个项目中的 appsettings.json 文件为存储帐户中的 blob 和队列服务指定终结点。
在 AspireStorage 项目中,将以下配置添加到
appsettings.Development.json文件:"ConnectionStrings": { "BlobConnection": "https://<your-storage-account-name>.blob.core.windows.net/", "QueueConnection": "https://<your-storage-account-name>.queue.core.windows.net/" }在 AspireStorage.Worker 项目中,将以下配置添加到
appsettings.Development.json文件中:"ConnectionStrings": { "QueueConnection": "https://<your-storage-account-name>.queue.core.windows.net/" }
在本地运行和测试应用
示例应用现已准备好进行测试。 通过完成以下步骤,验证提交的表单数据是否已发送到 Azure Blob Storage 并 Azure 队列存储:
按 Visual Studio 顶部的运行按钮,在浏览器中启动 .NET Aspire 项目仪表板。
在资源页上,在 aspirestorage.web 行中,单击 终结点 列中的链接以打开应用的 UI。
在
Title和Description表单字段中输入示例数据,然后选择一个简单文件进行上传。选择 提交 按钮,表单将提交支持请求进行处理,并清除表单。
在一个单独的浏览器选项卡中,使用 Azure 门户,导航到 存储帐户中的 Azure。
选择 容器,然后导航到 文档 容器以查看上传的文件。
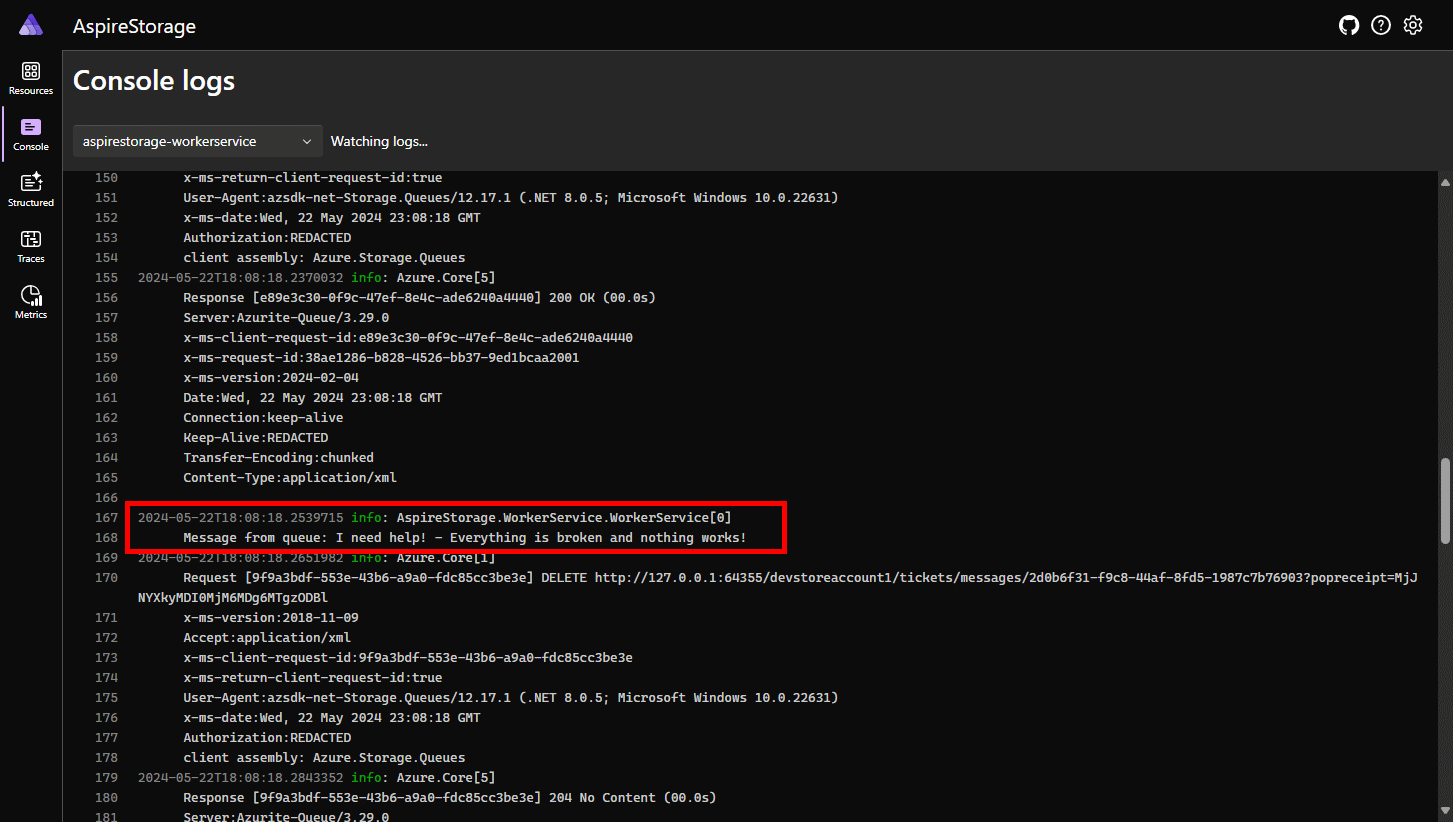
可以通过查看 .NET Aspire的 Project 日志,并从下拉列表中选择 aspirestorage.workerservice 来验证队列上的消息是否已处理。
总结
您开发的示例应用展示了如何从 ASP.NET CoreBlazor Web 应用持久化存储 blob,并在 .NET Worker Service中处理队列。 您的应用通过 Azure 集成连接到 .NET Aspire 存储。 应用将支持工单发送到队列进行处理,并将附件上传到云存储。
由于选择使用 Azurite,因此在完成测试后无需特意清理这些资源,因为它们是在模拟器的环境中本地创建的。 模拟器使你能够在本地测试应用,而不会产生任何费用,因为未预配或创建任何 Azure 资源。
清理资源
运行以下 Azure CLI 命令,在不再需要创建的 Azure 资源时删除资源组。 删除资源组也会删除其中包含的资源。
az group delete --name <your-resource-group-name>
有关详细信息,请参阅 清理 Azure中的资源。


