在 Node.js 中协调 .NET Aspire 应用
本文介绍如何在 Node.jsnpm 项目中使用 .NET 和 Node 包管理器(.NET Aspire)应用。 本文中的示例应用演示了 Angular、React和 Vue 客户端体验。 为了支持这些方案,以下 .NET.NET Aspire API 是 Aspire.Hosting.NodeJS NuGet 包的一部分:
这两个 API 之间的区别在于,前者用于托管 Node.js 应用,而后者用于托管从 package.json 文件的 scripts 节执行的应用,以及相应的 npm run <script-name> 命令。
提示
本文的示例源代码在 GitHub上提供,代码示例中提供了详细信息:.NET Aspire 包含 Angular、React 和 Vue 页。
重要
虽然本文重点介绍 Single-Page 应用(SPA)前端部分,但在 代码示例页面上提供了一个额外的 Node.js 示例:.NET AspireNode.js 示例 页,演示如何使用 Node.js 与 express作为服务器应用。
先决条件
若要使用 .NET.NET Aspire,需要在本地安装以下各项:
- .NET 8.0 或 .NET 9.0
- 符合开放容器协会(OCI)标准的容器运行时,例如:
- 集成开发人员环境(IDE)或代码编辑器,例如:
- Visual Studio 2022 17.9 或更高版本(可选)
-
Visual Studio Code (可选)
- C# Dev Kit:扩展(可选)
- JetBrains Rider 使用 .NET.NET Aspire 插件(可选)
有关详细信息,请参阅 .NET.NET Aspire 设置和工具,以及 .NET.NET Aspire SDK。
此外,需要在计算机上安装 Node.js。 本文中的示例应用是使用 Node.js 版本 20.12.2 和 npm 版本 10.5.1 生成的。 若要验证 Node.js 和 npm 版本,请运行以下命令:
node --version
npm --version
若要下载 Node.js(包括 npm),请参阅 Node.js 下载页面。
克隆示例源代码
若要从 GitHub克隆示例源代码,请运行以下命令:
git clone https://github.com/dotnet/aspire-samples.git
克隆存储库后,导航到 samples/AspireWithJavaScript 文件夹:
cd samples/AspireWithJavaScript
从这个目录中,有以下列表中描述的六个子目录:
- AspireJavaScript。Angular:使用天气预报 API 并在表中显示数据的 Angular 应用。
- AspireJavaScript.AppHost:协调此示例中其他应用的 .NET.NET Aspire 项目。 有关详细信息,请参阅 .NET.NET Aspire 业务流程概述。
- AspireJavaScript.MinimalApi:返回随机生成的天气预报数据的 HTTP API。
- AspireJavaScript。React:使用天气预报 API 并在表中显示数据的 React 应用。
- AspireJavaScript.ServiceDefaults:.NET.NET Aspire 项目的默认共享项目。 有关详细信息,请参阅 .NET.NET Aspire 服务默认值。
- AspireJavaScript。Vue:使用天气预报 API 并在表中显示数据的 Vue 应用。
安装客户端依赖项
示例应用演示如何使用基于 Node.js构建的 JavaScript 客户端应用。 每个客户端应用都使用 npm create 模板命令或手动编写。 下表列出了用于创建每个客户端应用的模板命令以及默认端口:
| 应用类型 | 创建模板命令 | 默认端口 |
|---|---|---|
| Angular | npm create @angular@latest |
4200 |
| React | 未使用模板。 | 端口 env var |
| Vue | npm create vue@latest |
5173 |
提示
无需运行这些命令中的任何一个,因为示例应用已包含客户端。 反之,这只是一个用于创建客户端的参考点。 有关详细信息,请参阅 npm-init。
若要运行应用,首先需要为每个客户端安装依赖项。 为此,请导航到每个客户端文件夹并运行 npm install(或安装别名 npm i)命令。
安装 Angular 依赖项
npm i ./AspireJavaScript.Angular/
有关 Angular 应用的详细信息,请参阅 浏览 Angular 客户端。
安装 React 依赖项
npm i ./AspireJavaScript.React/
有关 React 应用的详细信息,请参阅 浏览 React 客户端。
安装 Vue 依赖项
npm i ./AspireJavaScript.Vue/
有关 Vue 应用的详细信息,请参阅 浏览 Vue 客户端。
运行示例应用
若要运行示例应用程序,请调用 dotnet run 命令,并将编排应用宿主 AspireJavaScript.AppHost.csproj 作为 --project 切换参数。
dotnet run --project ./AspireJavaScript.AppHost/AspireJavaScript.AppHost.csproj
.NET .NET Aspire 仪表板 在默认浏览器中启动,每个客户端应用终结点显示在 资源 页的“终结点” 列下。 下图描绘了此示例应用的仪表板:
weatherapi 服务端点指向展示 HTTP API 的 Swagger UI 页面。 每个客户端应用使用此服务来显示天气预报数据。 可以通过导航到 .NET.NET Aspire 仪表板中的相应终结点来查看每个客户端应用。 以下部分详细介绍了从模板起点进行的屏幕截图和修改。
在用于运行应用的同一终端会话中,按 Ctrl + C 停止应用。
探索应用主机
为了帮助了解如何安排每个客户端应用资源,请查看应用主机项目。 应用主机需要 Aspire。Hosting.NodeJS NuGet 包来托管 Node.js 应用。
<Project Sdk="Microsoft.NET.Sdk">

  <Sdk Name="Aspire.AppHost.Sdk" Version="9.1.0" />

  <PropertyGroup>
    <OutputType>Exe</OutputType>
    <TargetFramework>net8.0</TargetFramework>
    <ImplicitUsings>enable</ImplicitUsings>
    <Nullable>enable</Nullable>
    <IsAspireHost>true</IsAspireHost>
  </PropertyGroup>

  <ItemGroup>
    <PackageReference Include="Aspire.Hosting.AppHost" Version="9.1.0" />
    <PackageReference Include="Aspire.Hosting.NodeJs" Version="9.1.0" />
  </ItemGroup>

  <ItemGroup>
    <ProjectReference Include="..\AspireJavaScript.MinimalApi\AspireJavaScript.MinimalApi.csproj" />
  </ItemGroup>

  <Target Name="RestoreNpm" BeforeTargets="Build" Condition=" '$(DesignTimeBuild)' != 'true' ">
    <ItemGroup>
      <PackageJsons Include="..\*\package.json" />
    </ItemGroup>

    <!-- Install npm packages if node_modules is missing -->
    <Message Importance="Normal" Text="Installing npm packages for %(PackageJsons.RelativeDir)" Condition="!Exists('%(PackageJsons.RootDir)%(PackageJsons.Directory)/node_modules')" />
    <Exec Command="npm install" WorkingDirectory="%(PackageJsons.RootDir)%(PackageJsons.Directory)" Condition="!Exists('%(PackageJsons.RootDir)%(PackageJsons.Directory)/node_modules')" />
  </Target>

</Project>
项目文件还定义了一个生成目标,该目标可确保在生成应用主机之前安装 npm 依赖项。 应用主机代码(Program.cs)使用 AddNpmApp(IDistributedApplicationBuilder, String, String, String, String[]) API 声明客户端应用资源。
var builder = DistributedApplication.CreateBuilder(args);

var weatherApi = builder.AddProject<Projects.AspireJavaScript_MinimalApi>("weatherapi")
    .WithExternalHttpEndpoints();

builder.AddNpmApp("angular", "../AspireJavaScript.Angular")
    .WithReference(weatherApi)
    .WaitFor(weatherApi)
    .WithHttpEndpoint(env: "PORT")
    .WithExternalHttpEndpoints()
    .PublishAsDockerFile();

builder.AddNpmApp("react", "../AspireJavaScript.React")
    .WithReference(weatherApi)
    .WaitFor(weatherApi)
    .WithEnvironment("BROWSER", "none") // Disable opening browser on npm start
    .WithHttpEndpoint(env: "PORT")
    .WithExternalHttpEndpoints()
    .PublishAsDockerFile();

builder.AddNpmApp("vue", "../AspireJavaScript.Vue")
    .WithReference(weatherApi)
    .WaitFor(weatherApi)
    .WithHttpEndpoint(env: "PORT")
    .WithExternalHttpEndpoints()
    .PublishAsDockerFile();

builder.AddNpmApp("reactvite", "../AspireJavaScript.Vite")
    .WithReference(weatherApi)
    .WithEnvironment("BROWSER", "none")
    .WithHttpEndpoint(env: "VITE_PORT")
    .WithExternalHttpEndpoints()
    .PublishAsDockerFile();

builder.Build().Run();
前面的代码:
- 创建 DistributedApplicationBuilder。
- 将“weatherapi”服务作为项目添加到应用主机。
- 将 HTTP 终结点标记为外部。
- 使用对“weatherapi”服务的引用,将“angular”、“react”和“vue”客户端应用添加为 npm 应用。
- 每个客户端应用都配置为在不同的容器端口上运行,并使用
PORT环境变量来确定端口。 - 所有客户端应用程序还依赖于 Dockerfile 来生成其容器映像,并配置为在发布清单中将自己表示为来自 PublishAsDockerFile API 的容器。
- 每个客户端应用都配置为在不同的容器端口上运行,并使用
有关内部循环网络的详细信息,请参阅 .NET.NET Aspire 内部循环网络概述。 有关部署应用的详细信息,请参阅部署工具生成器
当应用主机协调每个客户端应用的启动时,它将使用 npm run start 命令。 此命令在每个客户端应用的 scripts 文件的 节中定义。
start 脚本用于在指定的端口上启动客户端应用。 每个客户端应用依赖于代理来请求“weatherapi”服务。
代理配置在以下位置:
- 客户端的 Angular 文件。
- 客户端的 React 文件。
- 客户端的 Vue 文件。
浏览 Angular 客户端
原始 Angular 模板中有几个关键修改。 第一个是添加 proxy.conf.js 文件。 此文件用于将来自 Angular 客户端的请求代理到“weatherapi”服务。
module.exports = {
  "/api": {
    target:
      process.env["services__weatherapi__https__0"] ||
      process.env["services__weatherapi__http__0"],
    secure: process.env["NODE_ENV"] !== "development",
    pathRewrite: {
      "^/api": "",
    },
  },
};
.NET
.NET Aspire 应用主机设置 services__weatherapi__http__0 环境变量,该变量用于解析“weatherapi”服务终结点。 前面的配置将以 /api 开头的 HTTP 请求代理到环境变量中指定的目标 URL。
然后将代理文件包含在 angular.json 文件中。
更新 serve 目标以包含 proxyConfig 选项,引用创建的 proxy.conf.js 文件。
Angular CLI 现在将在提供 Angular 客户端应用时使用代理配置。
"serve": {
  "builder": "@angular-devkit/build-angular:dev-server",
  "configurations": {
    "production": {
      "buildTarget": "weather:build:production"
    },
    "development": {
      "buildTarget": "weather:build:development"
    }
  },
  "defaultConfiguration": "development",
  "options": {
    "proxyConfig": "proxy.conf.js"
  }
},
第三个更新是针对 package.json 文件。 此文件用于将 Angular 客户端配置为在与默认端口不同的端口上运行。 这是通过使用 PORT 环境变量实现的,run-script-os npm 包用于设置端口。
{
  "name": "angular-weather",
  "version": "0.0.0",
  "engines": {
    "node": ">=20.12"
  },
  "scripts": {
    "ng": "ng",
    "start": "run-script-os",
    "start:win32": "ng serve --port %PORT%",
    "start:default": "ng serve --port $PORT",
    "build": "ng build",
    "watch": "ng build --watch --configuration development",
    "test": "ng test"
  },
  "private": true,
  "dependencies": {
    "@angular/animations": "^19.2.1",
    "@angular/common": "^19.2.1",
    "@angular/compiler": "^19.2.1",
    "@angular/core": "^19.2.1",
    "@angular/forms": "^19.2.1",
    "@angular/platform-browser": "^19.2.1",
    "@angular/platform-browser-dynamic": "^19.2.1",
    "@angular/router": "^19.2.1",
    "rxjs": "~7.8.2",
    "tslib": "^2.8.1",
    "zone.js": "~0.15.0"
  },
  "devDependencies": {
    "@angular-devkit/build-angular": "^19.2.1",
    "@angular/cli": "^19.2.1",
    "@angular/compiler-cli": "^19.2.1",
    "@types/jasmine": "~5.1.7",
    "jasmine-core": "~5.6.0",
    "karma": "~6.4.4",
    "karma-chrome-launcher": "~3.2.0",
    "karma-coverage": "~2.2.1",
    "karma-jasmine": "~5.1.0",
    "karma-jasmine-html-reporter": "~2.1.0",
    "typescript": "~5.8.2",
    "run-script-os": "^1.1.6"
  }
}
scripts 文件的 节用于定义 start 脚本。
npm start 命令使用此脚本来启动 Angular 客户端应用。
start 脚本配置为使用 run-script-os 包来设置端口,它将设置工作委托给 ng serve 命令,后者根据适用于操作系统的语法传递合适的 --port 开关。
若要对“weatherapi”服务进行 HTTP 调用,需要将 Angular 客户端应用配置为提供依赖项注入的 AngularHttpClient。 这是通过使用 provideHttpClient 帮助程序函数在 app.config.ts 文件中配置应用程序来实现的。
import { ApplicationConfig } from '@angular/core';
import { provideHttpClient } from '@angular/common/http';
import { provideRouter } from '@angular/router';

import { routes } from './app.routes';

export const appConfig: ApplicationConfig = {
  providers: [
    provideRouter(routes),
    provideHttpClient()
  ]
};
最后,Angular 客户端应用需要调用 /api/WeatherForecast 终结点来检索天气预报数据。 有多个 HTML、CSS 和 TypeScript 更新,所有这些更新都针对以下文件进行:
- app.component.css:更新 CSS 以设置表格样式。
- app.component.html:更新 HTML 以显示表中的天气预报数据。
-
app.component.ts:更新 TypeScript 代码以调用
/api/WeatherForecast端点,并在表中显示数据。
import { Component, Injectable } from '@angular/core';
import { CommonModule } from '@angular/common';
import { RouterOutlet } from '@angular/router';
import { HttpClient } from '@angular/common/http';
import { WeatherForecasts } from '../types/weatherForecast';

@Injectable()
@Component({
  selector: 'app-root',
  standalone: true,
  imports: [CommonModule, RouterOutlet],
  templateUrl: './app.component.html',
  styleUrl: './app.component.css'
})
export class AppComponent {
  title = 'weather';
  forecasts: WeatherForecasts = [];

  constructor(private http: HttpClient) {
    http.get<WeatherForecasts>('api/weatherforecast').subscribe({
      next: result => this.forecasts = result,
      error: console.error
    });
  }
}
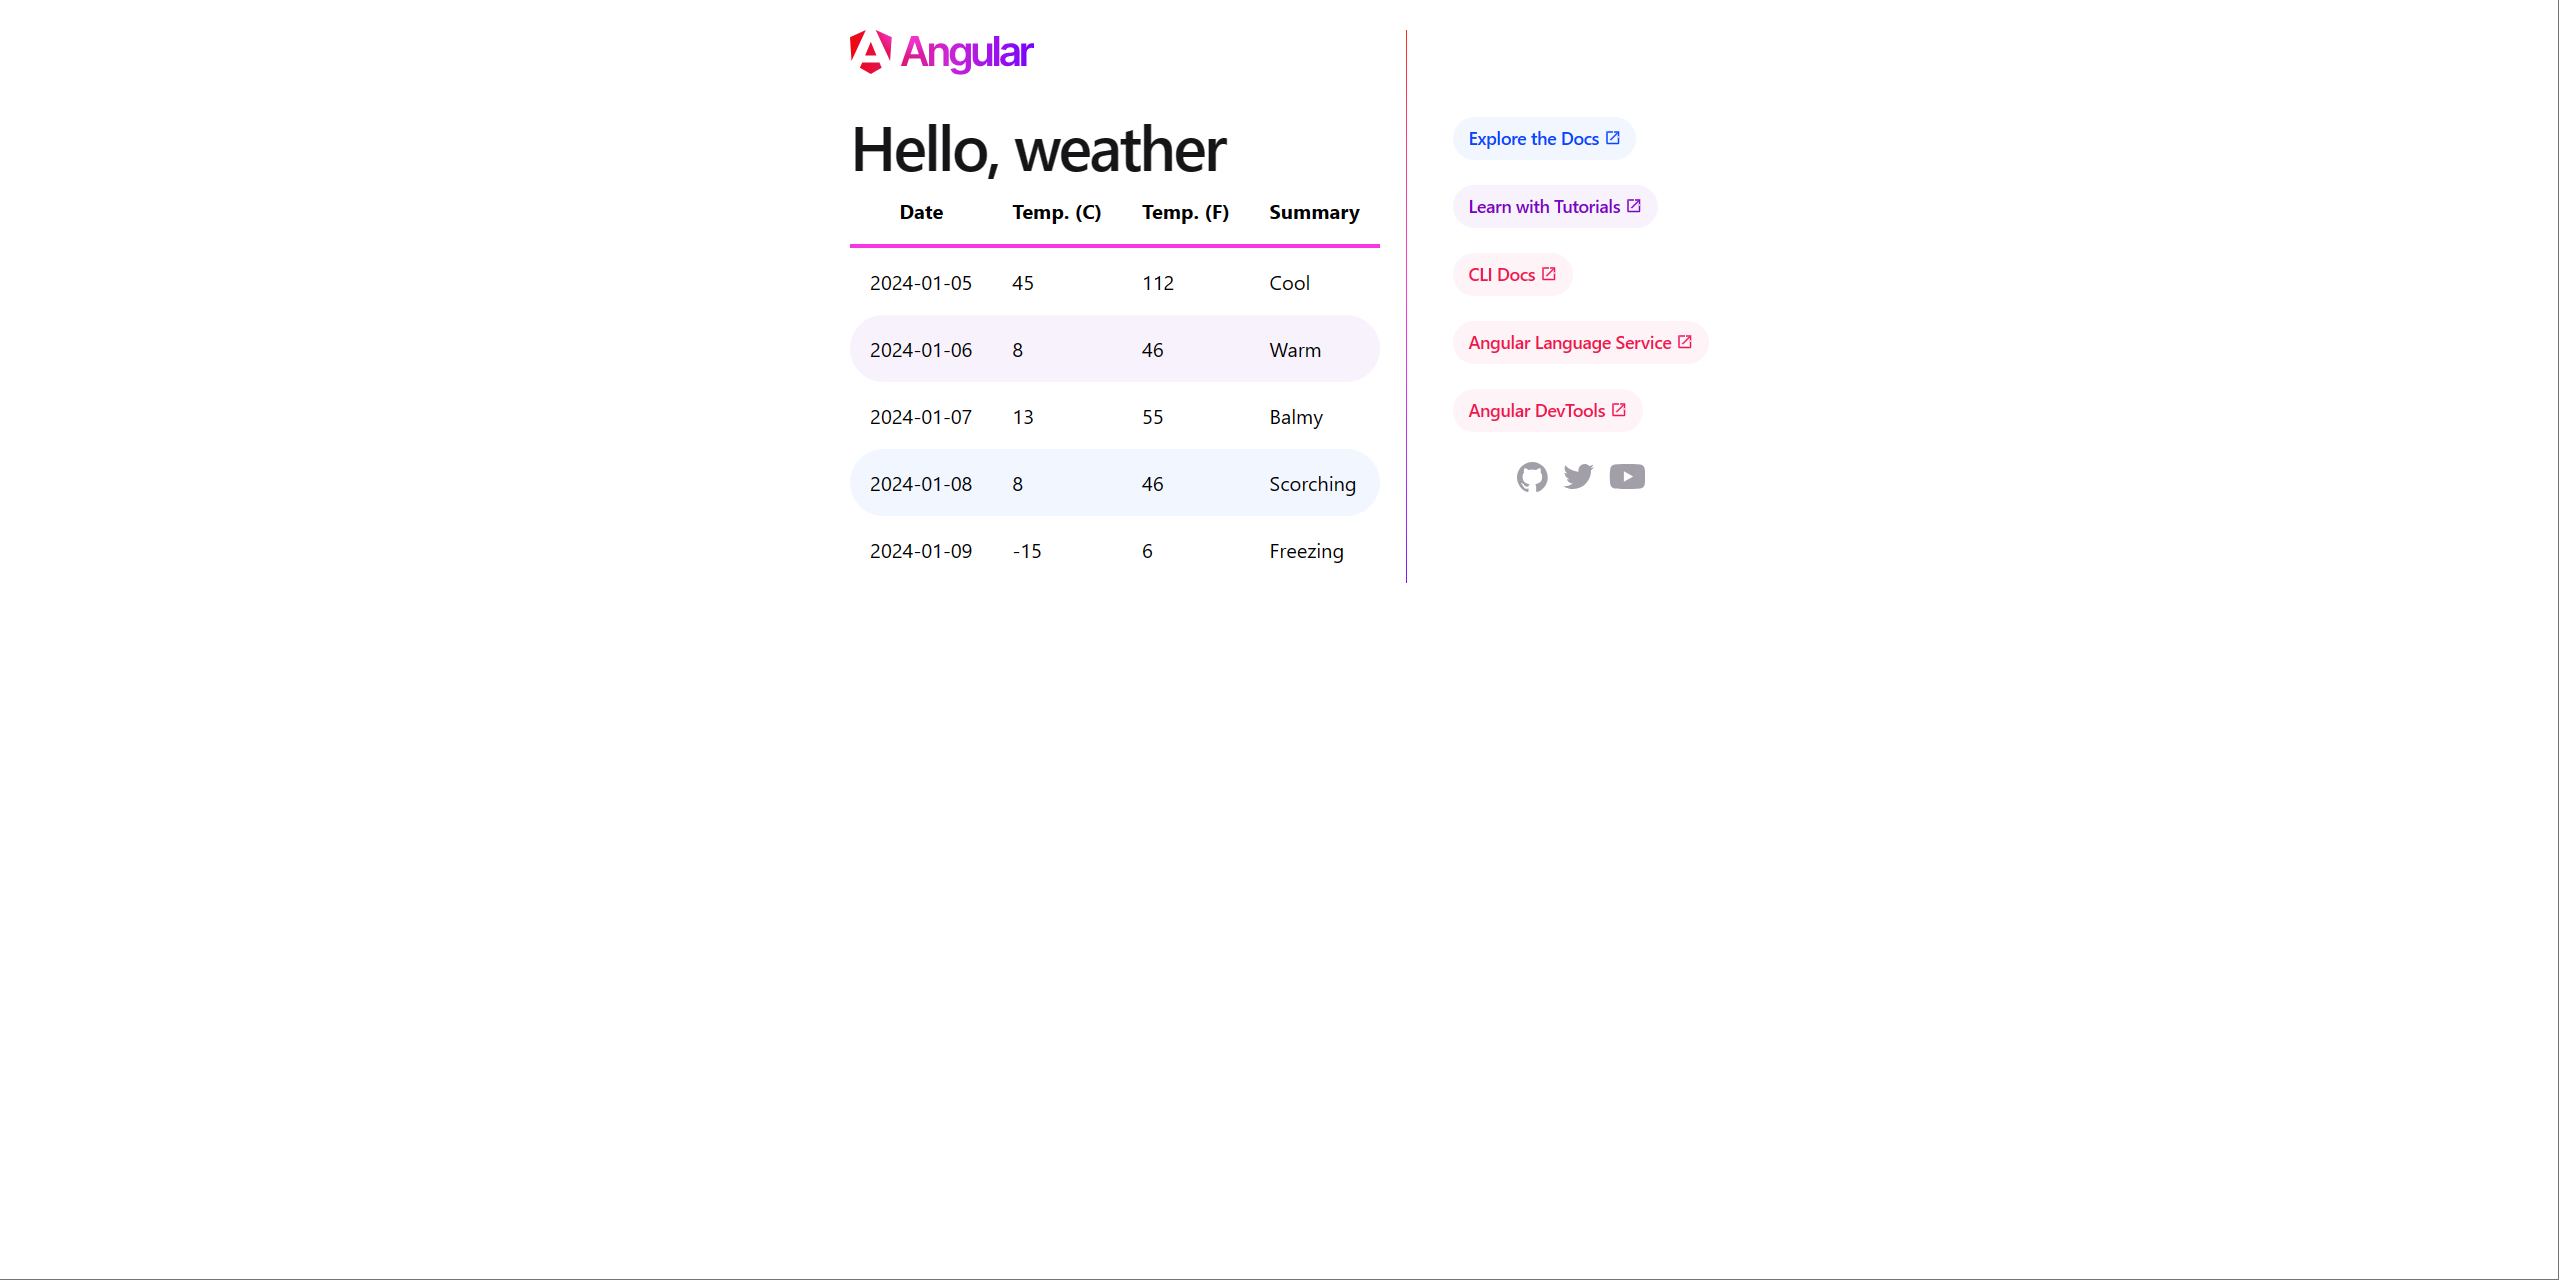
Angular应用正在运行
若要可视化 Angular 客户端应用,请在 .NET Aspire 仪表板中导航到 "angular" 端点。 下图描绘了 Angular 客户端应用:
浏览 React 客户端
React 应用未使用模板编写,而是手动编写。 可以在 dotnet/aspire-samples 存储库中找到完整的源代码。 某些关键要点出现在 src/App.js 文件中。
import { useEffect, useState } from "react";
import "./App.css";

function App() {
  const [forecasts, setForecasts] = useState([]);

  const requestWeather = async () => {
    const weather = await fetch("api/weatherforecast");
    console.log(weather);

    const weatherJson = await weather.json();
    console.log(weatherJson);

    setForecasts(weatherJson);
  };

  useEffect(() => {
    requestWeather();
  }, []);

  return (
    <div className="App">
      <header className="App-header">
        <h1>React Weather</h1>
        <table>
          <thead>
            <tr>
              <th>Date</th>
              <th>Temp. (C)</th>
              <th>Temp. (F)</th>
              <th>Summary</th>
            </tr>
          </thead>
          <tbody>
            {(
              forecasts ?? [
                {
                  date: "N/A",
                  temperatureC: "",
                  temperatureF: "",
                  summary: "No forecasts",
                },
              ]
            ).map((w) => {
              return (
                <tr key={w.date}>
                  <td>{w.date}</td>
                  <td>{w.temperatureC}</td>
                  <td>{w.temperatureF}</td>
                  <td>{w.summary}</td>
                </tr>
              );
            })}
          </tbody>
        </table>
      </header>
    </div>
  );
}

export default App;
App 函数是 React 客户端应用的入口点。 它使用 useState 和 useEffect 这些钩子来管理天气预报数据的状态。
fetch API 用于向 /api/WeatherForecast 终结点发出 HTTP 请求。 然后,响应将转换为 JSON,并设置为天气预报数据的状态。
const HTMLWebpackPlugin = require("html-webpack-plugin");

module.exports = (env) => {
  return {
    entry: "./src/index.js",
    devServer: {
      port: env.PORT || 4001,
      allowedHosts: "all",
      proxy: [
        {
          context: ["/api"],
          target:
            process.env.services__weatherapi__https__0 ||
            process.env.services__weatherapi__http__0,
          pathRewrite: { "^/api": "" },
          secure: false,
        },
      ],
    },
    output: {
      path: `${__dirname}/dist`,
      filename: "bundle.js",
    },
    plugins: [
      new HTMLWebpackPlugin({
        template: "./src/index.html",
        favicon: "./src/favicon.ico",
      }),
    ],
    module: {
      rules: [
        {
          test: /\.js$/,
          exclude: /node_modules/,
          use: {
            loader: "babel-loader",
            options: {
              presets: [
                "@babel/preset-env",
                ["@babel/preset-react", { runtime: "automatic" }],
              ],
            },
          },
        },
        {
          test: /\.css$/,
          exclude: /node_modules/,
          use: ["style-loader", "css-loader"],
        },
      ],
    },
  };
};
前面的代码定义 module.exports,如下所示:
-
entry属性被设置为 src/index.js 文件。 -
devServer依赖于代理将请求转发到“weatherapi”服务,将端口设置为PORT环境变量,并允许所有主机。 -
output会生成具有 bundle.js 文件的 dist 文件夹。 -
plugins将 src/index.html 文件设置为模板,并公开 favicon.ico 文件。
最终更新涉及以下文件:
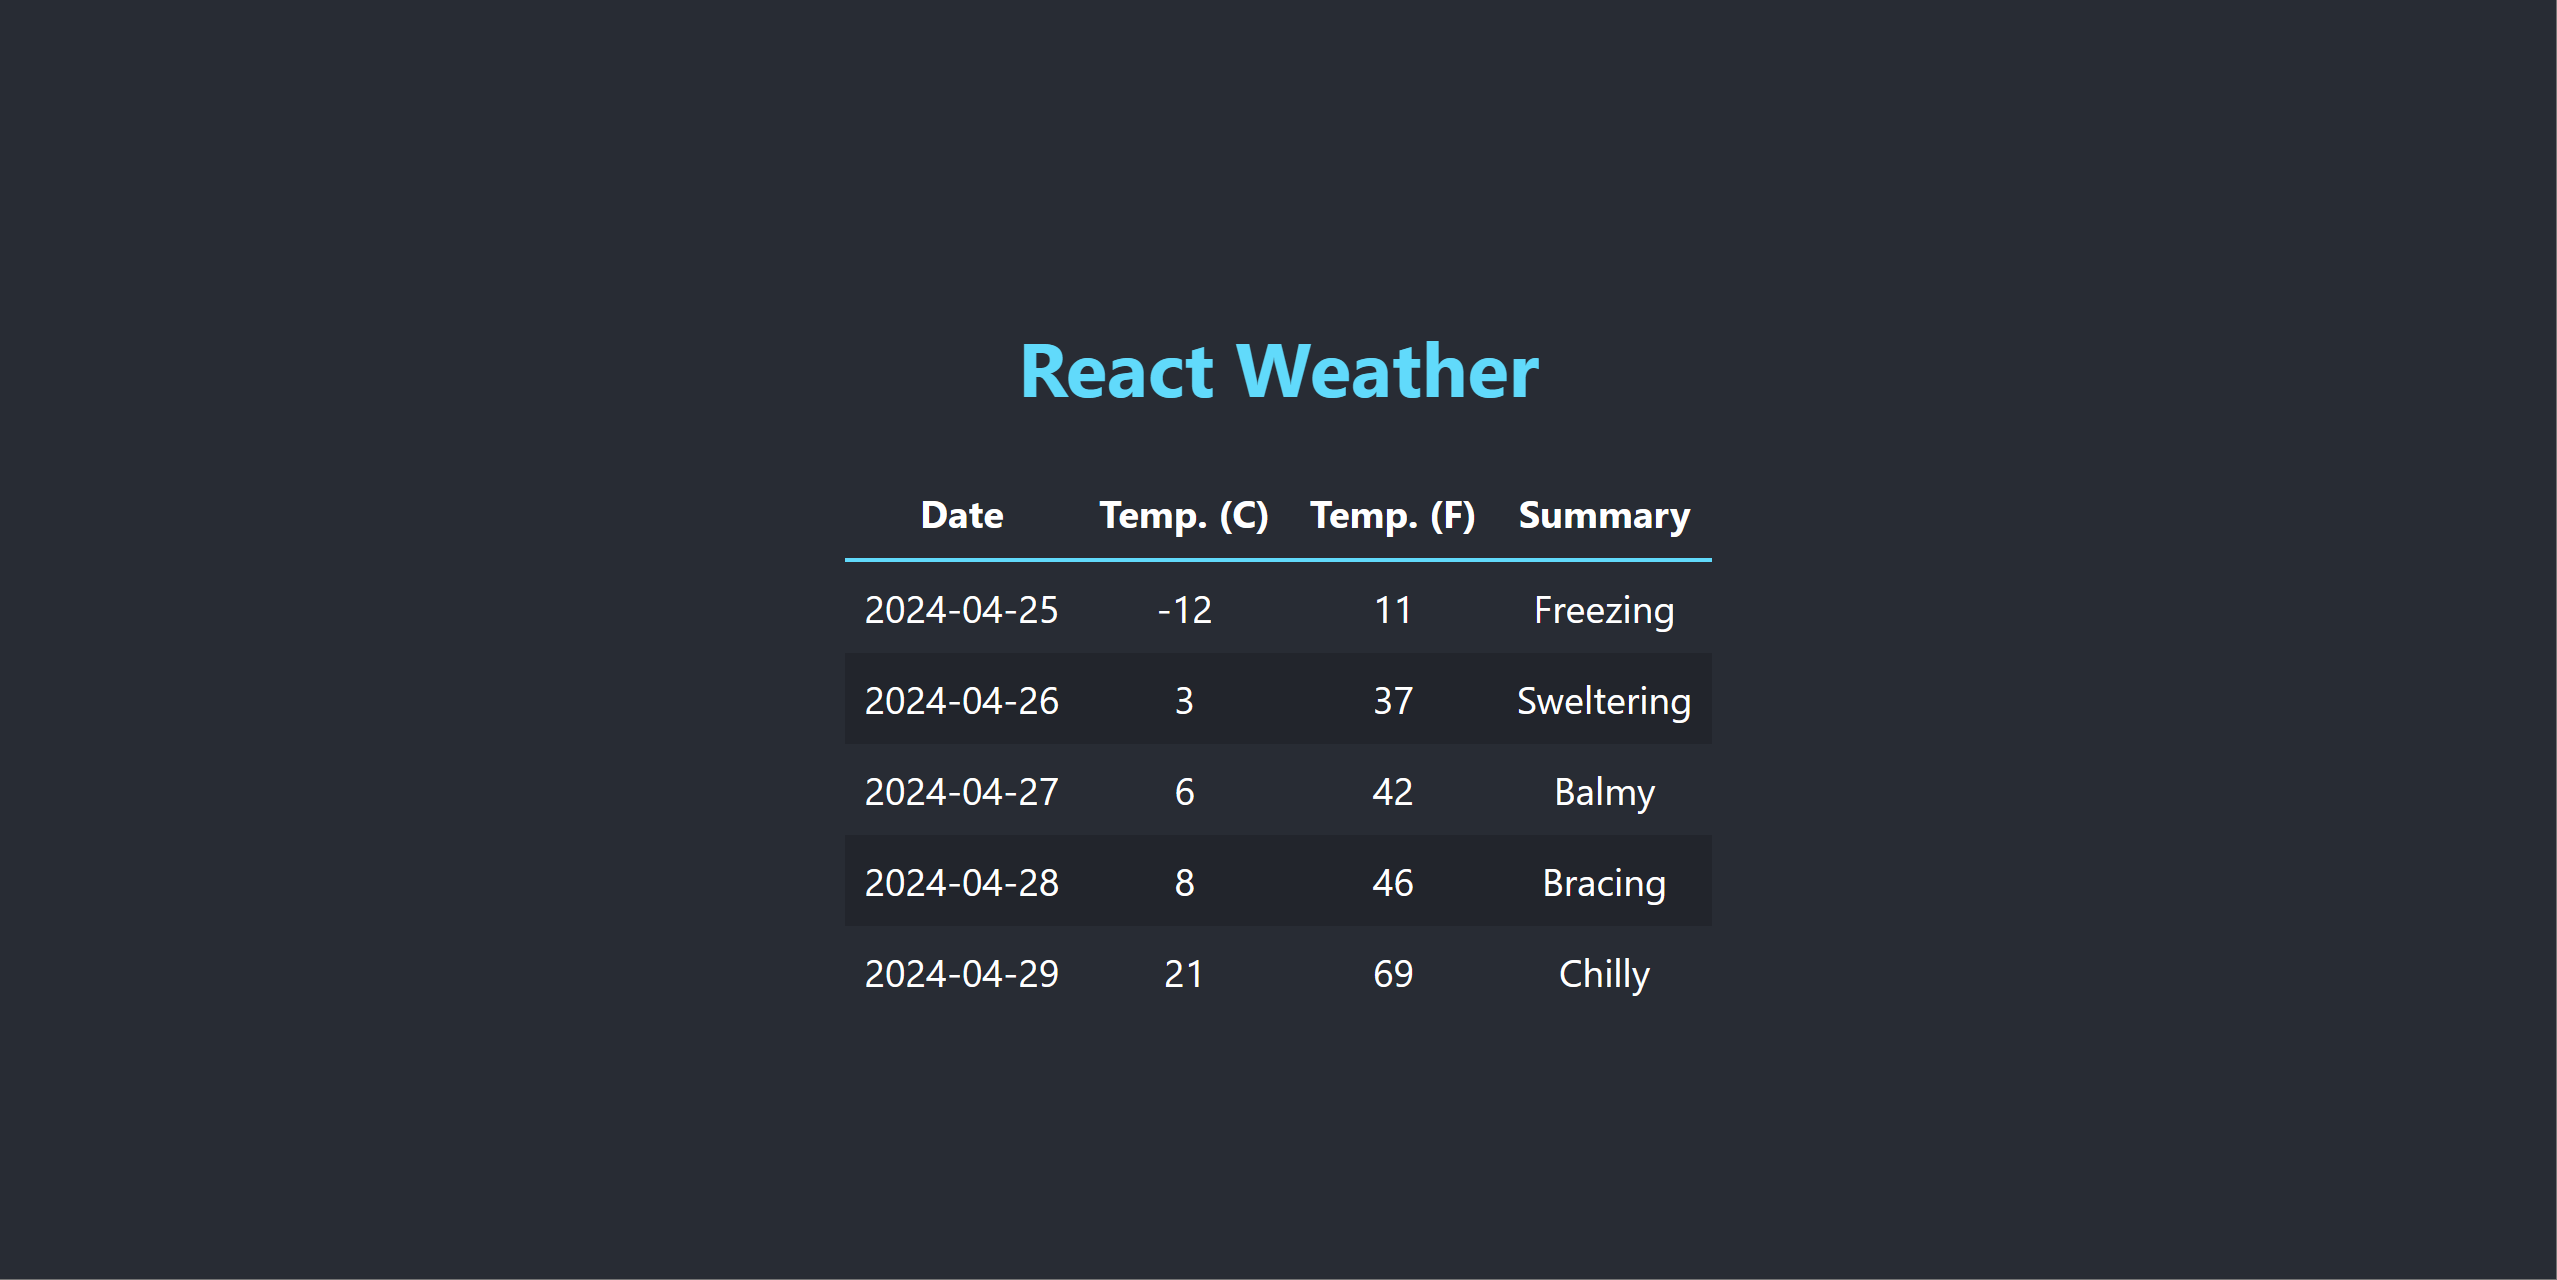
React应用正在运行
若要可视化 React 客户端应用,请导航到 .NET Aspire 仪表板中的“react”终结点。 下图描绘了 React 客户端应用:
浏览 Vue 客户端
原始 Vue 模板中有几个关键修改。 主要更新是在 fetch 文件中添加 调用,以从 /api/WeatherForecast 终结点检索天气预报数据。 以下代码片段演示了 fetch 调用:
<script lang="ts">
interface WeatherForecast {
  date: string
  temperatureC: number
  temperatureF: number
  summary: string
};

type Forecasts = WeatherForecast[];

export default {
  name: 'TheWelcome',
  data() {
    return {
      forecasts: [],
      loading: true,
      error: null
    }
  },
  mounted() {
    fetch('api/weatherforecast')
      .then(response => response.json())
      .then(data => {
        this.forecasts = data
      })
      .catch(error => {
        this.error = error
      })
      .finally(() => (this.loading = false))
  }
}
</script>

<template>
  <table>
    <thead>
      <tr>
        <th>Date</th>
        <th>Temp. (C)</th>
        <th>Temp. (F)</th>
        <th>Summary</th>
      </tr>
    </thead>
    <tbody>
      <tr v-for="forecast in (forecasts as Forecasts)">
        <td>{{ forecast.date }}</td>
        <td>{{ forecast.temperatureC }}</td>
        <td>{{ forecast.temperatureF }}</td>
        <td>{{ forecast.summary }}</td>
      </tr>
    </tbody>
  </table>
</template>

<style>
table {
  border: none;
  border-collapse: collapse;
}

th {
  font-size: x-large;
  font-weight: bold;
  border-bottom: solid .2rem hsla(160, 100%, 37%, 1);
}

th,
td {
  padding: 1rem;
}

td {
  text-align: center;
  font-size: large;
}

tr:nth-child(even) {
  background-color: var(--vt-c-black-soft);
}
</style>
由于 TheWelcome 集成 mounted,因此它将调用 /api/weatherforecast 终结点来检索天气预报数据。 随后,将响应设置为 forecasts 数据属性。 若要设置服务器端口,Vue 客户端应用使用 PORT 环境变量。 这是通过更新 vite.config.ts 文件来实现的:
import { fileURLToPath, URL } from 'node:url'

import { defineConfig } from 'vite'
import vue from '@vitejs/plugin-vue'

// https://vitejs.dev/config/
export default defineConfig({
  plugins: [
    vue(),
  ],
  resolve: {
    alias: {
      '@': fileURLToPath(new URL('./src', import.meta.url))
    }
  },
  server: {
    host: true,
    port: parseInt(process.env.PORT ?? "5173"),
    proxy: {
      '/api': {
        target: process.env.services__weatherapi__https__0 || process.env.services__weatherapi__http__0,
        changeOrigin: true,
        rewrite: path => path.replace(/^\/api/, ''),
        secure: false
      }
    }
  }
})
此外,Vite 配置中还指定了一个名为 server.proxy 的属性,用于将请求转发到“weatherapi”服务。 这是通过使用由 services__weatherapi__http__0.NET 应用主机设置的 .NET Aspire 环境变量来实现的。
模板的最终更新已应用到 TheWelcome.vue 文件。 此文件调用 /api/WeatherForecast 终结点来检索天气预报数据,并在表中显示数据。 它包括 CSS、HTML 和 TypeScript 更新。
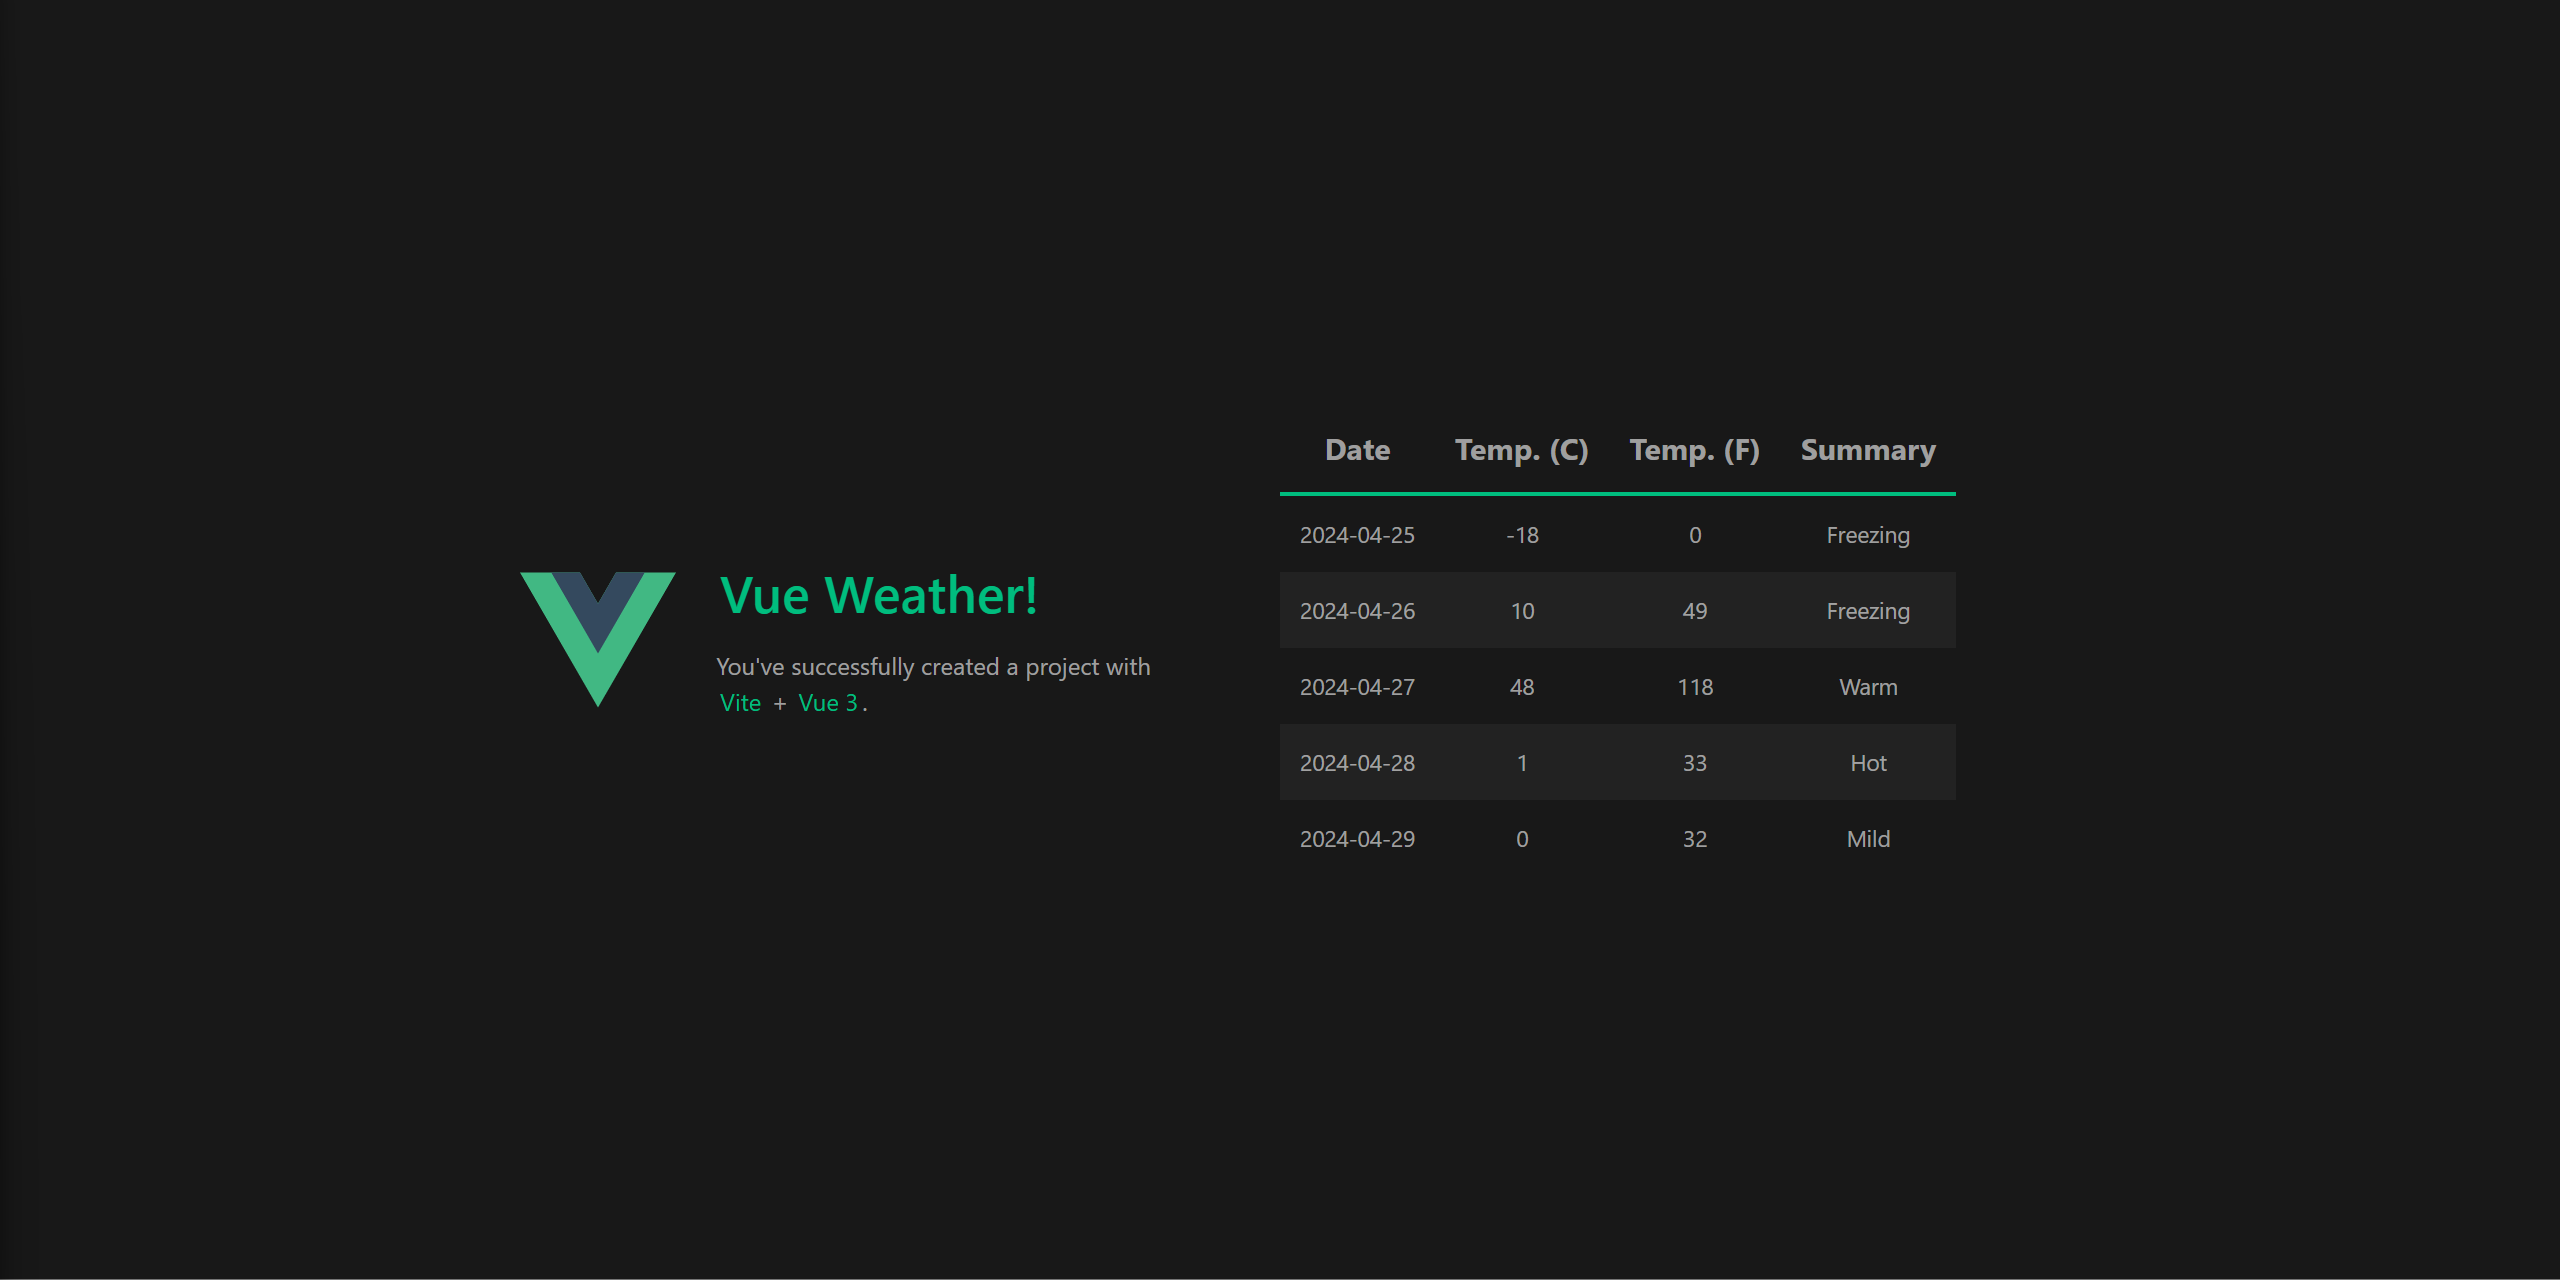
Vue应用正在运行
若要可视化 Vue 客户端应用,请导航到 .NET Aspire 仪表板中的“vue”接口。 下图描绘了 Vue 客户端应用:
部署注意事项
本文的示例源代码旨在在本地运行。 每个客户端应用程序都作为容器镜像进行部署。 每个客户端应用的 Dockerfile 用于生成容器映像。 每个 Dockerfile 都是相同的,使用多阶段生成来创建生产就绪的容器映像。
FROM node:20 as build

WORKDIR /app

COPY package.json package.json
COPY package-lock.json package-lock.json

RUN npm install

COPY . .

RUN npm run build

FROM nginx:alpine

COPY --from=build /app/default.conf.template /etc/nginx/templates/default.conf.template
COPY --from=build /app/dist/weather/browser /usr/share/nginx/html

# Expose the default nginx port
EXPOSE 80

CMD ["nginx", "-g", "daemon off;"]
客户端应用当前配置为以真正的 SPA 应用运行,并且未配置为在服务器端呈现的 (SSR) 模式下运行。 它们位于 nginx后面,用于为静态文件提供服务。 他们使用 default.conf.template 文件来配置 nginx,以便代理请求到客户端应用。
server {
    listen       ${PORT};
    listen  [::]:${PORT};
    server_name  localhost;

    access_log  /var/log/nginx/server.access.log  main;

    location / {
        root /usr/share/nginx/html;
        try_files $uri $uri/ /index.html;
    }

    location /api/ {
        proxy_pass ${services__weatherapi__https__0};
        proxy_http_version 1.1;
        proxy_ssl_server_name on;
        proxy_set_header X-Forwarded-For $proxy_add_x_forwarded_for;
        rewrite ^/api(/.*)$ $1 break;
    }
}
Node.js 服务器应用注意事项
虽然本文重点介绍客户端应用,但在某些情况下,可能需要托管 Node.js 服务器应用。 托管 Node.js 服务器应用与 SPA 客户端应用需要相同的语义。
.NET
.NET Aspire 应用主机需要引用 Aspire的 .Hosting.NodeJS NuGet 包,并且代码需要调用 AddNodeApp 或 AddNpmApp。 这些 API 可用于将现有 JavaScript 应用添加到 .NET.NET Aspire 应用主机。
配置机密并将环境变量传递给基于 JavaScript 的应用时,无论是客户端应用还是服务器应用,都使用参数。 有关详细信息,请参阅 .NET.NET Aspire:外部参数 - 机密。
使用 OpenTelemetry JavaScript SDK
若要从 OpenTelemetry 服务器应用导出 Node.js 日志、跟踪和指标,请使用 OpenTelemetry JavaScript SDK。
有关使用 Node.js JavaScript SDK 的 OpenTelemetry 服务器应用的完整示例,可以参考 代码示例:.NET AspireNode.js 示例 页。 请考虑示例的 instrumentation.js 文件,其中演示如何配置 OpenTelemetry JavaScript SDK 以导出日志、跟踪和指标:
import { env } from 'node:process';
import { NodeSDK } from '@opentelemetry/sdk-node';
import { OTLPTraceExporter } from '@opentelemetry/exporter-trace-otlp-grpc';
import { OTLPMetricExporter } from '@opentelemetry/exporter-metrics-otlp-grpc';
import { OTLPLogExporter } from '@opentelemetry/exporter-logs-otlp-grpc';
import { SimpleLogRecordProcessor } from '@opentelemetry/sdk-logs';
import { PeriodicExportingMetricReader } from '@opentelemetry/sdk-metrics';
import { HttpInstrumentation } from '@opentelemetry/instrumentation-http';
import { ExpressInstrumentation } from '@opentelemetry/instrumentation-express';
import { RedisInstrumentation } from '@opentelemetry/instrumentation-redis-4';
import { diag, DiagConsoleLogger, DiagLogLevel } from '@opentelemetry/api';
import { credentials } from '@grpc/grpc-js';

const environment = process.env.NODE_ENV || 'development';

// For troubleshooting, set the log level to DiagLogLevel.DEBUG
//diag.setLogger(new DiagConsoleLogger(), environment === 'development' ? DiagLogLevel.INFO : DiagLogLevel.WARN);

const otlpServer = env.OTEL_EXPORTER_OTLP_ENDPOINT;

if (otlpServer) {
    console.log(`OTLP endpoint: ${otlpServer}`);

    const isHttps = otlpServer.startsWith('https://');
    const collectorOptions = {
        credentials: !isHttps
            ? credentials.createInsecure()
            : credentials.createSsl()
    };

    const sdk = new NodeSDK({
        traceExporter: new OTLPTraceExporter(collectorOptions),
        metricReader: new PeriodicExportingMetricReader({
            exportIntervalMillis: environment === 'development' ? 5000 : 10000,
            exporter: new OTLPMetricExporter(collectorOptions),
        }),
        logRecordProcessor: new SimpleLogRecordProcessor({
            exporter: new OTLPLogExporter(collectorOptions)
        }),
        instrumentations: [
            new HttpInstrumentation(),
            new ExpressInstrumentation(),
            new RedisInstrumentation()
        ],
    });

    sdk.start();
}
提示
若要配置 .NET.NET Aspire 仪表板的 OTEL CORS 设置,请参阅 .NET.NET Aspire 仪表板 OTEL CORS 设置的 页。
总结
虽然本文的几个注意事项超出了本文的范围,但你已了解如何生成使用 .NET Aspire 和 Node 包管理器(Node.js)的 npm 项目。 你还了解了如何使用 AddNpmApp API 来托管从 Node.js 文件中分别执行的 应用和应用。 最后,你学习了如何使用 npm CLI 创建 Angular、React和 Vue 客户端应用,以及如何将其配置为在不同的端口上运行。


