你当前正在访问 Microsoft Azure Global Edition 技术文档网站。 如果需要访问由世纪互联运营的 Microsoft Azure 中国技术文档网站,请访问 https://docs.azure.cn 。
快速入门:将微服务应用程序部署到 Azure Spring Apps
本文内容
本文介绍如何使用已知的示例应用 PetClinic 将微服务应用程序部署到 Azure Spring Apps。
Pet Clinic 示例演示了微服务体系结构模式。 下图显示了 Azure Spring Apps Enterprise 计划上的 PetClinic 应用程序的体系结构。
此图显示了 Pet Clinic 示例的以下体系结构流和关系:
使用 Azure Spring Apps 管理前端和后端应用。 后端应用是使用 Spring Boot 生成的,每个应用都使用 HSQLDB 作为持久性存储。 重塑的前端应用基于 Pet Clinic API 网关应用构建,Node.js 充当独立的前端 Web 应用程序。
使用 Azure Spring Apps 上的托管组件,包括服务注册表、应用程序配置服务、Spring Cloud Gateway 和应用程序实时视图。 应用程序配置服务会读取 Git 存储库配置。
公开 Spring Cloud Gateway 的 URL 以将请求路由到后端服务应用,并公开应用程序实时视图的 URL 以监视后端应用。
使用 Log Analytics 工作区分析日志。
使用 Application Insights 来监视性能。
Pet Clinic 示例演示了微服务体系结构模式。 下图显示了 Azure Spring Apps 标准计划上的 PetClinic 应用程序的体系结构。
此图显示了 Pet Clinic 示例的以下体系结构流和关系:
使用 Azure Spring Apps 管理 Spring Boot 应用。 每个应用都使用 HSQLDB 作为永久性存储。
在 Azure Spring Apps 上使用托管组件 Spring Cloud Config Server 和 Eureka Service Registry。 Config Server 会读取 Git 存储库配置。
公开 API 网关的 URL 来对服务应用的请求进行负载均衡,并公开管理服务器的 URL 来管理应用程序。
使用 Log Analytics 工作区分析日志。
使用 Application Insights 来监视性能。
注意
本文使用简化版本的 PetClinic,该版本使用尚不可用于生产环境的内存数据库,以快速部署到 Azure Spring Apps。
部署的应用 admin-server 开放了公共访问,这是一个风险点。 生产环境需要保护 Spring Boot 管理员应用程序。
本文介绍用于部署到 Azure Spring Apps 的以下选项:
“Azure 门户”选项是创建资源和部署应用程序的最简单、最快的方式,只需点击一下即可
“Azure 门户 + Maven 插件”选项是一种更为传统的方法,可用于分步创建资源和部署应用程序
“Azure CLI”选项使用功能强大的命令行工具管理 Azure 资源
“Azure 门户 + Maven 插件”选项是一种更为传统的方法,可用于分步创建资源和部署应用程序
“Azure Developer CLI”选项是一种更高效的方法,可通过简单的命令自动创建资源和部署应用程序
1.先决条件
2. 准备 Spring 项目
使用以下步骤在本地准备示例:
使用以下命令克隆示例项目:
git clone https://github.com/Azure-Samples/spring-petclinic-microservices.git
导航到项目根目录,然后使用以下命令在本地运行示例项目:
bash ./scripts/run_all_without_infra.sh
成功完成脚本后,在浏览器中转到 http://localhost:8080 来访问 PetClinic 应用程序。
使用以下步骤,使用 Azure Developer CLI 模板初始化 Pet Clinic 应用程序:
在 Bash 窗口中,创建新的空文件夹,然后导航到该文件夹。
使用以下命令来初始化项目:
azd init --template Azure-Samples/spring-petclinic-microservices
以下列表描述了命令交互:
输入新的环境名称 :提供环境名称,该名称将用作为保存所有 Azure 资源而创建的资源组的后缀。 此名称应在 Azure 订阅中具有唯一性。
控制台输出类似于以下示例的消息:
Initializing a new project (azd init)

Downloading template code to: <your-local-path>
(✓) Done: Initialized git repository
Enter a new environment name: <your-env-name>

SUCCESS: New project initialized!
You can view the template code in your directory: <your-local-path>
Learn more about running 3rd party code on our DevHub: https://aka.ms/azd-third-party-code-notice
3. 准备云环境
本部分介绍如何创建 Azure Spring Apps 服务实例和准备 Azure 云环境。
3.1. 登录到 Azure 门户
转到 Azure 门户 ,输入凭据以登录到门户。 默认视图是服务仪表板。
3.2. 创建 Azure Spring Apps 实例
请执行以下步骤来创建服务实例:
在 Azure 门户一角选择“创建资源 ”。
在“Azure 服务”选项卡上,选择“配置”>“Azure Spring Apps”
在“创建 Azure Spring Apps”页上,填写“基本信息”选项卡上的窗体。
以下表为指南来填写窗体。 建议的计划 为是基本 。
设置
建议值
描述
订阅 你的订阅名称。
要用于服务器的 Azure 订阅。 如果你有多个订阅,请选择要计费的资源所在的订阅。
资源组 myresourcegroup
新的资源组名称,或订阅中的现有资源组。
名称 myasa
用于标识 Azure Spring Apps 实例的唯一名称。 该名称必须为 4 到 32 个字符,只能包含小写字母、数字及连字符。 服务名称的第一个字符必须是字母,最后一个字符必须是字母或数字。
规划 标准 定价层会确定与实例关联的资源和成本。
区域 离用户最近的区域。
最靠近用户的位置。
区域冗余 未选定
在 Azure 可用性区域中创建 Azure Spring Apps 服务。 目前并非在所有区域都可用。
导航到“创建 Azure Spring Apps”页上的“诊断设置”选项卡,然后选择“新建”,创建新的 Log Analytics 工作区实例。 在“创建新的 Log Analytics 工作区”页上,根据需要更新 Log Analytics 工作区的名称,然后选择“确定”来确认创建。
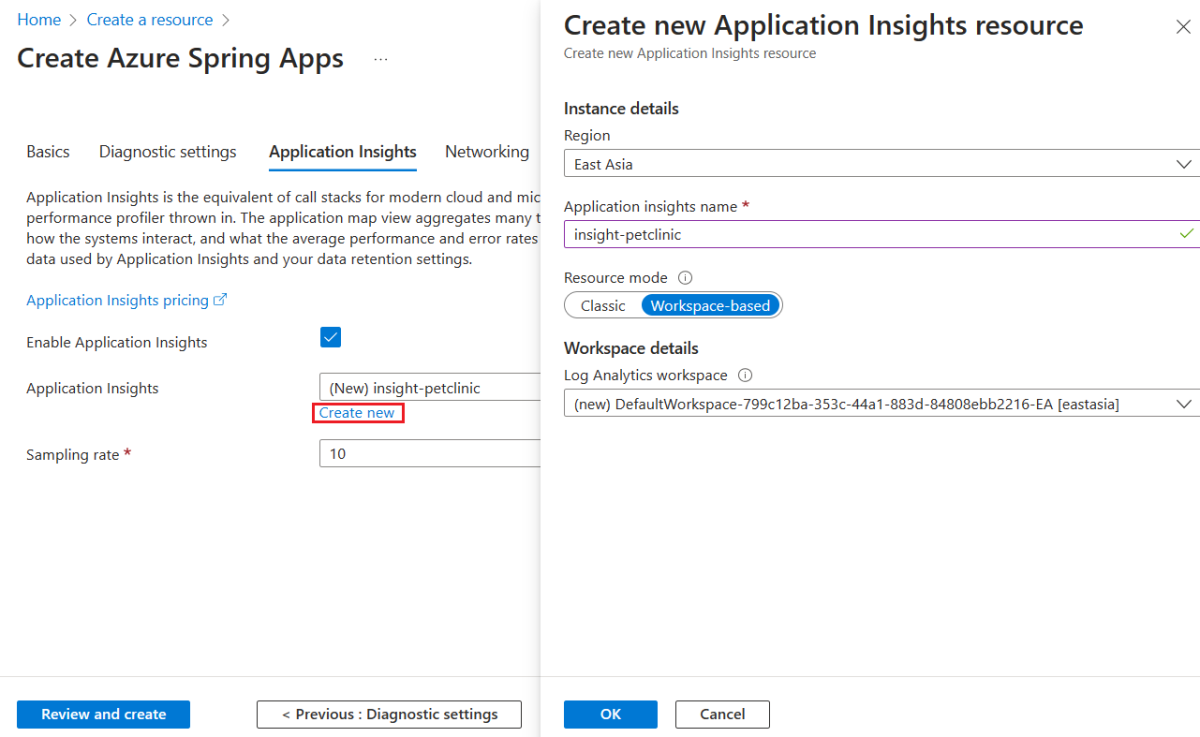
导航到“创建 Azure Spring Apps”页上的“Application Insights”选项卡,然后选择“新建”,创建新的 Application Insights 实例。 在创建新的 Application Insights 资源 页上,根据需要更新 Application Insights 名称 ,选择基于工作区 作为资源模式 ,然后选择确定 来确认创建。
选择“查看 + 创建”,查看所选内容。 然后,选择“创建”以预配 Azure Spring Apps 实例
选择“通知”图标(铃铛)来监视部署过程。 完成部署后,可以选择“固定到仪表板”,以便在 Azure 门户仪表板上创建到此服务“概述”页的快捷方式
选择“转到资源”,转到“Azure Spring Apps 概述”页面。
在导航窗格中选择“Config Server”
在“Config Server”页上的“URI”中,输入“https://github.com/Azure-Samples/spring-petclinic-microservices-config.git
验证后,选择“应用”来完成 Config Server 配置。
使用以下步骤来创建所需的资源:
使用以下命令通过 OAuth2 登录到 Azure CLI。 如果已登录,请忽略此步骤。
azd auth login
控制台输出类似于以下示例的消息:
Logged in to Azure.
使用以下命令打包应用程序的可部署副本,将模板的基础结构预配到 Azure,然后将应用程序代码部署到这些新预配的资源:
azd provision
以下列表描述了命令交互:
选择要使用的 Azure 订阅 :使用箭头移动,键入以进行筛选,然后按 Enter 。选择要使用的 Azure 位置 :使用箭头移动,键入以进行筛选,然后按 Enter 。
控制台输出类似于以下示例的消息:
SUCCESS: Your application was provisioned in Azure in xx minutes xx seconds.
You can view the resources created under the resource group rg-<your-environment-name> in Azure Portal:
https://portal.azure.com/#@/resource/subscriptions/<your-subscription-id>/resourceGroups/rg-<your-environment-name>/overview
注意
此命令可能需要一段时间才能完成。 预配 Azure 资源时,系统将会显示进度指示器。
4. 将应用部署到 Azure Spring Apps
现在可以将应用部署到 Azure Spring Apps。
按照以下步骤使用适用于 Azure Spring Apps 的 Maven 插件 部署微服务应用程序:
导航到示例项目目录,然后使用以下命令为 Azure Spring Apps 配置应用:
./mvnw -P spring-apps com.microsoft.azure:azure-spring-apps-maven-plugin:1.17.0:config
以下列表描述了命令交互:
选择子模块进行配置(以逗号分隔的输入数字,例如 [1-2,4,6],按 Enter 可全选) :按 Enter 选择全部。OAuth2 登录
选择订阅 :选择所创建的 Azure Spring Apps 实例的订阅列表编号,它默认为列表中的第一个订阅。 如果使用默认编号,请直接按 Enter 。选择要部署的 Azure Spring Apps :选择所创建的 Azure Spring Apps 实例的列表编号。 如果使用默认编号,请直接按 Enter 。选择要公开公共访问权限的应用:(以逗号分隔的输入数字,例如 [1-2,4,6],按 Enter 可全选 :输入 1,5 表示 admin-server 和 api-gateway。确认保存上述所有配置 (Y/n) :按 y 。 如果按 n ,则配置不会保存在 POM 文件中。
使用以下命令生成并部署每个应用程序:
./mvnw azure-spring-apps:deploy
对于“OAuth2 登录”提示,请根据 OAuth2 协议授权登录到 Azure。
注意
部署到 Azure Spring Apps 最多可能需要 25 分钟。
运行命令后,日志会显示与下例类似的输出,该输出指示所有部署均成功:
[INFO] Deployment(default) is successfully updated.
[INFO] Deployment Status: Running
[INFO]   InstanceName:admin-server-default-xx-xx-xxx  Status:Running Reason:null       DiscoverStatus:UP
[INFO] Getting public url of app(admin-server)...
[INFO] Application url: https://<your-Azure-Spring-Apps-instance-name>-admin-server.azuremicroservices.io

...

[INFO] Getting public url of app(api-gateway)...
[INFO] Application url: https://<your-Azure-Spring-Apps-instance-name>-api-gateway.azuremicroservices.io
按照以下步骤打包应用,预配 Web 应用程序所需的 Azure 资源,然后部署到 Azure Spring Apps:
使用以下命令打包应用程序的可部署副本:
azd package
控制台输出类似于以下示例的消息:
SUCCESS: Your application was packaged for Azure in xx minutes xx seconds.
使用以下命令将应用程序代码部署到这些新预配的资源:
azd deploy
控制台输出类似于以下示例的消息:
Deploying services (azd deploy)

(✓) Done: Deploying service admin-server
- Endpoint: https://<your-Azure-Spring-Apps-instance-name>-admin-server.azuremicroservices.io

(✓) Done: Deploying service api-gateway
- Endpoint: https://<your-Azure-Spring-Apps-instance-name>-api-gateway.azuremicroservices.io

(✓) Done: Deploying service customers-service
- No endpoints were found

(✓) Done: Deploying service vets-service
- No endpoints were found

(✓) Done: Deploying service visits-service
- No endpoints were found


SUCCESS: Your application was deployed to Azure in xx minutes xx seconds.
You can view the resources created under the resource group rg-<your-environment-name> in Azure Portal:
https://portal.azure.com/#@/resource/subscriptions/<your-subscription-id>/resourceGroups/rg-<your-environment-name>/overview
2. 准备 Spring 项目
如果要在将应用程序部署到云之前验证应用程序,请在本地计算机上执行以下步骤:
使用以下命令从 GitHub 克隆 Pet Clinic 应用程序 :
git clone https://github.com/Azure-Samples/spring-petclinic-microservices.git
导航到项目根目录,然后使用以下命令生成项目:
./mvnw clean package -DskipTests
如果要在本地运行应用程序,请使用以下步骤操作: 否则,可以跳过这些步骤。
打开新的 Bash 窗口,然后使用以下命令启动 Config Server:
./mvnw spring-boot:run -pl spring-petclinic-config-server
打开新的 Bash 窗口,然后使用以下命令启动 Discovery Server:
./mvnw spring-boot:run -pl spring-petclinic-discovery-server
对于 Customers、Vets、Visits 和 Spring Cloud Gateway 服务,请打开一个新的 Bash 窗口,并使用以下命令启动服务:
./mvnw spring-boot:run -pl spring-petclinic-customers-service
./mvnw spring-boot:run -pl spring-petclinic-vets-service
./mvnw spring-boot:run -pl spring-petclinic-visits-service
./mvnw spring-boot:run -Dspring-boot.run.profiles=default,development \
    -pl spring-petclinic-api-gateway
打开新的 Bash 窗口并导航到项目 spring-petclinic-frontend 目录。 使用以下命令安装依赖项并运行前端应用程序:
npm install
npm run start
成功完成脚本后,在浏览器中转到 http://localhost:8080 以访问 PetClinic 应用程序。
3. 准备云环境
运行此示例所需的主要资源是 Azure Spring Apps 实例。 本节介绍如何创建此资源。
本部分使用“部署到 Azure”按钮在 Azure 门户中启动部署体验ARM 模板 来创建 Azure 资源。
3.1. 登录到 Azure 门户
转到 Azure 门户 ,输入凭据以登录到门户。 默认视图是服务仪表板。
3.2. 创建 Azure 资源
按以下步骤创建应用依赖的所有 Azure 资源:
选择以下“部署到 Azure”按钮在 Azure 门户中启动部署体验
填写“基本信息”选项卡上的表单
设置
建议值
描述
订阅 你的订阅名称。
要用于服务器的 Azure 订阅。 如果你有多个订阅,请选择要计费的资源所在的订阅。
资源组 myresourcegroup
新的资源组名称,或订阅中的现有资源组。
区域 离用户最近的区域。
此区域用于创建资源组。
选择“查看 + 创建”,查看所选内容。 然后选择“创建”将应用部署到 Azure Spring Apps
在工具栏上选择“通知”图标(铃铛)以监视部署过程。 完成部署后,可以选择“固定到仪表板”,以便在 Azure 门户仪表板上为此服务创建磁贴作为前往此服务的“概述”页的快捷方式。转到资源 ”以打开服务的“概述 ”页。
3.1. 登录到 Azure 门户
转到 Azure 门户 ,输入登录到门户所需的凭据。 默认视图是服务仪表板。
3.2. 创建 Azure Spring Apps 实例
请执行以下步骤来创建服务实例:
在 Azure 门户一角选择“创建资源 ”。
选择“计算 >Azure Spring Apps ”。
填写“基本信息”选项卡上的表单
设置
建议值
描述
订阅 你的订阅名称。
要用于服务器的 Azure 订阅。 如果你有多个订阅,请选择要计费的资源所在的订阅。
资源组 myresourcegroup
新的资源组名称,或订阅中的现有资源组。
名称 myasa
用于标识 Azure Spring Apps 服务的唯一名称。 该名称必须为 4 到 32 个字符,只能包含小写字母、数字及连字符。 服务名称的第一个字符必须是字母,最后一个字符必须是字母或数字。
区域 离用户最近的区域。
最靠近用户的位置。
托管选项和计划 企业 定价计划确定与实例关联的资源和成本。
区域冗余 未选定
在 Azure 可用性区域中创建 Azure Spring Apps 服务的选项。 此功能目前在所有区域都不受支持。
即用即付 使用 Azure Spring Apps 进行即用即付的定价计划。
部署示例项目 未选定
使用内置示例应用程序的选项。
导航到“创建 Azure Spring Apps”页上的“诊断设置”选项卡,然后选择“新建”,创建新的 Log Analytics 工作区实例。 在“创建新的 Log Analytics 工作区 ”页上,根据需要更新 Log Analytics 工作区 的名称,然后选择“确定 ”以确认创建。
导航到“创建 Azure Spring Apps”页上的“Application Insights”选项卡,然后选择“新建”,创建新的 Application Insights 实例。 在创建新的 Application Insights 资源 页上,根据需要更新 Application Insights 名称 ,选择基于工作区 作为资源模式 ,然后选择确定 来确认创建。
选择“查看 + 创建”,查看所选内容。 然后,选择“创建”以预配 Azure Spring Apps 实例
选择“通知”图标(铃铛)来监视部署过程。 完成部署后,可以选择“固定到仪表板”,以便在 Azure 门户仪表板上创建到此服务“概述”页的快捷方式
选择“转到资源”,转到“Azure Spring Apps 概述”页面。
以下部分演示如何配置服务实例。
创建应用
使用以下步骤创建应用:
在导航窗格中,选择“应用 ”,然后选择“创建应用 ”。
在“创建应用 ”页上,对于应用名称 ,请使用前端 ,并将所有其他字段保留其默认值。
使用以下每个应用程序名称重复上一步:
customers-servicevets-servicevisits-service
选择“创建 ”以完成应用创建。
使用以下步骤配置服务注册表:
在导航窗格中,选择“服务注册表 ”。
选择“应用绑定 ”,选择“绑定应用 ”,从列表中选择 customers-service,然后选择“应用 ”。
重复上一步以绑定以下应用程序:
vets-servicevisits-service
使用以下步骤配置应用程序配置服务:
在导航窗格中,选择“应用程序配置服务 ”,然后选择“设置 ”。
使用以下信息填写存储库,然后选择“验证 ”:
验证后,选择“应用 ”以完成应用程序配置服务配置。
选择“应用绑定 ”,选择“绑定应用 ”,从列表中选择 customers-service,然后选择“应用 ”。
重复上一步以绑定以下应用程序:
vets-servicevisits-service
设置应用的配置文件模式
使用以下步骤设置配置文件模式:
在导航窗格中,选择“应用 ”,然后选择 customers-service 应用。
在“应用概述 ”页上,选择“配置 ”,在“常规设置 ”选项卡中选择“配置文件模式 ”,然后选择应用程序 和 customers-service。 选择“保存 ”以设置配置文件模式。
重复上一步,以保存以下应用程序的配置文件模式:
vets-service:选择 应用程序和 和 vets-service。visits-service:选择 应用程序和 和 visits-service。
本部分介绍如何配置 Spring Cloud Gateway。
首先,使用以下步骤为网关访问分配终结点:
在导航窗格中,选择 Spring Cloud Gateway 。
在“概述 ”选项卡上,选择“是 ”来分配终结点。 保存终结点 URL 以供以后使用。
接下来,配置 Spring Cloud Gateway 的路由。 由于 Azure 门户当前不支持 Spring Cloud Gateway 的路由配置,请打开 Bash 窗口并使用以下 Azure CLI 步骤配置路由:
使用以下命令登录到 Azure CLI:
az login
使用以下命令安装适用于 Azure CLI 的 Azure Spring Apps 扩展并注册 Microsoft.SaaS 命名空间:
az extension add --name spring --upgrade
az provider register --namespace Microsoft.SaaS
使用以下命令接受法律条款和隐私声明:
注意
仅当订阅从未用于创建 Azure Spring Apps 企业计划实例时,才需要执行此步骤。
az term accept \
    --publisher vmware-inc \
    --product azure-spring-cloud-vmware-tanzu-2 \
    --plan asa-ent-hr-mtr
使用以下命令创建变量以保存资源名称。 请务必将占位符替换为你自己的值。
export SUBSCRIPTION_ID=<subscription-ID>
export RESOURCE_GROUP=<resource-group-name>
export SPRING_APPS_NAME=<Azure-Spring-Apps-instance-name>
export APP_CUSTOMERS_SERVICE=customers-service
export APP_VETS_SERVICE=vets-service
export APP_VISITS_SERVICE=visits-service
export APP_FRONTEND=frontend
使用以下命令设置默认订阅:
az account set --subscription ${SUBSCRIPTION_ID}
使用以下命令设置 customers-service 应用的路由:
az spring gateway route-config create \
    --resource-group ${RESOURCE_GROUP} \
    --service ${SPRING_APPS_NAME} \
    --name ${APP_CUSTOMERS_SERVICE} \
    --app-name ${APP_CUSTOMERS_SERVICE} \
    --routes-json \
      '[
        {
          "predicates": [
            "Path=/api/customer/**"
          ],
          "filters": [
            "StripPrefix=2"
          ]
        }
      ]'
使用以下命令设置 vets-service 应用的路由:
az spring gateway route-config create \
    --resource-group ${RESOURCE_GROUP} \
    --service ${SPRING_APPS_NAME} \
    --name ${APP_VETS_SERVICE} \
    --app-name ${APP_VETS_SERVICE} \
    --routes-json \
      '[
         {
           "predicates": [
             "Path=/api/vet/**"
           ],
           "filters": [
             "StripPrefix=2"
           ]
         }
       ]'
使用以下命令设置 visits-service 应用的路由:
az spring gateway route-config create \
    --resource-group ${RESOURCE_GROUP} \
    --service ${SPRING_APPS_NAME} \
    --name ${APP_VISITS_SERVICE} \
    --app-name ${APP_VISITS_SERVICE} \
    --routes-json \
      '[
         {
           "predicates": [
             "Path=/api/visit/**"
           ],
           "filters": [
             "StripPrefix=2"
           ]
         }
       ]'
使用以下命令设置前端应用的路由:
az spring gateway route-config create \
    --resource-group ${RESOURCE_GROUP} \
    --service ${SPRING_APPS_NAME} \
    --name ${APP_FRONTEND} \
    --app-name ${APP_FRONTEND} \
    --routes-json \
      '[
         {
           "predicates": [
             "Path=/**"
           ],
           "filters": [
             "StripPrefix=0"
           ],
           "order": 1000
         }
       ]'
使用以下步骤配置开发人员工具。
在导航窗格中,选择“开发人员工具 ”。
选择“分配终结点 ”,为“开发人员工具 ”分配终结点。
保存“应用实时视图 ”的终结点以供以后使用。
3.1. 提供每个资源的名称
使用以下命令创建变量以保存资源名称。 请务必将占位符替换为你自己的值。
export LOCATION=<location>
export RESOURCE_GROUP=myresourcegroup
export SPRING_APPS=myasa
export APP_FRONTEND=frontend
export APP_CUSTOMERS_SERVICE=customers-service
export APP_VETS_SERVICE=vets-service
export APP_VISITS_SERVICE=visits-service
export GIT_CONFIG_REPO=default
3.2. 登录 Azure CLI
按照以下步骤来登录:
使用以下命令登录到 Azure CLI:
az login
使用以下命令列出所有可用的订阅,以确定要使用的订阅 ID:
az account list --output table
使用以下命令设置默认订阅:
az account set --subscription <subscription-ID>
3.3. 创建新的资源组
按照以下步骤创建新的资源组:
使用以下命令设置默认位置:
az configure --defaults location=${LOCATION}
使用以下命令来创建资源组:
az group create --resource-group ${RESOURCE_GROUP}
使用以下命令将新创建的资源组设置为默认资源组:
az configure --defaults group=${RESOURCE_GROUP}
3.4. 安装扩展并注册命名空间
使用以下命令安装适用于 Azure CLI 的 Azure Spring Apps 扩展并注册 Microsoft.SaaS 命名空间:
az extension add --name spring --upgrade
az provider register --namespace Microsoft.SaaS
3.5. 创建 Azure Spring Apps 实例
请执行以下步骤来创建服务实例:
使用以下命令接受企业计划的法律条款和隐私声明:
注意
仅当订阅从未用于创建 Azure Spring Apps 企业计划实例时,才需要执行此步骤。
az term accept \
    --publisher vmware-inc \
    --product azure-spring-cloud-vmware-tanzu-2 \
    --plan asa-ent-hr-mtr
使用以下命令创建具有必要的 Tanzu 组件的 Azure Spring Apps 服务实例:
az spring create \
    --name ${SPRING_APPS} \
    --sku Enterprise \
    --enable-application-configuration-service \
    --enable-service-registry \
    --enable-gateway \
    --enable-application-live-view
使用以下步骤来配置服务实例:
使用以下命令为 Azure Spring Apps 实例配置诊断设置:
export SPRING_APPS_RESOURCE_ID=$(az spring show \
    --name ${SPRING_APPS} \
    --query id \
    --output tsv)
az monitor diagnostic-settings create \
    --resource ${SPRING_APPS_RESOURCE_ID} \
    --name logs-and-metrics \
    --workspace ${SPRING_APPS} \
    --logs '[
      {
        "category": "ApplicationConsole",
        "enabled": true,
        "retentionPolicy": {
          "enabled": false,
          "days": 0
        }
      },
      {
         "category": "SystemLogs",
         "enabled": true,
         "retentionPolicy": {
           "enabled": false,
           "days": 0
         }
      },
      {
         "category": "IngressLogs",
         "enabled": true,
         "retentionPolicy": {
           "enabled": false,
           "days": 0
          }
      }
    ]' \
    --metrics '[
      {
        "category": "AllMetrics",
        "enabled": true,
        "retentionPolicy": {
          "enabled": false,
          "days": 0
        }
      }
    ]'
使用以下命令为 Azure Spring Apps 实例创建应用程序:
az spring app create --service ${SPRING_APPS} --name ${APP_FRONTEND}
az spring app create --service ${SPRING_APPS} --name ${APP_CUSTOMERS_SERVICE}
az spring app create --service ${SPRING_APPS} --name ${APP_VETS_SERVICE}
az spring app create --service ${SPRING_APPS} --name ${APP_VISITS_SERVICE}
使用以下命令为服务注册表绑定应用程序:
az spring service-registry bind --service ${SPRING_APPS} --app ${APP_CUSTOMERS_SERVICE}
az spring service-registry bind --service ${SPRING_APPS} --app ${APP_VETS_SERVICE}
az spring service-registry bind --service ${SPRING_APPS} --app ${APP_VISITS_SERVICE}
使用以下命令为应用程序配置服务创建配置存储库:
az spring application-configuration-service git repo add \
    --service ${SPRING_APPS} \
    --name ${GIT_CONFIG_REPO} \
    --patterns application,api-gateway,customers-service,vets-service,visits-service \
    --uri https://github.com/Azure-Samples/spring-petclinic-microservices-config.git \
    --label master
使用以下命令将应用程序绑定到应用程序配置服务:
az spring application-configuration-service bind \
    --service ${SPRING_APPS} \
    --app ${APP_CUSTOMERS_SERVICE}
az spring application-configuration-service bind \
    --service ${SPRING_APPS} \
    --app ${APP_VETS_SERVICE}
az spring application-configuration-service bind \
    --service ${SPRING_APPS} \
    --app ${APP_VISITS_SERVICE}
使用以下命令将终结点分配到 Spring Cloud 网关:
az spring gateway update --service ${SPRING_APPS} --assign-endpoint
使用以下命令设置 customers-service 应用程序的路由:
az spring gateway route-config create \
    --service ${SPRING_APPS} \
    --name ${APP_CUSTOMERS_SERVICE} \
    --app-name ${APP_CUSTOMERS_SERVICE} \
    --routes-json '[
      {
        "predicates": [
          "Path=/api/customer/**"
        ],
        "filters": [
          "StripPrefix=2"
        ]
      }
   ]'
使用以下命令设置 vets-service 应用程序的路由:
az spring gateway route-config create \
    --service ${SPRING_APPS} \
    --name ${APP_VETS_SERVICE} \
    --app-name ${APP_VETS_SERVICE} \
    --routes-json '[
      {
        "predicates": [
          "Path=/api/vet/**"
        ],
        "filters": [
          "StripPrefix=2"
        ]
      }
    ]'
使用以下命令设置 visits-service 应用程序的路由:
az spring gateway route-config create \
    --service ${SPRING_APPS} \
    --name ${APP_VISITS_SERVICE} \
    --app-name ${APP_VISITS_SERVICE} \
    --routes-json '[
      {
        "predicates": [
          "Path=/api/visit/**"
        ],
        "filters": [
          "StripPrefix=2"
        ]
      }
    ]'
使用以下命令设置 frontend 应用程序的路由:
az spring gateway route-config create \
    --service ${SPRING_APPS} \
    --name ${APP_FRONTEND} \
    --app-name ${APP_FRONTEND} \
    --routes-json '[
      {
        "predicates": [
          "Path=/**"
        ],
        "filters": [
          "StripPrefix=0"
        ],
        "order": 1000
      }
    ]'
使用以下命令将终结点分配给应用程序实时视图:
az spring dev-tool update --service ${SPRING_APPS} --assign-endpoint
4. 将应用部署到 Azure Spring Apps
上一部分中的“部署到 Azure”按钮将启动包含应用程序部署的 Azure 门户体验,因此无需执行任何其他操作
按照以下步骤,使用适用于 Azure Spring Apps 的 Maven 插件 进行部署:
导航到项目根文件夹,然后运行以下命令以在 Azure Spring Apps 中配置应用:
./mvnw -P spring-apps-enterprise com.microsoft.azure:azure-spring-apps-maven-plugin:1.19.0:config
以下列表描述了命令交互:
选择要配置的子模块 :按 Enter 以全部选择。选择订阅 :选择所创建的 Azure Spring Apps 实例的订阅列表编号,它默认为列表中的第一个订阅。 如果使用默认编号,请直接按 Enter 。使用 Azure 中的现有 Azure Spring Apps :按 y 使用现有的 Azure Spring Apps 实例。选择应用以公开公共访问 :按 Enter 选择无。确认保存上述所有配置 :按 y 。 如果按 n ,则配置不会保存在 POM 文件中。
使用以下命令部署后端应用程序:
./mvnw azure-spring-apps:deploy
运行命令后,你会从以下日志消息中看到部署已成功:
[INFO] Start deploying artifact(customers-service-3.0.1.jar) to deployment(default) of app(customers-service)...
[INFO] Artifact(customers-service-3.0.1.jar) is successfully deployed to deployment(default) of app(customers-service).
[INFO] Starting Spring App after deploying artifacts...
[INFO] Deployment Status: Running

...

[INFO] Start deploying artifact(vets-service-3.0.1.jar) to deployment(default) of app(vets-service)...
[INFO] Artifact(vets-service-3.0.1.jar) is successfully deployed to deployment(default) of app(vets-service).
[INFO] Starting Spring App after deploying artifacts...
[INFO] Deployment Status: Running

...

[INFO] Start deploying artifact(visits-service-3.0.1.jar) to deployment(default) of app(visits-service)...
[INFO] Artifact(visits-service-3.0.1.jar) is successfully deployed to deployment(default) of app(visits-service).
[INFO] Starting Spring App after deploying artifacts...
[INFO] Deployment Status: Running
Azure 门户不支持部署前端应用程序,因此请使用以下 Azure CLI 命令部署前端应用程序:
az spring app deploy \
    --resource-group ${RESOURCE_GROUP} \
    --service ${SPRING_APPS_NAME} \
    --name ${APP_FRONTEND} \
    --source-path spring-petclinic-frontend \
    --build-env BP_WEB_SERVER=nginx
运行命令后,你会从以下日志消息中看到部署已成功:
[5/5] Updating deployment in app "frontend" (this operation can take a while to complete)
Azure Spring Apps will use rolling upgrade to update your deployment, you have 1 instance, Azure Spring Apps will update the deployment in 1 round.
The deployment is in round 1, 1 old instance is deleted/deleting and 1 new instance is started/starting
Your application is successfully deployed.
使用以下步骤部署应用:
输入项目根目录,并使用以下命令生成和部署前端应用程序:
az spring app deploy \
    --service ${SPRING_APPS} \
    --name ${APP_FRONTEND} \
    --build-env BP_WEB_SERVER=nginx \
    --source-path ./spring-petclinic-frontend
使用以下命令生成和部署 customers-service 应用程序:
az spring app deploy \
    --service ${SPRING_APPS} \
    --name ${APP_CUSTOMERS_SERVICE} \
    --source-path \
    --config-file-pattern application,customers-service \
    --build-env \
        BP_MAVEN_BUILT_MODULE=spring-petclinic-customers-service \
        BP_JVM_VERSION=17
使用以下命令生成和部署 vets-service 应用程序:
az spring app deploy \
    --service ${SPRING_APPS} \
    --name ${APP_VETS_SERVICE} \
    --source-path \
    --config-file-pattern application,vets-service \
    --build-env \
        BP_MAVEN_BUILT_MODULE=spring-petclinic-vets-service \
        BP_JVM_VERSION=17
使用以下命令生成和部署 visits-service 应用程序:
az spring app deploy \
    --service ${SPRING_APPS} \
    --name ${APP_VISITS_SERVICE} \
    --source-path \
    --config-file-pattern application,visits-service \
    --build-env \
        BP_MAVEN_BUILT_MODULE=spring-petclinic-visits-service \
        BP_JVM_VERSION=17
5. 验证应用
以下部分介绍如何验证部署。
5.1. 访问应用程序
部署完成后,可以从部署输出中找到 Spring Cloud Gateway URL,如以下屏幕截图所示:
打开网关 URL。 应用程序应该与以下屏幕截图类似:
5.2. 查询应用程序日志
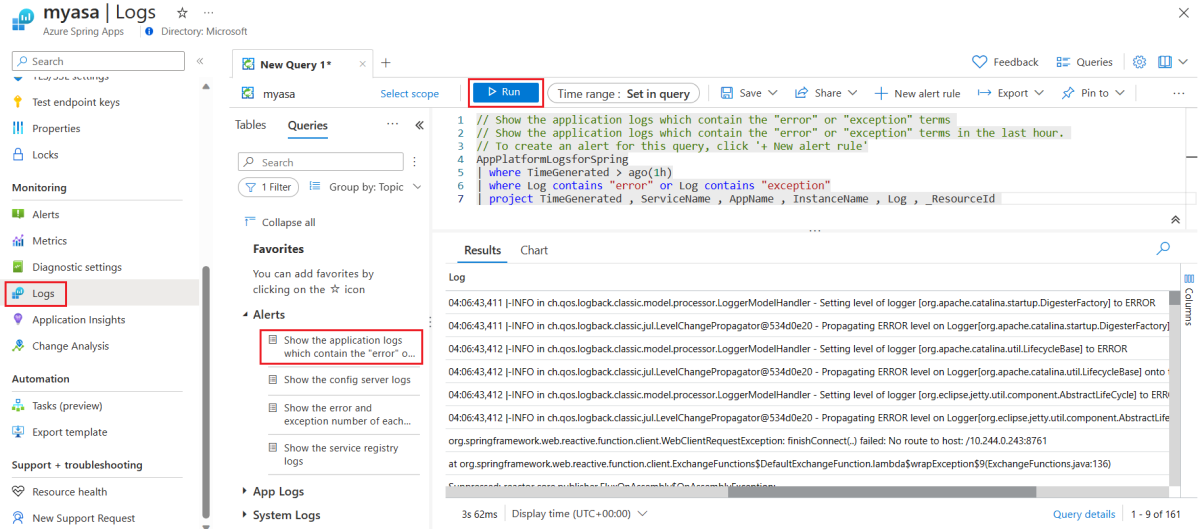
浏览完 Pet Clinic 的每个功能后,Log Analytics 工作区会收集每个应用程序的日志。 可使用自定义查询来检查日志,如以下屏幕截图所示:
5.3. 监视应用程序
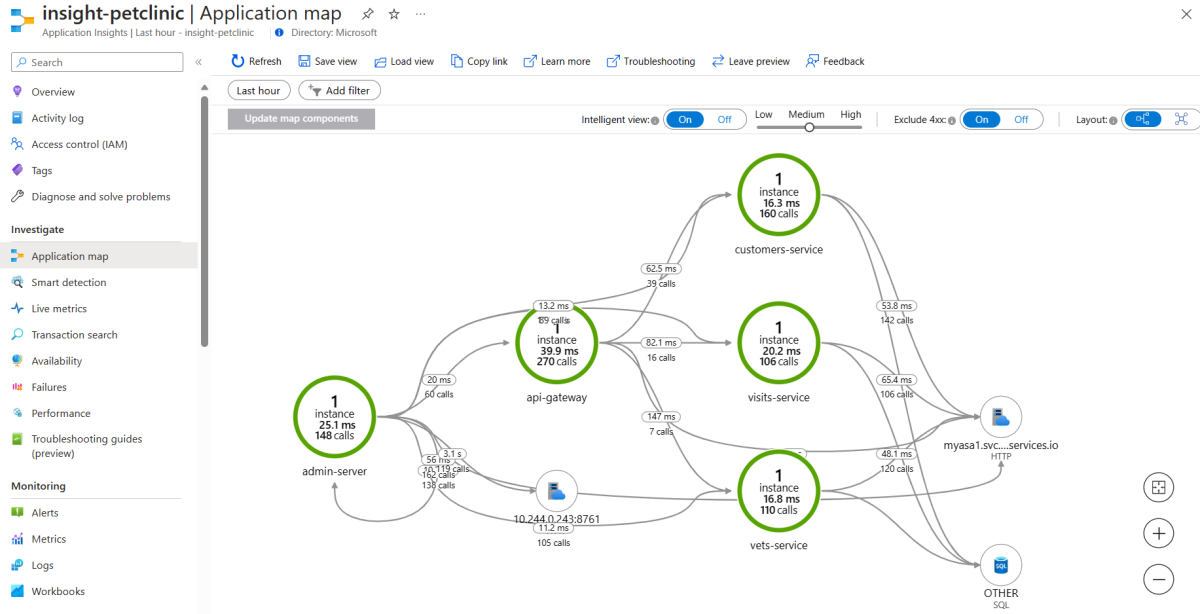
Application Insights 监视应用程序依赖项,如以下应用程序跟踪映射所示:
可以从部署输出中找到应用程序实时视图 URL。 打开应用程序实时视图 URL 以监视应用程序运行时,如以下屏幕截图所示:
5.1. 访问应用程序
使用从 Spring Cloud Gateway 分配的终结点,例如 https://<your-Azure-Spring-Apps-instance-name>-gateway-xxxxx.svc.azuremicroservices.io。 应用程序应该与以下屏幕截图类似:
5.2. 查询应用程序日志
浏览完 Pet Clinic 的每个功能后,Log Analytics 工作区会收集每个应用程序的日志。 可使用自定义查询来检查日志,如以下屏幕截图所示:
5.3. 监视应用程序
Application Insights 监视应用程序依赖项,如以下应用程序跟踪映射所示:
打开开发人员工具公开的应用程序实时视图 URL 以监视应用程序运行时,如以下屏幕截图所示:
5.1. 访问应用程序
使用以下命令检索 Spring Cloud 网关的 URL:
export GATEWAY_URL=$(az spring gateway show \
    --service ${SPRING_APPS} \
    --query properties.url \
    --output tsv)
echo "https://${GATEWAY_URL}"
应用程序应该与以下屏幕截图类似:
5.2. 查询应用程序日志
浏览完 Pet Clinic 的每个功能后,Log Analytics 工作区会收集每个应用程序的日志。 可使用自定义查询来检查日志,如以下屏幕截图所示:
5.3. 监视应用程序
Application Insights 监视应用程序依赖项,如以下应用程序跟踪映射所示:
使用以下命令检索应用程序实时视图的 URL:
export DEV_TOOL_URL=$(az spring dev-tool show \
    --service ${SPRING_APPS} \
    --query properties.url \
    --output tsv)
echo "https://${DEV_TOOL_URL}/app-live-view"
打开应用程序实时视图 URL 以监视应用程序运行时,如以下屏幕截图所示:
5.1. 访问应用程序
使用部署日志输出中的 URL 信息打开由名为 api-gateway 的应用公开的 URL,例如 https://<your-Azure-Spring-Apps-instance-name>-api-gateway.azuremicroservices.io。 应用程序应该与以下屏幕截图类似:
5.2. 查询应用程序日志
浏览完 Pet Clinic 的每个功能后,Log Analytics 工作区会收集每个应用程序的日志。 可使用自定义查询来检查日志,如以下屏幕截图所示:
5.3. 监视应用程序
Application Insights 监视应用程序依赖项,如以下应用程序跟踪映射所示:
打开应用 admin-server 公开的 URL 来通过 Spring Boot 管理服务器管理应用程序,如以下屏幕截图所示:
6.清理资源
如果打算继续使用后续的快速入门和教程,则可能需要保留这些资源。 不再需要资源时,可以清理不必要的资源以避免 Azure 费用。
按以下步骤删除整个资源组,包括新创建的服务实例:
在 Azure 门户中查找资源组。 在导航菜单上,选择“资源组”,然后选择资源组的名称
在“资源组”页上,选择“删除”删除 ”。
使用以下命令删除此示例应用程序中使用的所有 Azure 资源:
azd down
以下列表描述了命令交互:
要删除的资源总数:<resources-total>,是否确定要继续? :按 y 。
控制台输出类似于以下示例的消息:
SUCCESS: Your application was removed from Azure in xx minutes xx seconds.
当不再需要在本文中创建的资源时,请务必将其删除。 可以删除 Azure 资源组,其中包括资源组中的所有资源。
使用以下步骤删除整个资源组:
在 Azure 门户中查找资源组。 在导航菜单上,选择“资源组”,然后选择资源组的名称
在“资源组”页上,选择“删除”删除 ”。
使用以下步骤删除整个资源组:
在 Azure 门户中查找资源组。 在导航菜单上,选择“资源组”,然后选择资源组的名称
在“资源组”页上,选择“删除”删除 ”。
使用以下命令删除资源组:
az group delete --name ${RESOURCE_GROUP}
7. 后续步骤
有关详细信息,请参阅以下文章:


