你当前正在访问 Microsoft Azure Global Edition 技术文档网站。 如果需要访问由世纪互联运营的 Microsoft Azure 中国技术文档网站,请访问 https://docs.azure.cn。
将 Azure Spring Apps CI/CD 与 GitHub Actions 配合使用
注意
基本、标准和企业计划将从 2025 年 3 月中旬开始弃用,停用期为 3 年。 建议转换到 Azure 容器应用。 有关详细信息,请参阅 Azure Spring Apps 停用公告。
标准消耗和专用计划将于 2024 年 9 月 30 日开始弃用,并在六个月后完全关闭。 建议转换到 Azure 容器应用。 有关详细信息,请参阅将 Azure Spring Apps 标准消耗和专用计划迁移到 Azure 容器应用。
本文适用于:✅基本计划/标准计划 ✅ 企业计划
本文介绍如何通过 GitHub Actions 为 Azure Spring Apps 构建 CI/CD 工作流。
GitHub Actions 支持自动化的软件开发生命周期工作流。 通过适用于 Azure Spring Apps 的 GitHub Actions,可以在存储库中创建工作流来生成、测试、打包、发布并部署到 Azure。
先决条件
此示例需要 Azure CLI。
设置 GitHub 存储库并进行身份验证
需要使用 Azure 服务主体凭据来为 Azure 登录操作授权。 若要获取 Azure 凭据,请在本地计算机上执行以下命令:
az login
az ad sp create-for-rbac \
    --role contributor \
    --scopes /subscriptions/<SUBSCRIPTION_ID> \
    --json-auth
若要访问某个特定的资源组,可以缩小范围:
az ad sp create-for-rbac \
    --role contributor \
    --scopes /subscriptions/<SUBSCRIPTION_ID>/resourceGroups/<RESOURCE_GROUP> \
    --json-auth
该命令应该会输出一个 JSON 对象:
{
    "clientId": "<GUID>",
    "clientSecret": "<GUID>",
    "subscriptionId": "<GUID>",
    "tenantId": "<GUID>",
    ...
}
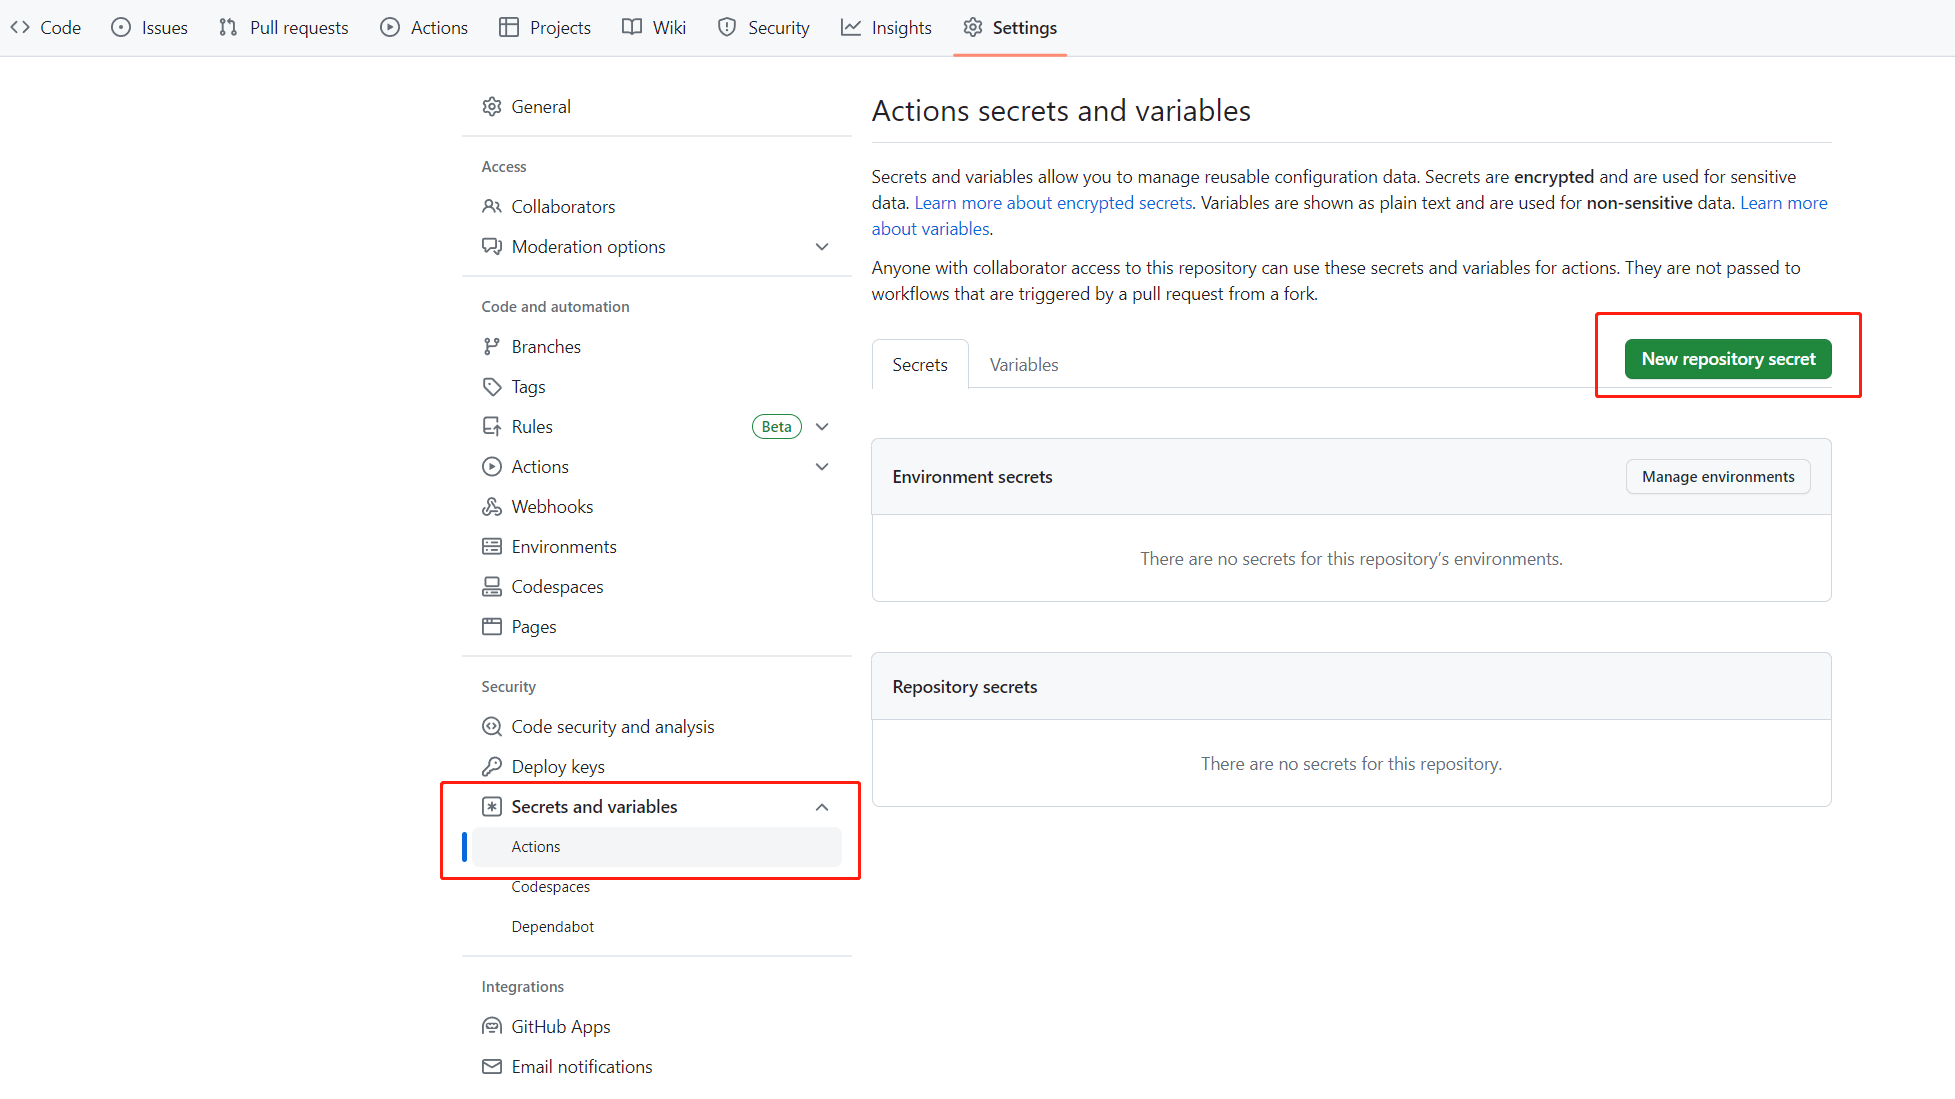
此示例使用 GitHub 上的 steeltoe 示例。 为存储库创建分支,打开该分支的 GitHub 存储库页,然后选择“设置”选项卡。打开“机密”菜单,并选择“新建机密”:
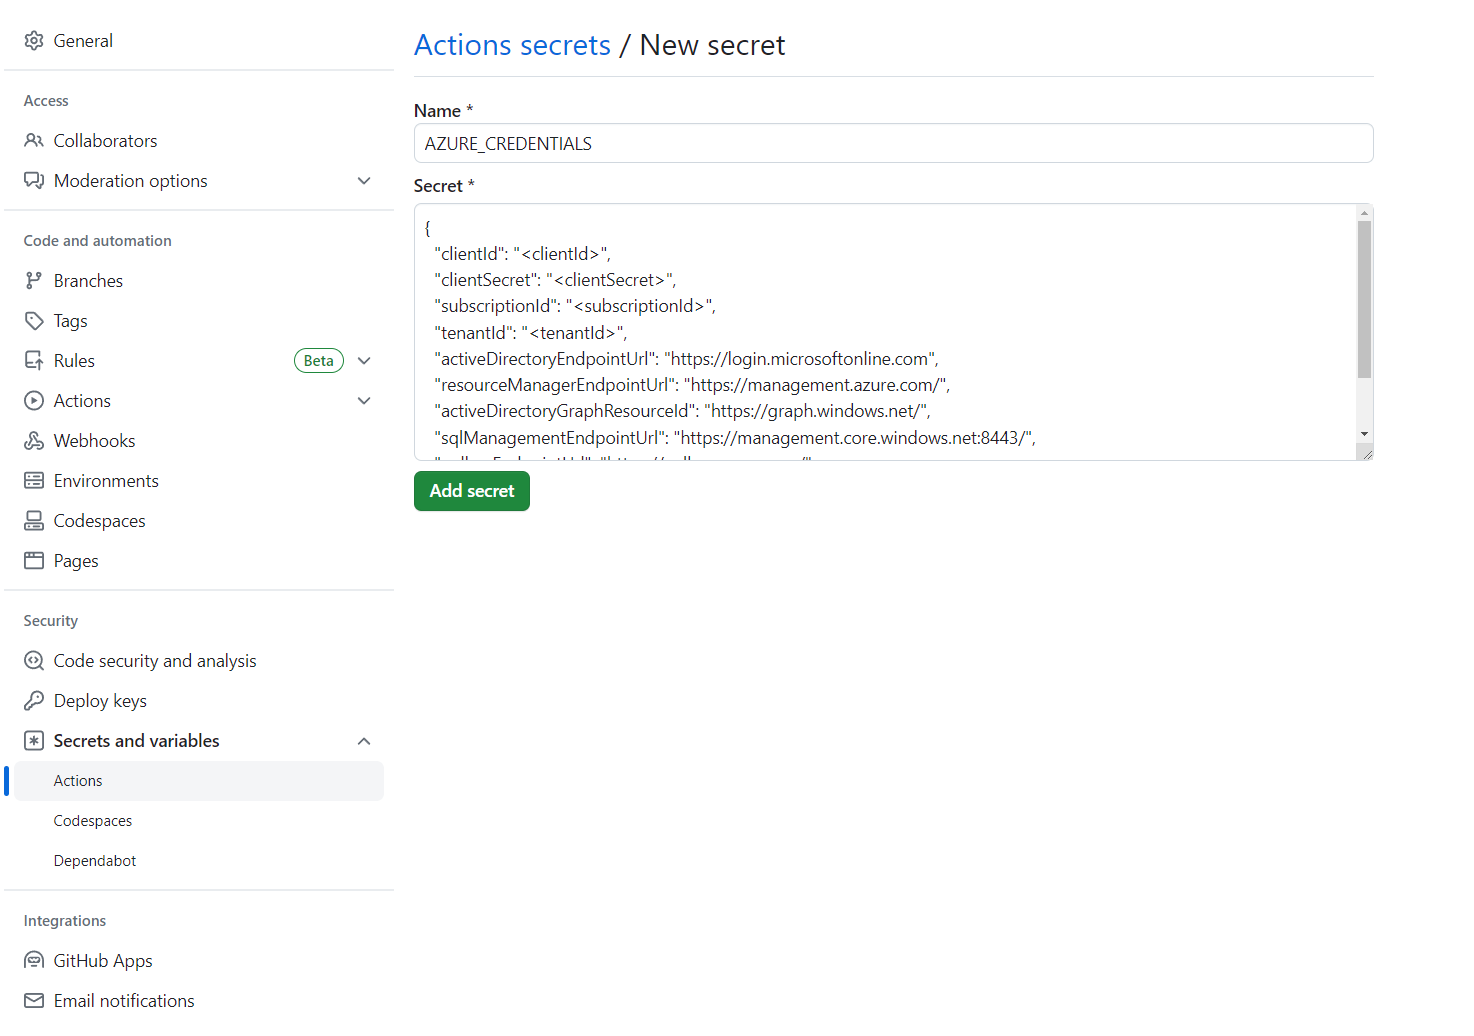
将机密名称设置为 AZURE_CREDENTIALS,并将其值设置为在标题“设置 GitHub 存储库并进行身份验证”下找到的 JSON 字符串。
也可以在 GitHub Actions 中从 Key Vault 获取 Azure 登录凭据,如在 GitHub Actions 中向 Key Vault 进行 Azure Spring 身份验证中所述。
预配服务实例
若要预配 Azure Spring Apps 服务实例,请使用 Azure CLI 运行以下命令。
az extension add --name spring
az group create \
    --name <resource-group-name> \
    --location eastus
az spring create \
    --resource-group <resource-group-name> \
    --name <service-instance-name>
az spring config-server git set \
    --name <service-instance-name> \
    --uri https://github.com/Azure-Samples/azure-spring-apps-samples \
    --label main \
    --search-paths steeltoe-sample/config
生成工作流
工作流是使用以下选项定义的。
使用 Azure CLI 准备部署
az spring app create 命令目前不是幂等的。 运行一次之后,如果再次运行相同的命令,则会看到错误。 建议将此工作流用于现有的 Azure Spring Apps 应用和实例。
请使用以下 Azure CLI 命令来进行准备:
az config set defaults.group=<service-group-name>
az config set defaults.spring=<service-instance-name>
az spring app create --name planet-weather-provider
az spring app create --name solar-system-weather
直接使用 Azure CLI 进行部署
在存储库中使用以下内容创建 .github/workflows/main.yml 文件。 将 <你的资源组名称> 和 <你的服务名称> 替换为正确的值。
name: Steeltoe-CD

# Controls when the action runs. Triggers the workflow on push or pull request
# events but only for the main branch
on:
  push:
    branches: [ main]

# A workflow run is made up of one or more jobs that can run sequentially or in parallel
jobs:
  # This workflow contains a single job called "build"
  build:
    # The type of runner that the job runs on
    runs-on: ubuntu-latest
    env:
      working-directory: ./steeltoe-sample
      resource-group-name: <your resource group name>
      service-name: <your service name>

    # Supported .NET Core version matrix.
    strategy:
      matrix:
        dotnet: [ '3.1.x' ]

    # Steps represent a sequence of tasks that is executed as part of the job
    steps:
      # Checks-out your repository under $GITHUB_WORKSPACE, so your job can access it
      - uses: actions/checkout@v2

      # Set up .NET Core 3.1 SDK
      - uses: actions/setup-dotnet@v1
        with:
          dotnet-version: ${{ matrix.dotnet }}

      # Set credential for az login
      - uses: azure/login@v1.1
        with:
          creds: ${{ secrets.AZURE_CREDENTIALS }}

      - name: install Azure CLI extension
        run: |
          az extension add --name spring --yes

      - name: Build and package planet-weather-provider app
        working-directory: ${{env.working-directory}}/src/planet-weather-provider
        run: |
          dotnet publish
          az spring app deploy -n planet-weather-provider --runtime-version NetCore_31 --main-entry Microsoft.Azure.SpringCloud.Sample.PlanetWeatherProvider.dll --artifact-path ./publish-deploy-planet.zip -s ${{ env.service-name }} -g ${{ env.resource-group-name }}
      - name: Build solar-system-weather app
        working-directory: ${{env.working-directory}}/src/solar-system-weather
        run: |
          dotnet publish
          az spring app deploy -n solar-system-weather --runtime-version NetCore_31 --main-entry Microsoft.Azure.SpringCloud.Sample.SolarSystemWeather.dll --artifact-path ./publish-deploy-solar.zip -s ${{ env.service-name }} -g ${{ env.resource-group-name }}
设置 GitHub 存储库并进行身份验证
需要使用 Azure 服务主体凭据来为 Azure 登录操作授权。 若要获取 Azure 凭据,请在本地计算机上执行以下命令:
az login
az ad sp create-for-rbac \
    --role contributor \
    --scopes /subscriptions/<SUBSCRIPTION_ID> \
    --json-auth
若要访问某个特定的资源组,可以缩小范围:
az ad sp create-for-rbac \
    --role contributor \
    --scopes /subscriptions/<SUBSCRIPTION_ID>/resourceGroups/<RESOURCE_GROUP> \
    --json-auth
该命令应该会输出一个 JSON 对象:
{
    "clientId": "<GUID>",
    "clientSecret": "<GUID>",
    "subscriptionId": "<GUID>",
    "tenantId": "<GUID>",
    ...
}
此示例使用 GitHub 上的 PiggyMetrics 示例。 为示例创建分支,取消选中“仅复制 Azure 分支”,打开 GitHub 存储库页,然后选择“设置”选项卡。打开“机密”菜单,并选择“添加新的机密”:
将机密名称设置为 AZURE_CREDENTIALS,并将其值设置为在标题“设置 GitHub 存储库并进行身份验证”下找到的 JSON 字符串。
也可以在 GitHub Actions 中从 Key Vault 获取 Azure 登录凭据,如在 GitHub Actions 中向 Key Vault 进行 Azure Spring 身份验证中所述。
预配服务实例
若要预配 Azure Spring Apps 服务实例,请使用 Azure CLI 运行以下命令。
az extension add --name spring
az group create --location eastus --name <resource group name>
az spring create -n <service instance name> -g <resource group name>
az spring config-server git set -n <service instance name> --uri https://github.com/xxx/piggymetrics --label config
端到端示例工作流
以下示例演示常见使用方案。
正在部署
以下部分介绍用于部署应用的各种选项。
部署到生产
Azure Spring Apps 支持使用已生成的工件(例如 JAR 或 .NET Core ZIP)或源代码存档部署到部署。
以下示例使用 Maven 生成的 JAR 文件在 Azure Spring Apps 中部署到默认生产部署。 此示例是使用基本 SKU 时唯一可能的部署方案:
注意
包搜索模式应该只返回一个包。 如果生成任务生成多个 JAR 包(如 sources.jar 和 javadoc.jar),则需要优化搜索模式,使其仅匹配应用程序二进制项目。
name: AzureSpringApps
on: push
env:
  ASC_PACKAGE_PATH: ${{ github.workspace }}
  AZURE_SUBSCRIPTION: <azure subscription name>

jobs:
  deploy_to_production:
    runs-on: ubuntu-latest
    name: deploy to production with artifact
    steps:
      - name: Checkout GitHub Action
        uses: actions/checkout@v2

      - name: Set up Java 11
        uses: actions/setup-java@v3
        with:
          distribution: 'temurin'
          java-version: '11'

      - name: maven build, clean
        run: |
          mvn clean package

      - name: Login via Azure CLI
        uses: azure/login@v1
        with:
          creds: ${{ secrets.AZURE_CREDENTIALS }}

      - name: deploy to production with artifact
        uses: azure/spring-apps-deploy@v1
        with:
          azure-subscription: ${{ env.AZURE_SUBSCRIPTION }}
          action: Deploy
          service-name: <service instance name>
          app-name: <app name>
          use-staging-deployment: false
          package: ${{ env.ASC_PACKAGE_PATH }}/**/*.jar
以下示例使用源代码在 Azure Spring Apps 中部署到默认生产部署。
name: AzureSpringApps
on: push
env:
  ASC_PACKAGE_PATH: ${{ github.workspace }}
  AZURE_SUBSCRIPTION: <azure subscription name>

jobs:
  deploy_to_production:
    runs-on: ubuntu-latest
    name: deploy to production with source code
    steps:
      - name: Checkout GitHub Action
        uses: actions/checkout@v2

      - name: Login via Azure CLI
        uses: azure/login@v1
        with:
          creds: ${{ secrets.AZURE_CREDENTIALS }}

      - name: deploy to production step with source code
        uses: azure/spring-apps-deploy@v1
        with:
          azure-subscription: ${{ env.AZURE_SUBSCRIPTION }}
          action: deploy
          service-name: <service instance name>
          app-name: <app name>
          use-staging-deployment: false
          package: ${{ env.ASC_PACKAGE_PATH }}
以下示例使用企业计划中的源代码在 Azure Spring Apps 中部署到默认生产部署。 可以使用 builder 选项指定要用于部署操作的生成器。
name: AzureSpringApps
on: push
env:
  ASC_PACKAGE_PATH: ${{ github.workspace }}
  AZURE_SUBSCRIPTION: <azure subscription name>

jobs:
  deploy_to_production:
    runs-on: ubuntu-latest
    name: deploy to production with source code
    steps:
      - name: Checkout GitHub Action
        uses: actions/checkout@v2

      - name: Login via Azure CLI
        uses: azure/login@v1
        with:
          creds: ${{ secrets.AZURE_CREDENTIALS }}

      - name: deploy to production step with source code in the Enterprise plan
        uses: azure/spring-apps-deploy@v1
        with:
          azure-subscription: ${{ env.AZURE_SUBSCRIPTION }}
          action: deploy
          service-name: <service instance name>
          app-name: <app name>
          use-staging-deployment: false
          package: ${{ env.ASC_PACKAGE_PATH }}
          builder: <builder>
以下示例使用现有容器映像部署到 Azure Spring Apps 中的默认生产部署。
name: AzureSpringApps
on: push
env:
  ASC_PACKAGE_PATH: ${{ github.workspace }}
  AZURE_SUBSCRIPTION: <azure subscription name>

jobs:
  deploy_to_production:
    runs-on: ubuntu-latest
    name: deploy to production with source code
    steps:
      - name: Checkout GitHub Action
        uses: actions/checkout@v2

      - name: Login via Azure CLI
        uses: azure/login@v1
        with:
          creds: ${{ secrets.AZURE_CREDENTIALS }}

      - name: Deploy Custom Image
        uses: Azure/spring-apps-deploy@v1
        with:
          azure-subscription: ${{ env.AZURE_SUBSCRIPTION }}
          action: deploy
          service-name: <service instance name>
          app-name: <app name>
          deployment-name: <deployment name>
          container-registry: <your container image registry>
          registry-username: ${{ env.REGISTRY_USERNAME }}
          registry-password: ${{ secrets.REGISTRY_PASSWORD }}
          container-image: <your image tag>
在部署过程中,可以通过使用更多的参数来实现更多功能。 有关更多信息,请参阅用于部署到 Azure Spring Apps 的 GitHub Action 的参数部分。
蓝绿部署
以下示例演示了部署到现有暂存部署。 此部署只有在被设置为生产部署之后才会接收生产流量。 可以将 use-staging-deployment 设置为 true 以自动查找暂存部署,或仅分配特定的 deployment-name。 我们仅关注 spring-apps-deploy 操作,并保留本文其余部分中的准备作业。
# environment preparation configurations omitted
    steps:
      - name: blue green deploy step use-staging-deployment
        uses: azure/spring-apps-deploy@v1
        with:
          azure-subscription: ${{ env.AZURE_SUBSCRIPTION }}
          action: deploy
          service-name: <service instance name>
          app-name: <app name>
          use-staging-deployment: true
          package: ${{ env.ASC_PACKAGE_PATH }}/**/*.jar
# environment preparation configurations omitted
    steps:
      - name: blue green deploy step with deployment-name
        uses: azure/spring-apps-deploy@v1
        with:
          azure-subscription: ${{ env.AZURE_SUBSCRIPTION }}
          action: deploy
          service-name: <service instance name>
          app-name: <app name>
          deployment-name: staging
          package: ${{ env.ASC_PACKAGE_PATH }}/**/*.jar
有关蓝绿部署(包括替代方法)的详细信息,请参阅蓝绿部署策略。
设置生产部署
以下示例将当前暂存部署设置为生产部署,有效地交换接收生产流量的部署。
# environment preparation configurations omitted
    steps:
      - name: set production deployment step
        uses: azure/spring-apps-deploy@v1
        with:
          azure-subscription: ${{ env.AZURE_SUBSCRIPTION }}
          action: set-production
          service-name: <service instance name>
          app-name: <app name>
          use-staging-deployment: true
删除暂存部署
通过“Delete Staging Deployment”操作可删除未接收生产流量的部署。 此删除操作将释放该部署使用的资源,为新的暂存部署提供空间:
# environment preparation configurations omitted
    steps:
      - name: Delete staging deployment step
        uses: azure/spring-apps-deploy@v1
        with:
          azure-subscription: ${{ env.AZURE_SUBSCRIPTION }}
          action: delete-staging-deployment
          service-name: <service instance name>
          app-name: <app name>
创建或更新生成(仅限企业计划)
以下示例在企业计划中创建或更新生成资源:
# environment preparation configurations omitted
    steps:
      - name: Create or update build
        uses: azure/spring-apps-deploy@v1
        with:
          azure-subscription: ${{ env.AZURE_SUBSCRIPTION }}
          action: build
          service-name: <service instance name>
          build-name: <build name>
          package: ${{ env.ASC_PACKAGE_PATH }}
          builder: <builder>
删除生成(仅限企业计划)
以下示例在企业计划中删除生成资源:
# environment preparation configurations omitted
    steps:
      - name: Delete build
        uses: azure/spring-apps-deploy@v1
        with:
          azure-subscription: ${{ env.AZURE_SUBSCRIPTION }}
          action: delete-build
          service-name: <service instance name>
          build-name: <build name>
使用 Maven 插件进行部署
另一种选择是使用 Maven 插件来部署 Jar 并更新应用设置。 mvn azure-spring-apps:deploy 命令是幂等的,会在需要时自动创建应用。 你无需提前创建相应的应用。
name: AzureSpringApps
on: push

jobs:
  build-and-deploy:
    runs-on: ubuntu-latest
    steps:

    - uses: actions/checkout@main

    - name: Set up Java 11
      uses: actions/setup-java@v3
      with:
        distribution: 'temurin'
        java-version: '11'

    - name: maven build, clean
      run: |
        mvn clean package -DskipTests

    # Maven plugin can cosume this authentication method automatically
    - name: Azure Login
      uses: azure/login@v1
      with:
        creds: ${{ secrets.AZURE_CREDENTIALS }}

    # Maven deploy, make sure you have correct configurations in your pom.xml
    - name: deploy to Azure Spring Apps using Maven
      run: |
        mvn azure-spring-apps:deploy
运行工作流
在将 .github/workflow/main.yml 推送到 GitHub 后,GitHub Actions 应会自动启用。 在推送新提交时,会触发该操作。 如果你在浏览器中创建此文件,你的操作应该已经运行了。
若要验证是否已启用该操作,请选择 GitHub 存储库页上的“操作”选项卡:
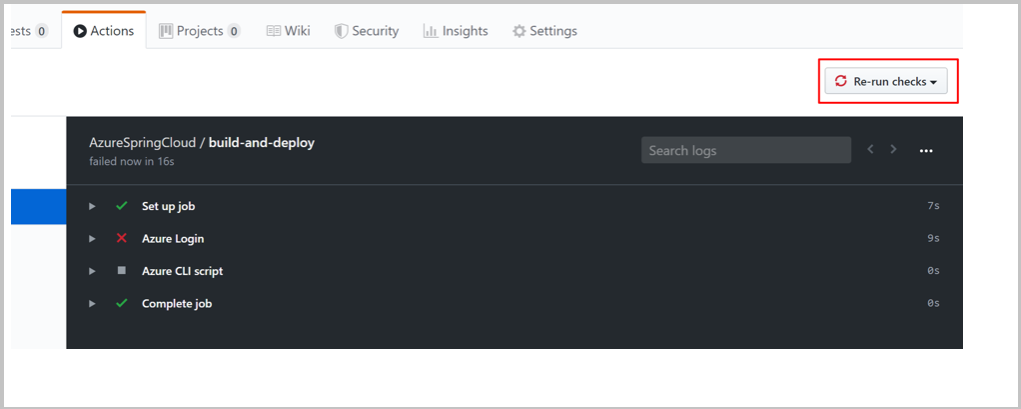
如果在存在错误的情况下(例如,如果尚未设置 Azure 凭据)运行操作,则可以在修复该错误后重新运行检查。 在 GitHub 存储库页上,选择“操作”,选择特定的工作流任务,然后选择“重新运行检查”按钮来重新运行检查 :


