你当前正在访问 Microsoft Azure Global Edition 技术文档网站。 如果需要访问由世纪互联运营的 Microsoft Azure 中国技术文档网站,请访问 https://docs.azure.cn。
使用 Webhook 通过 ServiceNow 发送 Azure 服务运行状况警报
本文介绍如何使用 Webhook 将 Azure 服务运行状况警报与 ServiceNow 集成。 设置与 ServiceNow 实例的 Webhook 集成以后,当 Azure 服务问题影响你时,你会通过现有的通知基础结构获得警报。 Azure 服务运行状况警报在每次触发时,会通过 ServiceNow 脚本 REST API 调用 Webhook。
在 ServiceNow 中创建脚本 REST API
请确保已注册并登录到 ServiceNow 帐户。
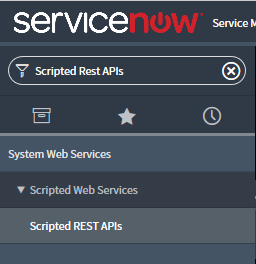
在 ServiceNow 中导航到“系统 Web 服务” 部分,然后选择“脚本 REST API”。

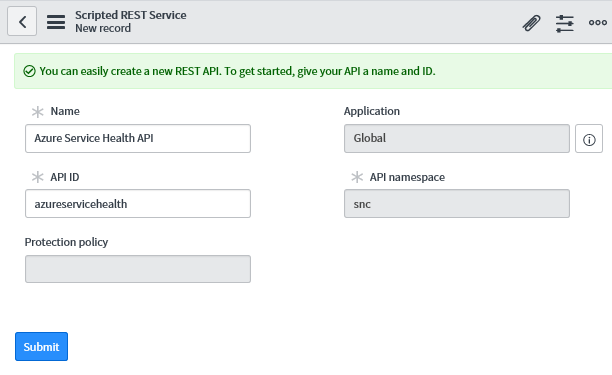
选择“新建”, 创建新的脚本 REST 服务。

为 REST API 添加“名称”,然后将“API ID”设置为
azureservicehealth。选择“提交”。

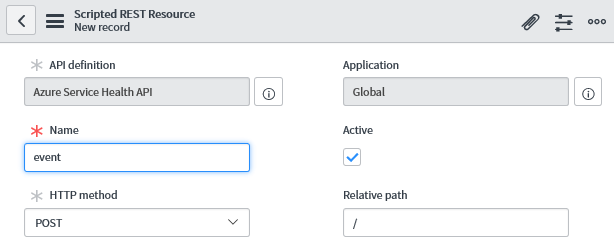
选择已创建的 REST API,然后在“资源”选项卡下选择“新建”。

为新资源
event命名,然后将“HTTP 方法”更改为POST。在“脚本” 部分,添加以下 JavaScript 代码:
注意
需要在下面的脚本中更新
<secret>、<group>和<email>值。<secret>应为随机字符串,例如 GUID<group>应为要向其分配事件的 ServiceNow 组<email>应为要向其分配事件的特定人员(可选)
(function process( /*RESTAPIRequest*/ request, /*RESTAPIResponse*/ response) {
    var apiKey = request.queryParams['apiKey'];
    var secret = '<secret>';
    if (apiKey == secret) {
        var event = request.body.data;
        var responseBody = {};
        if (event.data.context.activityLog.operationName == 'Microsoft.ServiceHealth/incident/action') {
            var inc = new GlideRecord('incident');
            var incidentExists = false;
            inc.addQuery('number', event.data.context.activityLog.properties.trackingId);
            inc.query();
            if (inc.hasNext()) {
                incidentExists = true;
                inc.next();
            } else {
                inc.initialize();
            }
            var short_description = "Azure Service Health";
            if (event.data.context.activityLog.properties.incidentType == "Incident") {
                short_description += " - Service Issue - ";
            } else if (event.data.context.activityLog.properties.incidentType == "Maintenance") {
                short_description += " - Planned Maintenance - ";
            } else if (event.data.context.activityLog.properties.incidentType == "Informational" || event.data.context.activityLog.properties.incidentType == "ActionRequired") {
                short_description += " - Health Advisory - ";
            }
            short_description += event.data.context.activityLog.properties.title;
            inc.short_description = short_description;
            inc.description = event.data.context.activityLog.properties.communication;
            inc.work_notes = "Impacted subscription: " + event.data.context.activityLog.subscriptionId;
            if (incidentExists) {
                if (event.data.context.activityLog.properties.stage == 'Active') {
                    inc.state = 2;
                } else if (event.data.context.activityLog.properties.stage == 'Resolved') {
                    inc.state = 6;
                } else if (event.data.context.activityLog.properties.stage == 'Closed') {
                    inc.state = 7;
                }
                inc.update();
                responseBody.message = "Incident updated.";
            } else {
                inc.number = event.data.context.activityLog.properties.trackingId;
                inc.state = 1;
                inc.impact = 2;
                inc.urgency = 2;
                inc.priority = 2;
                inc.assigned_to = '<email>';
                inc.assignment_group.setDisplayValue('<group>');
                var subscriptionId = event.data.context.activityLog.subscriptionId;
                var comments = "Azure portal Link: https://app.azure.com/h";
                comments += "/" + event.data.context.activityLog.properties.trackingId;
                comments += "/" + subscriptionId.substring(0, 3) + subscriptionId.slice(-3);
                var impactedServices = JSON.parse(event.data.context.activityLog.properties.impactedServices);
                var impactedServicesFormatted = "";
                for (var i = 0; i < impactedServices.length; i++) {
                    impactedServicesFormatted += impactedServices[i].ServiceName + ": ";
                    for (var j = 0; j < impactedServices[i].ImpactedRegions.length; j++) {
                        if (j != 0) {
                            impactedServicesFormatted += ", ";
                        }
                        impactedServicesFormatted += impactedServices[i].ImpactedRegions[j].RegionName;
                    }

                    impactedServicesFormatted += "\n";

                }
                comments += "\n\nImpacted Services:\n" + impactedServicesFormatted;
                inc.comments = comments;
                inc.insert();
                responseBody.message = "Incident created.";
            }
        } else {
            responseBody.message = "Hello from the other side!";
        }
        response.setBody(responseBody);
    } else {
        var unauthorized = new sn_ws_err.ServiceError();
        unauthorized.setStatus(401);
        unauthorized.setMessage('Invalid apiKey');
        response.setError(unauthorized);
    }
})(request, response);
在安全性选项卡中,取消选择“要求身份验证”,然后选择“提交”。 所设置的
<secret>改为保护此 API。
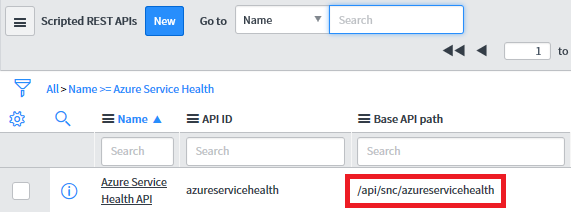
回到“脚本 REST API”部分,此时会找到新 REST API 的“基础 API 路径”:

完整的集成 URL 如下所示:
https://<yourInstanceName>.service-now.com/<baseApiPath>?apiKey=<secret>
在 Azure 门户中使用 ServiceNow 创建警报
对于新操作组:
按此文中的步骤 1-8 操作,使用新操作组创建警报。
在“操作” 列表中定义:
a. 操作类型:工作簿
b. 详细信息: 前面保存的 ServiceNow 集成 URL 。
c. 名称: Webhook 的名称、别名或标识符。
警报创建完成后,选择“保存” 。
对于现有操作组:
在 Azure 门户中,选择“监视” 。
在“设置” 部分中,选择“操作组” 。
找到要编辑的操作组并选择它。
添加到“操作” 列表:
a. 操作类型:工作簿
b. 详细信息: 前面保存的 ServiceNow 集成 URL 。
c. 名称: Webhook 的名称、别名或标识符。
操作组更新完成后,选择“保存” 。
通过 HTTP POST 请求测试 Webhook 集成
创建要发送的服务运行状况有效负载。 可以在 Azure 活动日志警报的 Webhook 中找到示例服务运行状况 Webhook 有效负载。
按如下所示创建 HTTP POST 请求:
POST        https://<yourInstanceName>.service-now.com/<baseApiPath>?apiKey=<secret>

HEADERS     Content-Type: application/json

BODY        <service health payload>
此时会收到
200 OK响应,其中包含消息“事件已创建”。转到 ServiceNow,确认集成已设置成功。
后续步骤
- 了解如何为现有问题管理系统配置 Webhook 通知。
- 查看活动日志警报 webhook 架构。
- 了解服务运行状况通知。
- 详细了解操作组。