你当前正在访问 Microsoft Azure Global Edition 技术文档网站。 如果需要访问由世纪互联运营的 Microsoft Azure 中国技术文档网站,请访问 https://docs.azure.cn。
教程:TLS、X.509 客户端身份验证和基于属性的访问控制 (ABAC) 授权与 Azure IoT 操作 MQTT 代理
本教程介绍如何使用 TLS 加密和 X.509 客户端身份验证设置 Azure IoT 操作 MQTT 代理。 它包括关于为代理和客户端创建证书的分步说明和脚本。 本教程介绍如何为客户端和代理配置具有不同根证书颁发机构 (CA) 的 MQTT 代理。 它还介绍如何基于客户端证书链设置基于属性的访问控制 (ABAC) 授权策略。 最后,本教程使用 Mosquito 客户端测试各种场景,以确保设置正常工作。
本教程模拟在 Contoso 工厂中安装了 Azure IoT 操作的环境,其中设备由 Fabrikam 制造。 若要使 TLS 和 X.509 身份验证正常工作:
- 安装在 Contoso 工厂中的 Azure IoT Operations MQTT 代理必须信任 Fabrikam 根 CA
- Fabrikam 传感器(如恒温器)必须信任 Contoso 根 CA
- 每个实体必须具有由正确的根 CA 颁发的自己的叶证书
先决条件
若要学习本教程,需要:
- 为端口 8883 启用端口转移的 Kubernetes 群集。
- 部署的 Azure IoT 操作没有现有的负载均衡器侦听器。
- Kubectl 访问群集以创建 Kubernetes 机密和配置映射。
- Mosquitto 客户端,用于发布和订阅在 Kubernetes 群集所在的同一台计算机上运行的 MQTT 消息,以供
localhost访问。 若要不使用localhost,请参阅可选:使用实际主机名或 IP 地址而不是localhost部分。 - 步骤 CLI,用于创建证书。
提示
若要满足这些要求,请使用快速入门 codespace。 快速入门 codespace 通过提供这些开箱即用的组件来简化设置过程。
此外,熟悉公钥加密以及根 CA、私钥和中间证书等术语很有帮助。
可选:使用实际主机名或 IP 地址而不是 localhost
为使本教程简单易懂,我们使用 localhost 访问 MQTT 代理。 此方法可确保代理的服务器证书具有与用于访问代理的主机名匹配的使用者可选名称 (SAN)。 使用 localhost 简化设置,因为 SAN 已正确设置。
在实际场景中,你将使用代理的主机名或外部 IP,而不是 localhost,并从网络上的另一台设备连接到它。 在这种情况下,需要确定正确的主机名或 IP 地址,并在创建服务器证书时将其用作 SAN:
- 如果主机名或 IP 地址已知(例如,通过 DNS 记录或静态 IP),系统在创建服务器证书时会将其用作 SAN。 然后,使用该主机名或 IP 连接到代理,而不是
localhost。 - 如果主机名或 IP 地址尚未知,可以使用占位符服务来确定外部 IP 地址:
- 在未使用的端口(如 8080)上创建 LoadBalancer 服务:
kubectl create service loadbalancer placeholder-service --tcp=8080:8080 - 检索外部 IP:
kubectl get svc placeholder-service - 如果外部 IP:
- 显示的值类似于
192.168.X.X- 在创建服务器证书和机密时使用该 IP 作为 SAN。 然后,使用该 IP 而不是localhost连接到代理。 - 显示
<pending>- 使用的 Kubernetes 分发可能不支持自动分配外部 IP。 若要查找外部 IP,请遵循分发和主机环境的 Kubernetes 文档中的步骤。 可能还需要根据网络设置配置端口转移或 VPN。
- 显示的值类似于
- 确定外部 IP 后,删除占位符服务:
kubectl delete svc placeholder-service
- 在未使用的端口(如 8080)上创建 LoadBalancer 服务:
此方法可确保服务器证书与外部 IP 地址匹配,从而允许对 MQTT 代理进行安全访问。
准备服务器端证书和完整链
首先,创建服务器端根 CA。 此 CA 独立于稍后创建的客户端根 CA。 为了保持隔离的明确性,我们将服务器端命名为“Contoso”。 为了简化后续步骤,我们跳过用于加密私钥的密码。 这种做法只能用在教程环境中。
step certificate create "Contoso Root CA" \
contoso_root_ca.crt contoso_root_ca.key \
--profile root-ca \
--no-password --insecure
然后,创建由此根 CA 签名的中间 CA。
step certificate create "Contoso Intermediate CA 1" \
contoso_intermediate_ca.crt contoso_intermediate_ca.key \
--profile intermediate-ca \
--ca ./contoso_root_ca.crt --ca-key ./contoso_root_ca.key \
--no-password --insecure
最后,使用此中间 CA 为 MQTT 代理的代理前端对服务器证书签名。 在这里,localhost 是用于本教程的使用者可选名称 (SAN)。
step certificate create mqtts-endpoint \
mqtts-endpoint.crt mqtts-endpoint.key \
--profile leaf \
--ca ./contoso_intermediate_ca.crt --ca-key ./contoso_intermediate_ca.key \
--bundle \
--san localhost \
--not-after 2400h --no-password --insecure
使用 --bundle 标志时,服务器证书与签名中间证书捆绑在一起。 TLS 握手要求捆绑包来验证完整链。
准备客户端证书和完整链
同样,为 Fabrikam 和中间 CA 创建根 CA。
step certificate create --profile root-ca "Fabrikam Root CA" \
fabrikam_root_ca.crt fabrikam_root_ca.key \
--no-password --insecure
step certificate create "Fabrikam Intermediate CA 1" \
fabrikam_intermediate_ca.crt fabrikam_intermediate_ca.key \
--profile intermediate-ca \
--ca ./fabrikam_root_ca.crt --ca-key ./fabrikam_root_ca.key \
--no-password --insecure
然后,为恒温器、湿度计、热水器和灯泡生成客户端证书。
# Create a client certificate for the thermostat
step certificate create thermostat thermostat.crt thermostat.key \
--ca ./fabrikam_intermediate_ca.crt --ca-key ./fabrikam_intermediate_ca.key --bundle \
--not-after 2400h --no-password --insecure

# Create a client certificate for the hygrometer
step certificate create hygrometer hygrometer.crt hygrometer.key \
--ca ./fabrikam_intermediate_ca.crt --ca-key ./fabrikam_intermediate_ca.key --bundle \
--not-after 2400h --no-password --insecure

# Create a client certificate for the heater
step certificate create heater heater.crt heater.key \
--ca ./fabrikam_intermediate_ca.crt --ca-key ./fabrikam_intermediate_ca.key --bundle \
--not-after 2400h --no-password --insecure

# Create a client certificate for the lightbulb
step certificate create lightbulb lightbulb.crt lightbulb.key \
--ca ./fabrikam_intermediate_ca.crt --ca-key ./fabrikam_intermediate_ca.key --bundle \
--not-after 2400h --no-password --insecure
配置 Kubernetes
将新生成的服务器证书和私钥导入到 Kubernetes 机密中。 此机密用于稍后为 MQTT 代理配置 TLS 侦听器。
kubectl create secret tls broker-server-cert -n azure-iot-operations \
--cert mqtts-endpoint.crt \
--key mqtts-endpoint.key
此外,创建 ConfigMap 以包含 Fabrikam(客户端)根 CA。 MQTT 代理需要此 ConfigMap 才能信任 X.509 身份验证。
kubectl create configmap fabrikam-ca -n azure-iot-operations \
--from-file=client_ca.pem=fabrikam_root_ca.crt
配置 MQTT 代理
后续步骤使用 TLS 加密和 X.509 客户端身份验证配置 MQTT 代理。 本教程使用 Azure 门户配置 MQTT 代理。
身份验证
若要允许客户端使用 Fabrikam 根 CA 颁发的 X.509 证书进行身份验证,请创建一个身份验证策略,使该策略信任 Fabrikam 根 CA 证书并将客户端证书映射到 ABAC 的授权属性。
在 Azure 门户中,导航到 IoT 操作实例。
在“组件”下,选择“MQTT 代理”。
选择“身份验证”选项卡。
选择“创建身份验证策略”。
在“策略名称”处输入
x509-auth。通过选择“添加方法”来添加新方法。
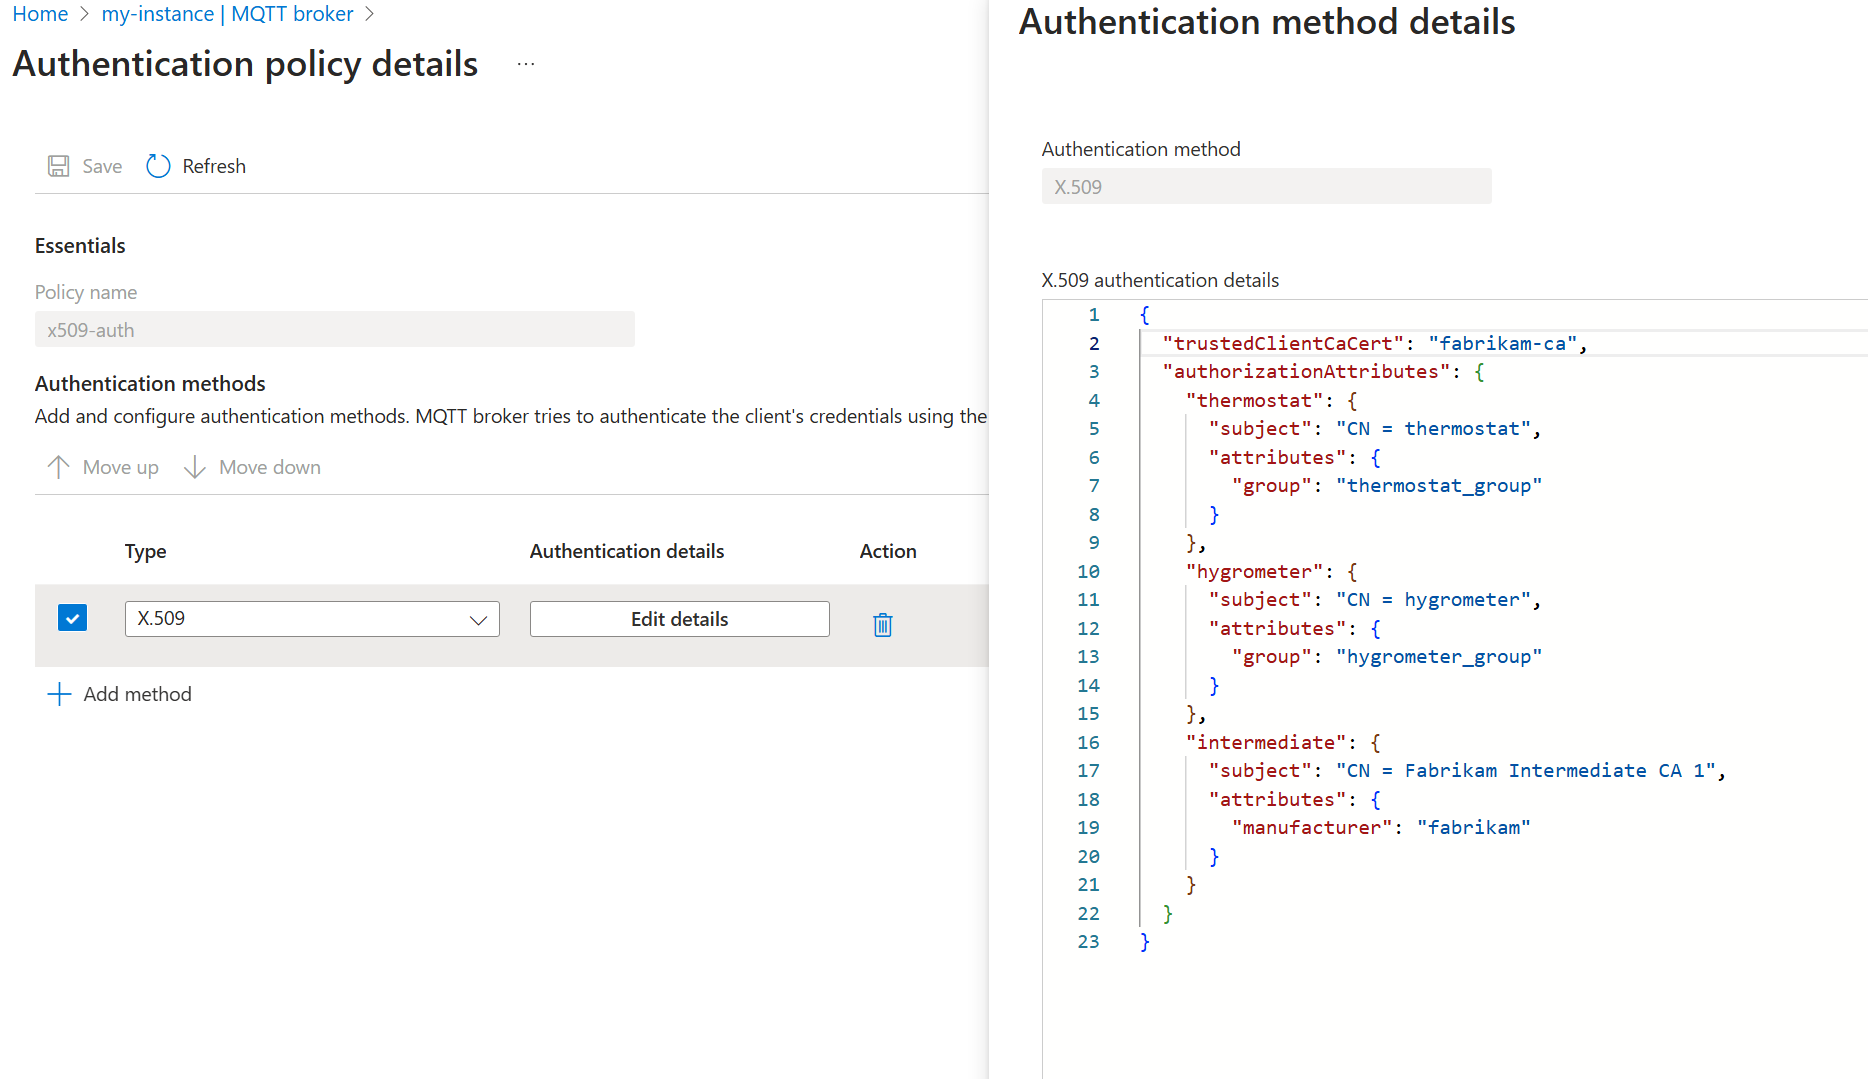
从下拉列表中选择方法类型 X.509,然后选择“添加详细信息”来配置方法。
在“X.509 身份验证详细信息”窗格中,指定 Fabrikam 受信任的 CA 证书 ConfigMap 名称
fabrikam-ca和属性。{ "trustedClientCaCert": "fabrikam-ca", "authorizationAttributes": { "thermostat": { "subject": "CN = thermostat", "attributes": { "group": "thermostat_group" } }, "hygrometer": { "subject": "CN = hygrometer", "attributes": { "group": "hygrometer_group" } }, "intermediate": { "subject": "CN = Fabrikam Intermediate CA 1", "attributes": { "manufacturer": "fabrikam" } } } }选择“应用”,然后选择“添加”以保存更改。

侦听器
有了身份验证策略后,创建使用 X.509 身份验证策略的侦听器。 此外,由于 X.509 身份验证需要 TLS,请配置侦听器以使用之前创建的 Contoso 服务器证书和私钥。
在 Azure 门户中,导航到 IoT 操作实例。
在“组件”下,选择“MQTT 代理”。
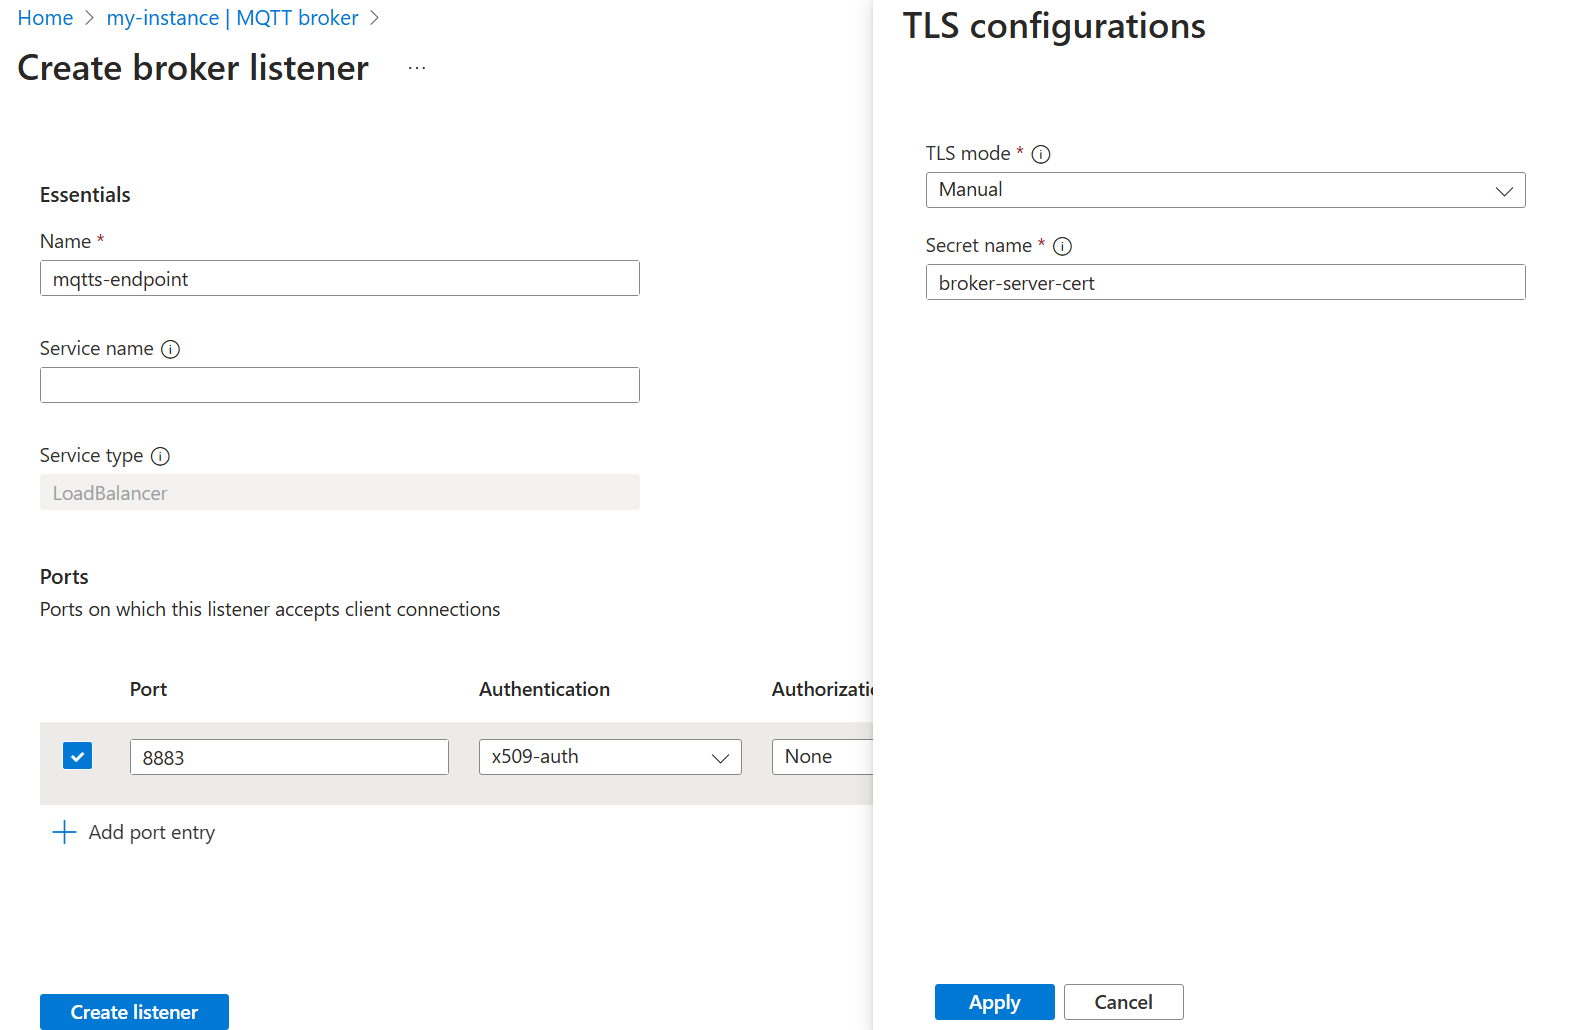
选择 LoadBalancer 的 MQTT 代理监听器>创建。 输入以下设置:
设置 说明 Name 输入 mqtts-endpoint。服务名称 Kubernetes 服务的名称。 留空以将侦听器名称 mqtts-endpoint用作服务名称。服务类型 已选择 LoadBalancer。 在“端口”下,为第一个端口输入以下设置:
设置 说明 端口 输入 8883 身份验证 选择“x509-auth” 授权 选择“无” 协议 选择“MQTT” TLS 选择“添加” 在“TLS 配置”窗格中输入以下设置:
设置 说明 TLS 模式 选择“手动” 颁发者名称 输入 broker-server-cert选择“应用”和“创建侦听器”。

一两分钟后,将创建 mqtts-endpoint LoadBalancer 服务。
$ kubectl get service mqtts-endpoint -n azure-iot-operations
NAME             TYPE           CLUSTER-IP     EXTERNAL-IP   PORT(S)          AGE
mqtts-endpoint   LoadBalancer   10.43.28.140   XXX.XX.X.X    8883:30988/TCP   104s
我们将在本教程使用 localhost,而不是使用外部 IP。
提示
codespace 配置会自动为 8883 设置端口转移。 若要设置其他环境,请参阅使用端口转移。
使用单个 Mosquito 客户端通过 TLS 发布消息
从证书文件(contoso_root_ca.crt、thermostat.crt 和 thermostat.key)所在的同一文件夹中,使用 Mosquito 客户端发布消息。 标志 --cafile contoso_root_ca.crt 用于使 Mosquito 执行服务器证书验证。
mosquitto_pub -t "example/topic" -m "example temperature measurement" -i thermostat \
-q 1 -V mqttv5 -d \
-h localhost \
--key thermostat.key \
--cert thermostat.crt \
--cafile contoso_root_ca.crt
发布成功,因为 Mosquito 使用以 fabrikam_root_ca.crt 为根的客户端证书。 MQTT 代理信任此证书,因为有之前创建的 x509-auth 身份验证策略。 此外,MQTT 代理目前允许经身份验证的客户端发布到任何主题。
Client thermostat sending CONNECT
Client thermostat received CONNACK (0)
Client thermostat sending PUBLISH (d0, q1, r0, m1, 'example/topic', ... (31 bytes))
Client thermostat received PUBACK (Mid: 1, RC:0)
Client thermostat sending DISCONNECT
使用 X.509 为多个客户端配置 MQTT 主题的授权
若要基于客户端证书属性限制对 MQTT 主题的访问,请创建一个授权策略,用该策略将客户端证书属性映射到特定主题上允许的操作。
在 Azure 门户中,导航到 IoT 操作实例。
在“组件”下,选择“MQTT 代理”。
选择授权选项卡。
选择“创建授权策略”。
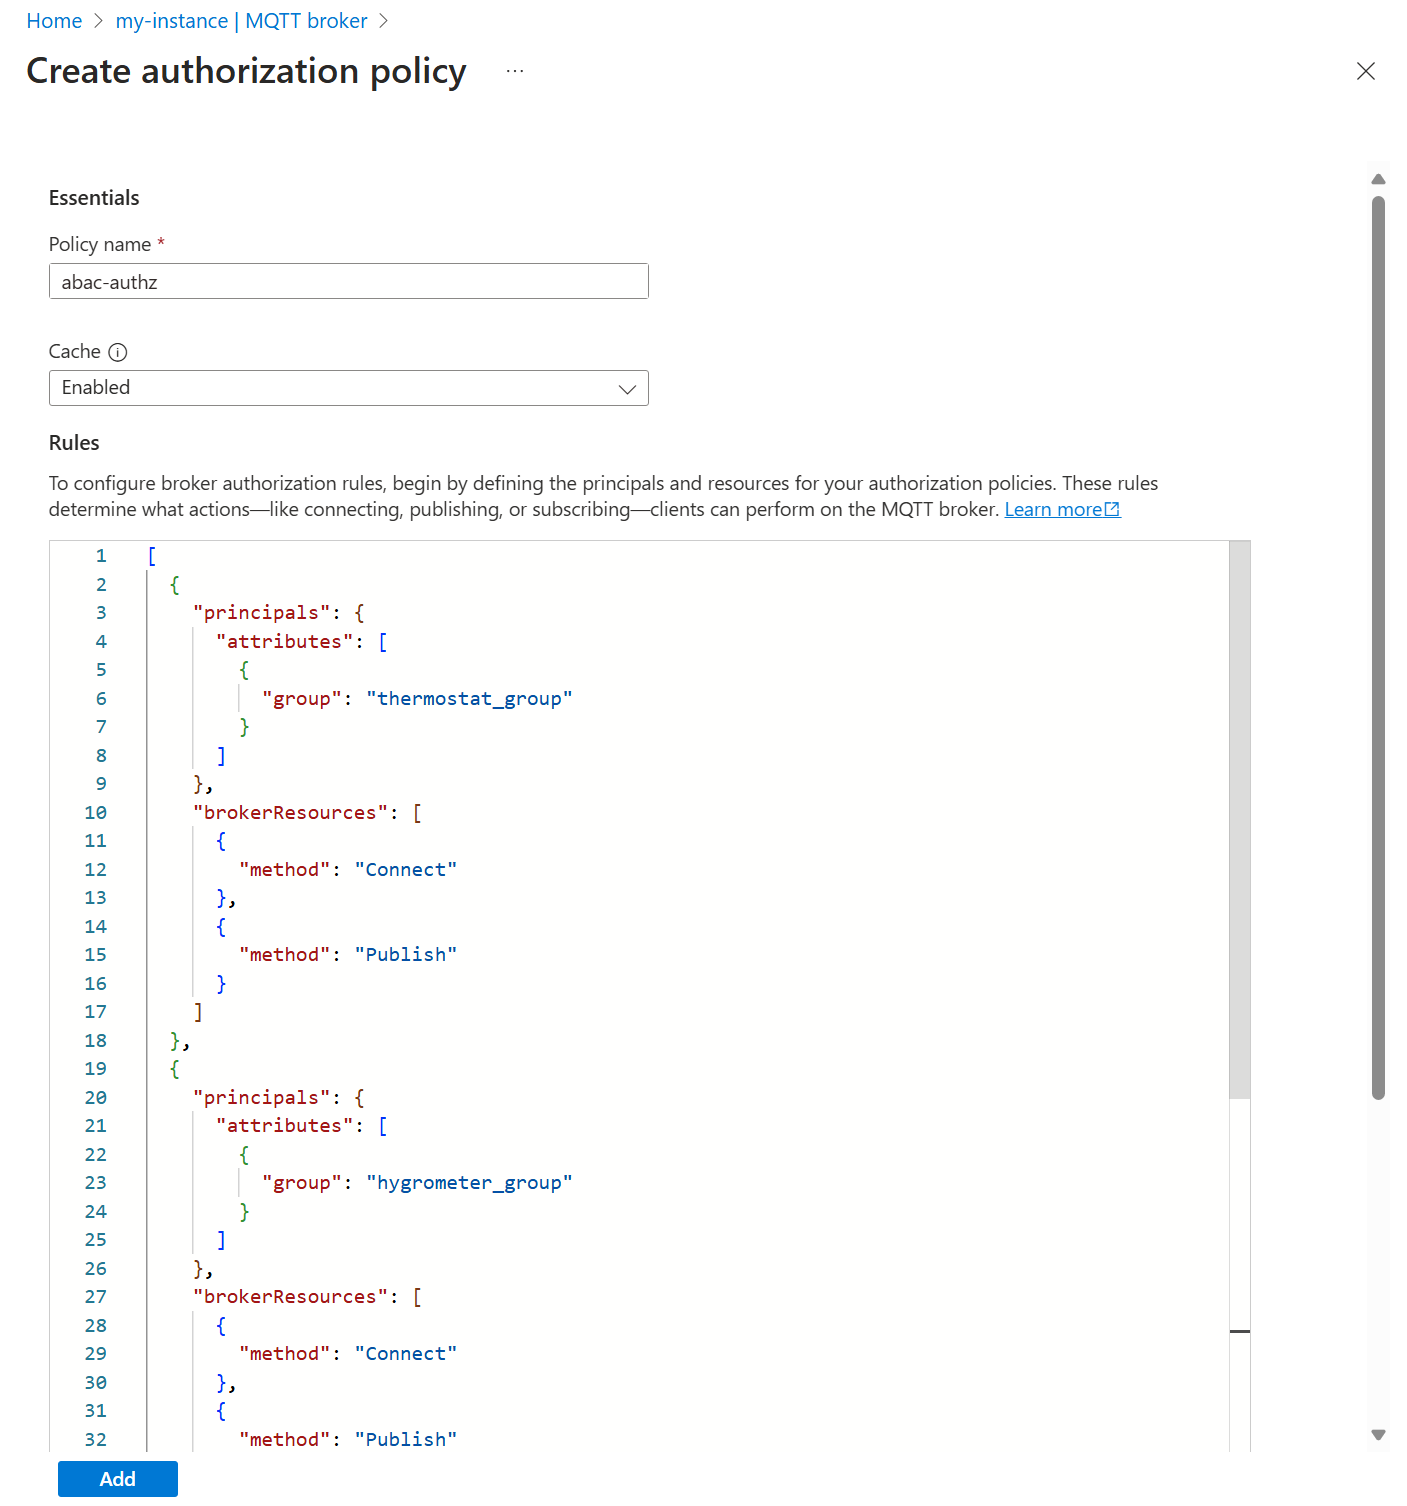
在“策略名称”处输入
abac-authz。在“规则”下输入以下规则:
[ { "principals": { "attributes": [ { "group": "thermostat_group" } ] }, "brokerResources": [ { "method": "Connect" }, { "method": "Publish", "topics": [ "telemetry/temperature" ] } ] }, { "principals": { "attributes": [ { "group": "hygrometer_group" } ] }, "brokerResources": [ { "method": "Connect" }, { "method": "Publish", "topics": [ "telemetry/humidity" ] } ] }, { "principals": { "attributes": [ { "manufacturer": "fabrikam" } ] }, "brokerResources": [ { "method": "Connect" }, { "method": "Publish", "topics": [ "health/heartbeat" ] } ] }, { "principals": { "usernames": [ "heater" ] }, "brokerResources": [ { "method": "Connect" }, { "method": "Subscribe", "topics": [ "telemetry/temperature", "telemetry/humidity" ] } ] } ]选择添加以保存更改。

然后,更新 MQTT 代理侦听器以使用新的授权策略。
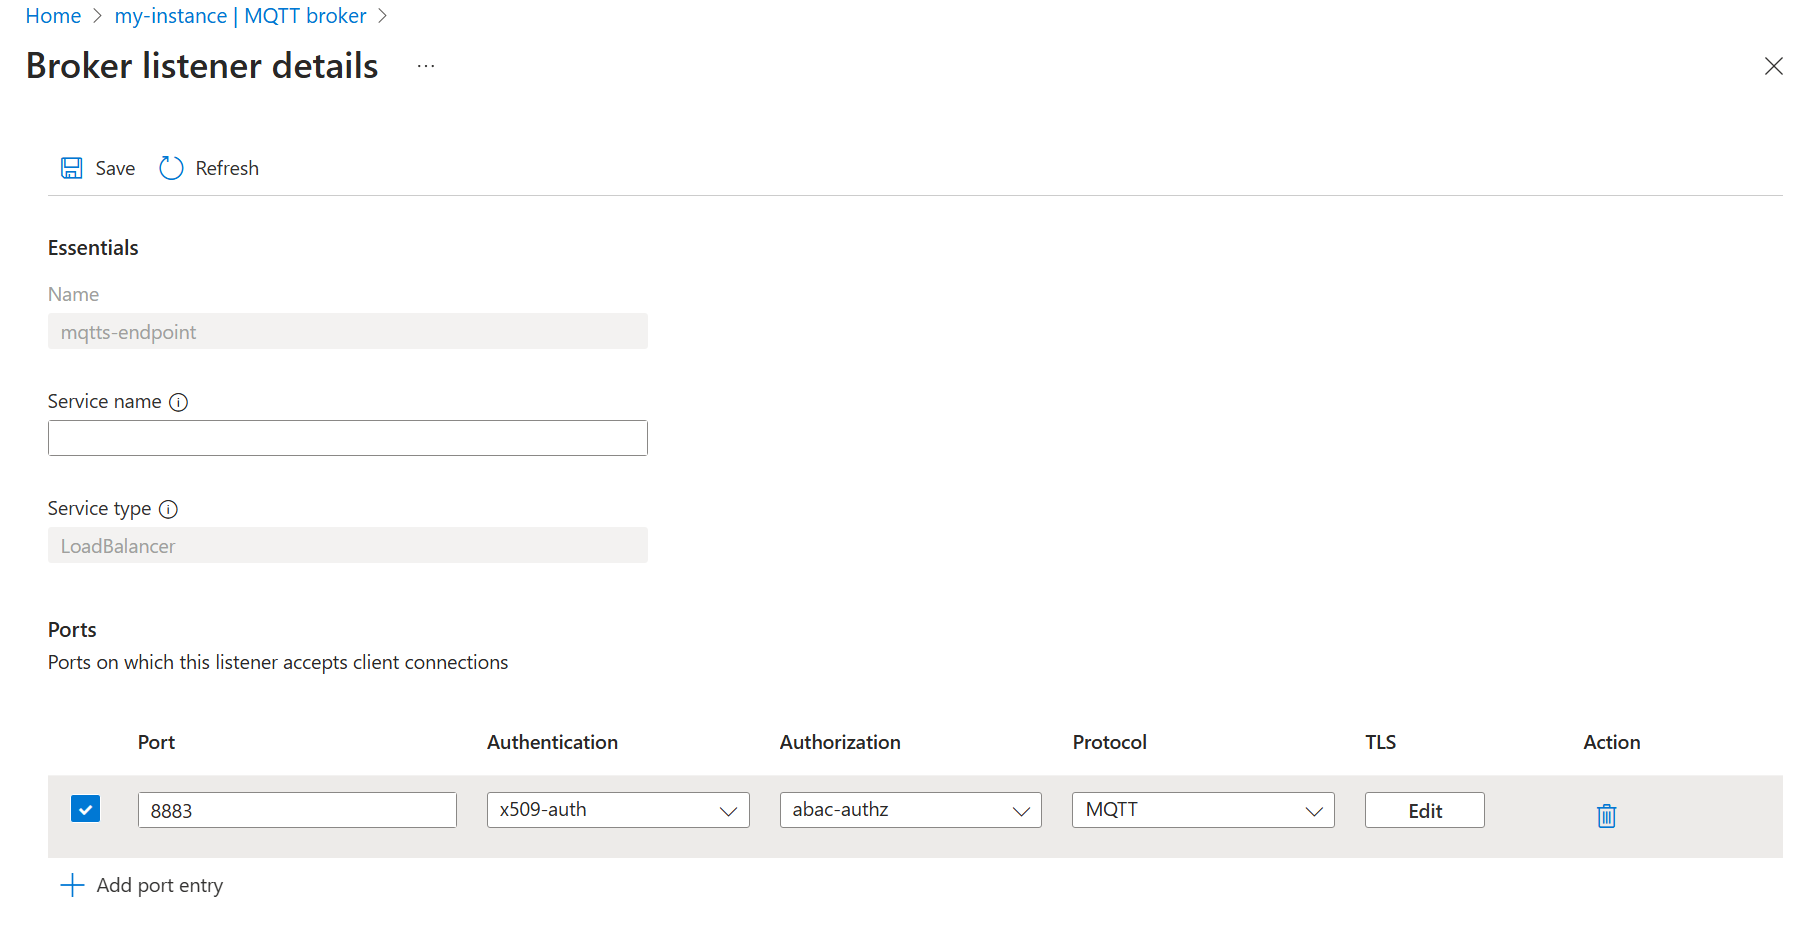
- 选择“侦听器”选项卡。
- 选择 mqtts-endpoint 侦听器。
- 在“端口”>“8883”>“授权”下,选择“abac-authz”。
- 选择“保存”。

将消息发布到受限主题
在本部分中,我们将测试新应用的授权策略。
首先,连接 thermostat 并尝试在主题 telemetry/humidity上发布:
mosquitto_pub -t "telemetry/humidity" -m "example temperature measurement" -i thermostat \
-q 1 -V mqttv5 -d \
-h localhost \
--key thermostat.key \
--cert thermostat.crt \
--cafile contoso_root_ca.crt
由于 thermostat 是 thermostat_group(不允许发布到湿度主题)的一部分,因此发布失败。
Client thermostat sending CONNECT
Client thermostat received CONNACK (0)
Client thermostat sending PUBLISH (d0, q1, r0, m1, 'telemetry/humidity', ... (6 bytes))
Client thermostat received PUBACK (Mid: 1, RC:135)
Warning: Publish 1 failed: Not authorized.
更改为发布到 telemetry/temperature(允许发布),发布成功。 使命令保持运行状态。
mosquitto_pub -t "telemetry/temperature" -m "example temperature measurement" -i thermostat \
-q 1 -V mqttv5 -d \
-h localhost \
--repeat 10000 \
--repeat-delay 3 \
--key thermostat.key \
--cert thermostat.crt \
--cafile contoso_root_ca.crt
订阅受限主题上的消息
在单独的终端会话中,连接到 heater 以订阅 health/heartbeat。
mosquitto_sub -q 1 -t "health/heartbeat" -d -V mqttv5 \
-i heater \
-h localhost \
--key heater.key \
--cert heater.crt \
--cafile contoso_root_ca.crt
由于 heater 无权订阅检测信号主题,因此订阅失败。 此处,代码 135 表示未授权。
Client heater sending CONNECT
Client heater received CONNACK (0)
Client heater sending SUBSCRIBE (Mid: 1, Topic: health/heartbeat, QoS: 1, Options: 0x00)
Client heater received SUBACK
Subscribed (mid: 1): 135
将订阅主题切换为 telemetry/temperature,thermostat 仍在向该主题其发送消息。
mosquitto_sub -q 1 -t "telemetry/temperature" -d -V mqttv5 \
-i heater \
-h localhost \
--key heater.key \
--cert heater.crt \
--cafile contoso_root_ca.crt
现在 heater 开始接收消息,因为它已获得其用户名的授权。
在另一个单独的终端会话中,使用 lightbulb 将消息发布到 health/heartbeat:
mosquitto_pub -q 1 -t "health/heartbeat" -m "example heartbeat" -d -V mqttv5 \
-i lightbulb \
-h localhost \
--repeat 100 \
--repeat-delay 3 \
--key lightbulb.key \
--cert lightbulb.crt \
--cafile contoso_root_ca.crt
发布成功,因为 lightbulb 具有一个中间证书,该证书 CN = Fabrikam Intermediate CA 1映射到属性 manufacturer=fabrikam。 具有该属性的客户端可以在 health/heartbeat 上发布。 客户端开始发送消息时,之前启动的 heater 不会收到任何消息。
清理资源
若要清理本教程中创建的资源,请删除侦听器和身份验证和授权策略。
- 在 Azure 门户中,导航到 IoT 操作实例。
- 在“组件”下,选择“MQTT 代理”。
- 选择“侦听器”选项卡。
- 选择“mqtts-endpoint”侦听器旁边的复选框。
- 选择“删除”。
- 确认删除。
- 选择“身份验证”选项卡。
- 选择“x509-auth”旁边的复选框。
- 选择“删除”。
- 确认删除。
- 选择授权选项卡。
- 选择“abac-authz”旁边的复选框。
- 选择“删除”。
- 确认删除。
此外,请删除 Kubernetes 机密和 ConfigMap。
kubectl delete secret broker-server-cert -n azure-iot-operations
kubectl delete configmap fabrikam-ca -n azure-iot-operations
最后,删除之前生成的证书和密钥。
rm contoso_root_ca.crt contoso_root_ca.key contoso_intermediate_ca.crt contoso_intermediate_ca.key mqtts-endpoint.crt mqtts-endpoint.key
rm fabrikam_root_ca.crt fabrikam_root_ca.key fabrikam_intermediate_ca.crt fabrikam_intermediate_ca.key thermostat.crt thermostat.key hygrometer.crt hygrometer.key heater.crt heater.key lightbulb.crt lightbulb.key