你当前正在访问 Microsoft Azure Global Edition 技术文档网站。 如果需要访问由世纪互联运营的 Microsoft Azure 中国技术文档网站,请访问 https://docs.azure.cn。
快速入门:配置 Azure IoT 分层网络管理(预览版)以在 AKS 环境中为群集启用 Arc
在本快速入门中,你将在第 4 层和第 3 层 Purdue 网络上设置 Azure IoT 分层网络管理(预览版)。 网络级别 4 具有 Internet 访问权限,级别 3 没有。 你将配置分层网络管理(预览版)以将网络流量从第 3 层路由到 Azure。 最后,你可以在第 3 层中为 K3S 群集启用 Arc,即使它未直接连接到 Internet。
- 部署了分层网络管理的 AKS 群集级别 4。
- 级别 3 是在 Linux VM 上运行的 K3S 群集,它使用级别 4 中的分层网络管理实例来实现与 Azure 的连接。 级别 3 网络配置为在端口 443 和 8084 上具有对级别 4 网络的出站访问权限。 禁用所有其他出站访问。
分层网络管理体系结构需要在级别 3 网络上配置 DNS,其中允许列出的 URL 将重新指向级别 4 网络。 在此示例中,此设置是使用基于 CoreDNS 构建的自动设置(k3s 附带的默认 DNS 解析机制)来完成的。
先决条件
这些先决条件仅用于独立部署分层网络管理,以及为子层群集启用 Arc。
- AKS 群集
- Azure Linux Ubuntu 22.04.3 LTS 虚拟机
- 有权访问 Internet 以及第 3 层和第 4 层网络的 Jumpbox 或设置计算机
将分层网络管理(预览版)部署到 AKS 群集
这些步骤将分层网络管理部署到 AKS 群集。 群集是 ISA-95 模型中的顶层。 在本部分结束时,你有一个分层网络管理实例,该实例已准备好接受以下已启用 Azure Arc 的群集的流量,并支持部署 Azure IoT 操作服务。
按照连接到群集中的步骤,配置
kubectl从 jumpbox 管理 AKS 群集。使用以下 Azure CLI 命令安装分层网络管理操作员:
az login

az k8s-extension create --resource-group <RESOURCE GROUP> --name kind-lnm-extension --cluster-type connectedClusters --cluster-name <CLUSTER NAME> --auto-upgrade false --extension-type Microsoft.IoTOperations.LayeredNetworkManagement --version 0.1.0-preview --release-train preview
若要验证安装是否成功,请运行:
kubectl get pods应会看到类似于以下示例的输出:
NAME                                READY   STATUS        RESTARTS   AGE
aio-lnm-operator-7db49dc9fd-kjf5x   1/1     Running       0          78s
通过创建包含以下内容的名为 level4.yaml 的文件来创建分层网络管理自定义资源:
apiVersion: layerednetworkmgmt.iotoperations.azure.com/v1beta1
kind: Lnm
metadata:
  name: level4
  namespace: default
spec:
  image:
    pullPolicy: IfNotPresent
    repository: mcr.microsoft.com/oss/envoyproxy/envoy-distroless
    tag: v1.27.0
  replicas: 1
  logLevel: "debug"
  openTelemetryMetricsCollectorAddr: "http://aio-otel-collector.azure-iot-operations.svc.cluster.local:4317"
  level: 4
  allowList:
    enableArcDomains: true
    domains:
    - destinationUrl: "management.azure.com"
      destinationType: external
    - destinationUrl: "*.dp.kubernetesconfiguration.azure.com"
      destinationType: external
    - destinationUrl: "login.microsoftonline.com"
      destinationType: external
    - destinationUrl: "*.login.microsoft.com"
      destinationType: external
    - destinationUrl: "login.windows.net"
      destinationType: external
    - destinationUrl: "mcr.microsoft.com"
      destinationType: external
    - destinationUrl: "*.data.mcr.microsoft.com"
      destinationType: external
    - destinationUrl: "gbl.his.arc.azure.com"
      destinationType: external
    - destinationUrl: "*.his.arc.azure.com"
      destinationType: external
    - destinationUrl: "k8connecthelm.azureedge.net"
      destinationType: external
    - destinationUrl: "guestnotificationservice.azure.com"
      destinationType: external
    - destinationUrl: "*.guestnotificationservice.azure.com"
      destinationType: external
    - destinationUrl: "sts.windows.net"
      destinationType: external
    - destinationUrl: "k8sconnectcsp.azureedge.net"
      destinationType: external
    - destinationUrl: "*.servicebus.windows.net"
      destinationType: external
    - destinationUrl: "graph.microsoft.com"
      destinationType: external
    - destinationUrl: "*.arc.azure.net"
      destinationType: external
    - destinationUrl: "*.obo.arc.azure.com"
      destinationType: external
    - destinationUrl: "linuxgeneva-microsoft.azurecr.io"
      destinationType: external
    - destinationUrl: "graph.windows.net"
      destinationType: external
    - destinationUrl: "*.azurecr.io"
      destinationType: external
    - destinationUrl: "*.blob.core.windows.net"
      destinationType: external
    - destinationUrl: "*.vault.azure.net"
      destinationType: external
    - destinationUrl: "*.blob.storage.azure.net"
      destinationType: external
    sourceIpRange:
    - addressPrefix: "0.0.0.0"
      prefixLen: 0
若要基于 level4.yaml 文件创建分层网络管理实例,请运行:
kubectl apply -f level4.yaml此步骤创建 n pod、一个服务和两个配置映射。 n 基于自定义资源中的副本数。
若要验证实例,请运行:
kubectl get pods输出应如下所示:
NAME                                    READY       STATUS    RESTARTS       AGE
aio-lnm-operator-7db49dc9fd-kjf5x       1/1         Running       0          78s
aio-lnm-level4-7598574bf-2lgss          1/1         Running       0          4s
若要查看服务,请运行:
kubectl get services输出应如以下示例所示:
NAME              TYPE           CLUSTER-IP     EXTERNAL-IP     PORT(S)                      AGE
aio-lnm-level4    LoadBalancer   10.0.141.101   20.81.111.118   80:30960/TCP,443:31214/TCP   29s
若要查看配置映射,请运行:
kubectl get cm输出应如以下示例所示:
NAME                           DATA   AGE
aio-lnm-level4-config          1      50s
aio-lnm-level4-client-config   1      50s
在此示例中,分层网络管理实例已准备好接受外部 IP
20.81.111.118上的流量。
准备第 3 层群集
在第 3 层中,你将在 Linux 虚拟机上创建 K3S Kubernetes 群集。 为了简化群集设置,你可以创建具有 Internet 访问权限的 Azure Linux Ubuntu 22.04.3 LTS VM,并从 Jumpbox 启用 ssh。
提示
在更现实的方案中将在隔离网络中启动设置,你可以使用适合你的解决方案的预生成映像或 K3S 的 Air-Gap Install 方法准备计算机。
在 Linux VM 上,使用以下命令安装和配置 K3S:
curl -sfL https://get.k3s.io | sh -s - --write-kubeconfig-mode 644为第 3 层配置网络隔离。 使用以下步骤将第 3 层群集配置为仅将流量发送到第 4 层中的分层网络管理。
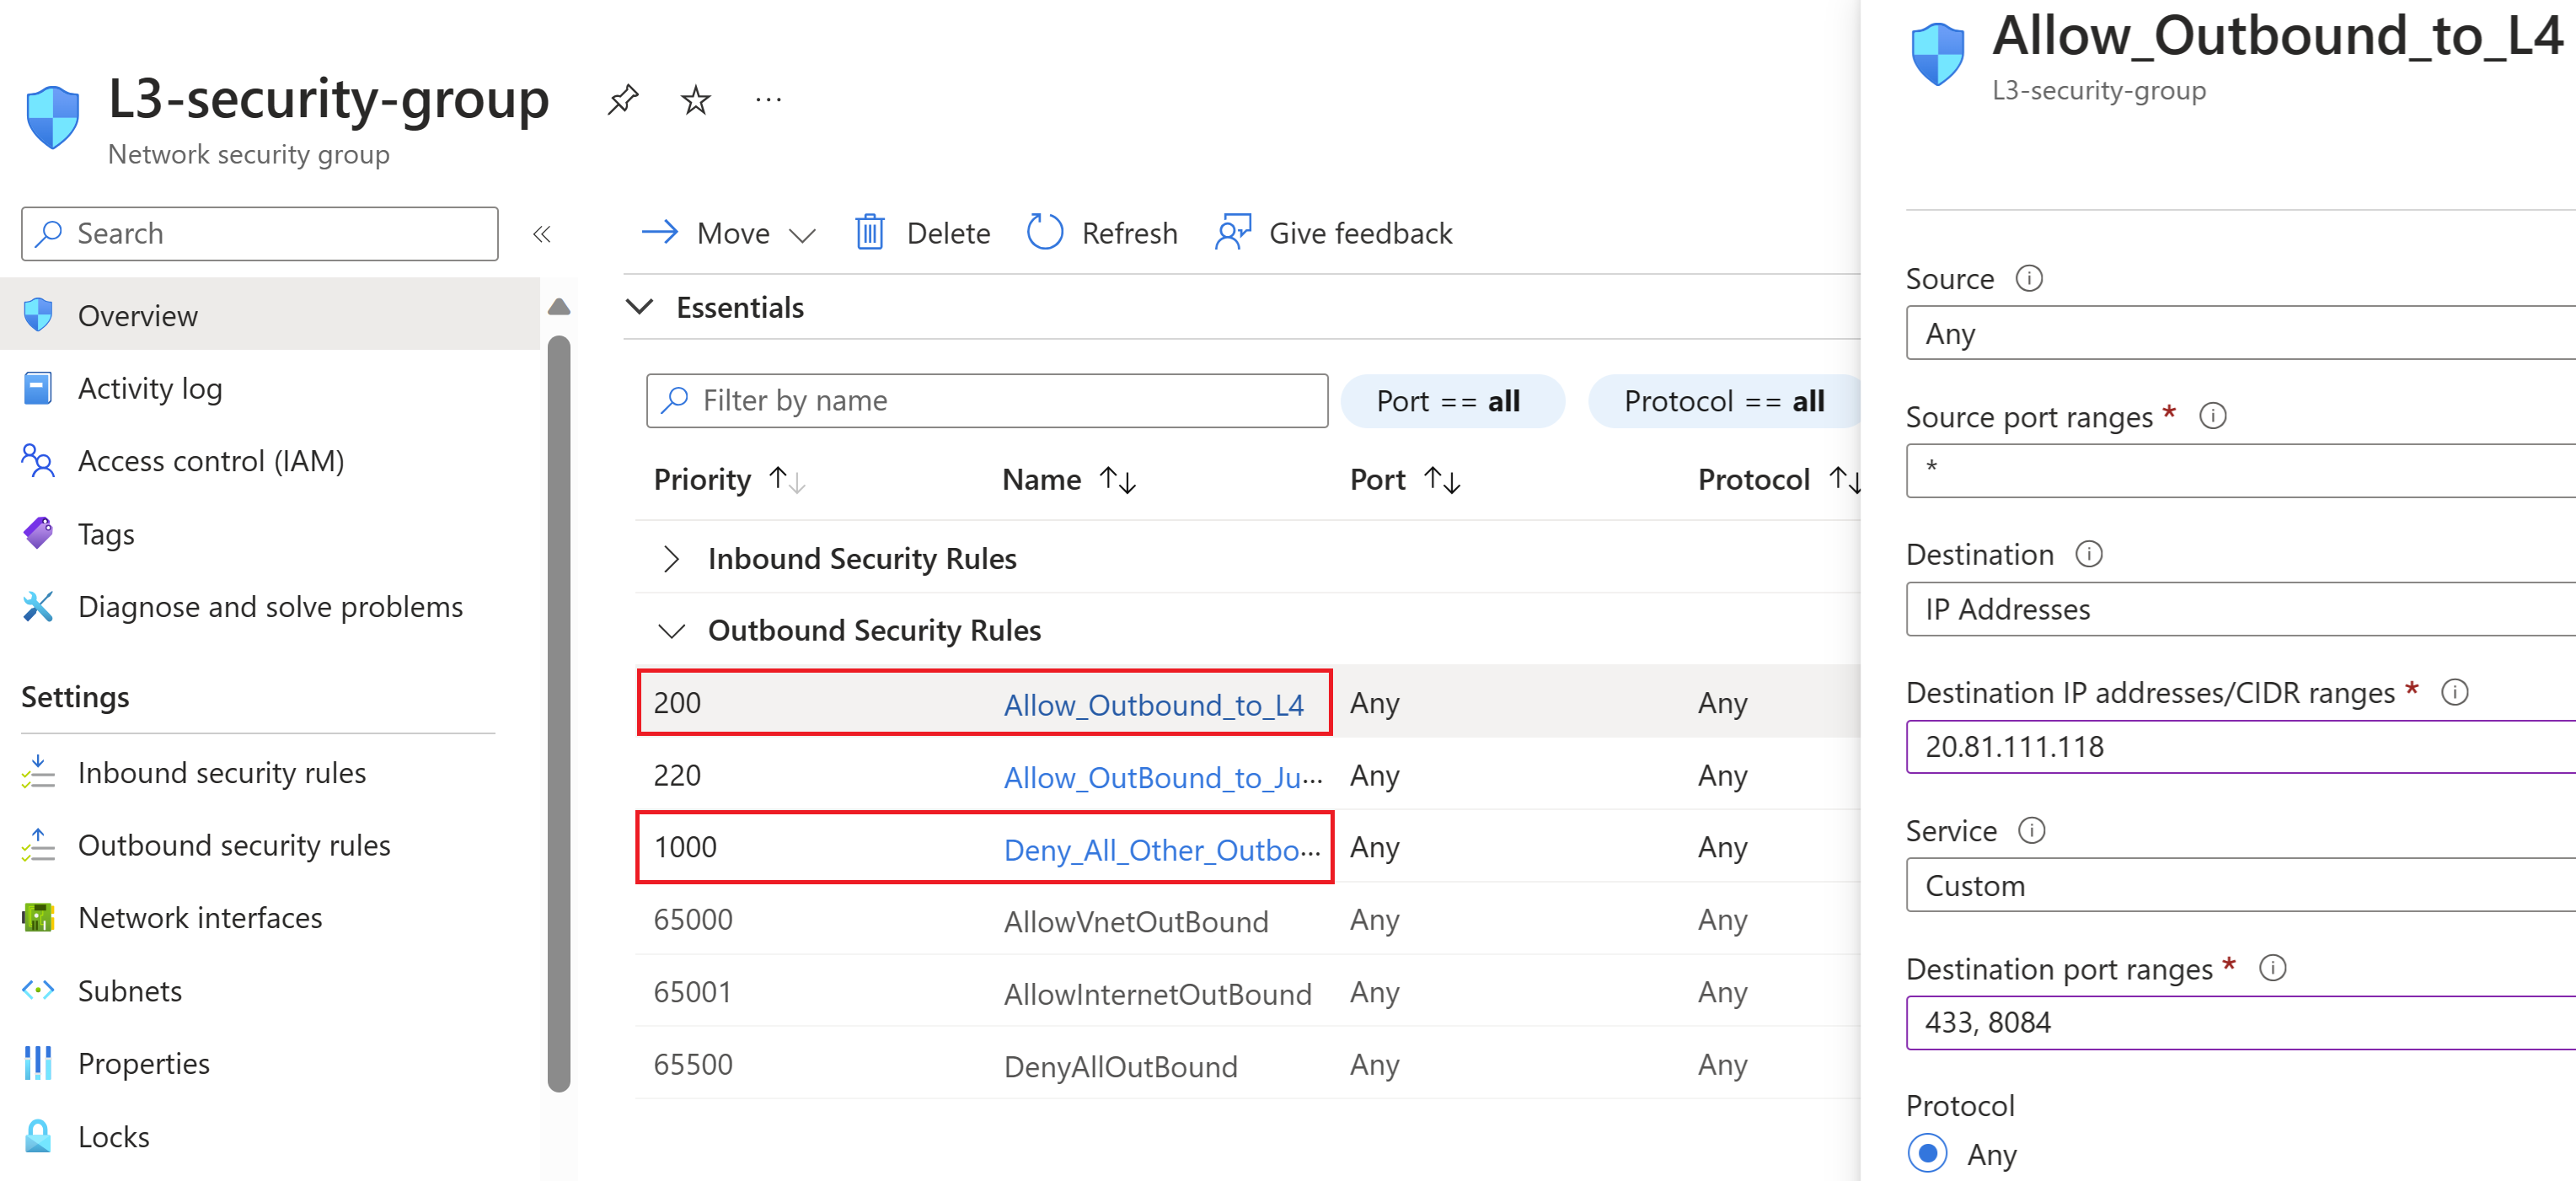
- 浏览到 VM 的网络接口的网络安全组。
- 添加一个额外的出站安全规则,以拒绝来自第 3 层虚拟机的所有出站流量。
- 添加优先级最高的另一个出站规则,以允许通过端口 443 和 8084 发送到第 4 层 AKS 群集 IP 的出站流量。
将隔离层中的群集预配到 Arc
你将通过以下步骤使用第 4 层上的分层网络管理实例为第 3 层群集启用 Arc。
设置 jumpbox 设置可以对群集进行 kubectl 访问。
在 Linux VM 上生成配置文件。
k3s kubectl config view --raw > config.level3在 jumpbox 上,将
config.level3文件复制到~/.kube目录并将其重命名为config,以设置对级别 3 k3s 群集的 kubectl 访问权限。 配置文件中的服务器条目应设置为级别 3 VM 的 IP 地址或域名。请参阅配置 CoreDNS,以使用 CoreDNS 提供的扩展机制(K3S 群集的默认 DNS 服务器)添加允许列表 URL。
在 jumpbox 上运行以下命令,将群集连接到 Arc。此步骤需要 Azure CLI。 根据需要安装 Az CLI。
az login
az account set --subscription <your Azure subscription ID>

az connectedk8s connect -g <your resource group name> -n <your connected cluster name>
有关 connectedk8s 的详细信息,请参阅快速入门:将现有 Kubernetes 群集连接到 Azure Arc。
应会看到类似于以下示例的输出:
This operation might take a while...

The required pre-checks for onboarding have succeeded.
Azure resource provisioning has begun.
Azure resource provisioning has finished.
Starting to install Azure arc agents on the Kubernetes cluster.
{
  "agentPublicKeyCertificate": "MIICCgKCAgEAmU+Pc55pc3sOE2Jo5JbAdk+2OprUziCbgfGRFfbMHO4dT7A7LDaDk7tWwvz5KwUt66eMrabI7M52H8xXvy1j7YwsMwR5TaSeHpgrUe1/4XNYKa6SN2NbpXIXA3w4aHgtKzENm907rYMgTO9gBJEZNJpqsfCdb3E7AHWQabUe9y9T8aub+arBHLQ3furGkv8JnN2LCPbvLnmeLfc1J5
  ....
  ....
Kubernetes 群集现已启用 Arc,而且列在 az connectedk8s connect 命令中提供的资源组中。 还可以通过 Azure 门户验证此群集的预配。 本快速入门介绍分层网络管理为 Kubernetes 群集启用 Arc 的功能。 现在可以尝试隔离网络中此群集上的内置 Arc 体验。
后续步骤
- 若要了解如何在隔离网络中为 Azure IoT 操作设置群集,请参阅配置分层网络管理服务以在隔离网络中启用 Azure IoT 操作
- 若要详细了解如何为 Azure IoT 操作相关方案设置全面的网络环境,请参阅创建示例网络环境
