你当前正在访问 Microsoft Azure Global Edition 技术文档网站。 如果需要访问由世纪互联运营的 Microsoft Azure 中国技术文档网站,请访问 https://docs.azure.cn。
快速入门:从 Azure 事件网格命名空间主题发送和接收消息 (.NET)
在本快速入门中,你将执行以下步骤:
- 使用 Azure 门户创建事件网格命名空间。
- 使用 Azure 门户创建事件网格命名空间主题。
- 使用 Azure 门户创建事件订阅。
- 编写 .NET 控制台应用程序,向主题发送一组消息
- 编写 .NET 控制台应用程序,从主题接收这些消息。
注意
此快速入门提供了分步说明来实现将一批消息发送到事件网格命名空间主题然后接收这些消息的简单方案。 有关 .NET 客户端库的概述,请参阅适用于 .NET 的 Azure 事件网格客户端库。 有关更多示例,请参阅GitHub 上的事件网格 .NET 示例。
先决条件
如果你是首次使用该服务,请在使用本快速入门之前先参阅事件网格概述。
- Azure 订阅。 要使用 Azure 服务(包括 Azure 事件网格),需要订阅。 如果没有现成的 Azure 帐户,可以注册免费试用版。
- Visual Studio 2022。 示例应用程序利用 C# 10 中引入的新功能。 要使用最新语法,建议安装 .NET 6.0 或更高版本,并将语言版本设置为
latest。 如果使用 Visual Studio,Visual Studio 2022 以前的版本与生成 C# 10 项目时所需的工具将不兼容。
在 Azure 门户中创建命名空间
Azure 事件网格中的命名空间是一个或多个主题、客户端、客户端组、主题空间和权限绑定的逻辑容器。 它提供唯一的命名空间,让你可以在同一 Azure 区域中使用多个资源。 使用 Azure 事件网格命名空间,现在可以将相关资源分组到一起,并将其作为 Azure 订阅中的单个单元进行管理。
请按照后续部分所述创建、查看和管理 Azure 事件网格命名空间。
创建命名空间:
登录到 Azure 门户。
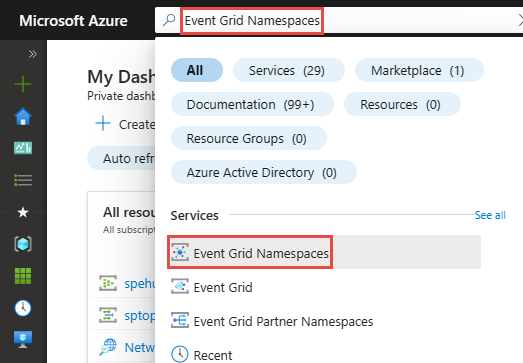
在“搜索框”中,输入“事件网格命名空间”,然后在结果中选择“事件网格命名空间”。
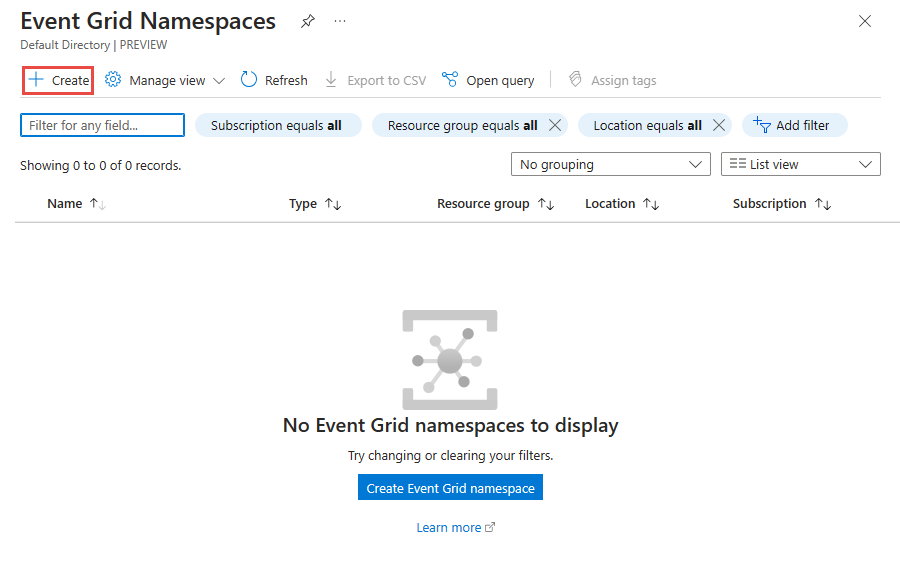
在“事件网格命名空间”页上的工具栏中选择“+ 创建”。
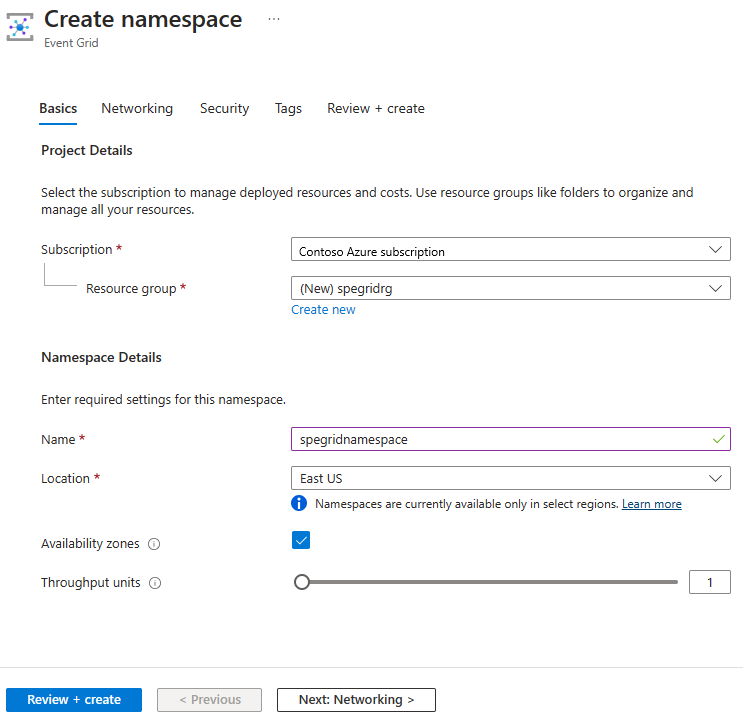
在“基本信息”页上执行以下步骤。
选择要在其中创建命名空间的 Azure 订阅。
选择现有的资源组,或创建资源组。
输入命名空间的名称。
选择要在其中创建命名空间的区域或位置。
在页面底部选择“查看 + 创建”。
在“查看 + 创建”选项卡上,查看设置并选择“创建”。
在“部署已成功”页面上选择“转到资源”,以导航到你的命名空间。
创建命名空间主题
如果没有在“事件网格命名空间”页面上,请按照创建、查看和管理命名空间步骤查看要用于创建主题的命名空间。
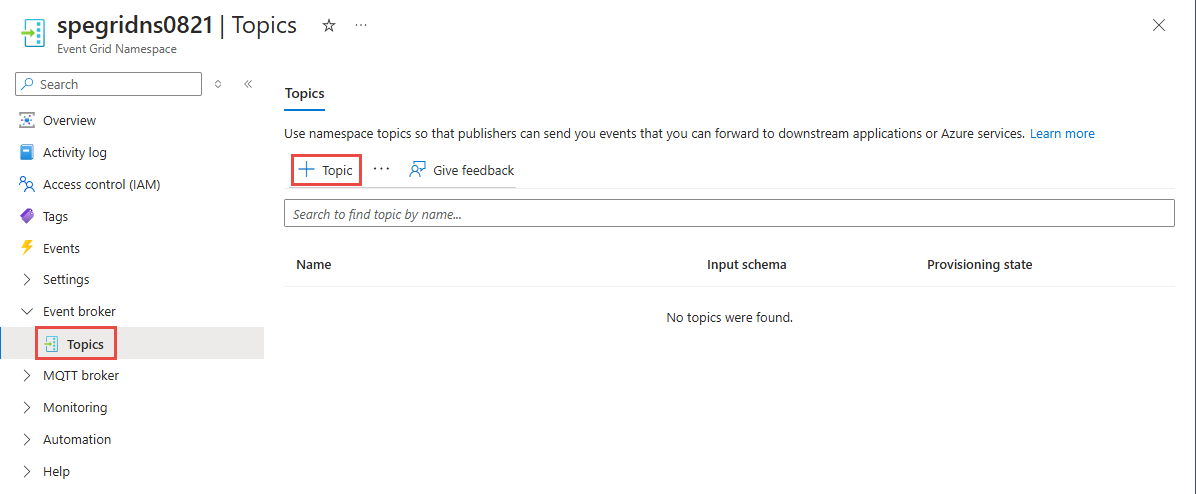
在“事件网格命名空间”页面上,选择左侧菜单中“事件代理”部分中的“主题”选项。
在“主题”页面上,选择命令栏上的“+ 主题”按钮。
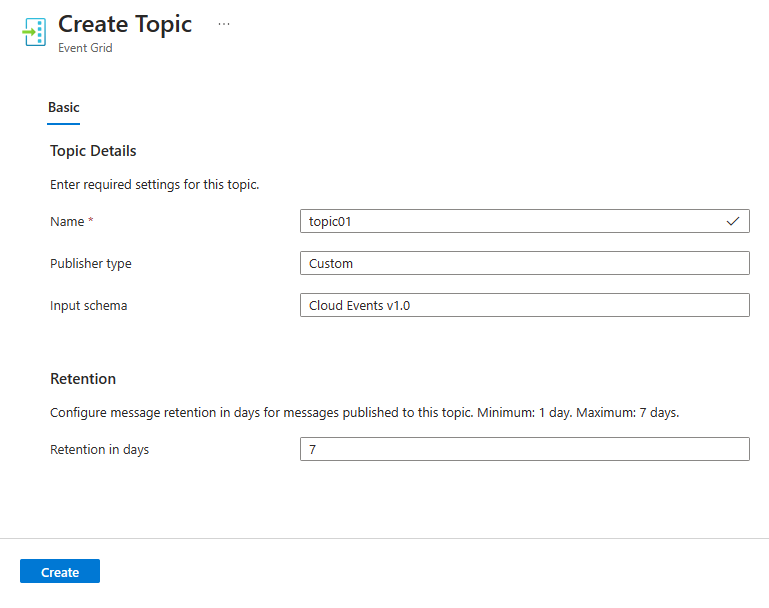
在“创建主题”页面中,键入要创建的主题的名称,然后选择“创建”。
创建事件订阅
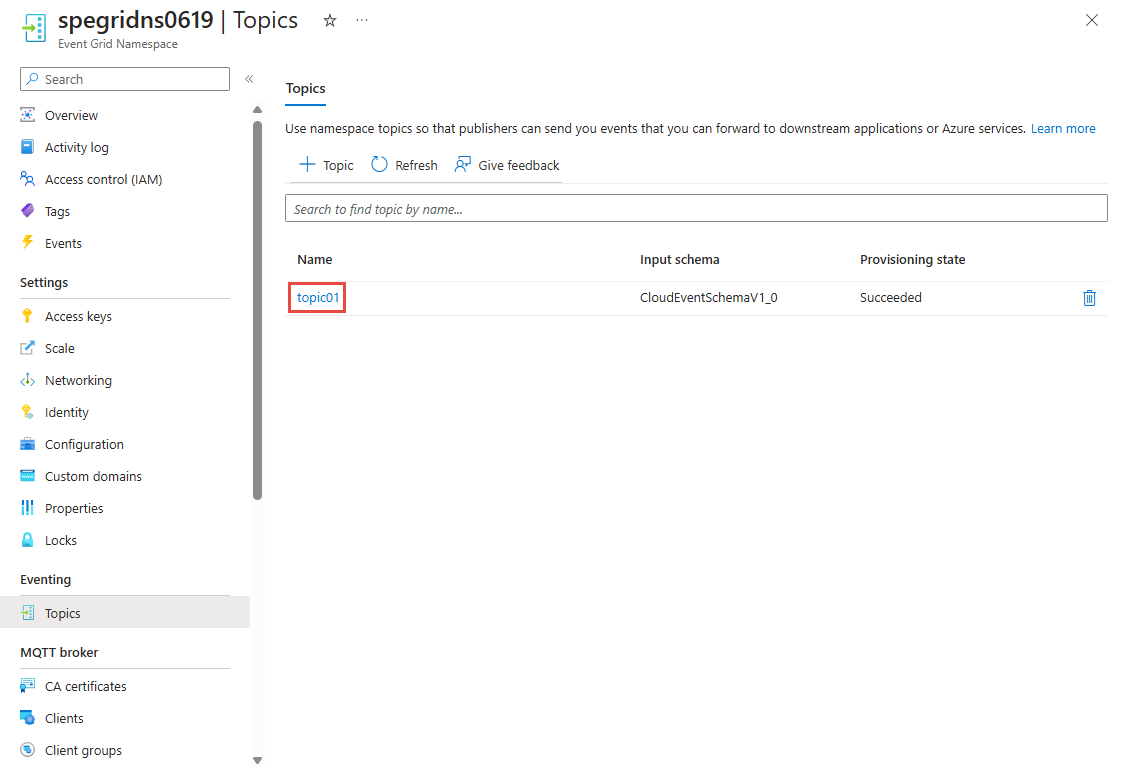
如果位于 Azure 门户中事件网格命名空间的“主题”页上,请从主题列表中选择主题。 如果位于“主题”页上,请按照创建、查看和管理命名空间主题来确定要用于创建事件订阅的主题。
在“事件网格命名空间主题”页上,在左侧菜单中的“实体”部分选择“订阅”选项。
在“订阅”页上,选择命令栏上的“+ 订阅”按钮。
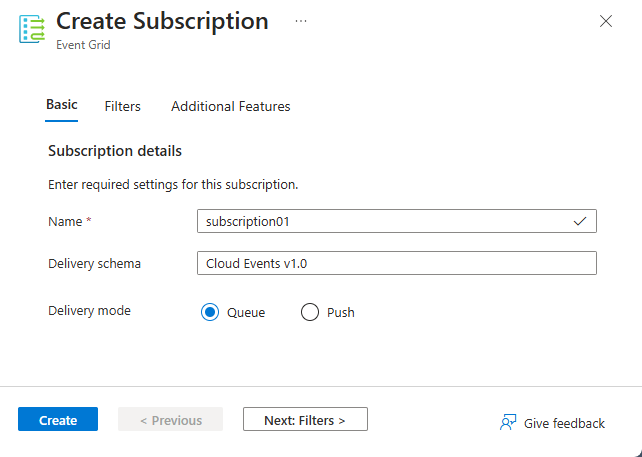
在“基本信息”选项卡上,执行以下步骤:
输入要创建的订阅的名称
确认“传送架构”设置为“云事件 v1.0”。
确认“传送模式”设置为“队列”(拉取模式)。
选择页面底部的“下一步: 筛选器”。
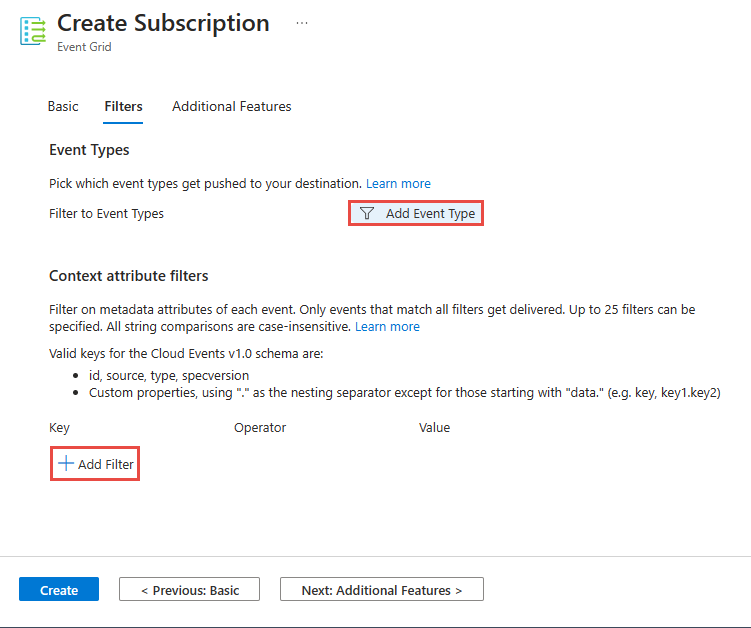
在“筛选器”选项卡中,添加要在订阅中筛选的事件类型的名称,并添加要在订阅中使用的上下文属性筛选器。 然后,在页面底部选择“下一步: 其他功能”。
在“其他功能”选项卡中,可以指定事件保留期、最大传递计数、锁定持续时间和死信设置。
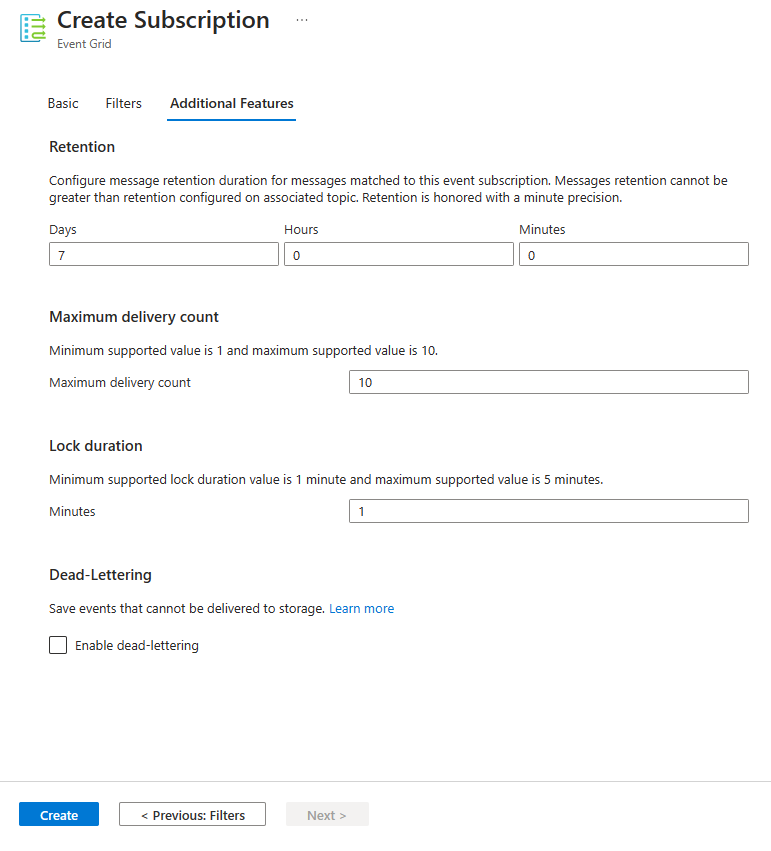
选择“创建”以创建事件订阅。
向 Azure 验证应用
本快速入门介绍了连接到 Azure 事件中心的方法:连接字符串。 本部分展示了如何使用连接字符串连接到事件网格命名空间。 如果你不熟悉 Azure,可能会感觉连接字符串选项更易于使用。 新建事件网格命名空间时,会自动生成初始的主密钥和辅助密钥,向每个密钥授予对命名空间或主题的所有资产的完全控制权限。 客户端可以使用连接字符串连接到事件网格命名空间。 要复制命名空间主题的访问密钥,请执行以下步骤:
在“事件网格命名空间”页面,选择“主题”。
选择需要访问的主题。
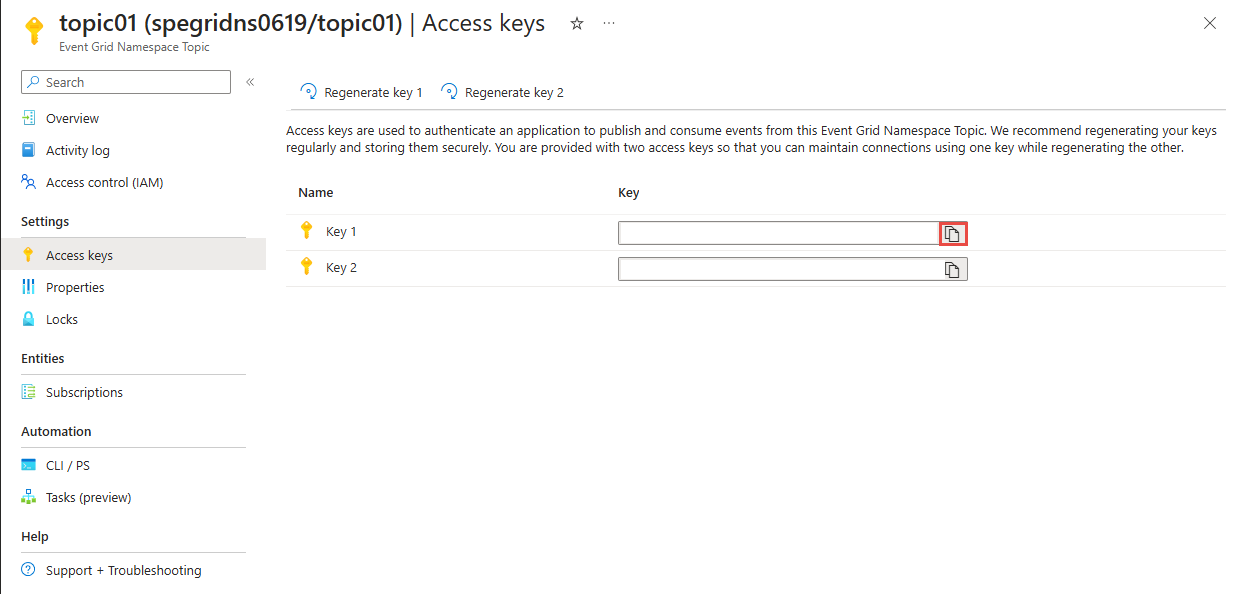
在“访问密钥”页面,选择“密钥 1 或密钥 2”旁边的复制按钮,将访问密钥复制到剪贴板供以后使用。 将此值粘贴到记事本或其他某个临时位置。
启动 Visual Studio
启动 Visual Studio。 如果看到“入门”窗口,请在右窗格中选择“在不使用代码的情况下继续”链接。
将消息发送到主题
本部分介绍了如何创建向事件网格主题发送消息的 .NET 控制台应用程序。
创建控制台应用程序
在 Visual Studio 中,选择“文件”->“新建”->“项目”菜单。
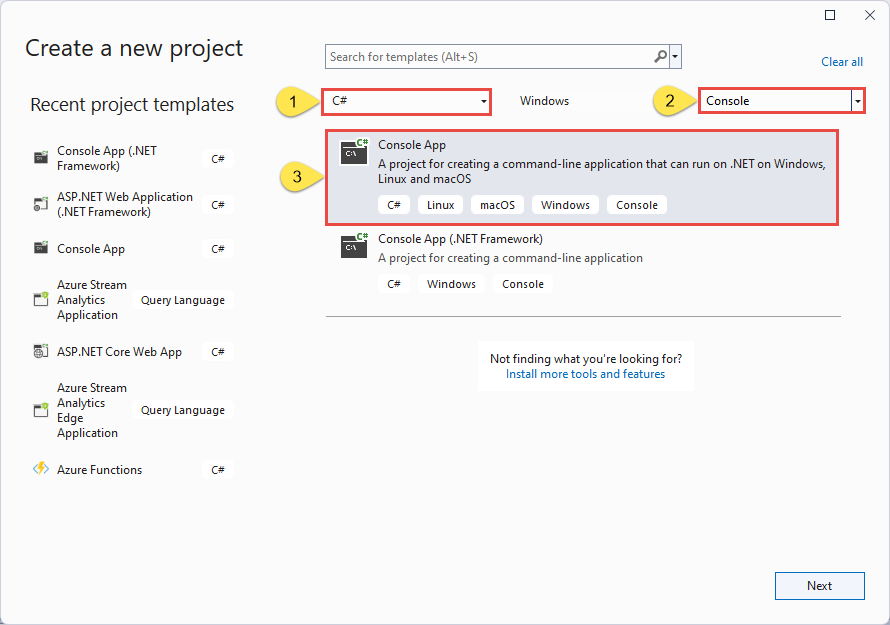
在“创建新项目”对话框中执行以下步骤:如果看不到此对话框,请在菜单中选择“文件”,然后依次选择“新建”、“项目”。
选择“C#”作为编程语言。
选择“控制台”作为应用程序类型。
从结果列表中选择“控制台应用”。
然后,选择“下一步” 。
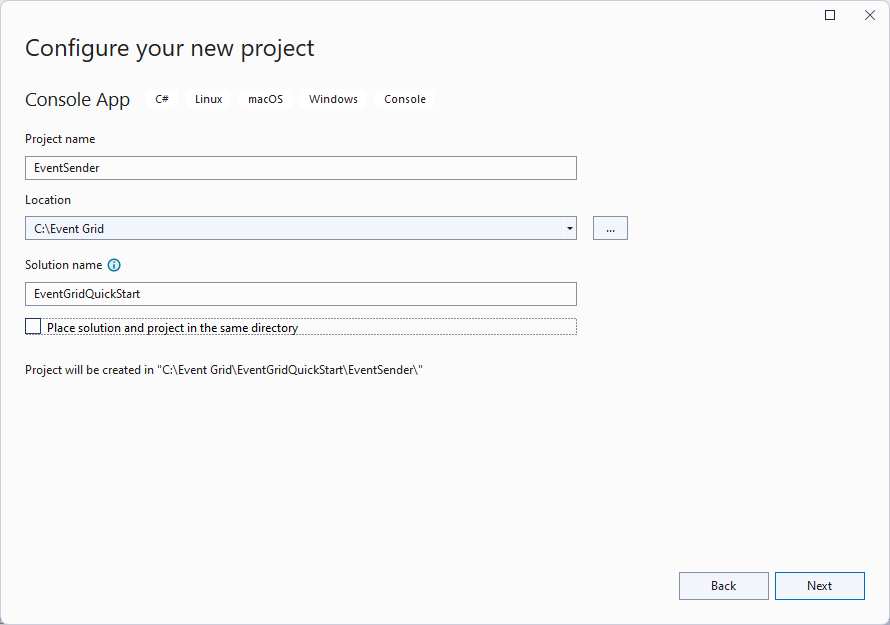
输入EventSender作为项目名称、EventGridQuickStart作为解决方案名称,然后选择“下一步”。
在“其他信息”页面,选择“创建”来创建解决方案和项目。
向项目添加 NuGet 包
在菜单中选择“工具”>“NuGet 包管理器”>“包管理器控制台”。
运行以下命令安装Azure.Messaging.EventGrid NuGet 包:
Install-Package Azure.Messaging.EventGrid.Namespaces
添加将事件发送到命名空间主题的代码
将
Program.cs的内容替换为以下代码。 概述了重要步骤,并在代码注释中提供了其他信息。重要
将代码片段中的占位符值(
<NAMESPACE-ENDPOINT>、<TOPIC-NAME>、<TOPIC-ACCESS-KEY>、<TOPIC-SUBSCRIPTION-NAME>)更新为你的命名空间终结点、主题名称和主题密钥。using Azure.Messaging; using Azure; using Azure.Messaging.EventGrid.Namespaces; // TODO: Replace the following placeholders with appropriate values // Endpoint of the namespace that you can find on the Overview page for your Event Grid namespace. Prefix it with https://. // Should be in the form: https://namespace01.eastus-1.eventgrid.azure.net. var namespaceEndpoint = "<NAMESPACE-ENDPOINT>"; // Name of the topic in the namespace var topicName = "<TOPIC-NAME>"; // Access key for the topic var topicKey = "<TOPIC-ACCESS-KEY>"; // Construct the client using an Endpoint for a namespace as well as the access key var client = new EventGridSenderClient(new Uri(namespaceEndpoint), topicName, new AzureKeyCredential(topicKey)); // Publish a single CloudEvent using a custom TestModel for the event data. var @ev = new CloudEvent("employee_source", "type", new TestModel { Name = "Bob", Age = 18 }); await client.SendAsync(ev); // Publish a batch of CloudEvents. await client.SendAsync( new[] { new CloudEvent("employee_source", "type", new TestModel { Name = "Tom", Age = 55 }), new CloudEvent("employee_source", "type", new TestModel { Name = "Alice", Age = 25 })}); Console.WriteLine("Three events have been published to the topic. Press any key to end the application."); Console.ReadKey(); public class TestModel { public string Name { get; set; } public int Age { get; set; } }生成项目并确保没有错误。
运行程序并等待出现确认消息。
Three events have been published to the topic. Press any key to end the application.重要
在大多数情况下,角色分配在 Azure 中传播需要一两分钟。 在极少数情况下,最多可能需要 8 分钟。 如果在首次运行代码时收到身份验证错误,请稍等片刻再试。
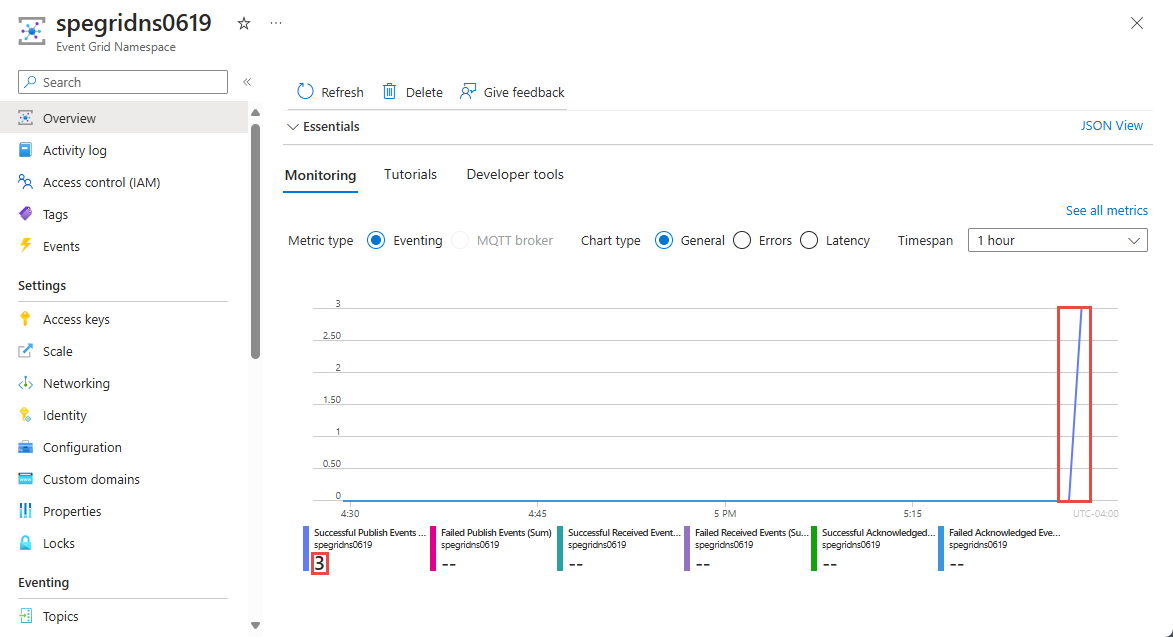
在 Azure 门户中按照以下步骤操作:
从主题拉取消息
在本部分中,你会创建 .NET 控制台应用程序,用于接收来自主题的消息。
创建项目以接收发布的 CloudEvents
- 在“解决方案资源管理器”窗口中,右击EventGridQuickStart解决方案,指向“添加”,然后选择“新建项目”。
- 依次选择“控制台应用程序”、“下一步” 。
- 输入EventReceiver作为“项目名称”,然后选择“创建”。
- 在“解决方案资源管理器”窗口中,右击EventReceiver并选择“设为启动项目”。
向项目添加 NuGet 包
在菜单中选择“工具”>“NuGet 包管理器”>“包管理器控制台”。
运行以下命令来安装 NuGet 包 Azure.Messaging.EventGrid。 如果尚未设置,请选择“EventReceiver”作为默认项目。
Install-Package Azure.Messaging.EventGrid.Namespaces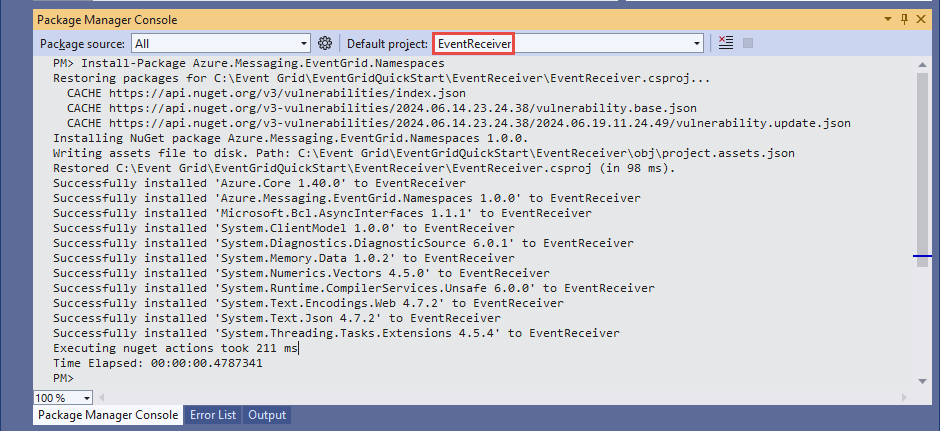
添加代码以从主题接收事件
在本部分中,你将添加从队列检索消息的代码。
在
Program类中,添加以下代码:重要
将代码片段中的占位符值(
<NAMESPACE-ENDPOINT>、<TOPIC-NAME>、<TOPIC-ACCESS-KEY>、<TOPIC-SUBSCRIPTION-NAME>)更新为你的命名空间终结点、主题名称、主题密钥和主题的订阅名称。using Azure; using Azure.Messaging; using Azure.Messaging.EventGrid.Namespaces; // TODO: Replace the following placeholders with appropriate values // Endpoint of the namespace that you can find on the Overview page for your Event Grid namespace // Example: https://namespace01.eastus-1.eventgrid.azure.net. var namespaceEndpoint = "<NAMESPACE-ENDPOINT>"; // Should be in the form: https://namespace01.eastus-1.eventgrid.azure.net. // Name of the topic in the namespace var topicName = "<TOPIC-NAME>"; // Access key for the topic var topicKey = "<TOPIC-ACCESS-KEY>"; // Name of the subscription to the topic var subscriptionName = "<TOPIC-SUBSCRIPTION-NAME>"; // Maximum number of events you want to receive const short MaxEventCount = 3; // Construct the client using an Endpoint for a namespace as well as the access key var client = new EventGridReceiverClient(new Uri(namespaceEndpoint), topicName, subscriptionName, new AzureKeyCredential(topicKey)); // Receive the published CloudEvents. ReceiveResult result = await client.ReceiveAsync(MaxEventCount); Console.WriteLine("Received Response"); Console.WriteLine("-----------------");将以下方法追加到
Program类的末尾。// handle received messages. Define these variables on the top. var toRelease = new List<string>(); var toAcknowledge = new List<string>(); var toReject = new List<string>(); // Iterate through the results and collect the lock tokens for events we want to release/acknowledge/result foreach (ReceiveDetails detail in result.Details) { CloudEvent @event = detail.Event; BrokerProperties brokerProperties = detail.BrokerProperties; Console.WriteLine(@event.Data.ToString()); // The lock token is used to acknowledge, reject or release the event Console.WriteLine(brokerProperties.LockToken); Console.WriteLine(); // If the event is from the "employee_source" and the name is "Bob", we are not able to acknowledge it yet, so we release it if (@event.Source == "employee_source" && @event.Data.ToObjectFromJson<TestModel>().Name == "Bob") { toRelease.Add(brokerProperties.LockToken); } // acknowledge other employee_source events else if (@event.Source == "employee_source") { toAcknowledge.Add(brokerProperties.LockToken); } // reject all other events else { toReject.Add(brokerProperties.LockToken); } } // Release/acknowledge/reject the events if (toRelease.Count > 0) { ReleaseResult releaseResult = await client.ReleaseAsync(toRelease); // Inspect the Release result Console.WriteLine($"Failed count for Release: {releaseResult.FailedLockTokens.Count}"); foreach (FailedLockToken failedLockToken in releaseResult.FailedLockTokens) { Console.WriteLine($"Lock Token: {failedLockToken.LockToken}"); Console.WriteLine($"Error Code: {failedLockToken.Error}"); Console.WriteLine($"Error Description: {failedLockToken.ToString}"); } Console.WriteLine($"Success count for Release: {releaseResult.SucceededLockTokens.Count}"); foreach (string lockToken in releaseResult.SucceededLockTokens) { Console.WriteLine($"Lock Token: {lockToken}"); } Console.WriteLine(); } if (toAcknowledge.Count > 0) { AcknowledgeResult acknowledgeResult = await client.AcknowledgeAsync(toAcknowledge); // Inspect the Acknowledge result Console.WriteLine($"Failed count for Acknowledge: {acknowledgeResult.FailedLockTokens.Count}"); foreach (FailedLockToken failedLockToken in acknowledgeResult.FailedLockTokens) { Console.WriteLine($"Lock Token: {failedLockToken.LockToken}"); Console.WriteLine($"Error Code: {failedLockToken.Error}"); Console.WriteLine($"Error Description: {failedLockToken.ToString}"); } Console.WriteLine($"Success count for Acknowledge: {acknowledgeResult.SucceededLockTokens.Count}"); foreach (string lockToken in acknowledgeResult.SucceededLockTokens) { Console.WriteLine($"Lock Token: {lockToken}"); } Console.WriteLine(); } if (toReject.Count > 0) { RejectResult rejectResult = await client.RejectAsync(toReject); // Inspect the Reject result Console.WriteLine($"Failed count for Reject: {rejectResult.FailedLockTokens.Count}"); foreach (FailedLockToken failedLockToken in rejectResult.FailedLockTokens) { Console.WriteLine($"Lock Token: {failedLockToken.LockToken}"); Console.WriteLine($"Error Code: {failedLockToken.Error}"); Console.WriteLine($"Error Description: {failedLockToken.ToString}"); } Console.WriteLine($"Success count for Reject: {rejectResult.SucceededLockTokens.Count}"); foreach (string lockToken in rejectResult.SucceededLockTokens) { Console.WriteLine($"Lock Token: {lockToken}"); } Console.WriteLine(); } public class TestModel { public string Name { get; set; } public int Age { get; set; } }在“解决方案资源管理器”窗口中,右键单击“EventReceiver”项目并选择“设为启动项目”。
生成项目并确保没有错误。
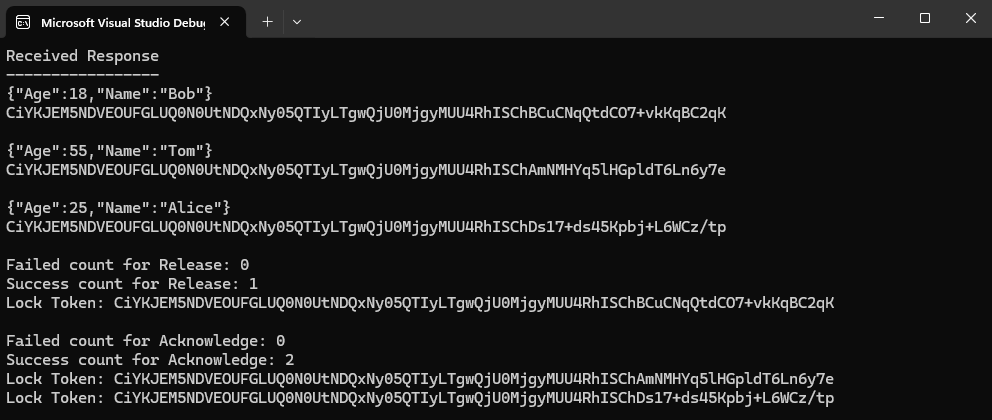
运行 EventReceiver 应用程序并确认在输出窗口中看到了这三个事件。
清理资源
导航到 Azure 门户中的事件网格命名空间,然后在 Azure 门户上选择“删除”以删除事件网格命名空间及其中的主题。
相关主题
请查看 ASP.NET API 参考。
