你当前正在访问 Microsoft Azure Global Edition 技术文档网站。 如果需要访问由世纪互联运营的 Microsoft Azure 中国技术文档网站,请访问 https://docs.azure.cn。
管理数字孪生
环境中的实体由数字孪生体表示。 数字孪生体的管理操作可能包括创建、修改和删除。
本文重点介绍如何管理数字孪生体;若要将关系和孪生图作为一个整体进行处理,请参阅管理孪生图和关系。
提示
所有 SDK 函数都提供同步和异步版本。
先决条件
若要在本文中使用 Azure 数字孪生,你需要有一个 Azure 数字孪生实例,还需具备使用它所必需的权限。 如果你已设置了一个 Azure 数字孪生实例,则可以使用该实例并跳到下一部分。 如果没有,请按照设置实例和身份验证中的说明操作。 该说明中包含可帮助你验证是否已成功完成每个步骤的信息。
设置实例后,记下实例的主机名。 可以在 Azure 门户中找到该主机名。
开发人员接口
本文重点介绍如何使用 .NET (C#) SDK 完成不同的管理操作。 还可使用 Azure 数字孪生 API 和 SDK 中所述的其他语言 SDK 创建这些管理调用。
其他可用于完成这些操作的开发人员接口包括:
可视化效果
Azure Digital Twins Explorer 是一种可视化工具,用于浏览 Azure 数字孪生图中的数据。 你可以使用此资源管理器查看、查询和编辑模型、孪生和关系。
若要了解 Azure Digital Twins Explorer 工具,请参阅 Azure Digital Twins Explorer。 如需各项功能的详细使用步骤,请参阅使用 Azure Digital Twins Explorer。
下面展示了可视化效果:
创建数字孪生体
若要创建孪生体,请在服务客户端上使用 CreateOrReplaceDigitalTwinAsync() 方法,如下所示:
await client.CreateOrReplaceDigitalTwinAsync<BasicDigitalTwin>(twinId, initData);
若要创建数字孪生体,需要提供:
- 要分配给数字孪生体的 ID 值(在创建孪生体时定义该 ID)
- 要使用的模型
- 任何所需的孪生体数据初始化,包括...
- 属性(可选初始化):如果需要,可以为数字孪生体的属性设置初始值。 属性视为可选项,可在以后设置,但在设置后才会显示为孪生体的一部分。
- 组件(存在于孪生体中时必须进行初始化):如果你的孪生体包含任何组件,则必须在创建孪生体时初始化这些组件。 它们可以是空对象,但组件本身必须存在。
模型和任何初始属性值都是通过 initData 参数提供的,该参数是一个包含相关数据的 JSON 字符串。 有关构造此对象的详细信息,请转到下一节。
提示
创建或更新孪生体后,可能会有长达 10 秒的延迟才会在查询中反映更改。
GetDigitalTwin API(见后文)不会遇到这种延迟,因此,如果需要即时响应,请使用 API 调用而不是通过查询来查看新创建的孪生体。
初始化模型和属性
可在创建孪生体时初始化该孪生体的属性。
孪生体创建 API 接受序列化为孪生体属性的有效 JSON 说明的对象。 请参阅数字孪生体和孪生图,获取孪生体的 JSON 格式的说明。
首先,可以创建一个数据对象来表示孪生体及其属性数据。 可以手动创建参数对象,也可使用提供的帮助程序类创建参数对象。 下面是每项的示例。
使用手动创建的数据创建孪生体
如果不使用任何自定义帮助程序类,则可在 Dictionary<string, object> 中表示孪生体的属性,其中 string 是属性的名称,object 是表示属性及其值的对象。
// Define a custom model type for the twin to be created

internal class CustomDigitalTwin
{
    [JsonPropertyName(DigitalTwinsJsonPropertyNames.DigitalTwinId)]
    public string Id { get; set; }

    [JsonPropertyName(DigitalTwinsJsonPropertyNames.DigitalTwinETag)]
    public string ETag { get; set; }

    [JsonPropertyName("temperature")]
    public double Temperature { get; set; }

    [JsonPropertyName("humidity")]
    public double Humidity{ get; set; }
}

// Initialize properties and create the twin
public class TwinOperationsCreateTwin
{
    public async Task CreateTwinAsync(DigitalTwinsClient client)
    {
        // Initialize the twin properties
        var myTwin = new CustomDigitalTwin
        {
            Temperature = 25.0,
            Humidity = 50.0,
        };

        // Create the twin
        const string twinId = "<twin-ID>";
        Response<CustomDigitalTwin> response = await client.CreateOrReplaceDigitalTwinAsync(twinId, myTwin);
        Console.WriteLine($"Temperature value: {response.Value.Temperature}");
    }
}
用帮助程序类创建孪生体
使用帮助程序类 BasicDigitalTwin 可直接在“twin”对象中存储属性字段。 你可能希望仍使用 Dictionary<string, object> 生成属性列表,然后将属性直接添加到孪生体对象作为其 CustomProperties。
string twinId = "myTwinID";
var initData = new BasicDigitalTwin
{
    Id = twinId,
    Metadata = { ModelId = "dtmi:example:Room;1" },
    // Initialize properties
    Contents =
    {
        { "Temperature", 25.0 },
        { "Humidity", 50.0 },
    },
};

await client.CreateOrReplaceDigitalTwinAsync<BasicDigitalTwin>(twinId, initData);
注意
BasicDigitalTwin 对象附带了一个 Id 字段。 可将此字段保留为空,但如果添加了一个 ID 值,则它需要与传递给 CreateOrReplaceDigitalTwinAsync() 调用的 ID 参数匹配。 例如:
twin.Id = "myRoomId";
使用导入作业 API 批量创建孪生
可以使用导入作业 API 在单个 API 调用中一次性创建多个孪生体。 此方法要求在 Azure 数字孪生实例中为孪生体和批量作业使用 Azure Blob 存储和写入权限。
提示
导入作业 API 还允许在同一调用中导入模型和关系,以便同时创建图形的所有部分。 有关此过程的详细信息,请参阅使用导入作业 API 批量上传模型、孪生体和关系。
若要批量导入孪生体,需要将孪生体(以及批量导入作业中包含的任何其他资源)构建为 NDJSON 文件。
Twins 部分在 Models 部分之后(并且在 Relationships 部分之前)。 文件中定义的孪生体可以引用在此文件中定义的模型,也可以引用实例中已存在的模型,并且可以选择性地包含孪生体属性的初始化。
可以在导入作业 API 简介中查看用于创建这些文件的示例导入文件和示例项目。
接下来,需要将文件上传到 Azure Blob 存储中的追加 blob 中。 若要了解如何创建 Azure 存储容器,请参阅创建容器。 然后,使用首选上传方法(一些选项包括 AzCopy 命令、Azure CLI 或 Azure 门户)上传文件。
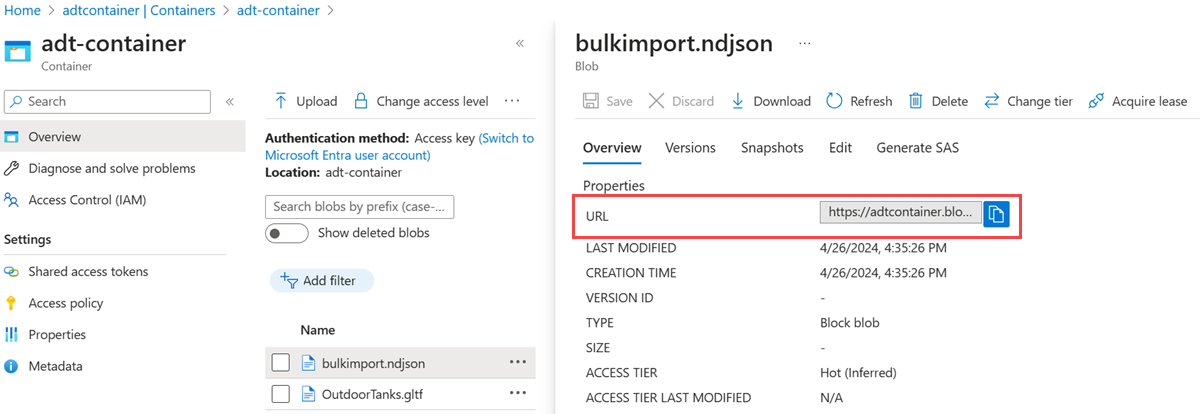
将 NDJSON 文件上传到容器后,在 blob 容器中获取其 URL。 稍后将在批量导入 API 调用正文中使用此值。
下面是显示 Azure 门户中 Blob 文件的 URL 值的屏幕截图:
然后,可以在导入作业 API 调用中使用该文件。 你需提供输入文件的 Blob 存储 URL,以及新的 Blob 存储 URL,以指示在服务创建输出日志后,你希望将它存储在哪里。
获取数字孪生体的数据
可通过调用 GetDigitalTwin() 方法来访问任何数字孪生体的详细信息,如下所示:
Response<BasicDigitalTwin> twinResponse = await client.GetDigitalTwinAsync<BasicDigitalTwin>(twinId);
twin = twinResponse.Value;
此调用以强类型对象类型的形式返回孪生体的数据,如 BasicDigitalTwin。
BasicDigitalTwin 是 SDK 中随附的序列化帮助程序类,它会以预分析形式返回孪生体的核心元数据和属性。 始终可使用你选择的 JSON 库(如 System.Text.Json 或 Newtonsoft.Json)反序列化孪生数据。 然而,若要对孪生体进行基本访问,帮助程序类可使此操作更方便。
注意
BasicDigitalTwin 使用 System.Text.Json 特性。 若要将 BasicDigitalTwin 用于 DigitalTwinsClient,必须使用默认构造函数初始化客户端,或者,如果要自定义序列化程序选项,请使用 JsonObjectSerializer。
使用 BasicDigitalTwin 帮助程序类,还可通过 Dictionary<string, object> 访问孪生体上定义的属性。 若要列出孪生体的属性,可使用:
BasicDigitalTwin twin;
Response<BasicDigitalTwin> twinResponse = await client.GetDigitalTwinAsync<BasicDigitalTwin>(twinId);
twin = twinResponse.Value;
Console.WriteLine($"Model id: {twin.Metadata.ModelId}");
foreach (string prop in twin.Contents.Keys)
{
    if (twin.Contents.TryGetValue(prop, out object value))
        Console.WriteLine($"Property '{prop}': {value}");
}
使用 GetDigitalTwin() 方法检索孪生体时,仅返回至少已设置一次的属性。
提示
孪生体的 displayName 是其模型元数据的一部分,因此在获取孪生体实例的数据时,它将不会显示。 若要查看此值,可从模型中进行检索。
若要使用单个 API 调用检索多个孪生体,请参阅查询孪生图中的查询 API 示例。
请看下面定义月亮的模型(用数字孪生体定义语言 (DTDL) 编写):
{
    "@id": "dtmi:example:Moon;1",
    "@type": "Interface",
    "@context": "dtmi:dtdl:context;3",
    "contents": [
        {
            "@type": "Property",
            "name": "radius",
            "schema": "double",
            "writable": true
        },
        {
            "@type": "Property",
            "name": "mass",
            "schema": "double",
            "writable": true
        }
    ]
}
对月亮类型的孪生体调用 object result = await client.GetDigitalTwinAsync("my-moon"); 的结果可能类似于下例:
{
  "$dtId": "myMoon-001",
  "$etag": "W/\"e59ce8f5-03c0-4356-aea9-249ecbdc07f9\"",
  "radius": 1737.1,
  "mass": 0.0734,
  "$metadata": {
    "$model": "dtmi:example:Moon;1",
    "radius": {
      "lastUpdateTime": "2022-12-06T20:00:32.8209188Z"
    },
    "mass": {
      "lastUpdateTime": "2022-12-04T12:04:43.3859361Z"
    }
  }
}
数字孪生体的已定义属性作为数字孪生体的顶级属性返回。 不属于 DTDL 定义的元数据或系统信息返回时将具有 $ 前缀。 元数据属性包括以下值:
-
$dtId:此 Azure 数字孪生实例中数字孪生体的 ID -
$etag:由 Web 服务器分配的标准 HTTP 字段。 每次更新孪生体时,此值将更新为新值,这对于确定自上次检查后是否已在服务器上更新了孪生体数据非常有用。 可以使用If-Match执行更新和删除,仅当实体的 etag 与提供的 etag 相匹配时,这两项操作才会完成。 有关这些操作的详细信息,请参阅 DigitalTwins 更新和 DigitalTwins 删除的文档。 -
$metadata:一组元数据属性,可能包括以下项:-
$model,数字孪生体的模型的 DTMI。 -
lastUpdateTime代表孪生体属性。 这是一个时间戳,表示 Azure 数字孪生处理属性更新消息的日期和时间 -
sourceTime代表孪生体属性。 这是一个可选的可写属性,表示在现实世界中观察到属性更新时的时间戳。
-
可以在数字孪生体 JSON 格式中阅读有关数字孪生体包含的字段的详细信息。 若要详细了解 BasicDigitalTwin 等序列化帮助程序类,可参阅 Azure 数字孪生 API 和 SDK。
查看所有数字孪生体
若要查看实例中的所有数字孪生体,请使用查询。 可使用查询 API 或 CLI 命令来运行查询。
下方是一个基本查询的正文,它会返回一个包含实例中所有数字孪生体的列表:
SELECT * FROM DIGITALTWINS
更新数字孪生
若要更新数字孪生体的属性,请以 JSON 修补程序格式编写要替换的信息。 有关可使用的 JSON 修补程序操作的完整列表,包括 replace、add 和 remove,请参阅 JSON 修补程序的操作。
在创建包含更新信息的 JSON 修补程序文档后,将文档传递给 UpdateDigitalTwin() 方法:
await client.UpdateDigitalTwinAsync(twinId, updateTwinData);
单个修补调用可根据需要更新单个孪生体上的任意数量的属性(甚至所有属性)。 如果需要更新多个孪生体上的属性,则需要对每个孪生体进行单独的更新调用。
提示
创建或更新孪生体后,可能会有长达 10 秒的延迟才会在查询中反映更改。
GetDigitalTwin API(见前文)不会遇到这种延迟,因此,如果需要即时响应,请使用 API 调用而不是通过查询来查看新创建的孪生体。
下面是 JSON 补丁代码的示例。 此文档替换其应用到的数字孪生体的 mass 和 radius 属性值。 此示例演示 JSON 修补程序 replace 操作,该操作将替换现有属性的值。
[
    {
      "op": "replace",
      "path": "/mass",
      "value": 0.0799
    },
    {
      "op": "replace",
      "path": "/radius",
      "value": 0.800
    }
  ]
使用 .NET SDK 更新代码项目中的孪生体时,可以使用 Azure .NET SDK 的 JsonPatchDocument 创建 JSON 修补程序。 下面的示例展示了如何在项目代码中创建 JSON 补丁文档和使用 UpdateDigitalTwin()。
var updateTwinData = new JsonPatchDocument();
updateTwinData.AppendAdd("/Temperature", 25.0);
updateTwinData.AppendAdd("/myComponent/Property", "Hello");
// Un-set a property
updateTwinData.AppendRemove("/Humidity");

await client.UpdateDigitalTwinAsync("myTwin", updateTwinData).ConfigureAwait(false);
提示
可以通过本部分中所述的过程来更新 $metadata.<property-name>.sourceTime 字段,从而维护数字孪生体上的源时间戳。 有关此字段以及数字孪生体上可写的其他字段的详细信息,请参阅数字孪生体 JSON 格式。
更新数字孪生体组件中的子属性
请记住,模型可以包含组件,使其可由其他模型组成。
若要修补数字孪生体组件中的属性,可在 JSON 修补程序中使用路径语法:
[
  {
    "op": "replace",
    "path": "/mycomponentname/mass",
    "value": 0.0799
  }
]
更新对象类型属性中的子属性
模型可能包含属于对象类型的属性。 这些对象可能具有自己的属性,并且你可能想要更新属于对象类型属性的其中一个子属性。 此过程类似于更新组件中的子属性的过程,但可能需要执行一些额外的步骤。
考虑具有对象类型属性 ObjectProperty 的模型。
ObjectProperty 具有一个名为 StringSubProperty 的字符串属性。
使用此模型创建孪生体时,无需实例化 ObjectProperty。 如果在创建孪生体的过程中未实例化对象属性,则不会为修补操作创建默认路径来访问 ObjectProperty 及其 StringSubProperty。 需要先添加 ObjectProperty 的路径,然后才能更新其属性。
这可以通过 JSON 修补 add 操作来完成,如下所示:
[
  {
    "op": "add",
    "path": "/ObjectProperty",
    "value": {"StringSubProperty":"<string-value>"}
  }
]
注意
如果 ObjectProperty 具有多个属性,则应将所有属性都包含在此操作的 value 字段中,即使只更新一个属性也是如此:
... "value": {"StringSubProperty":"<string-value>", "Property2":"<property2-value>", ...}
完成此操作后,将存在一个 StringSubProperty 路径,并且现在可以通过典型的 replace 操作直接更新它:
[
  {
    "op": "replace",
    "path": "/ObjectProperty/StringSubProperty",
    "value": "<string-value>"
  }
]
虽然在创建孪生体时实例化了 ObjectProperty 的情况下不需要第一步,但建议在每次首次更新子属性时使用该步骤,因为你可能并不总是能够确定对象属性最初是否已实例化。
更新数字孪生体的模型
UpdateDigitalTwin() 函数还可用于将数字孪生体迁移到其他模型。
例如,请看以下 JSON 修补程序文档,该文档将替换数字孪生体的元数据 $model 字段:
[
  {
    "op": "replace",
    "path": "/$metadata/$model",
    "value": "dtmi:example:foo;1"
  }
]
仅当修补程序修改的数字孪生体符合新模型时,此操作才会成功。
请考虑以下示例:
- 假设有一个数字孪生体,其模型为 foo_old。 foo_old 定义必需属性 mass。
- 新模型 foo_new 定义属性 mass 并添加新的必需属性 temperature。
- 修补后,数字孪生体必须同时具有 mass 和 temperature 属性。
这种情况的修补程序需要同时更新模型和孪生体的 temperature 属性,如下所示:
[
  {
    "op": "replace",
    "path": "/$metadata/$model",
    "value": "dtmi:example:foo_new;1"
  },
  {
    "op": "add",
    "path": "/temperature",
    "value": 60
  }
]
更新属性的 sourceTime
你还可以选择使用孪生体属性中的 sourceTime 字段来记录在现实世界中观察到属性更新的时间的时间戳。 Azure 数字孪生原生支持每个孪生体属性的元数据中的 sourceTime。
sourceTime 值必须符合 ISO 8601 日期和时间格式。 有关此字段以及数字孪生体上的其他字段的详细信息,请参阅数字孪生体 JSON 格式。
支持此字段的最低稳定 REST API 版本是 2022-05-31 版本。 若要使用 Azure 数字孪生 SDK 处理此字段,建议使用最新版本的 SDK 以确保包含此字段。
下面是一个 JSON 修补程序文档示例,它同时更新 Temperature 属性的值和 sourceTime 字段:
[
  {
    "op": "replace",
    "path": "/Temperature",
    "value": "22.3"
  },
  {
    "op": "replace",
    "path": "/$metadata/Temperature/sourceTime",
    "value": "2021-11-30T18:47:53.7648958Z"
  }
]
若要更新属于某个组件的属性上的 sourceTime 字段,请在路径开头包括该组件。 在以上示例中,可以通过将路径值从 /$metadata/Temperature/sourceTime 更改为 myComponent/$metadata/Temperature/sourceTime 来实现这一点。
注意
如果同时更新属性上的 sourceTime和值,然后只更新属性的值,则第一次更新的 sourceTime 时间戳将保留。
处理冲突的更新调用
Azure 数字孪生确保所有传入请求都会一个接一个地得到处理。 这意味着即使多个函数尝试同时更新一个孪生体的相同属性,也无需编写显式锁定代码来处理冲突。
此行为按孪生体发生。
例如,假设这三个调用同时到达:
- 在 Twin1 上写入属性 A
- 在 Twin1 上写入属性 B
- 在 Twin2 上写入属性 A
修改 Twin1 的两个调用相继执行,并为每个更改生成更改消息。 修改 Twin2 的调用在到达后,可以在没有冲突的情况下并发执行。
删除数字孪生体
可使用 DeleteDigitalTwin() 方法删除孪生体。 但是,只能在孪生体没有关系时将其删除。 因此,请先删除孪生体的传入和传出关系。
下面是用于删除孪生体及其关系的代码示例。
DeleteDigitalTwin SDK 调用将突出显示,明确其在较为广泛的示例上下文中的位置。
private static async Task CustomMethod_DeleteTwinAsync(DigitalTwinsClient client, string twinId)
{
    await CustomMethod_FindAndDeleteOutgoingRelationshipsAsync(client, twinId);
    await CustomMethod_FindAndDeleteIncomingRelationshipsAsync(client, twinId);
    try
    {
        await client.DeleteDigitalTwinAsync(twinId);
        Console.WriteLine("Twin deleted successfully");
    }
    catch (RequestFailedException ex)
    {
        Console.WriteLine($"*** Error:{ex.Message}");
    }
}

private static async Task CustomMethod_FindAndDeleteOutgoingRelationshipsAsync(DigitalTwinsClient client, string dtId)
{
    // Find the relationships for the twin

    try
    {
        // GetRelationshipsAsync will throw an error if a problem occurs
        AsyncPageable<BasicRelationship> rels = client.GetRelationshipsAsync<BasicRelationship>(dtId);

        await foreach (BasicRelationship rel in rels)
        {
            await client.DeleteRelationshipAsync(dtId, rel.Id).ConfigureAwait(false);
            Console.WriteLine($"Deleted relationship {rel.Id} from {dtId}");
        }
    }
    catch (RequestFailedException ex)
    {
        Console.WriteLine($"*** Error {ex.Status}/{ex.ErrorCode} retrieving or deleting relationships for {dtId} due to {ex.Message}");
    }
}

private static async Task CustomMethod_FindAndDeleteIncomingRelationshipsAsync(DigitalTwinsClient client, string dtId)
{
    // Find the relationships for the twin

    try
    {
        // GetRelationshipsAsync will throw an error if a problem occurs
        AsyncPageable<IncomingRelationship> incomingRels = client.GetIncomingRelationshipsAsync(dtId);

        await foreach (IncomingRelationship incomingRel in incomingRels)
        {
            await client.DeleteRelationshipAsync(incomingRel.SourceId, incomingRel.RelationshipId).ConfigureAwait(false);
            Console.WriteLine($"Deleted incoming relationship {incomingRel.RelationshipId} from {dtId}");
        }
    }
    catch (RequestFailedException ex)
    {
        Console.WriteLine($"*** Error {ex.Status}/{ex.ErrorCode} retrieving or deleting incoming relationships for {dtId} due to {ex.Message}");
    }
}
删除所有数字孪生体
有关如何一次删除所有孪生体的示例,请下载使用示例客户端应用了解基础知识中使用的示例应用。 CommandLoop.cs 文件在 CommandDeleteAllTwins() 函数中执行此操作。
注意
如果要一次性删除实例中的所有模型、孪生体和关系,请使用删除作业 API。
可运行的数字孪生体代码示例
可使用下面的可运行代码示例创建一个孪生体,更新其详细信息,然后删除孪生体。
设置示例项目文件
代码片段使用示例模型定义 Room.json。 若要下载模型文件以便可以在代码中使用,请使用此链接直接转到 GitHub 中的该文件。 然后,右键单击屏幕上的任意位置,在浏览器的右击菜单中选择“另存为”,并使用“另存为”窗口将文件另存为 Room.json。
接下来,在 Visual Studio 或所选的编辑器中创建新的控制台应用项目。
然后,将可运行示例的以下代码复制到你的项目中:
using System;
using System.Threading.Tasks;
using System.Collections.Generic;
using Azure;
using Azure.DigitalTwins.Core;
using Azure.Identity;
using System.IO;

namespace DigitalTwins_Samples
{
    class TwinOperationsSample
    {
        public static async Task Main(string[] args)
        {
            Console.WriteLine("Hello World!");

            // Create the Azure Digital Twins client for API calls
            string adtInstanceUrl = "https://<your-instance-hostname>";
            var credentials = new DefaultAzureCredential();
            var client = new DigitalTwinsClient(new Uri(adtInstanceUrl), credentials);
            Console.WriteLine($"Service client created – ready to go");

            // Upload models
            Console.WriteLine($"Upload a model");
            string dtdl = File.ReadAllText("<path-to>/Room.json");
            var models = new List<string> { dtdl };
            // Upload the model to the service
            await client.CreateModelsAsync(models);

            // Create new digital twin
            // <CreateTwin_withHelper>
            string twinId = "myTwinID";
            var initData = new BasicDigitalTwin
            {
                Id = twinId,
                Metadata = { ModelId = "dtmi:example:Room;1" },
                // Initialize properties
                Contents =
                {
                    { "Temperature", 25.0 },
                    { "Humidity", 50.0 },
                },
            };

            // <CreateTwinCall>
            await client.CreateOrReplaceDigitalTwinAsync<BasicDigitalTwin>(twinId, initData);
            // </CreateTwinCall>
            // </CreateTwin_withHelper>
            Console.WriteLine("Twin created successfully");

            //Print twin
            Console.WriteLine("--- Printing twin details:");
            await CustomMethod_FetchAndPrintTwinAsync(twinId, client);
            Console.WriteLine("--------");

            //Update twin data
            var updateTwinData = new JsonPatchDocument();
            updateTwinData.AppendAdd("/Temperature", 30.0);
            // <UpdateTwinCall>
            await client.UpdateDigitalTwinAsync(twinId, updateTwinData);
            // </UpdateTwinCall>
            Console.WriteLine("Twin properties updated");
            Console.WriteLine();

            //Print twin again
            Console.WriteLine("--- Printing twin details (after update):");
            await CustomMethod_FetchAndPrintTwinAsync(twinId, client);
            Console.WriteLine("--------");
            Console.WriteLine();

            //Delete twin
            await CustomMethod_DeleteTwinAsync(client, twinId);
        }

        private static async Task<BasicDigitalTwin> CustomMethod_FetchAndPrintTwinAsync(string twinId, DigitalTwinsClient client)
        {
            // <GetTwin>
            BasicDigitalTwin twin;
            // <GetTwinCall>
            Response<BasicDigitalTwin> twinResponse = await client.GetDigitalTwinAsync<BasicDigitalTwin>(twinId);
            twin = twinResponse.Value;
            // </GetTwinCall>
            Console.WriteLine($"Model id: {twin.Metadata.ModelId}");
            foreach (string prop in twin.Contents.Keys)
            {
                if (twin.Contents.TryGetValue(prop, out object value))
                    Console.WriteLine($"Property '{prop}': {value}");
            }
            // </GetTwin>

            return twin;
        }

        // <DeleteTwin>
        private static async Task CustomMethod_DeleteTwinAsync(DigitalTwinsClient client, string twinId)
        {
            await CustomMethod_FindAndDeleteOutgoingRelationshipsAsync(client, twinId);
            await CustomMethod_FindAndDeleteIncomingRelationshipsAsync(client, twinId);
            try
            {
                await client.DeleteDigitalTwinAsync(twinId);
                Console.WriteLine("Twin deleted successfully");
            }
            catch (RequestFailedException ex)
            {
                Console.WriteLine($"*** Error:{ex.Message}");
            }
        }

        private static async Task CustomMethod_FindAndDeleteOutgoingRelationshipsAsync(DigitalTwinsClient client, string dtId)
        {
            // Find the relationships for the twin

            try
            {
                // GetRelationshipsAsync will throw an error if a problem occurs
                AsyncPageable<BasicRelationship> rels = client.GetRelationshipsAsync<BasicRelationship>(dtId);

                await foreach (BasicRelationship rel in rels)
                {
                    await client.DeleteRelationshipAsync(dtId, rel.Id).ConfigureAwait(false);
                    Console.WriteLine($"Deleted relationship {rel.Id} from {dtId}");
                }
            }
            catch (RequestFailedException ex)
            {
                Console.WriteLine($"*** Error {ex.Status}/{ex.ErrorCode} retrieving or deleting relationships for {dtId} due to {ex.Message}");
            }
        }

        private static async Task CustomMethod_FindAndDeleteIncomingRelationshipsAsync(DigitalTwinsClient client, string dtId)
        {
            // Find the relationships for the twin

            try
            {
                // GetRelationshipsAsync will throw an error if a problem occurs
                AsyncPageable<IncomingRelationship> incomingRels = client.GetIncomingRelationshipsAsync(dtId);

                await foreach (IncomingRelationship incomingRel in incomingRels)
                {
                    await client.DeleteRelationshipAsync(incomingRel.SourceId, incomingRel.RelationshipId).ConfigureAwait(false);
                    Console.WriteLine($"Deleted incoming relationship {incomingRel.RelationshipId} from {dtId}");
                }
            }
            catch (RequestFailedException ex)
            {
                Console.WriteLine($"*** Error {ex.Status}/{ex.ErrorCode} retrieving or deleting incoming relationships for {dtId} due to {ex.Message}");
            }
        }
        // </DeleteTwin>

    }
}
注意
当前存在影响 DefaultAzureCredential 包装类的已知问题,该问题在进行身份验证时可能会导致错误。 如果遇到此问题,可以尝试使用以下可选参数实例化 DefaultAzureCredential 来解决问题:new DefaultAzureCredential(new DefaultAzureCredentialOptions { ExcludeSharedTokenCacheCredential = true });
有关此问题的详细信息,请参阅 Azure 数字孪生已知问题。
配置项目
接下来,完成以下步骤来配置项目代码:
将之前下载的 Room.json 文件添加到项目中,并替换代码中的
<path-to>占位符,以告知程序可在何处找到它。将占位符
<your-instance-hostname>替换为你的 Azure 数字孪生实例的主机名。将两个依赖项添加到你的项目,这是与 Azure 数字孪生结合使用所必需的。 第一个是适用于 .NET 的 Azure 数字孪生 SDK 的包,第二个提供工具来帮助向 Azure 进行身份验证。
dotnet add package Azure.DigitalTwins.Core
dotnet add package Azure.Identity
如果要直接运行该示例,则还需要设置本地凭据。 下一节将详细介绍这一点。
设置本地 Azure 凭据
当你在本地计算机上运行示例时,此示例使用 DefaultAzureCredential(属于 Azure.Identity 库的一部分)对用户进行 Azure 数字孪生实例验证。 若要详细了解客户端应用可向 Azure 数字孪生进行身份验证的不同方法,请参阅编写应用身份验证代码。
使用 DefaultAzureCredential,此示例将在本地环境中搜索凭据,如本地 DefaultAzureCredential 或 Visual Studio/Visual Studio Code 中的 Azure 登录。 因此,应该通过这些机制在本地登录 Azure,以便设置示例的凭据。
如果使用 Visual Studio 或 Visual Studio Code 运行代码示例,请确保使用要用于访问 Azure 数字孪生实例的相同 Azure 凭据登录到该编辑器。 如果使用本地 CLI 窗口,请运行 az login 命令来登录到你的 Azure 帐户。 此后,当你运行代码示例时,系统应自动对你进行身份验证。
运行示例
安装完成后,可以运行示例代码项目。
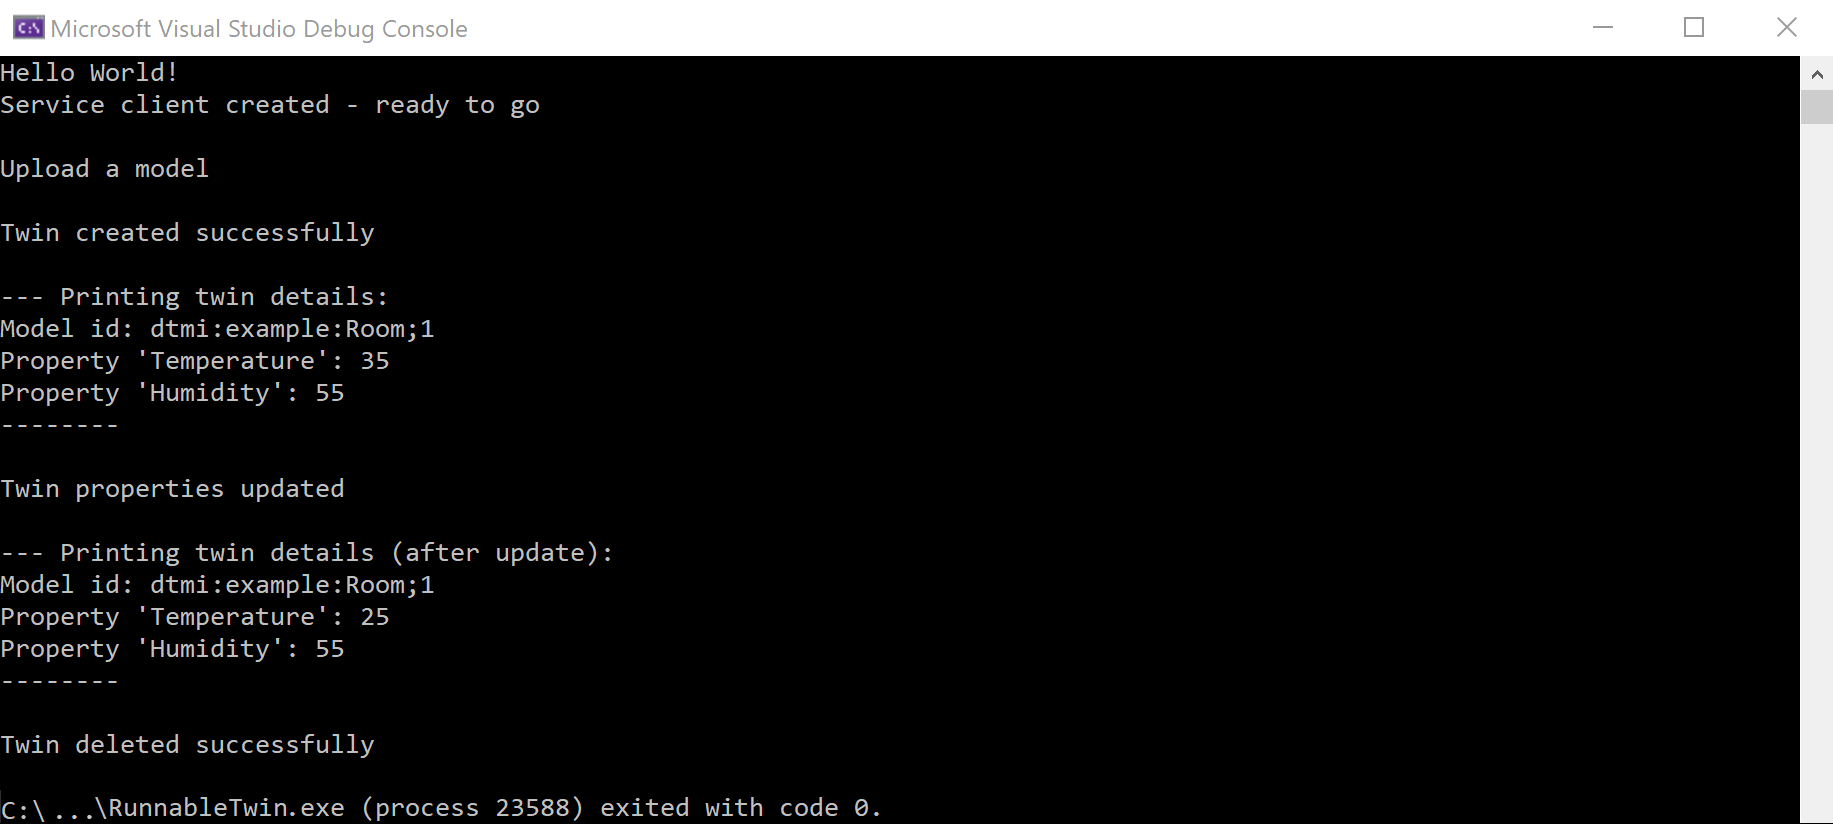
下面是上述程序的控制台输出:
后续步骤
了解如何创建和管理数字孪生体之间的关系:


