你当前正在访问 Microsoft Azure Global Edition 技术文档网站。 如果需要访问由世纪互联运营的 Microsoft Azure 中国技术文档网站,请访问 https://docs.azure.cn。
使用 Azure VM 映像生成器和 Microsoft Dev Box 配置开发箱
在本文中,你将使用 Azure VM 映像生成器在 Microsoft Dev Box 中基于一个模板创建自定义开发箱。 该模板包括用于安装 Visual Studio Code (VS Code) 的自定义步骤。
使用标准化虚拟机 (VM) 映像,有助于确保在迁移到云时实现一致的部署。 这些映像可能包括预定义的安全功能、配置设置和必要的软件。 设置映像管道的工作可能非常耗时且复杂。 Azure VM 映像生成器可以简化该过程:该服务将允许你为映像创建配置,然后该服务将以此为基础生成映像并将其提交到开发箱项目。
手动或使用其他工具创建自定义 VM 映像可能会比较困难且不可靠。 基于 HashiCorp Packer 构建的 VM 映像生成器可提供托管服务的优势。
为了简化 VM 映像创建过程,VM 映像生成器:
- 无需复杂的工具、流程和手动步骤。 它会提取这些详细信息并隐藏特定于 Azure 的需求,例如对映像进行通用化处理 (Sysprep),同时允许高级用户在必要时进行替代。
- 适用于现有映像生成管道。 你可以从管道调用 VM 映像生成器,也可以使用 Azure VM 映像生成器服务的 DevOps 任务。
- 从各种源收集自定义数据,因此不必在一个位置收集所有自定义数据。
- 与 Azure Compute Gallery 集成,创建用于进行全局分发、复制、版本控制和缩放的映像管理系统。 可以将相同的映像作为虚拟硬盘或托管映像进行分发,而无需重新生成它们。
重要
Microsoft Dev Box 仅支持启用了受信任启动安全类型的映像。
先决条件
若要预配使用 VM 映像生成器创建的自定义映像,需要:
- Azure PowerShell 6.0 或更高版本。 如果未安装 PowerShell,请按照在 Windows 上安装 Azure PowerShell 中的步骤操作。
- Azure 订阅或特定资源组的所有者或参与者权限。
- 资源组。
- 具有附加网络连接的开发人员中心。 如果没有,请按照通过配置网络连接将开发箱连接到资源中的步骤操作。
创建 Windows 映像并将其分发到 Azure Compute Gallery
第一步是使用 Azure VM 映像生成器和 Azure PowerShell 在 Azure Compute Gallery 中创建映像,然后进行全局分发。
以下示例使用了 PowerShell。 你也可以使用 Azure 命令行接口 (CLI)。
若要使用 VM 映像生成器,则需要注册此功能。
检查提供程序注册情况。 确保每个命令都针对指定功能返回
Registered。Get-AzResourceProvider -ProviderNamespace Microsoft.VirtualMachineImages | Format-table -Property ResourceTypes,RegistrationState Get-AzResourceProvider -ProviderNamespace Microsoft.Storage | Format-table -Property ResourceTypes,RegistrationState Get-AzResourceProvider -ProviderNamespace Microsoft.Compute | Format-table -Property ResourceTypes,RegistrationState Get-AzResourceProvider -ProviderNamespace Microsoft.KeyVault | Format-table -Property ResourceTypes,RegistrationState Get-AzResourceProvider -ProviderNamespace Microsoft.Network | Format-table -Property ResourceTypes,RegistrationState如果提供程序注册未返回
Registered,请运行以下命令来注册提供程序:Register-AzResourceProvider -ProviderNamespace Microsoft.VirtualMachineImages Register-AzResourceProvider -ProviderNamespace Microsoft.Storage Register-AzResourceProvider -ProviderNamespace Microsoft.Compute Register-AzResourceProvider -ProviderNamespace Microsoft.KeyVault Register-AzResourceProvider -ProviderNamespace Microsoft.Network安装 PowerShell 模块:
'Az.ImageBuilder', 'Az.ManagedServiceIdentity' | ForEach-Object {Install-Module -Name $_ -AllowPrerelease}创建变量以存储多次使用的信息。
- 复制以下示例代码。
- 将
<Resource group>替换为用于创建开发人员中心的资源组。 - 在 PowerShell 中运行更新的代码。
# Get existing context
$currentAzContext = Get-AzContext

# Get your current subscription ID
$subscriptionID=$currentAzContext.Subscription.Id

# Destination image resource group
$imageResourceGroup="<Resource group>"

# Location
$location="eastus2"

# Image distribution metadata reference name
$runOutputName="aibCustWinManImg01"

# Image template name
$imageTemplateName="vscodeWinTemplate"
通过在 PowerShell 中运行以下代码,创建用户分配的标识并设置对资源组的权限。
VM 映像生成器将使用你提供的用户标识来在 Azure Compute Gallery 中存储映像。 以下示例将创建一个 Azure 角色定义,其中包含用于分发映像的特定操作。 然后将角色定义分配给用户标识。
# Set up role definition names, which need to be unique
$timeInt=$(get-date -UFormat "%s")
$imageRoleDefName="Azure Image Builder Image Def"+$timeInt
$identityName="aibIdentity"+$timeInt

# Add an Azure PowerShell module to support AzUserAssignedIdentity
Install-Module -Name Az.ManagedServiceIdentity

# Create an identity
New-AzUserAssignedIdentity -ResourceGroupName $imageResourceGroup -Name $identityName -Location $location

$identityNameResourceId=$(Get-AzUserAssignedIdentity -ResourceGroupName $imageResourceGroup -Name $identityName).Id
$identityNamePrincipalId=$(Get-AzUserAssignedIdentity -ResourceGroupName $imageResourceGroup -Name $identityName).PrincipalId
为标识分配权限以分发映像。
使用以下命令下载 Azure 角色定义模板,然后使用之前指定的参数对其进行更新:
$aibRoleImageCreationUrl="https://raw.githubusercontent.com/azure/azvmimagebuilder/master/solutions/12_Creating_AIB_Security_Roles/aibRoleImageCreation.json"
$aibRoleImageCreationPath = "aibRoleImageCreation.json"

# Download the configuration
Invoke-WebRequest -Uri $aibRoleImageCreationUrl -OutFile $aibRoleImageCreationPath -UseBasicParsing
((Get-Content -path $aibRoleImageCreationPath -Raw) -replace '<subscriptionID>',$subscriptionID) | Set-Content -Path $aibRoleImageCreationPath
((Get-Content -path $aibRoleImageCreationPath -Raw) -replace '<rgName>', $imageResourceGroup) | Set-Content -Path $aibRoleImageCreationPath
((Get-Content -path $aibRoleImageCreationPath -Raw) -replace 'Azure Image Builder Service Image Creation Role', $imageRoleDefName) | Set-Content -Path $aibRoleImageCreationPath

# Create a role definition
New-AzRoleDefinition -InputFile  ./aibRoleImageCreation.json

# Grant the role definition to the VM Image Builder service principal
New-AzRoleAssignment -ObjectId $identityNamePrincipalId -RoleDefinitionName $imageRoleDefName -Scope "/subscriptions/$subscriptionID/resourceGroups/$imageResourceGroup"
创建库
若要将 VM 映像生成器与 Azure Compute Gallery 配合使用,请确保具有现有的库和映像定义。 VM 映像生成器不会创建库和映像定义。
运行以下命令以创建新的库和映像定义。
此代码将创建采用“受信任启动”安全类型的定义,并满足 Windows 365 映像要求。
# Gallery name
$galleryName= "devboxGallery"

# Image definition name
$imageDefName ="vscodeImageDef"

# Additional replication region
$replRegion2="eastus"

# Create the gallery
New-AzGallery -GalleryName $galleryName -ResourceGroupName $imageResourceGroup -Location $location

$SecurityType = @{Name='SecurityType';Value='TrustedLaunch'}
$features = @($SecurityType)

# Create the image definition
New-AzGalleryImageDefinition -GalleryName $galleryName -ResourceGroupName $imageResourceGroup -Location $location -Name $imageDefName -OsState generalized -OsType Windows -Publisher 'myCompany' -Offer 'vscodebox' -Sku '1-0-0' -Feature $features -HyperVGeneration "V2"
创建一个文件来存储模板定义,例如 c:/temp/mytemplate.txt。
将 VM 映像生成器的以下 Azure 资源管理器模板复制到新的模板文件中。
此模板将指示源映像和已应用的自定义项。 它将安装 Choco 和 VS Code,并指示映像分发位置。
{
   "$schema": "http://schema.management.azure.com/schemas/2015-01-01/deploymentTemplate.json#",
   "contentVersion": "1.0.0.0",
   "parameters": {
     "imageTemplateName": {
      "type": "string"
     },
     "api-version": {
      "type": "string"
     },
     "svclocation": {
      "type": "string"
     }
   },
   "variables": {},
   "resources": [
     {
      "name": "[parameters('imageTemplateName')]",
      "type": "Microsoft.VirtualMachineImages/imageTemplates",
      "apiVersion": "[parameters('api-version')]",
      "location": "[parameters('svclocation')]",
      "dependsOn": [],
      "tags": {
        "imagebuilderTemplate": "win11multi",
        "userIdentity": "enabled"
      },
      "identity": {
        "type": "UserAssigned",
        "userAssignedIdentities": {
         "<imgBuilderId>": {}
        }
      },
      "properties": {
        "buildTimeoutInMinutes": 100,
        "vmProfile": {
         "vmSize": "Standard_DS2_v2",
         "osDiskSizeGB": 127
        },
      "source": {
         "type": "PlatformImage",
         "publisher": "MicrosoftWindowsDesktop",
         "offer": "Windows-11",
         "sku": "win11-21h2-ent",
         "version": "latest"
      },
        "customize": [
         {
            "type": "PowerShell",
            "name": "Install Choco and Vscode",
            "inline": [
               "Set-ExecutionPolicy Bypass -Scope Process -Force; [System.Net.ServicePointManager]::SecurityProtocol = [System.Net.ServicePointManager]::SecurityProtocol -bor 3072; iex ((New-Object System.Net.WebClient).DownloadString('https://community.chocolatey.org/install.ps1'))",
               "choco install -y vscode"
            ]
         }
        ],
         "distribute":
         [
            {
               "type": "SharedImage",
               "galleryImageId": "/subscriptions/<subscriptionID>/resourceGroups/<rgName>/providers/Microsoft.Compute/galleries/<sharedImageGalName>/images/<imageDefName>",
               "runOutputName": "<runOutputName>",
               "artifactTags": {
                  "source": "azureVmImageBuilder",
                  "baseosimg": "win11multi"
               },
               "replicationRegions": [
                 "<region1>",
                 "<region2>"
               ]
            }
         ]
      }
     }
   ]
  }
在继续执行下一步之前,请关闭模板文件。
使用变量配置新模板。
将
<Template Path>替换为模板文件的位置,例如c:/temp/mytemplate。$templateFilePath = <Template Path> (Get-Content -path $templateFilePath -Raw ) -replace '<subscriptionID>',$subscriptionID | Set-Content -Path $templateFilePath (Get-Content -path $templateFilePath -Raw ) -replace '<rgName>',$imageResourceGroup | Set-Content -Path $templateFilePath (Get-Content -path $templateFilePath -Raw ) -replace '<runOutputName>',$runOutputName | Set-Content -Path $templateFilePath (Get-Content -path $templateFilePath -Raw ) -replace '<imageDefName>',$imageDefName | Set-Content -Path $templateFilePath (Get-Content -path $templateFilePath -Raw ) -replace '<sharedImageGalName>',$galleryName| Set-Content -Path $templateFilePath (Get-Content -path $templateFilePath -Raw ) -replace '<region1>',$location | Set-Content -Path $templateFilePath (Get-Content -path $templateFilePath -Raw ) -replace '<region2>',$replRegion2 | Set-Content -Path $templateFilePath ((Get-Content -path $templateFilePath -Raw) -replace '<imgBuilderId>',$identityNameResourceId) | Set-Content -Path $templateFilePath将模板提交到服务。
以下命令将下载所有依赖工件(如脚本),并将其存储在暂存资源组中。 暂存资源组的前缀为
IT_。New-AzResourceGroupDeployment -ResourceGroupName $imageResourceGroup -TemplateFile $templateFilePath -Api-Version "2020-02-14" -imageTemplateName $imageTemplateName -svclocation $location通过在模板上调用
Run命令来生成映像:在系统提示确认运行过程时,输入 Yes。
Invoke-AzResourceAction -ResourceName $imageTemplateName -ResourceGroupName $imageResourceGroup -ResourceType Microsoft.VirtualMachineImages/imageTemplates -ApiVersion "2020-02-14" -Action Run重要
在创建映像并将其复制到两个区域时,可能需要一段时间。 PowerShell 和 Azure 门户之间的进度报告可能会有所不同。 请等待该过程完成,然后再创建开发箱定义。
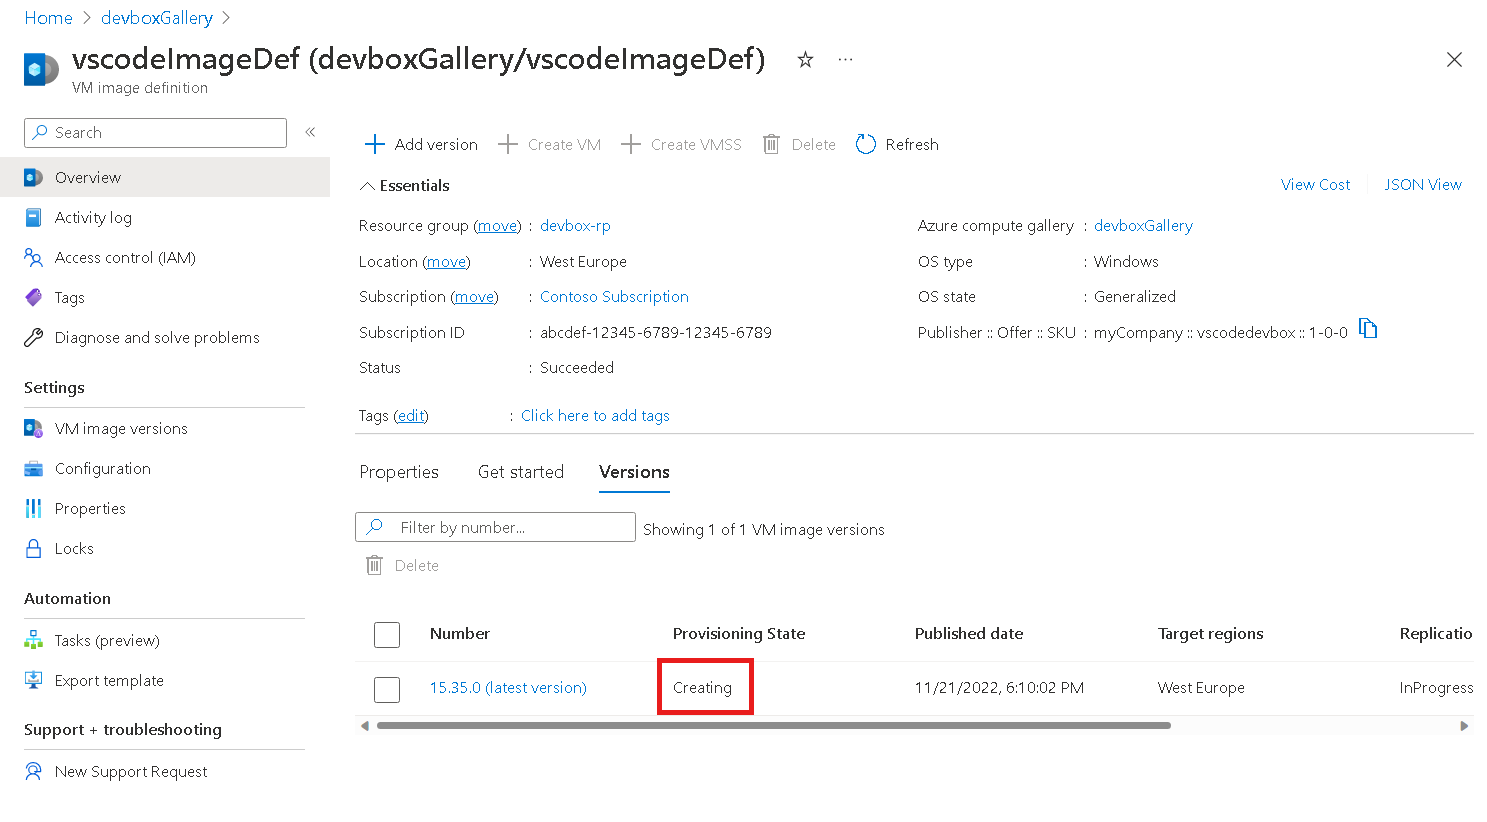
获取有关新生成的映像的信息,包括运行状态和预配状态。
Get-AzImageBuilderTemplate -ImageTemplateName $imageTemplateName -ResourceGroupName $imageResourceGroup | Select-Object -Property Name, LastRunStatusRunState, LastRunStatusMessage, ProvisioningState示例输出:
Name                 LastRunStatusRunState    LastRunStatusMessage   ProvisioningState
---------------------------------------------------------------------------------------
vscodeWinTemplate                                                    Creating
你还可以在 Azure 门户中查看映像的预配状态。 转到库并查看映像定义。
配置库
当自定义映像存储在库中时,可以对库进行相应配置,以在开发人员中心中使用映像。 有关详细信息,请参阅配置 Azure Compute Gallery。
使用自定义映像设置 Microsoft Dev Box
当库映像在开发人员中心内可用时,可以将自定义映像与 Microsoft Dev Box 配合使用。 有关详细信息,请参阅快速入门:配置 Microsoft Dev Box。
