Microsoft Defender for Cloud 中的漏洞扫描使用集成的 Microsoft Defender 漏洞管理扫描计算机以获取软件清单和查找漏洞,并在 Defender for Cloud 中提供发现结果和见解。 如果当前使用的是其他漏洞评估解决方案,可以通过本文中的说明改用 Defender 漏洞管理。
你当前正在访问 Microsoft Azure Global Edition 技术文档网站。 如果需要访问由世纪互联运营的 Microsoft Azure 中国技术文档网站,请访问 https://docs.azure.cn。
改为使用 Defender 漏洞管理进行扫描
先决条件
- 查看支持的计算机
- 确保已启用 Defender for Servers 计划。
- 该计划必须启用 Defender for Endpoint 集成。
- 需要具有所有者(资源组级别)权限才能进行部署。
- 需要具有安全读取者权限才能查看漏洞发现结果。
对 Azure VM 使用 Azure 策略进行转换
执行以下步骤:
登录到 Azure 门户。
导航到“策略”>“定义”。
搜索
Setup subscriptions to transition to an alternative vulnerability assessment solution。选择分配。
选择一个范围并输入分配名称。
选择“查看 + 创建”。
查看输入的信息,然后选择“创建”。
此策略可确保使用内置的 Defender 漏洞管理解决方案保护所选订阅中的所有虚拟机 (VM)。
完成到 Defender 漏洞管理解决方案的过渡后,需要删除旧的漏洞评估解决方案
在 Azure 门户中转换
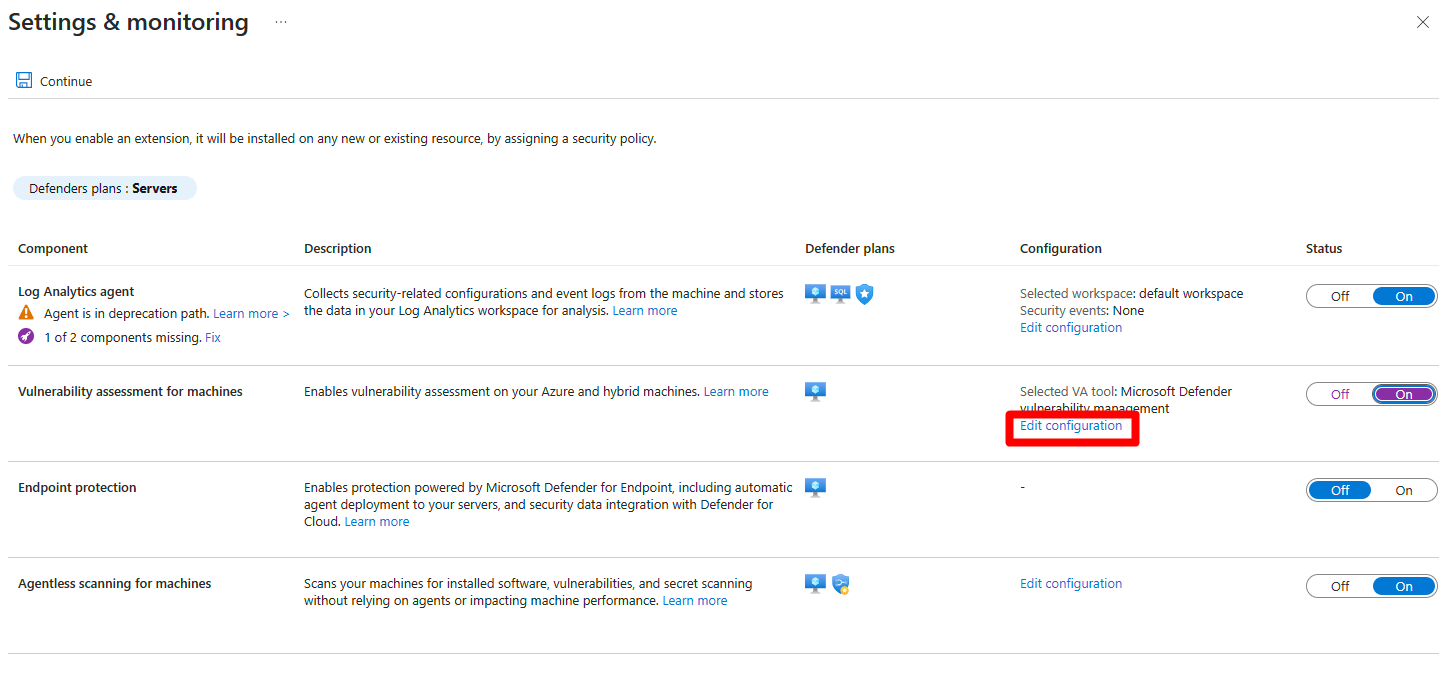
在 Azure 门户中,可以将漏洞评估解决方案更改为内置的 Defender 漏洞管理解决方案。
登录 Azure 门户。
导航到“Microsoft Defender for Cloud”>“环境设置”
选择相关订阅。
找到 Defenders for Servers 计划并选择“设置”。
将
Vulnerability assessment for machines切换为“开”。如果
Vulnerability assessment for machines已设置为“开”,请选择“编辑配置”选择“Microsoft Defender 漏洞管理”。
选择“应用”。
确保
Endpoint protection或Agentless scanning for machines切换到“开”。选择继续。
选择“保存”。
完成到 Defender 漏洞管理解决方案的过渡后,需要删除旧的漏洞评估解决方案
使用 REST API 进行转换
用于 Azure VM 的 REST API
使用此 REST API,可以轻松地将订阅从任何漏洞评估解决方案大规模地迁移到 Defender 漏洞管理解决方案。
PUT https://management.azure.com/subscriptions/{subscriptionId}/providers/Microsoft.Security/serverVulnerabilityAssessmentsSettings/AzureServersSetting?api-version=2022-01-01-preview
{
  "kind": "AzureServersSetting",
  "properties": {
    "selectedProvider": "MdeTvm"
  }
}
Once you complete the transition to the Defender Vulnerability Management solution, you need to remove the old vulnerability assessment solution.
REST API for multicloud VMs
Using this REST API, you can easily migrate your subscription, at scale, from any vulnerability assessment solution to the Defender Vulnerability Management solution.
PUT https://management.azure.com/subscriptions/{subscriptionId}/resourcegroups/{resourceGroupName}/providers/Microsoft.Security/securityconnectors/{connectorName}?api-version=2022-08-01-preview
{
"properties": {
"hierarchyIdentifier": "{GcpProjectNumber}",
"environmentName": "GCP",
"offerings": [
{
"offeringType": "CspmMonitorGcp",
"nativeCloudConnection": {
"workloadIdentityProviderId": "{cspm}",
"serviceAccountEmailAddress": "{emailAddressRemainsAsIs}"
}
},
{
"offeringType": "DefenderCspmGcp"
},
{
"offeringType": "DefenderForServersGcp",
"defenderForServers": {
"workloadIdentityProviderId": "{defender-for-servers}",
"serviceAccountEmailAddress": "{emailAddressRemainsAsIs}"
},
"arcAutoProvisioning": {
"enabled": true,
"configuration": {}
},
"mdeAutoProvisioning": {
"enabled": true,
"configuration": {}
},
"vaAutoProvisioning": {
"enabled": true,
"configuration": {
"type": "TVM"
}
},
"subPlan": "{P1/P2}"
}
],
"environmentData": {
"environmentType": "GcpProject",
"projectDetails": {
"projectId": "{GcpProjectId}",
"projectNumber": "{GcpProjectNumber}",
"workloadIdentityPoolId": "{identityPoolIdRemainsTheSame}"
}
}
},
"location": "{connectorRegion}"
}
Remove the old vulnerability assessment solution
After migrating to the built-in Defender Vulnerability Management solution in Defender for Cloud, offboard each VM from their old vulnerability assessment solution. To delete the VM extension, you can use the Remove-AzVMExtension PowerShell cmdlet or a REST API Delete request.


