你当前正在访问 Microsoft Azure Global Edition 技术文档网站。 如果需要访问由世纪互联运营的 Microsoft Azure 中国技术文档网站,请访问 https://docs.azure.cn。
通过 Azure PowerShell 脚本在 Azure Stack Edge Pro GPU 设备上部署 VM
适用于: Azure Stack Edge Pro - GPUAzure Stack Edge Pro 2Azure Stack Edge Pro RAzure Stack Edge Mini R
本教程介绍如何使用 Azure PowerShell 脚本在 Azure Stack Edge Pro 设备上创建和管理 VM。
先决条件
在开始使用此脚本在 Azure Stack Edge Pro 设备上创建和管理 VM 之前,你需要确保已完成以下步骤中列出的先决条件:
对于通过本地 Web UI 的 Azure Stack Edge Pro 设备
在 Azure Stack Edge 设备上部署 VM 之前,必须先将客户端配置为使用 Azure PowerShell 通过 Azure 资源管理器连接到设备。 有关详细说明,请参阅连接到 Azure Stack Edge 设备上的 Azure 资源管理器。
确保可使用以下步骤从客户端访问设备。 能连接到 Azure 资源管理器即表示已完成此配置,现在是验证配置是否成功。
运行以下命令,验证 Azure 资源管理器通信是否正常运行:
若要调用本地设备 API 进行身份验证,请输入:
如果已为 Kubernetes 配置计算,则可以跳过此步骤。 否则,请执行以下操作,确保已为网络接口启用计算:
a. 在本地用户界面上,转到“计算”设置。
b. 选择要用于创建虚拟交换机的网络接口。 创建的 VM 将附加到与此端口及关联网络连接的虚拟交换机。 请确保选择与要用于此 VM 的 IP 地址相匹配的网络。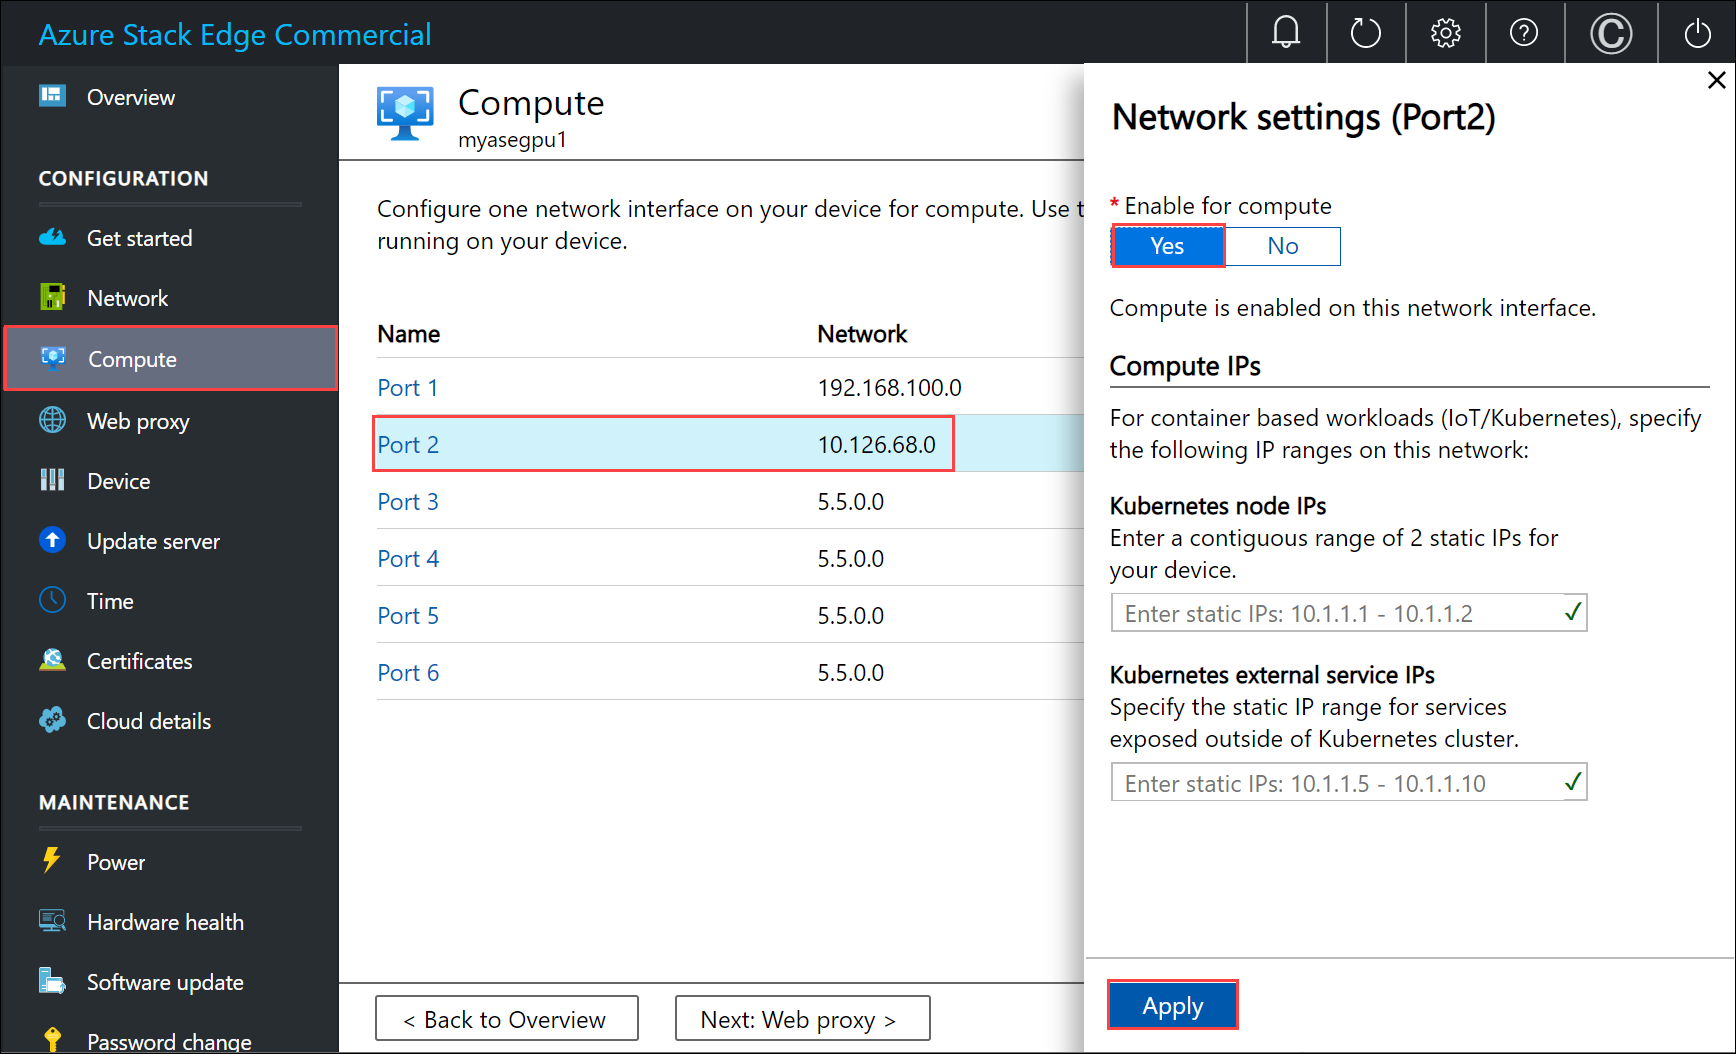
c. 在网络接口上的“启用计算”下,选择“是”。 Azure Stack Edge 将创建一个与该网络接口相对应的虚拟交换机,并对其进行管理。 请勿在此时输入 Kubernetes 的特定 IP。 启用计算可能需要花费几分钟时间。
注意
如果是创建 GPU VM,请选择已连接到 Internet 的网络接口。 这样将能在设备上安装 GPU 扩展。
对于 Windows 客户端
请确保你已修改:
- 客户端上的主机文件,或
- DNS 服务器配置
重要
建议你修改终结点名称解析的 DNS 服务器配置。
以管理员身份启动“记事本”(保存文件需要管理员权限),然后打开位于
C:\Windows\System32\Drivers\etc的 hosts 文件 。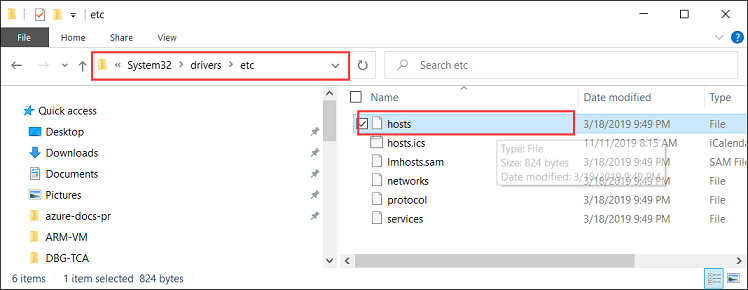
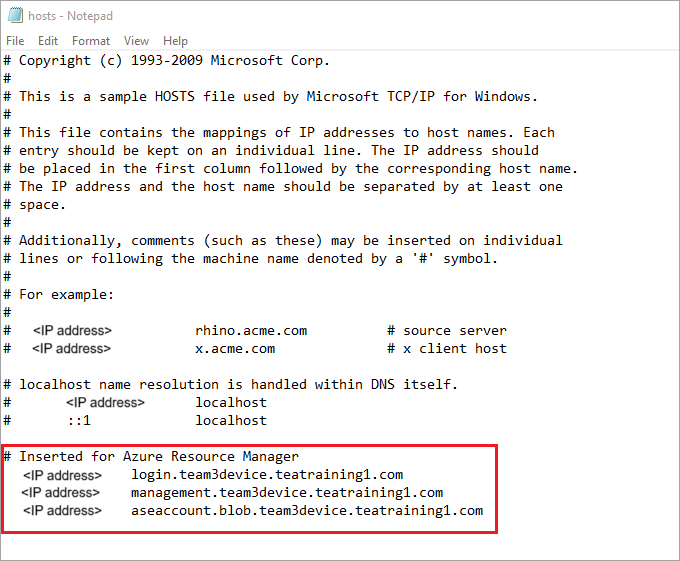
将以下条目添加到 hosts 文件,替换为设备的适当值:
<device IP> login.<appliance name>.<DNS domain>
<device IP> management.<appliance name>.<DNS domain>
<device IP> <storage name>.blob.<appliance name>.<DNS domain>
对于存储帐户,可以提供一个名称,以便脚本稍后使用该名称来创建新的存储帐户。 脚本不会检查该存储帐户是否存在。
使用下图作为参考。 保存 hosts 文件。
请确保 Windows 客户端运行的是 PowerShell 5.0 或更高版本。
请确保系统上安装了
Azure.Storage Module version 4.5.0。 可以从 PowerShell 库获取此模块。 若要安装此模块,请键入:Install-Module -Name Azure.Storage -RequiredVersion 4.5.0若要验证已安装模块的版本,请键入:
Get-InstalledModule -name Azure.Storage若要卸载任何其他版本的模块,请键入:
Uninstall-Module -Name Azure.Storage将 AzCopy 10 下载到 Windows 客户端。 记下该位置,因为你将在运行脚本时将其作为参数传递。
请确保 Windows 客户端运行的是 TLS 1.2 或更高版本。
创建 VM
以管理员身份运行 PowerShell。
转到客户端上脚本下载到的文件夹。
在运行该脚本之前,请确保仍连接到设备的本地 Azure 资源管理器,并且连接尚未过期。
PS C:\windows\system32> login-AzureRMAccount -EnvironmentName aztest1 -TenantId aaaabbbb-0000-cccc-1111-dddd2222eeee

Account               SubscriptionName              TenantId                             Environment
-------               ----------------              --------                             -----------
EdgeArmUser@localhost Default Provider Subscription aaaabbbb-0000-cccc-1111-dddd2222eeee aztest1

PS C:\windows\system32> cd C:\Users\v2
PS C:\Users\v2>
使用以下命令运行该脚本:
.\ArmPowershellClient.ps1 -NicPrivateIp <Private IP> -VHDPath <Path> -VHDFile <VHD File, with extension> -StorageAccountName <Name> -OS <Windows/Linux> -VMSize <Supported VM Size> -VMUserName <Username to be used to sign in to VM> -VMPassword <Password for the VM> --AzCopy10Path <Absolute Path>如果要将 IP 动态分配给 VM,请省略
-NicPrivateIp参数。以下是运行脚本以创建 Windows VM 和 Linux VM 时的示例。
对于Windows VM:
下面是已创建的 Windows VM 的示例输出。
PS C:\Users\v2> .\ArmPowershellClient.ps1 -VHDPath \\asefs\Logs\vmvhd -VHDFile WindowsServer2016Datacenter.vhd -StorageAccountName myasesatest -OS Windows -VMSize Standard_D1_v2 -VMUserName Administrator -VMPassword Password1 -AzCopy10Path C:\Users\AzCopy10\AzCopy.exe
New-AzureRmResourceGroup -Name rg201221071831 -Location DBELocal -Force
Successfully created Resource Group:rg201221071831
Successfully created Resource Group:StorAccRG
Get-AzureRmStorageAccount -Name myasesatest -ResourceGroupName StorAccRG -ErrorAction SilentlyContinue
New-AzureRmStorageAccount -Name myasesatest  -ResourceGroupName StorAccRG -SkuName Standard_LRS -Location DBELocal

Created New Storage Account
Get-AzureRmStorageAccount -name myasesatest -resourcegroupname
StorageAccountName ResourceGroupName Location SkuName     Kind    AccessTier CreationTime          ProvisioningState EnableHttpsTrafficOnly
------------------ ----------------- -------- -------     ----    ---------- ------------          ----------------- ----------------------
myasesatest        StorAccRG         DBELocal StandardLRS Storage            12/22/2020 3:18:38 AM Succeeded         False
myasesatest        StorAccRG         DBELocal StandardLRS Storage            12/22/2020 3:18:38 AM Succeeded         False

 Uploading Vhd to Storage Account

New-AzureStorageContext -StorageAccountName myasesatest -StorageAccountKey hyibjhbVlOROgTlU1nQJIlxrg94eGDhF+RIQ71Z7UVZIxoOPMlHP274NUhZtA1hMxGBcpk2BVApiFasFPEhY/A== -Endpoint https://myasesatest.blob.myasegpuvm.wdshcsso.com/

New-AzureStorageAccountSASToken -Service Blob,File,Queue,Table -ResourceType Container,Service,Object -Permission

SAS Token : ?sv=2017-07-29&sig=TXaGbjum9tFFaJnu3SFmDuslJuqNiNQwvuHfpPJMYN0%3D&spr=https&se=2020-12-22T04%3A18%3A43Z&srt=sco&ss=bfqt&sp=racwdl

 C:\Users\AzCopy10\AzCopy.exe make https://myasesatest.blob.myasegpuvm.wdshcsso.com/vmimages?sv=2017-07-29&sig=TXaGbjum9tFFaJnu3SFmDuslJuqNiNQwvuHfpPJMYN0%3D&spr=https&se=2020-12-22T04%3A18%3A43Z&srt=sco&ss=bfqt&sp=racwdl

Successfully created the resource.

 AzCopy cp \\asefs\Logs\vmvhd\WindowsServer2016Datacenter.vhd https://myasesatest.blob.myasegpuvm.wdshcsso.com/vmimages?sv=2017-07-29&sig=TXaGbjum9tFFaJnu3SFmDuslJuqNiNQwvuHfpPJMYN0%3D&spr=https&se=2020-12-22T04%3A18%3A43Z&srt=sco&ss=bfqt&sp=racwdl

INFO: Scanning...

Job b6f54665-93c4-2f47-4770-5f3b7b0de2dc has started
Log file is located at: C:\Users\Administrator\.azcopy\b6f54665-93c4-2f47-4770-5f3b7b0de2dc.log

INFO: AzCopy.exe: A newer version 10.8.0 is available to download

99.9 %, 0 Done, 0 Failed, 1 Pending, 0 Skipped, 1 Total,  (Disk may be limiting speed)

Job b6f54665-93c4-2f47-4770-5f3b7b0de2dc summary
Elapsed Time (Minutes): 12.7717
Total Number Of Transfers: 1
Number of Transfers Completed: 1
Number of Transfers Failed: 0
Number of Transfers Skipped: 0
TotalBytesTransferred: 13958644224
Final Job Status: Completed

VHD Upload Done

 Creating a new managed disk

  = New-AzureRmDiskConfig -Location DBELocal -CreateOption Import -SourceUri

 Microsoft.Azure.Commands.Compute.Automation.Models.PSDisk

 New-AzureRmDisk -ResourceGroupName rg201221071831 -DiskName ld201221071831 -Disk

ResourceGroupName  : rg201221071831
ManagedBy          :
Sku                : Microsoft.Azure.Management.Compute.Models.DiskSku
Zones              :
TimeCreated        : 12/21/2020 7:31:35 PM
OsType             :
CreationData       : Microsoft.Azure.Management.Compute.Models.CreationData
DiskSizeGB         : 13
EncryptionSettings :
ProvisioningState  : Succeeded
Id                 : /subscriptions/aaaa0a0a-bb1b-cc2c-dd3d-eeeeee4e4e4e/resourceGroups/rg201221071831/providers/Microsoft.Compute/disks/ld201221071831
Name               : ld201221071831
Type               : Microsoft.Compute/disks
Location           : DBELocal
Tags               : {}

 Created a new managed disk

 Creating a new Image out of managed disk

ResourceGroupName    :
SourceVirtualMachine :
StorageProfile       : Microsoft.Azure.Management.Compute.Models.ImageStorageProfile
ProvisioningState    :
Id                   :
Name                 :
Type                 :
Location             : DBELocal
Tags                 :

 New-AzureRmImage -Image Microsoft.Azure.Commands.Compute.Automation.Models.PSImage -ImageName ig201221071831  -ResourceGroupName rg201221071831 -HyperVGeneration V1

ResourceGroupName    : rg201221071831
SourceVirtualMachine :
StorageProfile       : Microsoft.Azure.Management.Compute.Models.ImageStorageProfile
ProvisioningState    : Succeeded
Id                   : /subscriptions/aaaa0a0a-bb1b-cc2c-dd3d-eeeeee4e4e4e/resourceGroups/rg201221071831/providers/Microsoft.Compute/images/ig201221071831
Name                 : ig201221071831
Type                 : Microsoft.Compute/images
Location             : dbelocal
Tags                 : {}

 Created a new Image

 Using Vnet /subscriptions/aaaa0a0a-bb1b-cc2c-dd3d-eeeeee4e4e4e/resourceGroups/ASERG/providers/Microsoft.Network/virtualNetworks/ASEVNET

 Creating a new Network Interface
WARNING: The output object type of this cmdlet will be modified in a future release.

VirtualMachine              :
IpConfigurations            : {ip201221071831}
DnsSettings                 : Microsoft.Azure.Commands.Network.Models.PSNetworkInterfaceDnsSettings
MacAddress                  : 001DD87D7216
Primary                     :
EnableAcceleratedNetworking : False
EnableIPForwarding          : False
NetworkSecurityGroup        :
ProvisioningState           : Succeeded
VirtualMachineText          : null
IpConfigurationsText        : [
                                {
                                  "Name": "ip201221071831",
                                  "Etag": "W/\"27785dd5-d12a-4d73-9495-ffad7847261a\"",
                                  "Id": "/subscriptions/aaaa0a0a-bb1b-cc2c-dd3d-eeeeee4e4e4e/resourceGroups/rg201221071831/providers/Microsoft.Network/networkInterfaces/nic201221071831/ipConfigurations/ip201221071831",
                                  "PrivateIpAddress": "10.57.51.61",
                                  "PrivateIpAllocationMethod": "Dynamic",
                                  "Subnet": {
                                    "Id": "/subscriptions/aaaa0a0a-bb1b-cc2c-dd3d-eeeeee4e4e4e/resourceGroups/ASERG/providers/Microsoft.Network/virtualNetworks/ASEVNET/subnets/ASEVNETsubNet",
                                    "ResourceNavigationLinks": [],
                                    "ServiceEndpoints": []
                                  },
                                  "ProvisioningState": "Succeeded",
                                  "PrivateIpAddressVersion": "IPv4",
                                  "LoadBalancerBackendAddressPools": [],
                                  "LoadBalancerInboundNatRules": [],
                                  "Primary": true,
                                  "ApplicationGatewayBackendAddressPools": [],
                                  "ApplicationSecurityGroups": []
                                }
                              ]
DnsSettingsText             : {
                                "DnsServers": [],
                                "AppliedDnsServers": [],
                                "InternalDomainNameSuffix": "qgotb4hjdh4efnhn0vz5adtb3f.a--x.internal.cloudapp.net"
                              }
NetworkSecurityGroupText    : null
ResourceGroupName           : rg201221071831
Location                    : dbelocal
ResourceGuid                : e6327ab9-0855-4f04-9b36-17bbf31b5bd8
Type                        : Microsoft.Network/networkInterfaces
Tag                         :
TagsTable                   :
Name                        : nic201221071831
Etag                        : W/"27785dd5-d12a-4d73-9495-ffad7847261a"
Id                          : /subscriptions/aaaa0a0a-bb1b-cc2c-dd3d-eeeeee4e4e4e/resourceGroups/rg201221071831/providers/Microsoft.Network/networkInterfaces/nic201221071831

 Created Network Interface

 Creating a new VM

 New-AzureRmVMConfig -VMName VM201221071831 -VMSize Standard_D1_v2

 Set-AzureRmVMOperatingSystem -VM Microsoft.Azure.Commands.Compute.Models.PSVirtualMachine -Windows -ComputerName COM201221071831 -Credential System.Management.Automation.PSCredential

 Microsoft.Azure.Commands.Compute.Models.PSVirtualMachine = Set-AzureRmVMOSDisk -VM Microsoft.Azure.Commands.Compute.Models.PSVirtualMachine -Name osld201221071831 -Caching ReadWrite -CreateOption FromImage -Windows -StorageAccountType StandardLRS

 Add-AzureRmVMNetworkInterface -VM Microsoft.Azure.Commands.Compute.Models.PSVirtualMachine -Id /subscriptions/aaaa0a0a-bb1b-cc2c-dd3d-eeeeee4e4e4e/resourceGroups/rg201221071831/providers/Microsoft.Network/networkInterfaces/nic201221071831.Id

 Set-AzureRmVMSourceImage -VM Microsoft.Azure.Commands.Compute.Models.PSVirtualMachine -Id /subscriptions/aaaa0a0a-bb1b-cc2c-dd3d-eeeeee4e4e4e/resourceGroups/rg201221071831/providers/Microsoft.Compute/images/ig201221071831

 New-AzureRmVM -ResourceGroupName rg201221071831 -Location DBELocal -VM Microsoft.Azure.Commands.Compute.Models.PSVirtualMachine -Verbose
WARNING: Since the VM is created using premium storage or managed disk, existing standard storage account, myasesa1, is used for boot
diagnostics.
VERBOSE: Performing the operation "New" on target "VM201221071831".

Ticks             : 1533424841
Days              : 0
Hours             : 0
Milliseconds      : 342
Minutes           : 2
Seconds           : 33
TotalDays         : 0.00177479726967593
TotalHours        : 0.0425951344722222
TotalMilliseconds : 153342.4841
TotalMinutes      : 2.55570806833333
TotalSeconds      : 153.3424841

RequestId           :
IsSuccessStatusCode : True
StatusCode          : OK
ReasonPhrase        : OK

PS C:\Users\v2>
对于 Linux VM:
下面是用于创建 Linux VM 的命令示例。
.\ArmPowershellClient.ps1 -VHDPath \\asefs\Logs\vmvhd -VHDFile ubuntu13.vhd -StorageAccountName myasesatest -OS Linux -VMSize Standard_D1_v2 -VMUserName Administrator -VMPassword Password1 -AzCopy10Path C:\Users\AzCopy10\AzCopy.exe
New-AzureRmResourceGroup -Name rg201221075546 -Location DBELocal -Force
成功创建 VM 后,这些 VM 应显示在 Azure 门户的虚拟机列表中。 若要查看 VM,请在 Azure 门户中设备的 Azure Stack Edge 资源中,转到“边缘服务”>“虚拟机”。
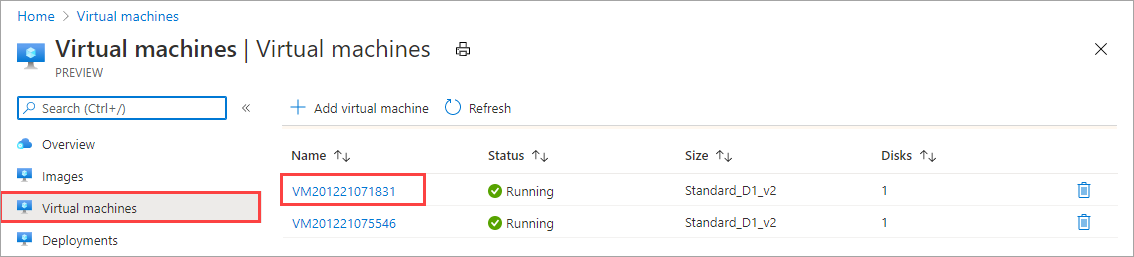
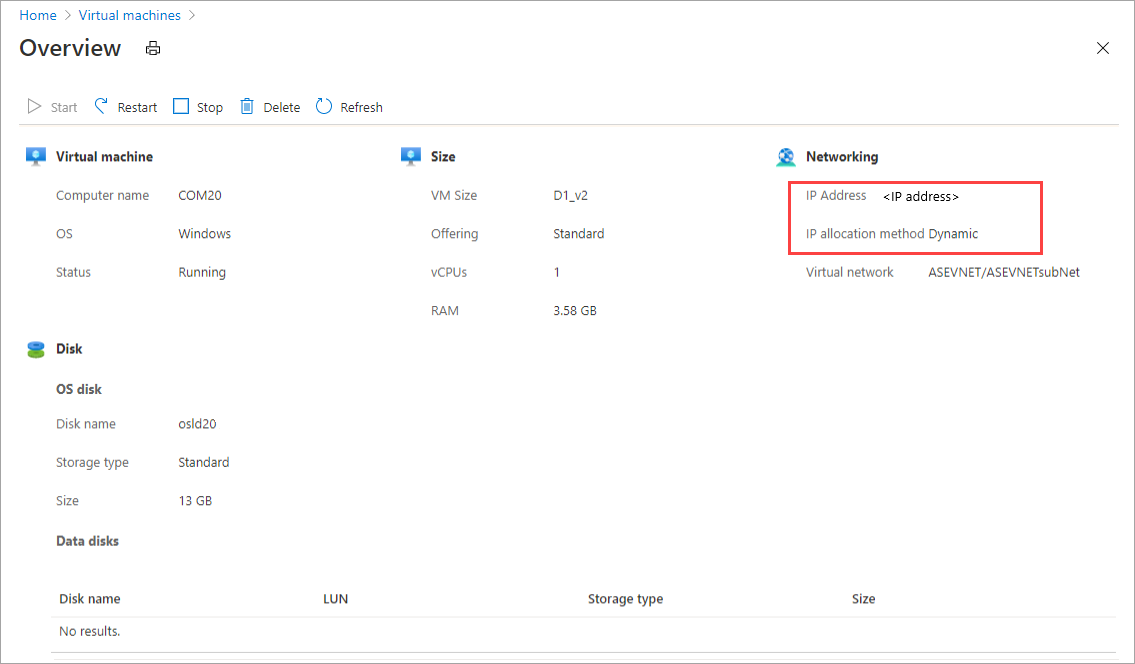
若要查看 VM 的详细信息,请选择 VM 名称。 请注意,此 VM 的 IP 是动态分配的。
若要清除该脚本创建的资源,请使用以下命令:
Get-AzureRmVM | Remove-AzureRmVM -Force
Get-AzureRmNetworkInterface | Remove-AzureRmNetworkInterface -Force
Get-AzureRmImage | Remove-AzureRmImage -Force
Get-AzureRmDisk | Remove-AzureRmDisk -Force
Get-AzureRmStorageAccount | Remove-AzureRmStorageAccount -Force