你当前正在访问 Microsoft Azure Global Edition 技术文档网站。 如果需要访问由世纪互联运营的 Microsoft Azure 中国技术文档网站,请访问 https://docs.azure.cn。
用于持续集成和持续交付 (CI/CD) 的自动发布
适用于: Azure 数据工厂
  Azure Synapse Analytics
提示
试用 Microsoft Fabric 中的数据工厂,这是一种适用于企业的一站式分析解决方案。 Microsoft Fabric 涵盖从数据移动到数据科学、实时分析、商业智能和报告的所有内容。 了解如何免费开始新的试用!
注意
Synapse Analytics 也支持 CI/CD。 有关详细信息,请参阅 Synapse Analytics CI/CD 文档。
概述
持续集成是这样一种做法:自动测试对代码库所做的每项更改。 持续交付尽早执行在持续集成期间发生的测试并将更改推送到暂存系统或生产系统。
在 Azure 数据工厂中,CI/CD 是指将数据工厂管道从一种环境(例如开发、测试和生产)移动到另一种环境。 数据工厂使用 Azure 资源管理器模板(ARM 模板)存储各种数据工厂实体(如管道、数据集和数据流)的配置。
可通过两种建议的方式将数据工厂提升到另一个环境:
- 使用数据工厂与 Azure Pipelines 的集成进行自动化部署。
- 使用数据工厂用户体验与 Azure 资源管理器的集成手动上传 ARM 模板。
有关详细信息,请参阅 Azure 数据工厂中的持续集成和交付。
本文重点介绍持续部署改进以及 CI/CD 的自动发布功能。
持续部署改进
自动发布功能采用数据工厂用户体验中的“全部验证”和“导出 ARM 模板”功能,并通过正式发布的 npm 包 @microsoft/azure-data-factory-utilities 使逻辑可供使用。 出于此原因,可以通过编程方式触发这些操作,而无需转到数据工厂 UI 并手动选择按钮。 此功能为 CI/CD 管道提供了真正的持续集成体验。
注意
请务必使用 node 版本 18.x 及其兼容版本,避免因包与旧版本不兼容而可能发生的错误。
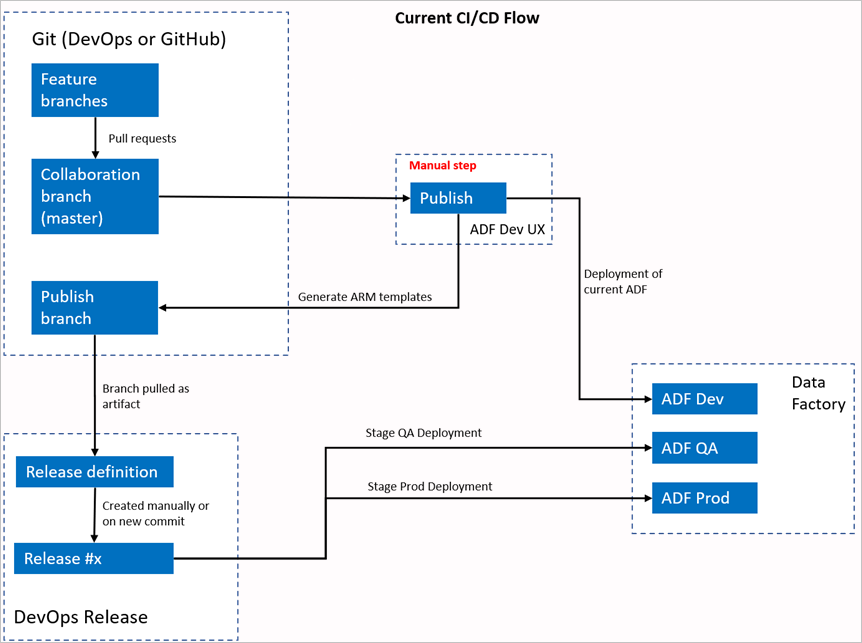
当前 CI/CD 流
- 每个用户在其专用分支中进行更改。
- 不允许推送到主节点。 用户必须创建拉取请求才能进行更改。
- 用户必须加载数据工厂 UI,选择“发布”以将更改部署到数据工厂,然后在发布分支中生成 ARM 模板。
- 每次将新更改推送到发布分支时,DevOps 发布管道就会配置为创建新版本并部署 ARM 模板。

手动步骤
在当前 CI/CD 流中,用户体验是创建 ARM 模板的中介。 因此,用户必须转到数据工厂 UI,手动选择“发布”以启动 ARM 模板生成,然后将其放在发布分支中。
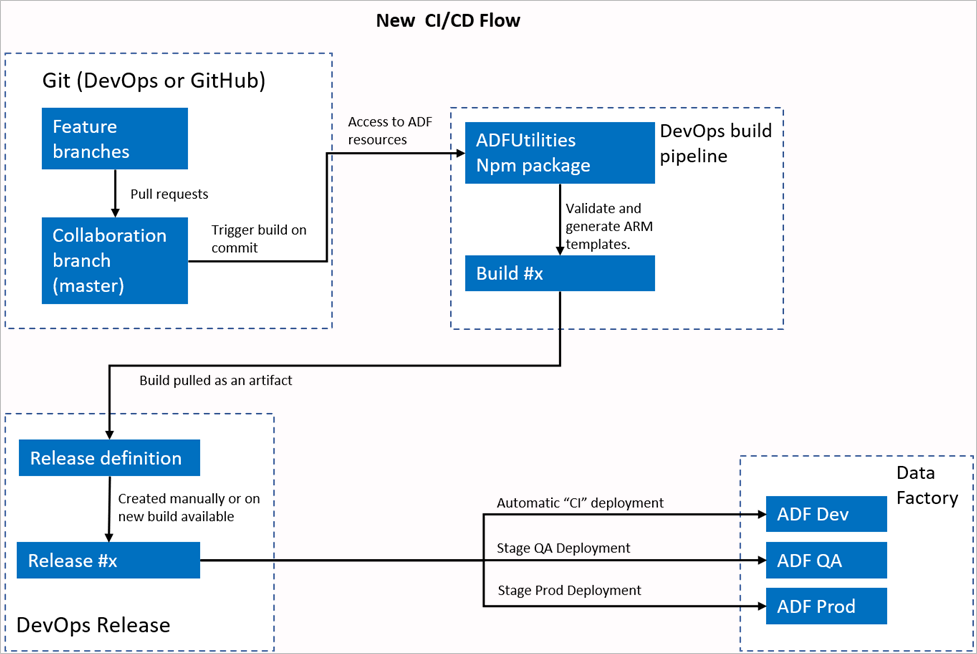
新的 CI/CD 流
- 每个用户在其专用分支中进行更改。
- 不允许推送到主节点。 用户必须创建拉取请求才能进行更改。
- 每次向主节点作出新提交时,都会触发 Azure DevOps 管道生成。 如果验证成功,则它将验证资源并将 ARM 模板生成为项目。
- 每次有新的生成可用时,DevOps 发布管道就会配置为创建新版本并部署 ARM 模板。

有何变化?
- 现在,我们有了一个使用 DevOps 生成管道的生成过程。
- 生成管道使用 ADFUtilities NPM 包,该包将验证所有资源并生成 ARM 模板。 这些模板可以是单一模板,也可以是链接模板。
- 生成管道负责验证数据工厂资源并生成 ARM 模板,而不是数据工厂 UI(“发布”按钮)。
- DevOps 发布定义现在将使用这一新的生成管道,而不是 Git 项目。
注意
可以继续使用现有机制(即 adf_publish 分支),也可以使用新流。 两者都受到支持。
包概述
包目前支持以下两个命令:
- 导出 ARM 模板
- 验证
导出 ARM 模板
运行 npm run build export <rootFolder> <factoryId> [outputFolder] 以使用给定文件夹的资源导出 ARM 模板。 此命令还在生成 ARM 模板之前运行验证检查。 下面是使用名为 testResourceGroup 的资源组的示例:
npm run build export C:\DataFactories\DevDataFactory /subscriptions/xxxxxxxx-xxxx-xxxx-xxxx-xxxxxxxxxxxx/resourceGroups/testResourceGroup/providers/Microsoft.DataFactory/factories/DevDataFactory ArmTemplateOutput
RootFolder是表示数据工厂资源所在位置的必填字段。FactoryId是表示采用/subscriptions/<subId>/resourceGroups/<rgName>/providers/Microsoft.DataFactory/factories/<dfName>格式的数据工厂资源 ID 的必填字段。OutputFolder是一个可选参数,它指定用于保存所生成 ARM 模板的相对路径。
仅停止/启动更新触发器的功能已正式发布,并合并到上述命令中。
注意
生成的 ARM 模板未发布到工厂的实时版本。 应使用 CI/CD 管道进行部署。
验证
运行 npm run build validate <rootFolder> <factoryId> 以验证给定文件夹的所有资源。 下面是一个示例:
npm run build validate C:\DataFactories\DevDataFactory /subscriptions/xxxxxxxx-xxxx-xxxx-xxxx-xxxxxxxxxxxx/resourceGroups/testResourceGroup/providers/Microsoft.DataFactory/factories/DevDataFactory
RootFolder是表示数据工厂资源所在位置的必填字段。FactoryId是表示采用/subscriptions/<subId>/resourceGroups/<rgName>/providers/Microsoft.DataFactory/factories/<dfName>格式的数据工厂资源 ID 的必填字段。
创建 Azure 管道
尽管可以通过多种方式使用 npm 包,但其中一个主要优势是通过 Azure 管道使用的。 每次合并到协作分支中时,都可以触发一个管道,该管道首先验证所有代码,然后将 ARM 模板导出到可由发布管道使用的生成项目。 它与当前 CI/CD 过程的不同之处在于,你将在此项目(而不是现有 adf_publish 分支)中指出发布管道。
执行以下步骤以便开始:
打开 Azure DevOps 项目,然后转到“管道”。 选择“新建管道”。

选择要在其中保存管道 YAML 脚本的存储库。 建议将其保存在数据工厂资源的同一存储库中的生成文件夹中。 确保存储库中有包含包名称的 package.json 文件,如以下示例中所示:
{
    "scripts":{
        "build":"node node_modules/@microsoft/azure-data-factory-utilities/lib/index"
    },
    "dependencies":{
        "@microsoft/azure-data-factory-utilities":"^1.0.0"
    }
}
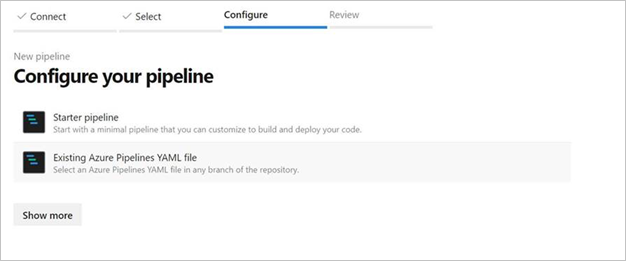
选择“初学者管道”。 如果已上传或合并 YAML 文件(如以下示例中所示),也可以直接指向该文件并对其进行编辑。

# Sample YAML file to validate and export an ARM template into a build artifact
# Requires a package.json file located in the target repository

trigger:
- main #collaboration branch

pool:
  vmImage: 'ubuntu-latest'

steps:

# Installs Node and the npm packages saved in your package.json file in the build

- task: UseNode@1
  inputs:
    version: '18.x'
  displayName: 'Install Node.js'

- task: Npm@1
  inputs:
    command: 'install'
    workingDir: '$(Build.Repository.LocalPath)/<folder-of-the-package.json-file>' #replace with the package.json folder
    verbose: true
  displayName: 'Install npm package'

# Validates all of the Data Factory resources in the repository. You'll get the same validation errors as when "Validate All" is selected.
# Enter the appropriate subscription and name for the source factory. Either of the "Validate" or "Validate and Generate ARM template" options are required to perform validation. Running both is unnecessary.

- task: Npm@1
  inputs:
    command: 'custom'
    workingDir: '$(Build.Repository.LocalPath)/<folder-of-the-package.json-file>' #replace with the package.json folder
    customCommand: 'run build validate $(Build.Repository.LocalPath)/<Root-folder-from-Git-configuration-settings-in-ADF> /subscriptions/xxxxxxxx-xxxx-xxxx-xxxx-xxxxxxxxxxxx/resourceGroups/<Your-ResourceGroup-Name>/providers/Microsoft.DataFactory/factories/<Your-Factory-Name>'
  displayName: 'Validate'

# Validate and then generate the ARM template into the destination folder, which is the same as selecting "Publish" from the UX.
# The ARM template generated isn't published to the live version of the factory. Deployment should be done by using a CI/CD pipeline.

- task: Npm@1
  inputs:
    command: 'custom'
    workingDir: '$(Build.Repository.LocalPath)/<folder-of-the-package.json-file>' #replace with the package.json folder
    customCommand: 'run build export $(Build.Repository.LocalPath)/<Root-folder-from-Git-configuration-settings-in-ADF> /subscriptions/xxxxxxxx-xxxx-xxxx-xxxx-xxxxxxxxxxxx/resourceGroups/<Your-ResourceGroup-Name>/providers/Microsoft.DataFactory/factories/<Your-Factory-Name> "ArmTemplate"'
#For using preview that allows you to only stop/ start triggers that are modified, please comment out the above line and uncomment the below line. Make sure the package.json contains the build-preview command.
 #customCommand: 'run build-preview export $(Build.Repository.LocalPath) /subscriptions/aaaa0a0a-bb1b-cc2c-dd3d-eeeeee4e4e4e/resourceGroups/GartnerMQ2021/providers/Microsoft.DataFactory/factories/Dev-GartnerMQ2021-DataFactory "ArmTemplate"'
  displayName: 'Validate and Generate ARM template'

# Publish the artifact to be used as a source for a release pipeline.

- task: PublishPipelineArtifact@1
  inputs:
    targetPath: '$(Build.Repository.LocalPath)/<folder-of-the-package.json-file>/ArmTemplate' #replace with the package.json folder
    artifact: 'ArmTemplates'
    publishLocation: 'pipeline'
输入你的 YAML 代码。 建议使用 YAML 文件作为起点。
保存并运行。 如果使用了 YAML,则在每次更新主分支时都会触发该文件。
备注
生成的项目已包含触发器的预部署脚本和部署后脚本,因此无需手动添加这些脚本。 但在部署时,用户仍需要参考有关停止和启动触发器的文档来执行提供的脚本。
相关内容
详细了解数据工厂中的持续集成和交付:Azure 数据工厂中的持续集成和交付。