你当前正在访问 Microsoft Azure Global Edition 技术文档网站。 如果需要访问由世纪互联运营的 Microsoft Azure 中国技术文档网站,请访问 https://docs.azure.cn。
快速入门:使用 UI 库添加聊天
开始使用 Azure 通信服务 UI 库,以将通信体验快速集成到你的应用程序中。 本快速入门介绍如何将 UI 库聊天复合组件集成到应用程序中,并为应用用户设置体验。
Azure 通信服务 UI 库会在应用程序中呈现完整的聊天体验。 它负责连接到 Azure 通信服务聊天服务,并自动更新参与者的状态。 作为开发人员,你需要决定要在应用用户体验中的哪个位置启动聊天体验,并仅根据需要创建 Azure 通信服务资源。
注意
有关 Web UI 库的详细文档和快速入门,请参阅 Web UI 库 Storybook。
先决条件
- 具有活动订阅的 Azure 帐户。 免费创建帐户。
- 已部署的 Azure 通信服务资源。 创建 Azure 通信服务资源
- Azure 通信服务令牌。 请参阅此示例。
访问这些快速入门
访问这些 Storybook
重要
Azure 通信服务的这一功能目前以预览版提供。
预览版 API 和 SDK 在没有服务级别协议的情况下提供。 建议不要将它们用于生产工作负荷。 某些功能可能不受支持或者已受限。
有关详细信息,请参阅 Microsoft Azure 预览版补充使用条款。
在开源 Azure 通信服务的适用于 Android 的 UI 库中获取本快速入门的示例 Android 应用程序。
先决条件
- Azure 帐户和有效的 Azure 订阅。 免费创建帐户。
- 运行 Android Studio 的操作系统。
- 已部署的 Azure 通信服务资源。 记下终结点 URL。
- Azure 通信服务访问令牌和用户标识符。
- Azure 通信服务聊天线程,其中添加了上一步骤中的用户。
设置项目
完成以下部分以设置快速入门项目。
创建新的 Android 项目
在 Android Studio 中,创建新的项目。
在“文件”菜单中,依次选择“新建”>“新建项目”。
在“新建项目”中,选择“空活动”项目模板。
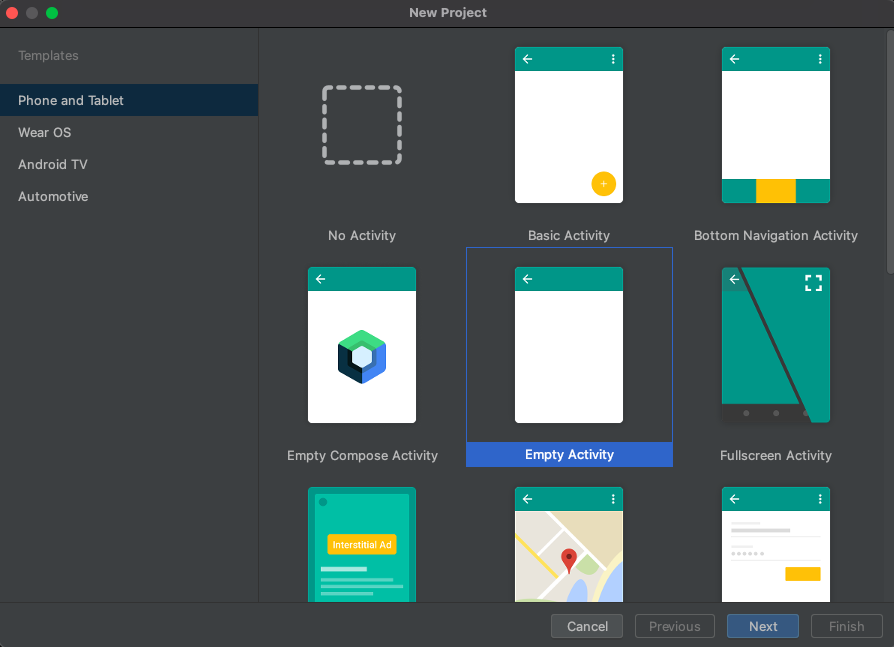
选择下一步。
在“空活动”中,将项目命名为 UILibraryQuickStart。 对于语言,请选择“Java/Kotlin”。 对于最低 SDK 版本,请选择“API 23: Android 6.0 (Marshmallow)”或更高版本。
选择“完成”。
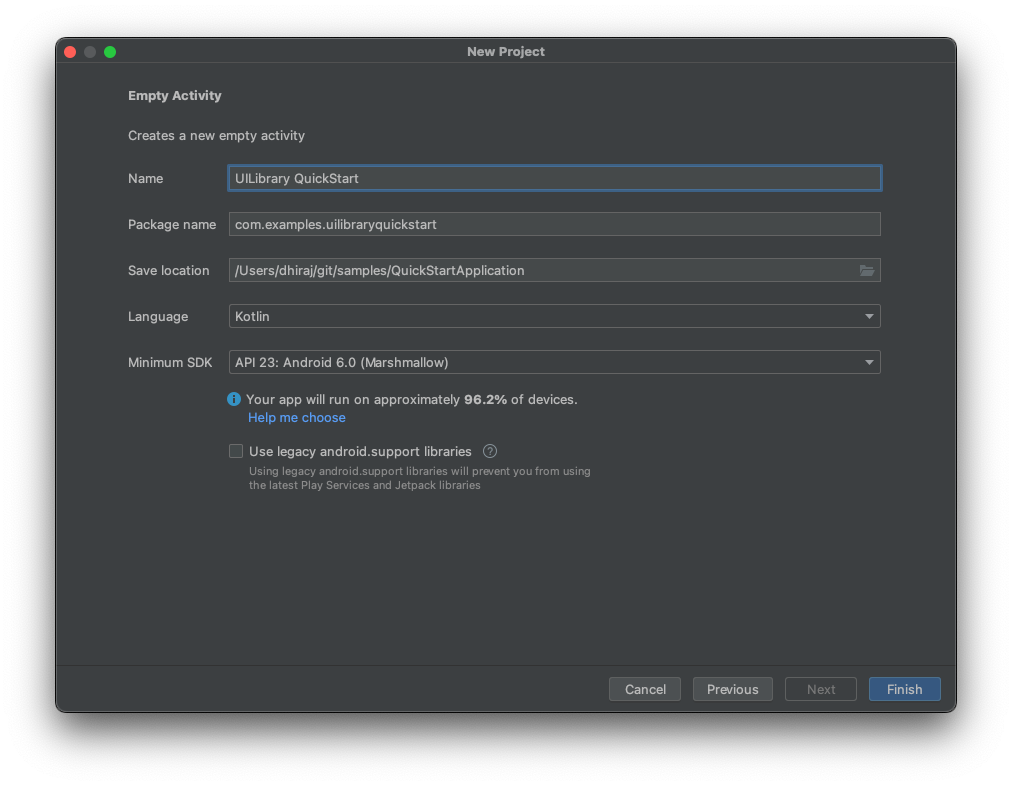
安装包
完成以下部分以安装所需的应用程序包。
添加依赖项
在应用级 UILibraryQuickStart/app/build.gradle 文件中(在应用文件夹中),添加以下依赖项:
dependencies {
    ...
    implementation 'com.azure.android:azure-communication-ui-chat:+'
    ...
}
添加 Maven 存储库
需要添加 Azure 包存储库才能集成库。
若要添加存储库,请执行以下操作:
在项目 Gradle 脚本中,确保添加了以下存储库。 对于 Android Studio (2020.*),
repositories位于dependencyResolutionManagement(Gradle version 6.8 or greater)下的settings.gradle中。 对于早期版本的 Android Studio (4.*),repositories位于allprojects{}下的项目级别build.gradle中。// dependencyResolutionManagement repositories { ... maven { url "https://pkgs.dev.azure.com/MicrosoftDeviceSDK/DuoSDK-Public/_packaging/Duo-SDK-Feed/maven/v1" } ... }将项目与 Gradle 文件同步。 若要同步项目,请在“文件”菜单上,选择“将项目与 Gradle 文件同步”。
将一个按钮添加到 activity_main.xml 中
在 app/src/main/res/layout/activity_main.xml 布局文件中,添加以下代码来创建一个启动复合组件的按钮:
<?xml version="1.0" encoding="utf-8"?>
<androidx.constraintlayout.widget.ConstraintLayout xmlns:android="http://schemas.android.com/apk/res/android"
    xmlns:app="http://schemas.android.com/apk/res-auto"
    xmlns:tools="http://schemas.android.com/tools"
    android:layout_width="match_parent"
    android:layout_height="match_parent"
    tools:context=".MainActivity">

    <Button
        android:id="@+id/startButton"
        android:layout_width="wrap_content"
        android:layout_height="wrap_content"
        android:text="Launch"
        app:layout_constraintBottom_toBottomOf="parent"
        app:layout_constraintLeft_toLeftOf="parent"
        app:layout_constraintRight_toRightOf="parent"
        app:layout_constraintTop_toTopOf="parent" />

</androidx.constraintlayout.widget.ConstraintLayout>
初始化复合组件
初始化复合组件:
转到
MainActivity。添加以下代码来初始化用于通话的复合组件。 替换
endpoint、acsIdentity、displayName、accessToken和ThreadId的属性 (kotlin) 或函数 (java) 的字符串值。 将endpoint替换为 Azure 通信服务为你的资源提供的 URL。 将acsIdentity和accessToken替换为创建访问令牌时 Azure 通信服务提供的值,并使用相关的displayName。 将ThreadId替换为创建线程时返回的值。 在尝试运行快速入门示例之前,请通过 REST API 调用或 az 命令行界面客户端将用户添加到线程。 否则将拒绝客户端访问,导致其无法加入线程。
package com.example.uilibraryquickstart

import android.os.Bundle
import android.view.View
import android.view.ViewGroup
import android.widget.Button
import androidx.appcompat.app.AlertDialog
import androidx.appcompat.app.AppCompatActivity
import com.azure.android.communication.common.CommunicationTokenCredential
import com.azure.android.communication.common.CommunicationTokenRefreshOptions
import com.azure.android.communication.common.CommunicationUserIdentifier
import com.azure.android.communication.ui.chat.ChatAdapter
import com.azure.android.communication.ui.chat.ChatAdapterBuilder
import com.azure.android.communication.ui.chat.presentation.ChatThreadView

class MainActivity : AppCompatActivity() {
    private lateinit var chatAdapter: ChatAdapter

    override fun onCreate(savedInstanceState: Bundle?) {
        super.onCreate(savedInstanceState)
        setContentView(R.layout.activity_main)
        val startButton = findViewById<Button>(R.id.startButton)
        startButton.setOnClickListener { l: View? ->
            val communicationTokenRefreshOptions =
                CommunicationTokenRefreshOptions(
                    { accessToken }, true
                )
            val communicationTokenCredential =
                CommunicationTokenCredential(communicationTokenRefreshOptions)
            chatAdapter = ChatAdapterBuilder()
                .endpoint(endpoint)
                .credential(communicationTokenCredential)
                .identity(CommunicationUserIdentifier(acsIdentity))
                .displayName(displayName)
                .threadId(threadId)
                .build()
            try {
                chatAdapter.connect(this@MainActivity).get()
                val chatView: View = ChatThreadView(this@MainActivity, chatAdapter)
                addContentView(
                    chatView,
                    ViewGroup.LayoutParams(
                        ViewGroup.LayoutParams.MATCH_PARENT,
                        ViewGroup.LayoutParams.MATCH_PARENT
                    )
                )
            } catch (e: Exception) {
                var messageCause: String? = "Unknown error"
                if (e.cause != null && e.cause!!.message != null) {
                    messageCause = e.cause!!.message
                }
                showAlert(messageCause)
            }
        }
    }

    /**
     *
     * @return String endpoint URL from Azure Communication Services Admin UI, "https://example.domain.com/"
     */
    private val endpoint: String?
        get() = "https://example.domain.com/"

    /**
     *
     * @return String identity of the user joining the chat
     * Looks like "8:acs:a6aada1f-0b1e-47ac-866a-91aae00a1c01_00000015-45ee-bad7-0ea8-923e0d008a89"
     */
    private val acsIdentity: String?
        get() = ""

    /**
     *
     * @return String display name of the user joining the chat
     */
    private val displayName: String?
        get() = ""

    /**
     *
     * @return String secure Azure Communication Services access token for the current user
     */
    private val accessToken: String?
        get() = ""

    /**
     *
     * @return String id of Azure Communication Services chat thread to join
     * Looks like "19:AVNnEll25N4KoNtKolnUAhAMu8ntI_Ra03saj0Za0r01@thread.v2"
     */
    private val threadId: String?
        get() = ""

    fun showAlert(message: String?) {
        runOnUiThread {
            AlertDialog.Builder(this@MainActivity)
                .setMessage(message)
                .setTitle("Alert")
                .setPositiveButton(
                    "OK"
                ) { _, i -> }
                .show()
        }
    }
}
运行代码
在 Android Studio 中,生成并启动应用程序。
- 选择“开始体验”。
- 聊天客户端会加入聊天线程,你可以开始键入和发送消息。
- 如果客户端无法加入线程,并且出现
chatJoin失败错误,请验证用户的访问令牌是否有效,以及是否已通过 REST API 调用或使用az命令行界面将用户添加到聊天线程。
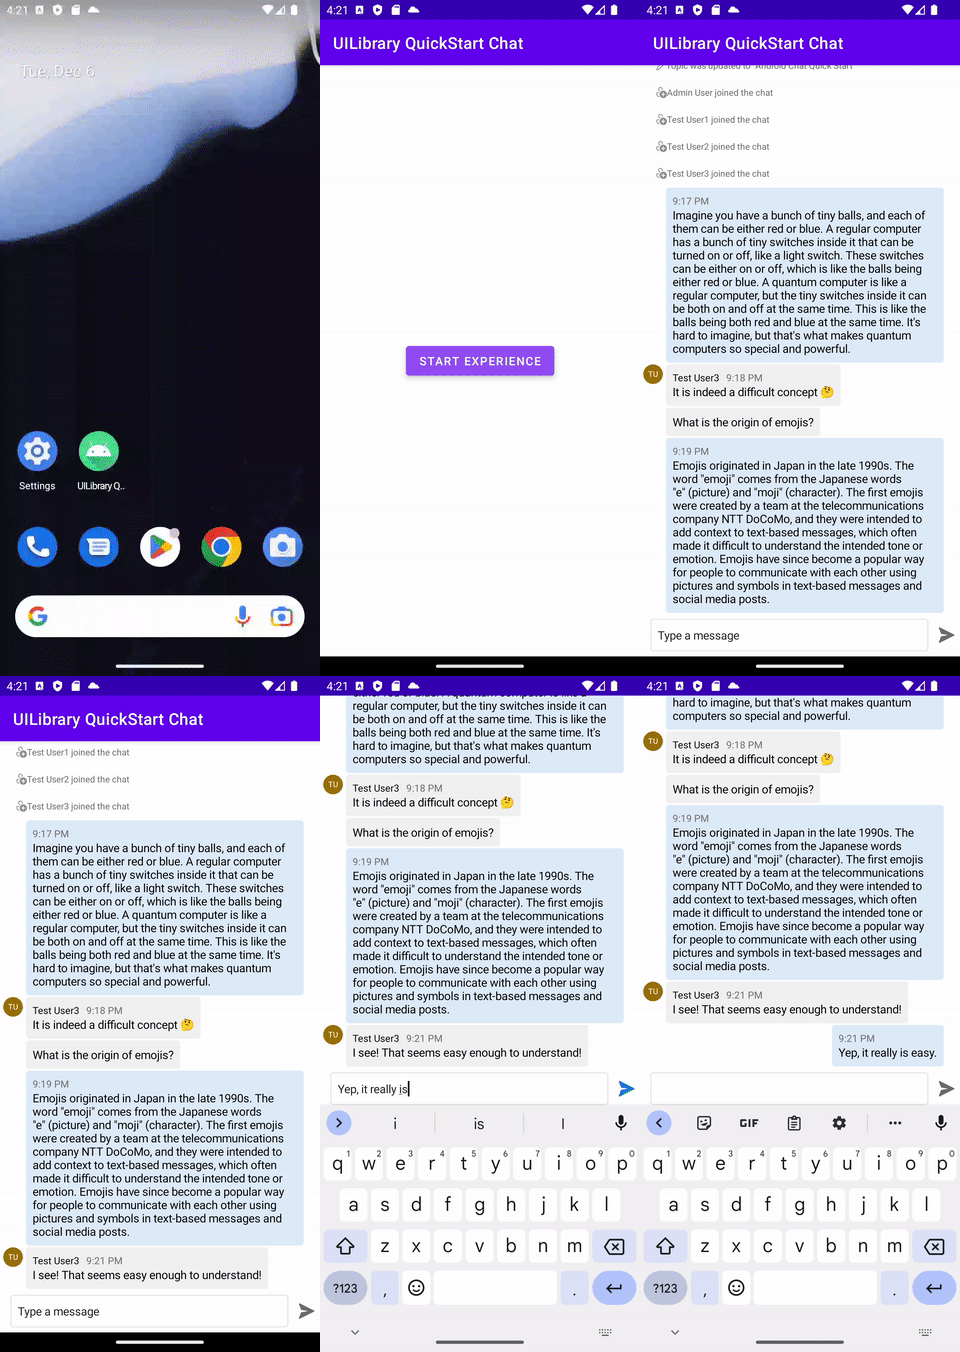
重要
Azure 通信服务的这一功能目前以预览版提供。
预览版 API 和 SDK 在没有服务级别协议的情况下提供。 建议不要将它们用于生产工作负荷。 某些功能可能不受支持或者已受限。
有关详细信息,请参阅 Microsoft Azure 预览版补充使用条款。
在开放源代码 Azure 通信服务的适用于 iOS 的 UI 库中获取适用于本快速入门的示例 iOS 应用程序。
先决条件
- Azure 帐户和有效的 Azure 订阅。 免费创建帐户。
- 运行 Xcode 13 或更高版本的 Mac,以及已安装到密钥链中的有效的开发人员证书。 还必须安装 CocoaPods 以提取依赖项。
- 已部署的 Azure 通信服务资源。 记下终结点 URL。
- Azure 通信服务访问令牌和用户标识符。
- Azure 通信服务聊天线程。 将上一步创建的用户添加到此聊天线程。
设置项目
完成以下部分以设置快速入门项目。
创建新的 Xcode 项目
在 Xcode 中创建新项目。
在“文件”菜单中,选择“新建”>“项目”。
在“为新项目选择模板”中,选择 iOS 平台并选择“应用”应用程序模板。 快速入门使用 UIKit Storyboard。
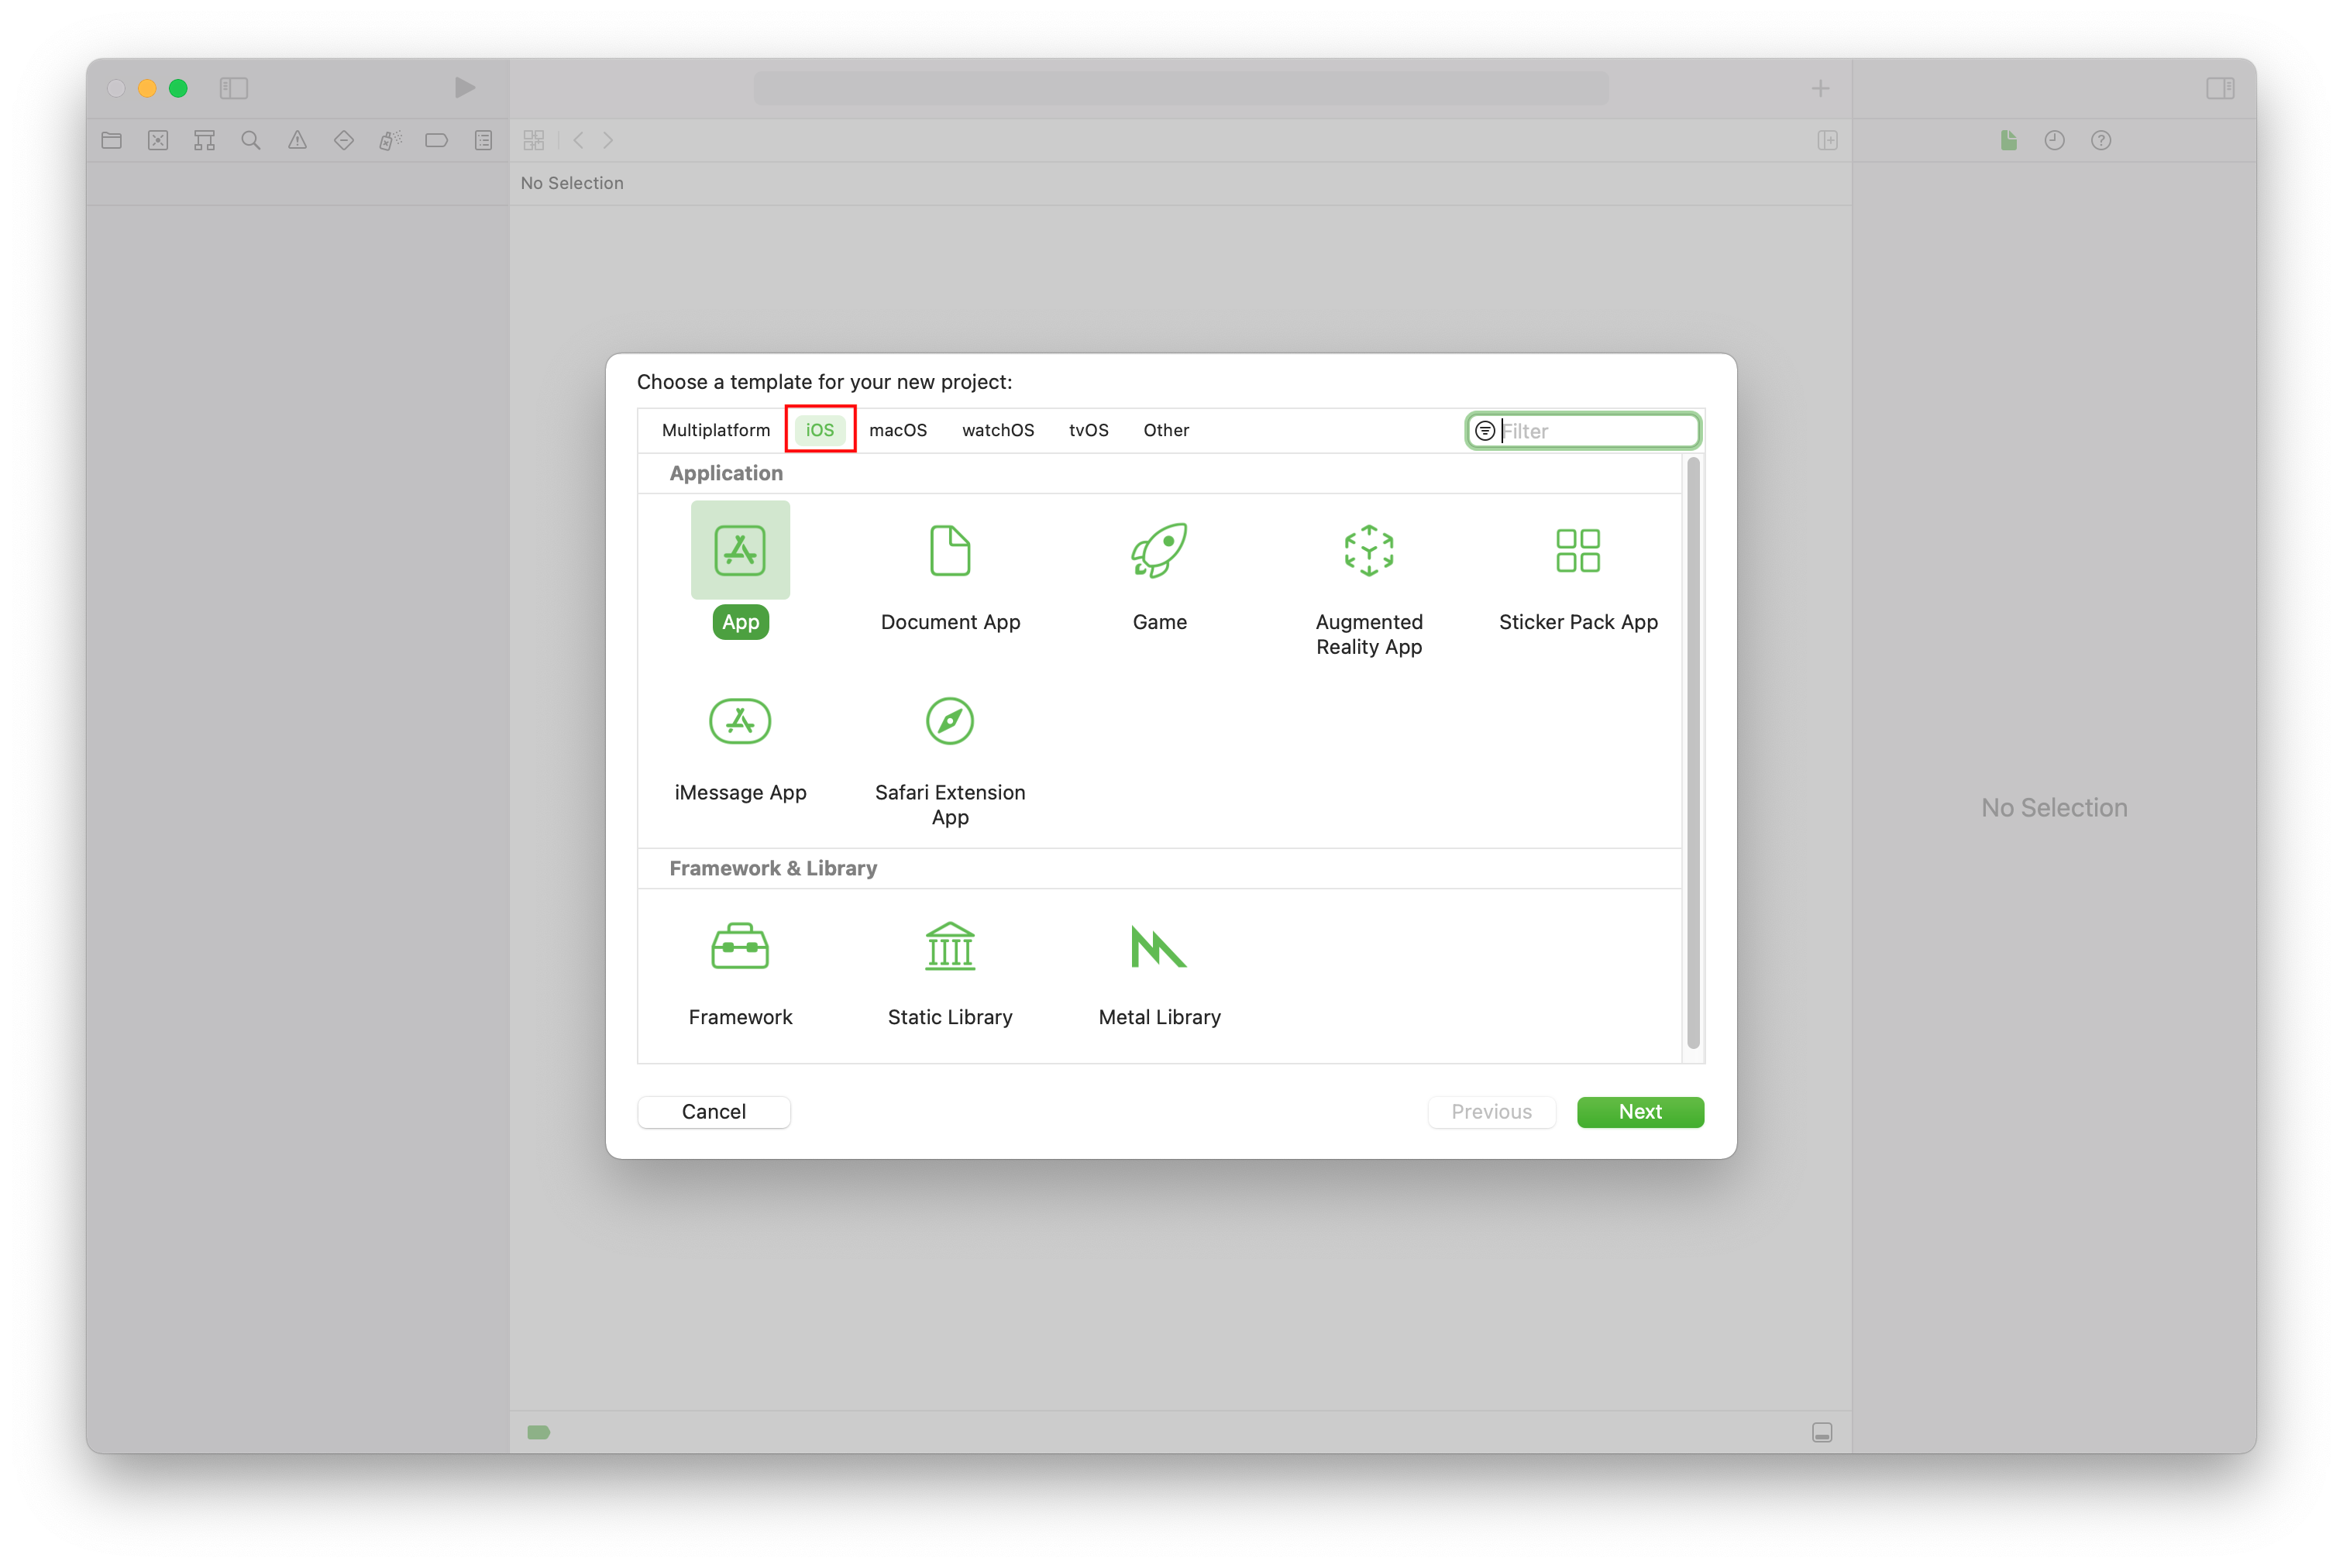
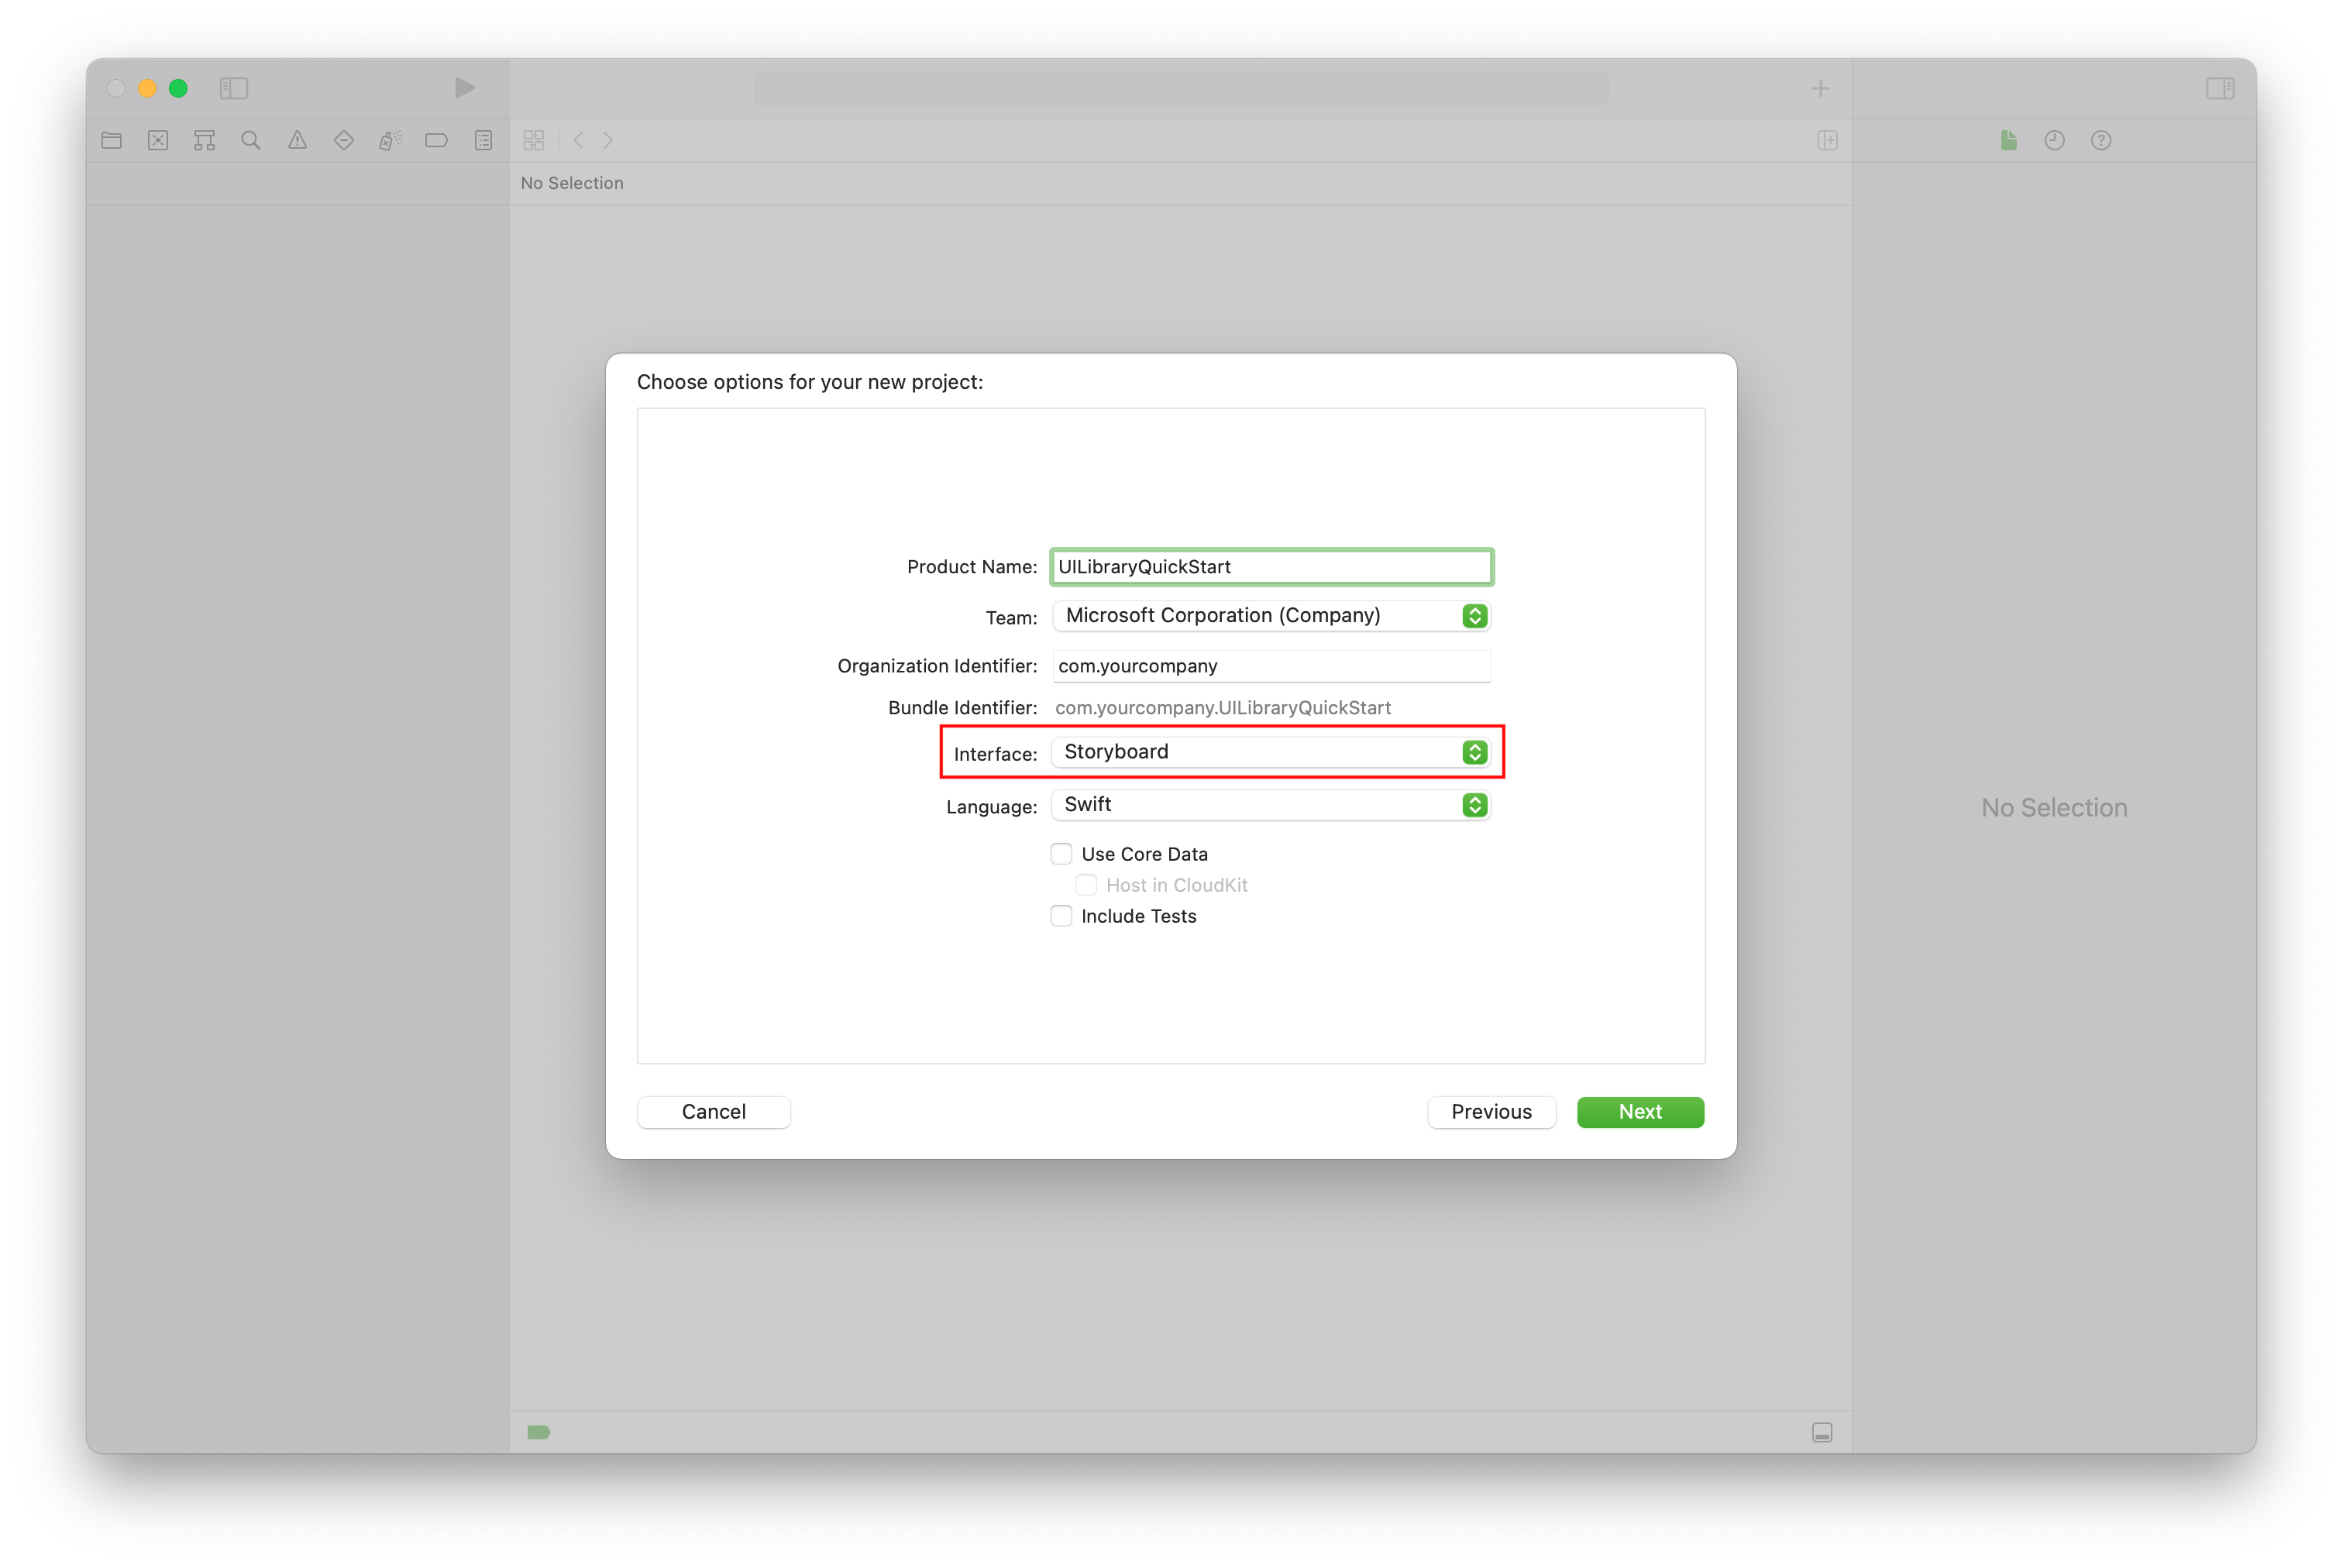
在“为新建项目选择选项”中,在产品名称处输入 UILibraryQuickStart。 请在“界面”处选择“Storyboard”。 快速入门不会创建测试,因此可以清除“包括测试”复选框。
安装包和依赖项
(可选)对于 MacBook with M1,请在 Xcode 中安装并启用 Rosetta。
在项目根目录中,运行
pod init以创建 Podfile。 如果遇到错误,请将 CocoaPods 更新为当前版本。请将以下代码添加到 Podfile 中。 将
UILibraryQuickStart替换为你的项目名称。platform :ios, '14.0' target 'UILibraryQuickStart' do use_frameworks! pod 'AzureCommunicationUIChat', '1.0.0-beta.4' end运行
pod install --repo-update。在 Xcode 中,打开生成的 xcworkspace 文件。
关闭 Bitcode
在 Xcode 项目中的“生成设置”下,将“启用 Bitcode”选项设置为“否”。 若要查找设置,请将筛选器从“基本”更改为“全部”,或使用搜索栏。

初始化复合组件
初始化复合组件:
转到
ViewController。添加以下代码来初始化用于聊天的复合组件。 将
<USER_ID>替换为用户标识符。 将<USER_ACCESS_TOKEN>替换为访问令牌。 将<ENDPOINT_URL>替换为你的终结点 URL。 将<THREAD_ID>替换为聊天会话 ID。 将<DISPLAY_NAME>替换为自己的名称。 (<DISPLAY_NAME>的字符串长度限制为 256 个字符)。import UIKit import AzureCommunicationCommon import AzureCommunicationUIChat class ViewController: UIViewController { var chatAdapter: ChatAdapter? override func viewDidLoad() { super.viewDidLoad() let button = UIButton() button.contentEdgeInsets = UIEdgeInsets(top: 10.0, left: 20.0, bottom: 10.0, right: 20.0) button.layer.cornerRadius = 10 button.backgroundColor = .systemBlue button.setTitle("Start Experience", for: .normal) button.addTarget(self, action: #selector(startChatComposite), for: .touchUpInside) button.translatesAutoresizingMaskIntoConstraints = false self.view.addSubview(button) button.widthAnchor.constraint(equalToConstant: 200).isActive = true button.heightAnchor.constraint(equalToConstant: 50).isActive = true button.centerXAnchor.constraint(equalTo: view.centerXAnchor).isActive = true button.centerYAnchor.constraint(equalTo: view.centerYAnchor).isActive = true } @objc private func startChatComposite() { let communicationIdentifier = CommunicationUserIdentifier("<USER_ID>") guard let communicationTokenCredential = try? CommunicationTokenCredential( token: "<USER_ACCESS_TOKEN>") else { return } self.chatAdapter = ChatAdapter( endpoint: "<ENDPOINT_URL>", identifier: communicationIdentifier, credential: communicationTokenCredential, threadId: "<THREAD_ID>", displayName: "<DISPLAY_NAME>") Task { @MainActor in guard let chatAdapter = self.chatAdapter else { return } try await chatAdapter.connect() let chatCompositeViewController = ChatCompositeViewController( with: chatAdapter) let closeItem = UIBarButtonItem( barButtonSystemItem: .close, target: nil, action: #selector(self.onBackBtnPressed)) chatCompositeViewController.title = "Chat" chatCompositeViewController.navigationItem.leftBarButtonItem = closeItem let navController = UINavigationController(rootViewController: chatCompositeViewController) navController.modalPresentationStyle = .fullScreen self.present(navController, animated: true, completion: nil) } } @objc func onBackBtnPressed() { self.dismiss(animated: true, completion: nil) Task { @MainActor in self.chatAdapter?.disconnect(completionHandler: { [weak self] result in switch result { case .success: self?.chatAdapter = nil case .failure(let error): print("disconnect error \(error)") } }) } } }如果选择将聊天视图放在小于屏幕大小的框架中,则建议的最小宽度为 250,最小高度为 300。
运行代码
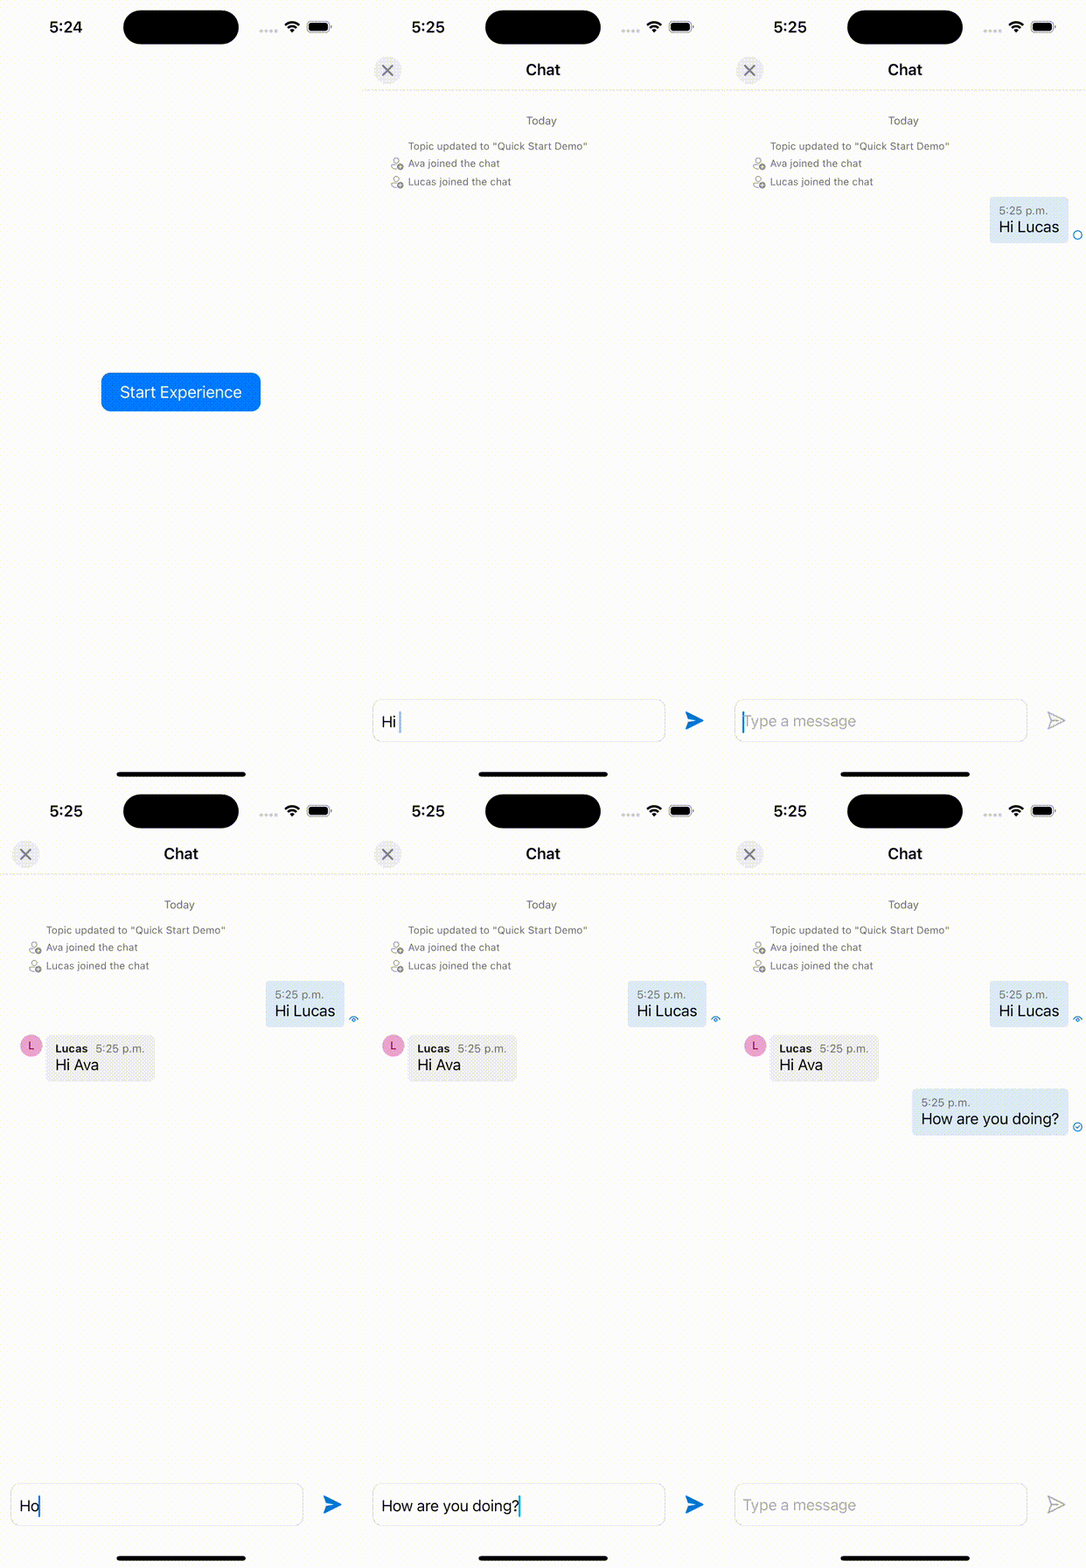
若要在 iOS 模拟器上生成和运行应用,请选择“产品”>“运行”。 还可以使用 (⌘-R) 键盘快捷方式。 然后,在模拟器上试用聊天体验。
- 选择“开始体验”。
- 聊天客户端会加入聊天线程,你可以开始键入和发送消息。
- 如果客户端无法加入线程,并且出现
chatJoin失败错误,请验证用户的访问令牌是否有效,以及是否已通过 REST API 调用或使用 az 命令行界面将用户添加到聊天线程。
清理资源
如果要清理并移除 Azure 通信服务订阅,可以删除资源或资源组。
删除资源组同时也会删除与之相关联的任何其他资源。
了解有关清理资源的详细信息。