你当前正在访问 Microsoft Azure Global Edition 技术文档网站。 如果需要访问由世纪互联运营的 Microsoft Azure 中国技术文档网站,请访问 https://docs.azure.cn。
设置地图样式 (Android SDK)
本文介绍使用 Azure Maps Android SDK 设置地图样式的两种方法。 Azure Maps 有六种不同的地图样式可供选择。 有关受支持的地图样式的详细信息,请参阅 Azure Maps 中受支持的地图样式。
注意
Azure Maps Android SDK 停用
适用于 Android 的 Azure Maps 本机 SDK 现已弃用,将于 2025 年 3 月 31 日停用。 为了避免服务中断,请在 2025 年 3 月 31 日之前迁移到 Azure Maps Web SDK。 有关详细信息,请参阅 Azure Maps Android SDK 迁移指南。
先决条件
请务必完成快速入门中的步骤:创建 Android 应用。
在布局中设置地图样式
在添加地图控件时,你可以在活动类的布局文件中设置地图样式。 以下代码可设置中心位置、缩放级别和地图样式。
<com.azure.android.maps.control.MapControl
android:id="@+id/mapcontrol"
android:layout_width="match_parent"
android:layout_height="match_parent"
app:azure_maps_centerLat="47.602806"
app:azure_maps_centerLng="-122.329330"
app:azure_maps_zoom="12"
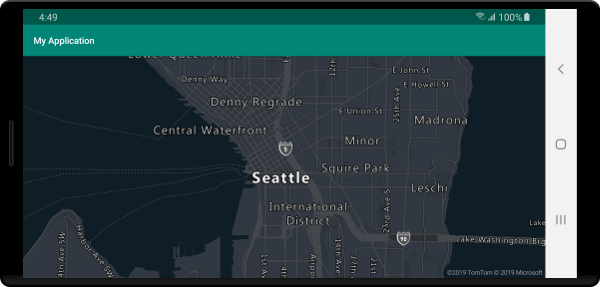
app:azure_maps_style="grayscale_dark"
/>
以下屏幕截图表明,上述代码可显示具有灰度深色样式的道路地图。
在代码中设置地图样式
使用地图的 setStyle 方法可以在代码中以编程方式设置地图样式。 以下代码使用地图的 setCamera 方法设置中心位置和缩放级别并且将地图样式设置为 SATELLITE_ROAD_LABELS。
mapControl.onReady(map -> {
//Set the camera of the map.
map.setCamera(center(Point.fromLngLat(-122.33, 47.64)), zoom(14));
//Set the style of the map.
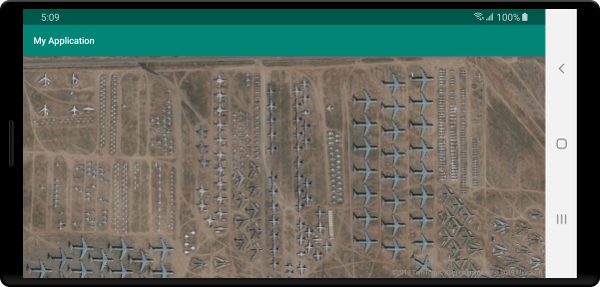
map.setStyle(style(MapStyle.SATELLITE_ROAD_LABELS));
});
mapControl!!.onReady { map: AzureMap ->
    //Set the camera of the map.
    map.setCamera(center(Point.fromLngLat(-122.33, 47.64)), zoom(14))

    //Set the style of the map.
    map.setStyle(style(MapStyle.SATELLITE_ROAD_LABELS))
}
以下屏幕截图表明,上述代码可显示具有卫星道路标签样式的地图。
设置地图相机
地图相机可控制在地图视区中显示世界的哪一部分。 可以在代码中以编程方式将相机放在布局中。 在代码中设置地图时,有两种主要方法可用于设置地图的位置:使用居中和缩放,或在边界框传递。 以下代码演示在使用 center 和 zoom 时如何设置所有可选相机选项。
//Set the camera of the map using center and zoom.
map.setCamera(
    center(Point.fromLngLat(-122.33, 47.64)),

    //The zoom level. Typically a value between 0 and 22.
    zoom(14),

    //The amount of tilt in degrees the map where 0 is looking straight down.
    pitch(45),

    //Direction the top of the map is pointing in degrees. 0 = North, 90 = East, 180 = South, 270 = West
    bearing(90),

    //The minimum zoom level the map will zoom-out to when animating from one location to another on the map.
    minZoom(10),

    //The maximum zoom level the map will zoom-in to when animating from one location to another on the map.
    maxZoom(14)
);
//Set the camera of the map using center and zoom.
map.setCamera(
    center(Point.fromLngLat(-122.33, 47.64)),

    //The zoom level. Typically a value between 0 and 22.
    zoom(14),

    //The amount of tilt in degrees the map where 0 is looking straight down.
    pitch(45),

    //Direction the top of the map is pointing in degrees. 0 = North, 90 = East, 180 = South, 270 = West
    bearing(90),

    //The minimum zoom level the map will zoom-out to when animating from one location to another on the map.
    minZoom(10),

    //The maximum zoom level the map will zoom-in to when animating from one location to another on the map.
    maxZoom(14)
)
通常,需要通过一组数据将地图聚焦。 可以使用 MapMath.fromData 方法根据地物计算边界框,然后可以将其传递到地图相机的 bounds 选项。 在根据边界框设置地图视图时,指定一个 padding 值以考虑呈现为气泡或符号的点的像素大小通常是很有用的。 下面的代码演示了如何在使用边界框设置相机位置时设置所有可选的相机选项。
//Set the camera of the map using a bounding box.
map.setCamera(
    //The area to focus the map on.
    bounds(BoundingBox.fromLngLats(
        //West
        -122.4594,

        //South
        47.4333,

        //East
        -122.21866,

        //North
        47.75758
    )),

    //Amount of pixel buffer around the bounding box to provide extra space around the bounding box.
    padding(20),

    //The maximum zoom level the map will zoom-in to when animating from one location to another on the map.
    maxZoom(14)
);
//Set the camera of the map using a bounding box.
map.setCamera(
    //The area to focus the map on.
    bounds(BoundingBox.fromLngLats(
        //West
        -122.4594,

        //South
        47.4333,

        //East
        -122.21866,

        //North
        47.75758
    )),

    //Amount of pixel buffer around the bounding box to provide extra space around the bounding box.
    padding(20),

    //The maximum zoom level the map will zoom-in to when animating from one location to another on the map.
    maxZoom(14)
)
边界框的纵横比可能与地图的纵横比不同,因此地图通常会显示完整的边界框区域,但通常仅在垂直或水平方向紧缩。
将地图视图制成动画
设置地图的相机选项时,动画选项还可用于创建当前地图视图和下一个地图视图之间的过渡效果。 这些选项指定动画的类型和移动照相机所需的持续时间。
| 选项 | 说明 |
|---|---|
animationDuration(Integer durationMs) |
指定相机在视图之间进行动画处理的时间(以毫秒 (ms) 为单位)。 |
animationType(AnimationType animationType) |
指定要执行的动画过渡效果类型。 - JUMP - 即时更改。- EASE - 逐渐更改相机的设置。- FLY - 逐渐改变相机中创建类似飞行的弧线的设置。 |
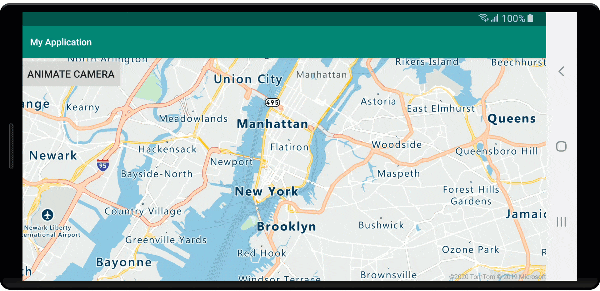
此代码演示如何在三秒钟内使用 FLY 动画对地图视图进行动画处理:
map.setCamera(
    center(Point.fromLngLat(-122.33, 47.6)),
    zoom(12),
    animationType(AnimationType.FLY),
    animationDuration(3000)
);
map.setCamera(
    center(Point.fromLngLat(-122.33, 47.6)),
    zoom(12.0),
    AnimationOptions.animationType(AnimationType.FLY),
    AnimationOptions.animationDuration(3000)
)
上述代码演示了从纽约到西雅图的地图视图产生的动画效果:
后续步骤
有关可向地图添加的更多代码示例,请参阅以下文章: