使用 Azure 策略大规模启用 Azure 本地见解
适用于:Azure Local 2311.2 及更高版本
本文档介绍如何使用 Azure 策略大规模为 Azure 本地系统启用 Insights。 若要为单个 Azure 本地系统启用 Insights,请参阅 使用 Insights 监视单个 Azure 本地系统。
有关 Azure Policy 的概述,请参阅 什么是 Azure Policy?
关于使用 Azure 策略大规模启用见解
若要使用 Insights 监视多个 Azure 本地系统,需要单独为每个系统启用 Insights。 为了简化此过程,可以使用 Azure 策略在订阅或资源组级别自动启用 Insights。 这些策略根据定义的规则检查其范围内资源的符合性。 如果在分配策略后找到任何不符合的资源,则可以通过修正任务对其进行修正。
本部分介绍用于大规模启用见解的 Azure 策略。 对于每个策略,它还提供 JSON 中的策略定义模板,可用于按原样创建策略定义,或作为进一步自定义的起点。
修复 AMA 的策略
对于在 2023 年 11 月之前注册的 Azure 本地系统,需要在再次配置 Insights 之前修复群集注册和 Azure Monitor 代理(AMA)。 有关详细信息,请参阅 排查在 2023 年 11 月之前注册的群集问题。
用于修复 AMA 的策略执行以下功能:
- 删除注册表项(如果存在),这将确定 AMA 收集数据的资源 ID。
在应用此策略之前,请记住以下事项:
- 此策略仅适用于 Azure 本地版本 22H2 系统。 在任何其他策略之前应用它,以确保 AMA 选取正确的资源 ID。
- 在应用此策略之前卸载 AMA 以设置正确的资源 ID。 如果未首先卸载 AMA,则可能不会显示数据。 有关详细信息,请参阅 卸载 AMA。
下面是 JSON 中的策略定义:
{
"mode": "INDEXED",
"policyRule": {
"then": {
"effect": "deployIfNotExists",
"details": {
"type": "Microsoft.GuestConfiguration/guestConfigurationAssignments",
"existenceCondition": {
"allOf": [
{
"field": "Microsoft.GuestConfiguration/guestConfigurationAssignments/complianceStatus",
"equals": "Compliant"
},
{
"field": "Microsoft.GuestConfiguration/guestConfigurationAssignments/parameterHash",
"equals": "[base64(concat('[RepairClusterAMA]RepairClusterAMAInstanceName;Path', '=', parameters('Path'), ',', '[RepairClusterAMA]RepairClusterAMAInstanceName;Content', '=', parameters('Content')))]"
}
]
},
"roleDefinitionIds": [
"/providers/Microsoft.Authorization/roleDefinitions/088ab73d-1256-47ae-bea9-9de8e7131f31"
],
"deployment": {
"properties": {
"parameters": {
"type": {
"value": "[field('type')]"
},
"location": {
"value": "[field('location')]"
},
"vmName": {
"value": "[field('name')]"
},
"assignmentName": {
"value": "[concat('RepairClusterAMA$pid', uniqueString(policy().assignmentId, policy().definitionReferenceId))]"
},
"Content": {
"value": "[parameters('Content')]"
},
"Path": {
"value": "[parameters('Path')]"
}
},
"mode": "incremental",
"template": {
"parameters": {
"type": {
"type": "string"
},
"location": {
"type": "string"
},
"vmName": {
"type": "string"
},
"assignmentName": {
"type": "string"
},
"Content": {
"type": "string"
},
"Path": {
"type": "string"
}
},
"contentVersion": "1.0.0.0",
"resources": [
{
"type": "Microsoft.Compute/virtualMachines/providers/guestConfigurationAssignments",
"properties": {
"guestConfiguration": {
"version": "1.0.0",
"name": "RepairClusterAMA",
"configurationParameter": [
{
"value": "[parameters('Path')]",
"name": "[RepairClusterAMA]RepairClusterAMAInstanceName;Path"
},
{
"value": "[parameters('Content')]",
"name": "[RepairClusterAMA]RepairClusterAMAInstanceName;Content"
}
],
"contentHash": "7EA99B10AE79EA5C1456A134441270BC48F5208F3521BFBFDCAE5EF7B6A9D9BD",
"contentUri": "https://guestconfiguration4.blob.core.windows.net/guestconfiguration/RepairClusterAMA.zip",
"contentType": "Custom",
"assignmentType": "ApplyAndAutoCorrect"
}
},
"location": "[parameters('location')]",
"apiVersion": "2018-11-20",
"name": "[concat(parameters('vmName'), '/Microsoft.GuestConfiguration/', parameters('assignmentName'))]",
"condition": "[equals(toLower(parameters('type')), toLower('Microsoft.Compute/virtualMachines'))]"
},
{
"type": "Microsoft.HybridCompute/machines/providers/guestConfigurationAssignments",
"properties": {
"guestConfiguration": {
"version": "1.0.0",
"name": "RepairClusterAMA",
"configurationParameter": [
{
"value": "[parameters('Path')]",
"name": "[RepairClusterAMA]RepairClusterAMAInstanceName;Path"
},
{
"value": "[parameters('Content')]",
"name": "[RepairClusterAMA]RepairClusterAMAInstanceName;Content"
}
],
"contentHash": "7EA99B10AE79EA5C1456A134441270BC48F5208F3521BFBFDCAE5EF7B6A9D9BD",
"contentUri": "https://guestconfiguration4.blob.core.windows.net/guestconfiguration/RepairClusterAMA.zip",
"contentType": "Custom",
"assignmentType": "ApplyAndAutoCorrect"
}
},
"location": "[parameters('location')]",
"apiVersion": "2018-11-20",
"name": "[concat(parameters('vmName'), '/Microsoft.GuestConfiguration/', parameters('assignmentName'))]",
"condition": "[equals(toLower(parameters('type')), toLower('Microsoft.HybridCompute/machines'))]"
},
{
"type": "Microsoft.Compute/virtualMachineScaleSets/providers/guestConfigurationAssignments",
"properties": {
"guestConfiguration": {
"version": "1.0.0",
"name": "RepairClusterAMA",
"configurationParameter": [
{
"value": "[parameters('Path')]",
"name": "[RepairClusterAMA]RepairClusterAMAInstanceName;Path"
},
{
"value": "[parameters('Content')]",
"name": "[RepairClusterAMA]RepairClusterAMAInstanceName;Content"
}
],
"contentHash": "7EA99B10AE79EA5C1456A134441270BC48F5208F3521BFBFDCAE5EF7B6A9D9BD",
"contentUri": "https://guestconfiguration4.blob.core.windows.net/guestconfiguration/RepairClusterAMA.zip",
"contentType": "Custom",
"assignmentType": "ApplyAndAutoCorrect"
}
},
"location": "[parameters('location')]",
"apiVersion": "2018-11-20",
"name": "[concat(parameters('vmName'), '/Microsoft.GuestConfiguration/', parameters('assignmentName'))]",
"condition": "[equals(toLower(parameters('type')), toLower('Microsoft.Compute/virtualMachineScaleSets'))]"
}
],
"$schema": "https://schema.management.azure.com/schemas/2015-01-01/deploymentTemplate.json#"
}
}
},
"name": "[concat('RepairClusterAMA$pid', uniqueString(policy().assignmentId, policy().definitionReferenceId))]"
}
},
"if": {
"anyOf": [
{
"allOf": [
{
"anyOf": [
{
"field": "type",
"equals": "Microsoft.Compute/virtualMachines"
},
{
"field": "type",
"equals": "Microsoft.Compute/virtualMachineScaleSets"
}
]
},
{
"field": "tags['aks-managed-orchestrator']",
"exists": "false"
},
{
"field": "tags['aks-managed-poolName']",
"exists": "false"
},
{
"anyOf": [
{
"field": "Microsoft.Compute/imagePublisher",
"in": [
"esri",
"incredibuild",
"MicrosoftDynamicsAX",
"MicrosoftSharepoint",
"MicrosoftVisualStudio",
"MicrosoftWindowsDesktop",
"MicrosoftWindowsServerHPCPack"
]
},
{
"allOf": [
{
"field": "Microsoft.Compute/imagePublisher",
"equals": "MicrosoftWindowsServer"
},
{
"field": "Microsoft.Compute/imageSKU",
"notLike": "2008*"
}
]
},
{
"allOf": [
{
"field": "Microsoft.Compute/imagePublisher",
"equals": "MicrosoftSQLServer"
},
{
"field": "Microsoft.Compute/imageOffer",
"notLike": "SQL2008*"
}
]
},
{
"allOf": [
{
"field": "Microsoft.Compute/imagePublisher",
"equals": "microsoft-dsvm"
},
{
"field": "Microsoft.Compute/imageOffer",
"like": "dsvm-win*"
}
]
},
{
"allOf": [
{
"field": "Microsoft.Compute/imagePublisher",
"equals": "microsoft-ads"
},
{
"field": "Microsoft.Compute/imageOffer",
"in": [
"standard-data-science-vm",
"windows-data-science-vm"
]
}
]
},
{
"allOf": [
{
"field": "Microsoft.Compute/imagePublisher",
"equals": "batch"
},
{
"field": "Microsoft.Compute/imageOffer",
"equals": "rendering-windows2016"
}
]
},
{
"allOf": [
{
"field": "Microsoft.Compute/imagePublisher",
"equals": "center-for-internet-security-inc"
},
{
"field": "Microsoft.Compute/imageOffer",
"like": "cis-windows-server-201*"
}
]
},
{
"allOf": [
{
"field": "Microsoft.Compute/imagePublisher",
"equals": "pivotal"
},
{
"field": "Microsoft.Compute/imageOffer",
"like": "bosh-windows-server*"
}
]
},
{
"allOf": [
{
"field": "Microsoft.Compute/imagePublisher",
"equals": "cloud-infrastructure-services"
},
{
"field": "Microsoft.Compute/imageOffer",
"like": "ad*"
}
]
},
{
"allOf": [
{
"anyOf": [
{
"field": "Microsoft.Compute/virtualMachines/osProfile.windowsConfiguration",
"exists": true
},
{
"field": "Microsoft.Compute/virtualMachines/storageProfile.osDisk.osType",
"like": "Windows*"
},
{
"field": "Microsoft.Compute/VirtualMachineScaleSets/osProfile.windowsConfiguration",
"exists": true
},
{
"field": "Microsoft.Compute/virtualMachineScaleSets/virtualMachineProfile.storageProfile.osDisk.osType",
"like": "Windows*"
}
]
},
{
"anyOf": [
{
"field": "Microsoft.Compute/imageSKU",
"exists": false
},
{
"allOf": [
{
"field": "Microsoft.Compute/imageOffer",
"notLike": "SQL2008*"
},
{
"field": "Microsoft.Compute/imageSKU",
"notLike": "2008*"
}
]
}
]
}
]
}
]
}
]
},
{
"allOf": [
{
"equals": true,
"value": "[parameters('IncludeArcMachines')]"
},
{
"anyOf": [
{
"allOf": [
{
"field": "type",
"equals": "Microsoft.HybridCompute/machines"
},
{
"field": "Microsoft.HybridCompute/imageOffer",
"like": "windows*"
}
]
},
{
"allOf": [
{
"field": "type",
"equals": "Microsoft.ConnectedVMwarevSphere/virtualMachines"
},
{
"field": "Microsoft.ConnectedVMwarevSphere/virtualMachines/osProfile.osType",
"like": "windows*"
}
]
}
]
}
]
}
]
}
},
"parameters": {
"IncludeArcMachines": {
"allowedValues": [
"true",
"false"
],
"defaultValue": "false",
"metadata": {
"description": "By selecting this option, you agree to be charged monthly per Arc connected machine.",
"displayName": "Include Arc connected machines",
"portalReview": true
},
"type": "String"
},
"Content": {
"defaultValue": "File content XYZ",
"metadata": {
"description": "File content",
"displayName": "Content"
},
"type": "String"
},
"Path": {
"defaultValue": "C:\\DSC\\CreateFileXYZ.txt",
"metadata": {
"description": "Path including file name and extension",
"displayName": "Path"
},
"type": "String"
}
}
}
用于安装 AMA 的策略
安装 AMA 的策略执行以下功能:
评估 Azure 本地系统
AzureMonitoringAgent是否安装了扩展。通过修正任务在不符合策略的系统上安装 AMA。
下面是 JSON 中的策略定义:
{
  "mode": "Indexed",
  "policyRule": {
     "if": {
          "field": "type",
          "equals": "Microsoft.AzureStackHCI/clusters"
        },
        "then": {
          "effect": "[parameters('effect')]",
          "details": {
            "type": "Microsoft.AzureStackHCI/clusters/arcSettings/extensions",
            "name": "[concat(field('name'), '/default/AzureMonitorWindowsAgent')]",
            "roleDefinitionIds": [
              "/providers/Microsoft.Authorization/roleDefinitions/b24988ac-6180-42a0-ab88-20f7382dd24c"
            ],
            "existenceCondition": {
              "field": "Microsoft.AzureStackHCI/clusters/arcSettings/extensions/extensionParameters.type",
              "equals": "AzureMonitorWindowsAgent"
            },
            "deployment": {
              "properties": {
                "mode": "incremental",
                "template": {
                  "$schema": "https://schema.management.azure.com/schemas/2019-04-01/deploymentTemplate.json#",
                  "contentVersion": "1.0.0.0",
                  "parameters": {
                    "clusterName": {
                      "type": "string",
                      "metadata": {
                        "description": "The name of Cluster."
                      }
                    }
                  },
                  "resources": [
                    {
                      "type": "Microsoft.AzureStackHCI/clusters/arcSettings/extensions",
                      "apiVersion": "2023-08-01",
                      "name": "[concat(parameters('clusterName'), '/default/AzureMonitorWindowsAgent')]",
                      "properties": {
                        "extensionParameters": {
                          "publisher": "Microsoft.Azure.Monitor",
                          "type": "AzureMonitorWindowsAgent",
                          "autoUpgradeMinorVersion": false,
                          "enableAutomaticUpgrade": false
                        }
                      }
                    }
                  ]
                },
                "parameters": {
                  "clusterName": {
                    "value": "[field('Name')]"
                  }
                }
              }
            }
          }
        }
  },
  "parameters": {
   "effect": {
          "type": "String",
          "metadata": {
            "displayName": "Effect",
            "description": "Enable or disable the execution of the policy"
          },
          "allowedValues": [
            "DeployIfNotExists",
            "Disabled"
          ],
          "defaultValue": "DeployIfNotExists"
        }
  }
}
配置 DCR 关联的策略
此策略应用于 Azure 本地系统中的每个节点,并执行以下功能:
dataCollectionResourceId采用作为输入并将数据收集规则(DCR)与每个节点相关联。注意
此策略不会创建数据收集终结点(DCE)。 如果使用专用链接,则必须创建 DCE,以确保 Insights 中提供数据。 有关详细信息,请参阅使用 专用链接 为 Azure Monitor 代理启用网络隔离。
下面是 JSON 中的策略定义:
{
  "mode": "INDEXED",
  "policyRule": {
     "if": {
          "field": "type",
          "equals": "Microsoft.HybridCompute/machines"
        },
        "then": {
          "effect": "[parameters('effect')]",
          "details": {
            "type": "Microsoft.Insights/dataCollectionRuleAssociations",
            "name": "[concat(field('name'), '-dataCollectionRuleAssociations')]",
            "roleDefinitionIds": [
              "/providers/Microsoft.Authorization/roleDefinitions/b24988ac-6180-42a0-ab88-20f7382dd24c"
            ],
            "deployment": {
              "properties": {
                "mode": "incremental",
                "template": {
                  "$schema": "https://schema.management.azure.com/schemas/2019-04-01/deploymentTemplate.json#",
                  "contentVersion": "1.0.0.0",
                  "parameters": {
                    "machineName": {
                      "type": "string",
                      "metadata": {
                        "description": "The name of the machine."
                      }
                    },
                    "dataCollectionResourceId": {
                      "type": "string",
                      "metadata": {
                        "description": "Resource Id of the DCR"
                      }
                    }
                  },
                  "resources": [
                    {
                      "type": "Microsoft.Insights/dataCollectionRuleAssociations",
                      "apiVersion": "2022-06-01",
                      "name": "[concat(parameters('machineName'), '-dataCollectionRuleAssociations')]",
                      "scope": "[format('Microsoft.HybridCompute/machines/{0}', parameters('machineName'))]",
                      "properties": {
                        "description": "Association of data collection rule. Deleting this association will break the data collection for this machine",
                        "dataCollectionRuleId": "[parameters('dataCollectionResourceId')]"
                      }
                    }
                  ]
                },
                "parameters": {
                  "machineName": {
                    "value": "[field('Name')]"
                  },
                  "dataCollectionResourceId": {
                    "value": "[parameters('dcrResourceId')]"
                  }
                }
              }
            }
          }
        }
  },
  "parameters": { "effect": {
        "type": "String",
        "metadata": {
        "displayName": "Effect",
        "description": "Enable or disable the execution of the policy"
        },
        "allowedValues": [
        "DeployIfNotExists",
        "Disabled"
        ],
        "defaultValue": "DeployIfNotExists"
    },
    "dcrResourceId": {
        "type": "String",
        "metadata": {
        "displayName": "dcrResourceId",
        "description": "Resource Id of the DCR"
        }
    }

  }
}
使用 Azure 策略大规模启用见解
本部分介绍如何使用 Azure 策略大规模启用 Azure 本地见解。
先决条件
在使用 Azure 策略大规模启用 Azure 本地见解之前,请完成以下先决条件:
- 必须有权访问要在其中启用 Insights 的已部署和注册的 Azure 本地系统。
- 必须启用 Azure 资源的托管标识。 有关详细信息,请参阅启用增强管理。
- 必须在 Azure 订阅中具有 来宾配置资源参与者 角色。
- (仅适用于 Azure 本地版本 22H2 系统)必须先卸载 AMA,然后才能开始应用 Azure 策略。
策略应用程序的顺序
若要为 Azure 本地系统大规模启用 Insights,请按以下顺序应用 Azure 策略:
修复 AMA(仅适用于 Azure 本地版本 22H2 系统):
- 如果使用的是 Azure Local 版本 22H2 系统,请首先应用策略来修复 AMA。 Azure 本地版本 23H2 系统不需要此步骤。
- 有关策略定义模板,请参阅 用于修复 AMA 的策略。
安装 AMA:
- 应用策略以安装 AMA。
- 有关策略定义模板,请参阅 “策略”以安装 AMA。
配置 DCR 关联。
- 应用策略以配置 DCR 关联。
- 有关策略定义模板,请参阅 “策略”以配置 DCR 关联。
应用策略以大规模启用见解的工作流
针对每个策略执行以下步骤,大规模启用 Insights:
- 创建策略定义。 使用策略定义模板定义规则和条件来定义符合性。 请参阅 “创建策略定义”。
- 创建策略分配。 定义策略的范围、排除项(如果有)和强制参数。 使用上一步中定义的策略定义。 请参阅 “创建策略分配”。
- 查看符合性状态。 监视策略分配的符合性状态。 检查是否有任何不合规的资源。 请参阅 “查看符合性状态”。
- 修正不符合要求的资源。 创建修正任务以修正不符合的资源。 请参阅 修正不符合的资源。
创建策略定义
若要创建策略定义,请执行以下步骤:
在 Azure 门户中,导航到 Azure Policy 服务。
在“创作”部分下,选择“定义”。
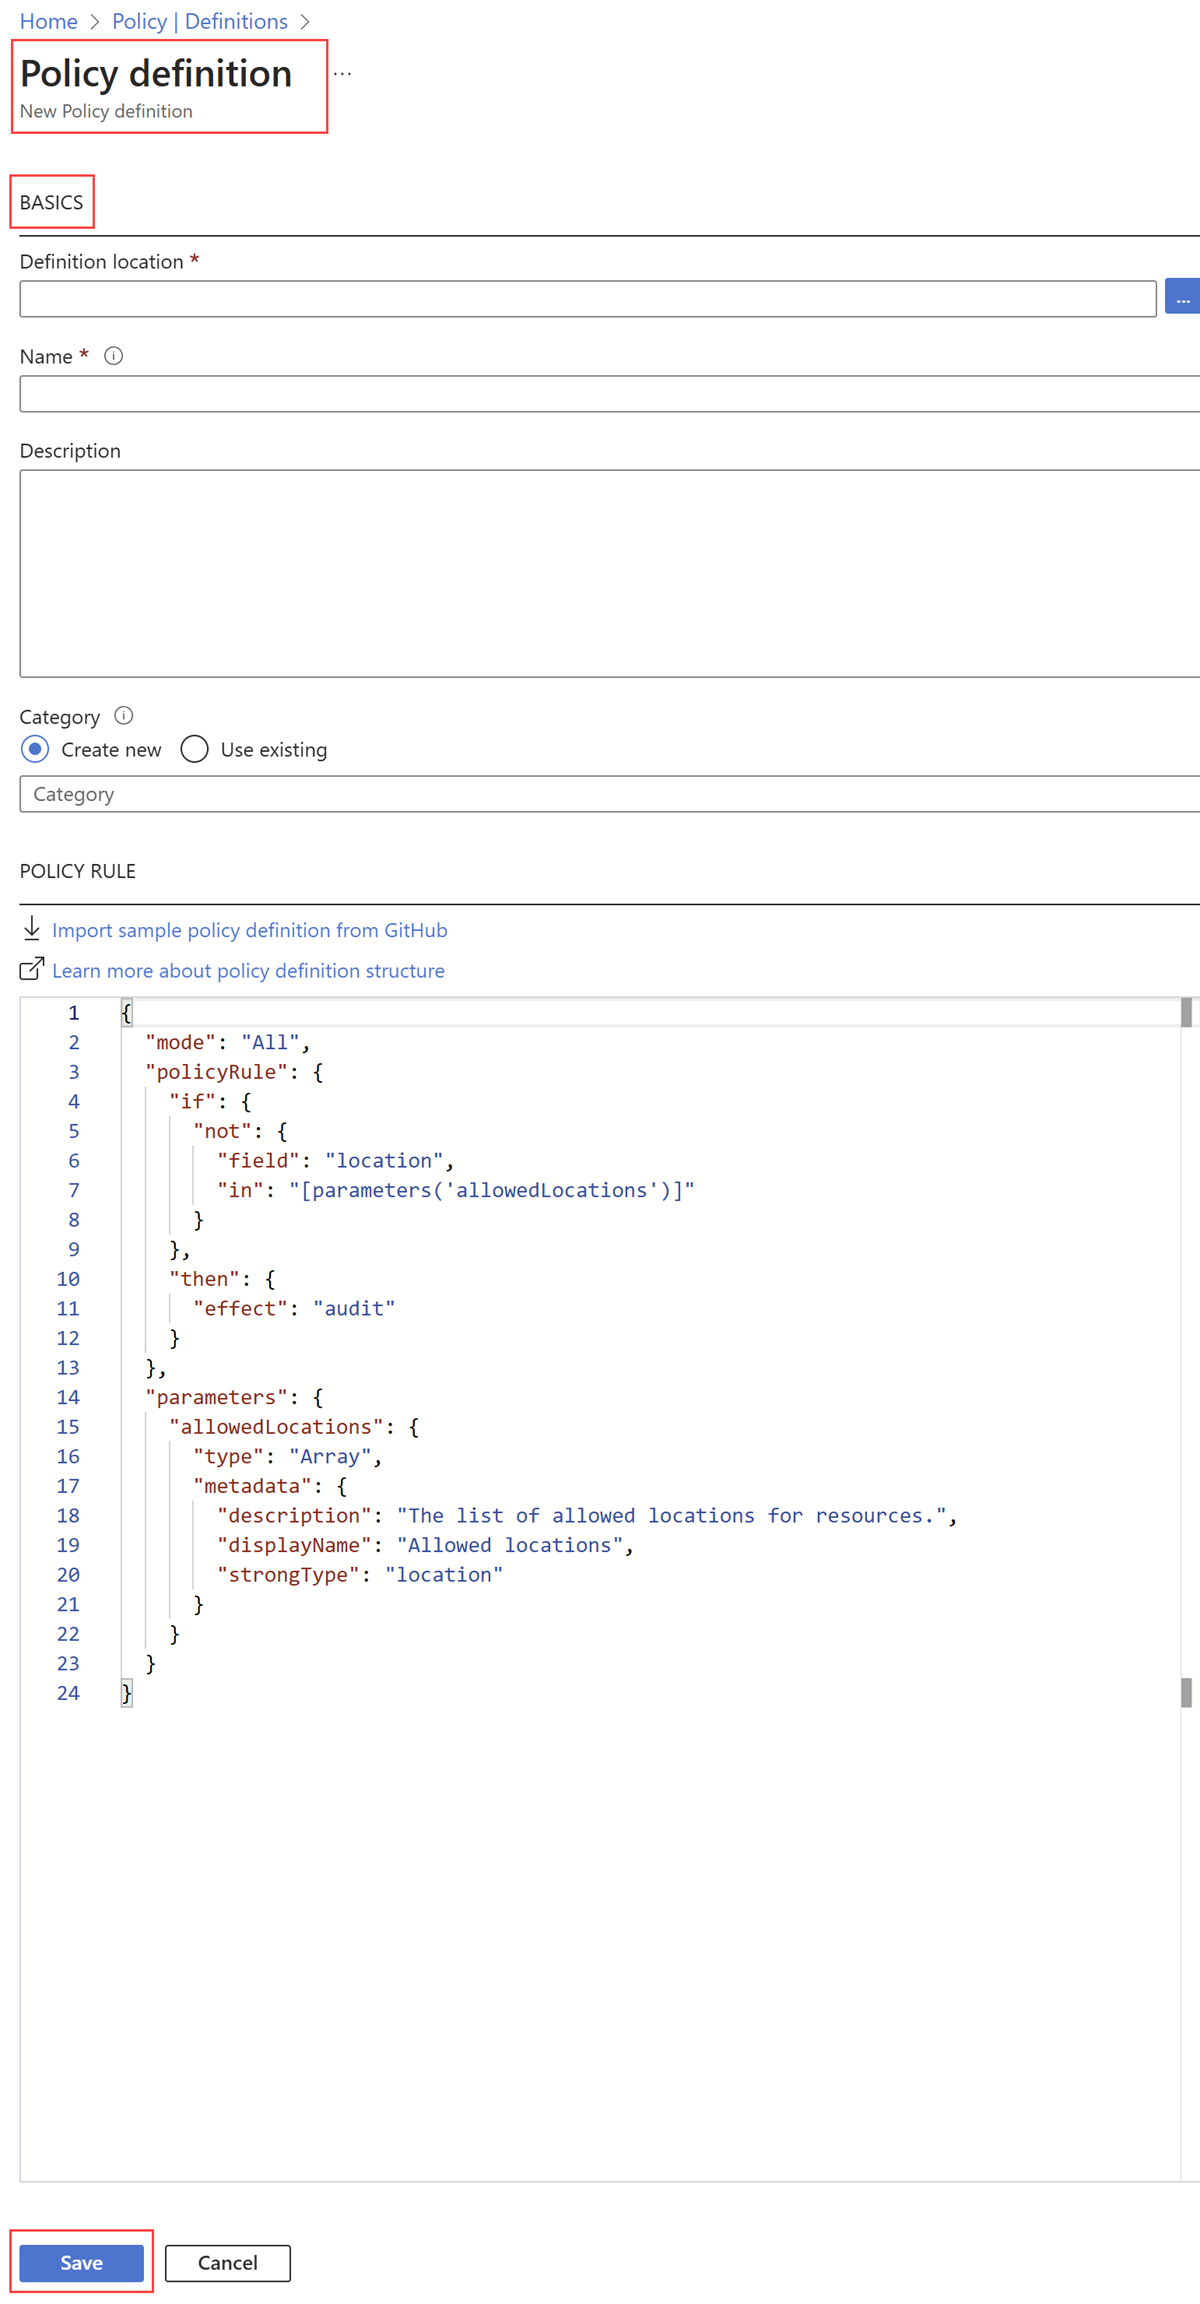
选择“ + 策略定义 ”以创建新的策略定义。
在 “策略定义 ”页上,指定以下值:
字段 操作 定义位置 选择省略号 ( ...) 以指定策略资源所在的位置。 在 “定义位置 ”窗格中,选择 Azure 订阅,然后选择“ 选择”。Name 指定策略定义的友好名称。 还可以指定说明和类别。 策略规则 JSON 编辑框已预先填充策略定义模板。 将此模板替换为要应用的策略定义模板。 有关 JSON 格式的 Insights 策略的定义模板,请参阅“ 关于使用 Azure 策略启用大规模 见解”部分。 角色定义 复制策略定义并将其粘贴到 POLICY RULE 字段中后,将显示此字段。 从列表中选择“来宾配置资源参与者”角色。 选择“保存”。
你会收到一条通知,指出策略定义创建成功,并显示策略定义页。 现在可以继续创建策略分配。
创建策略分配
接下来,创建策略分配并在订阅或资源组级别分配策略定义。 有关策略分配的详细信息,请参阅 Azure Policy 分配结构。
若要创建策略分配,请执行以下步骤:
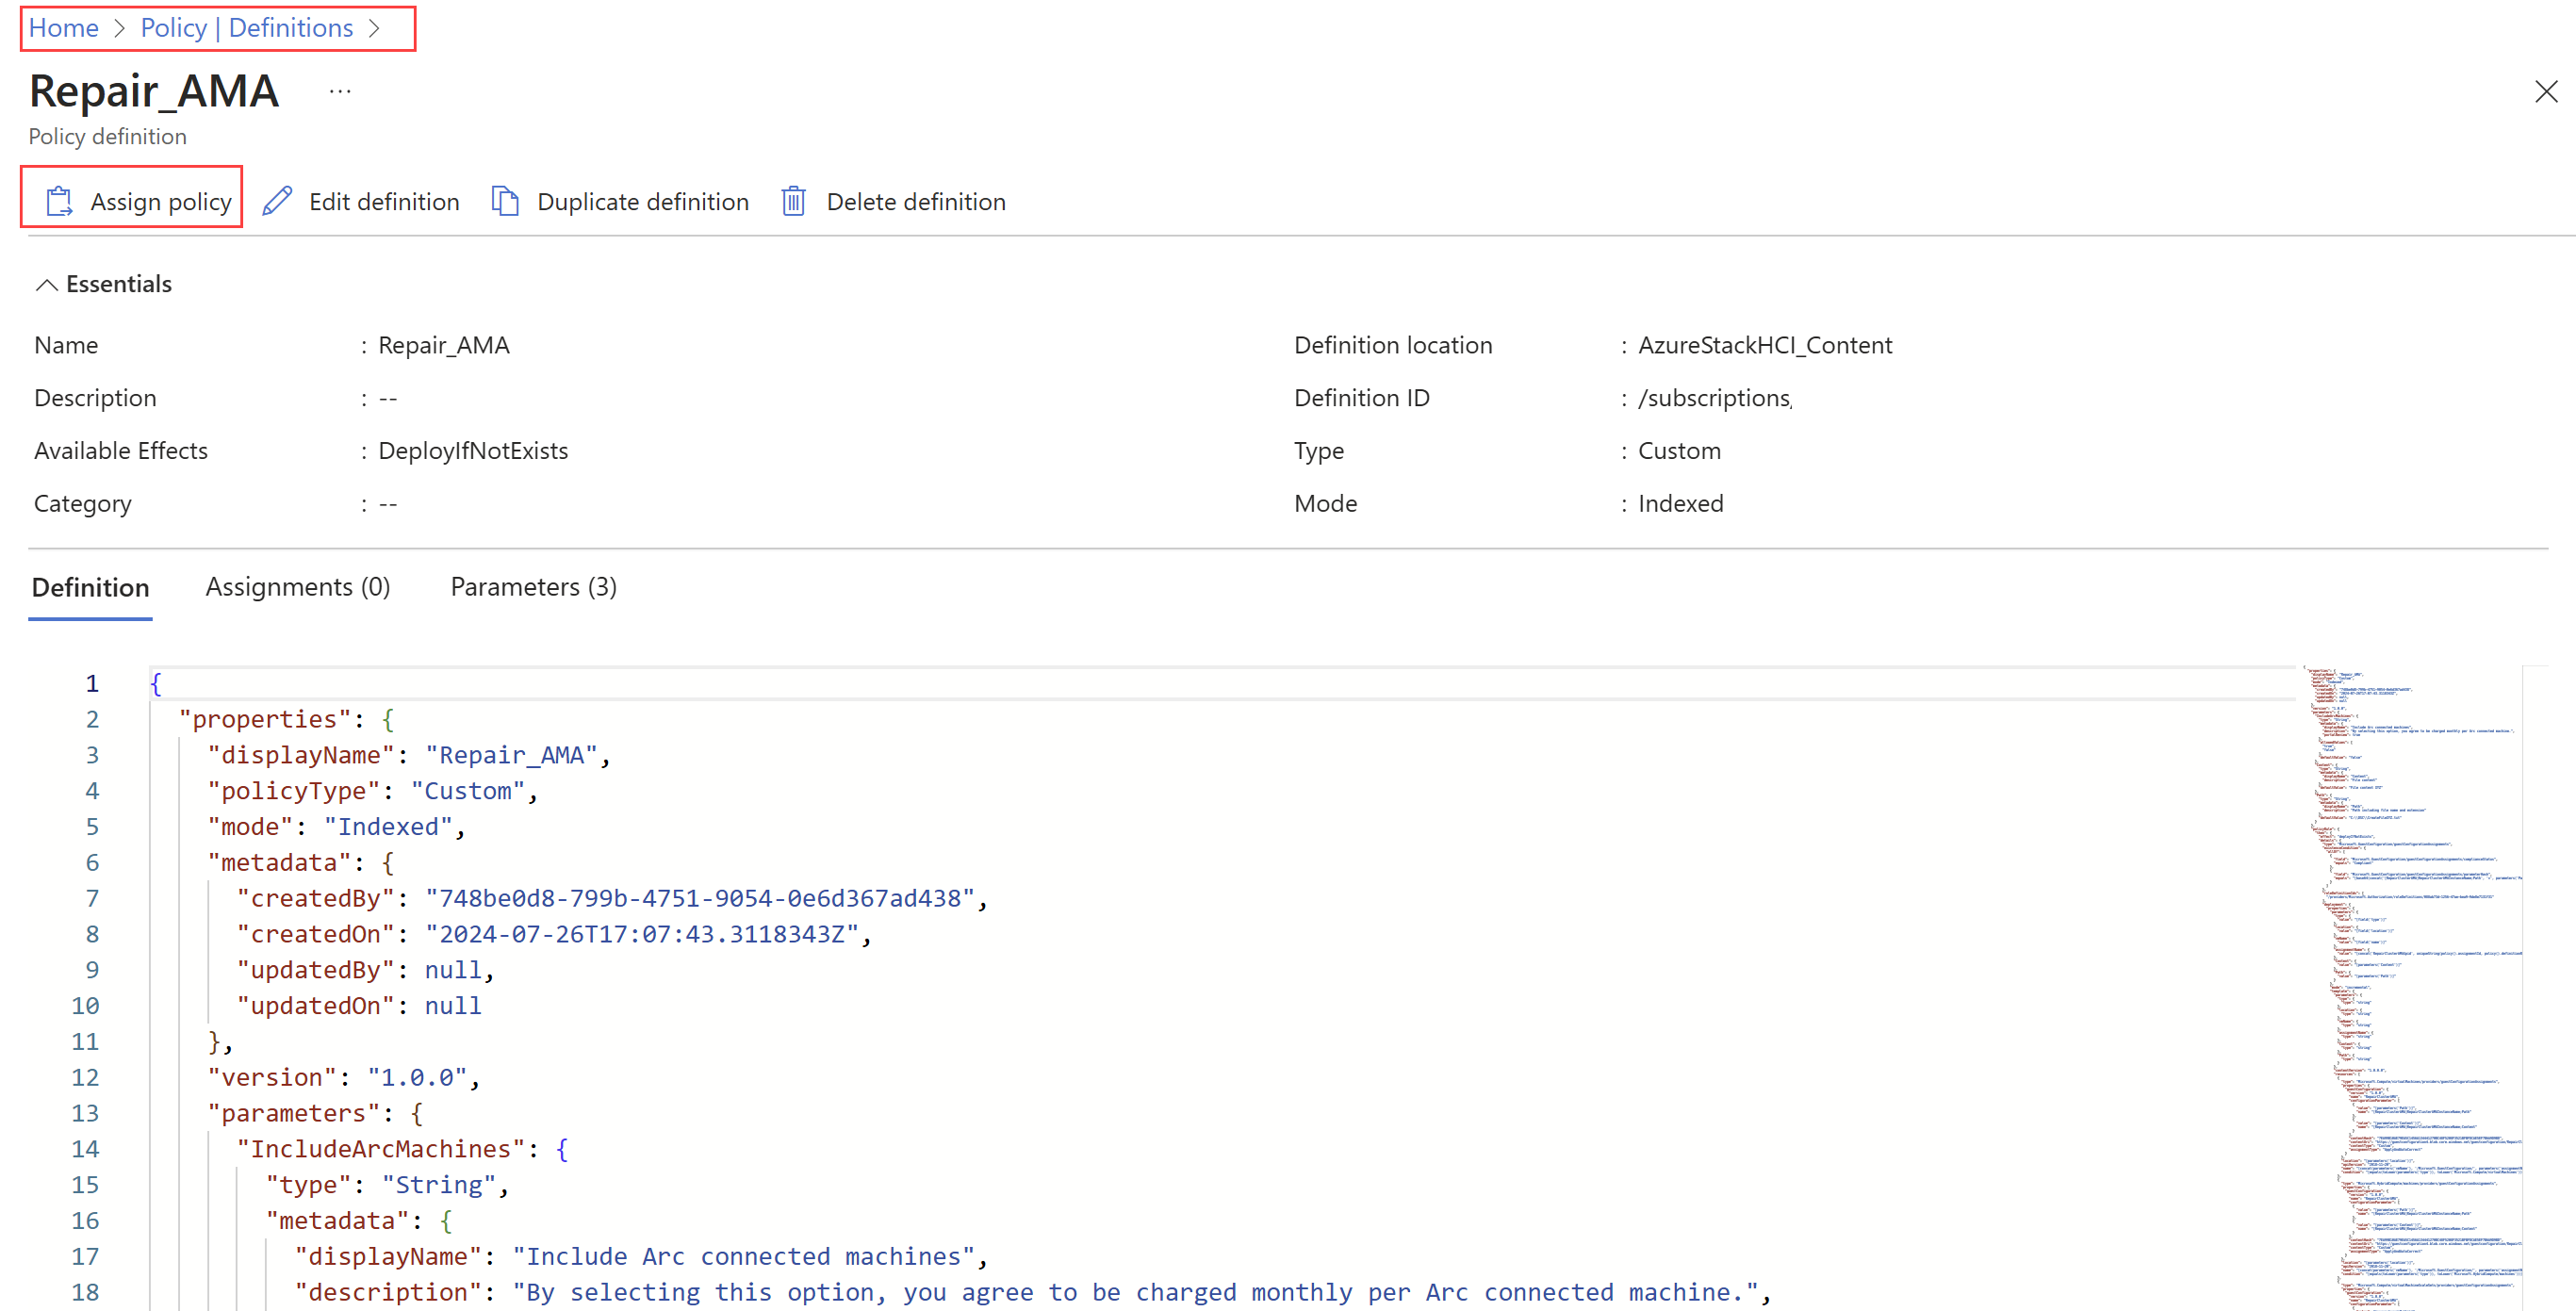
在 策略上 |上一步中创建的策略定义的定义 页,选择“ 分配策略”。
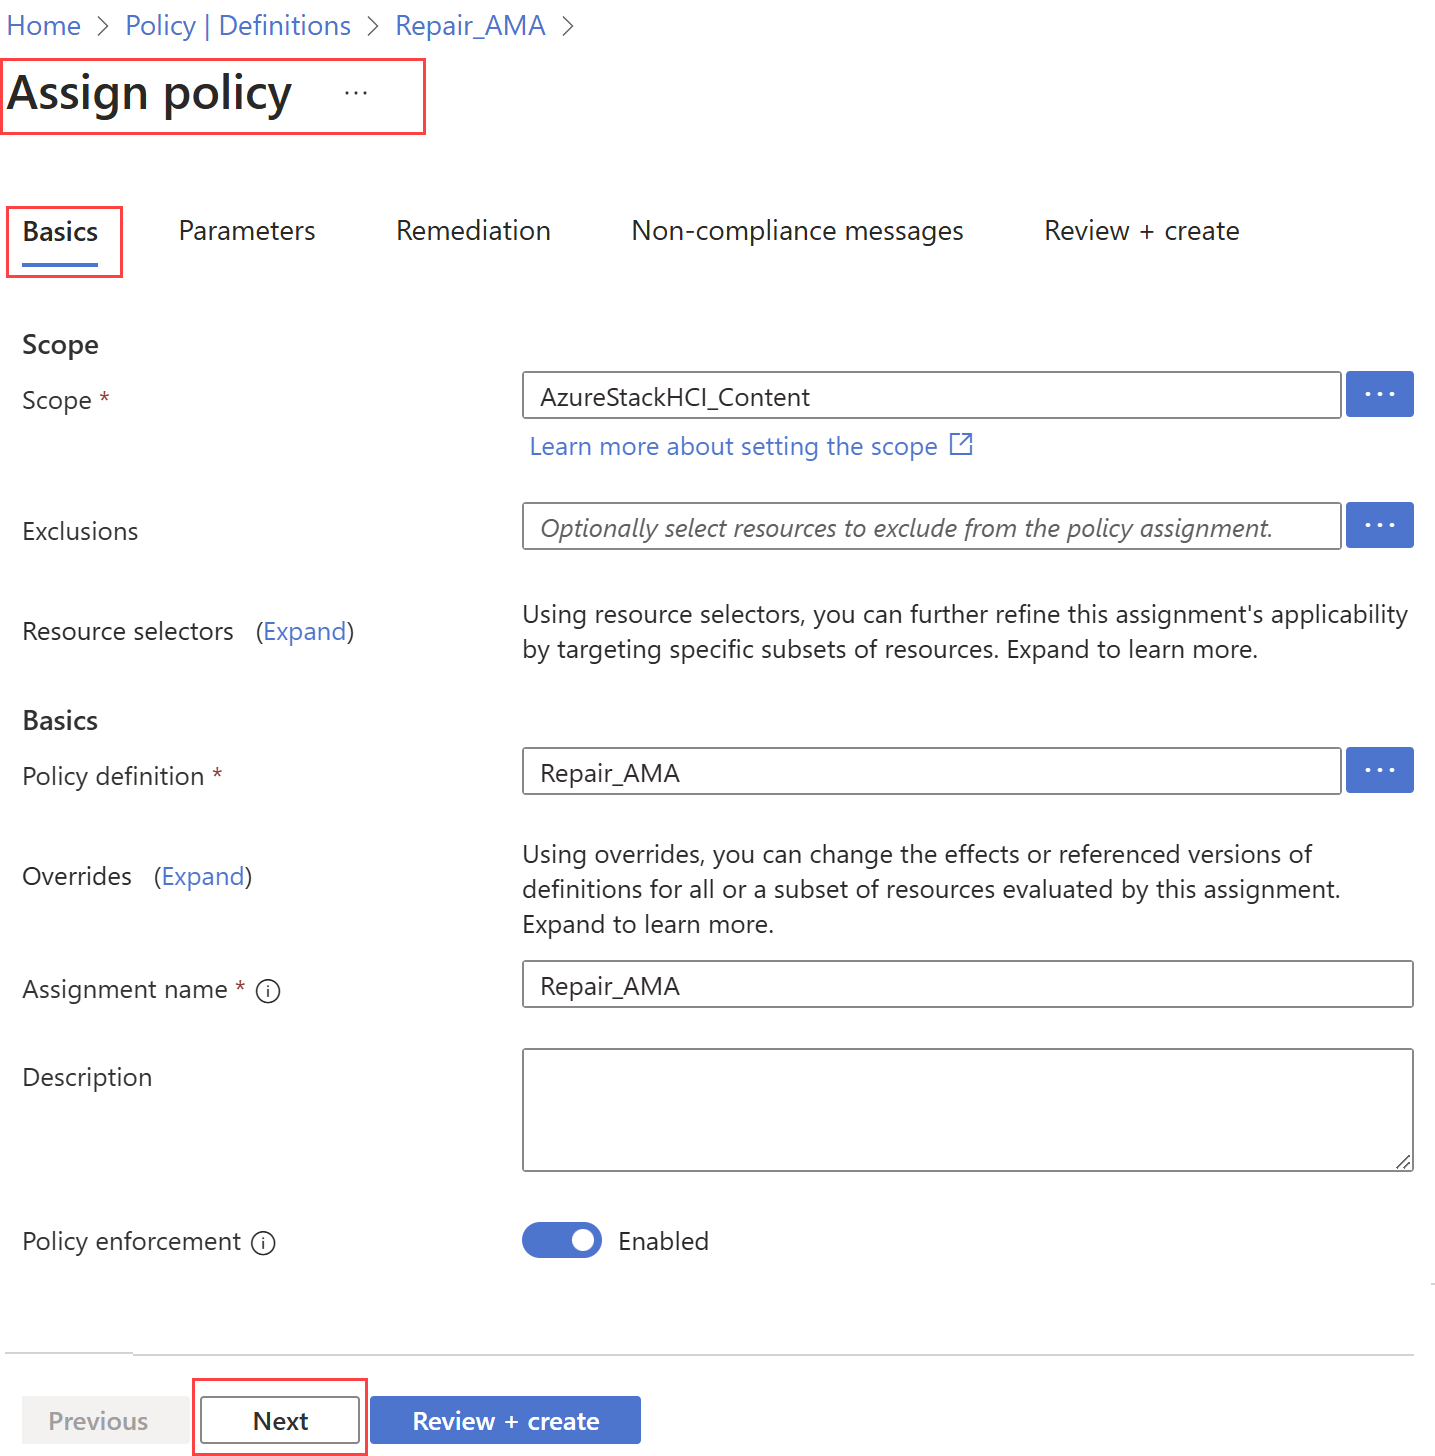
在 “分配策略 ”页 >“基本 ”选项卡上,指定以下值:
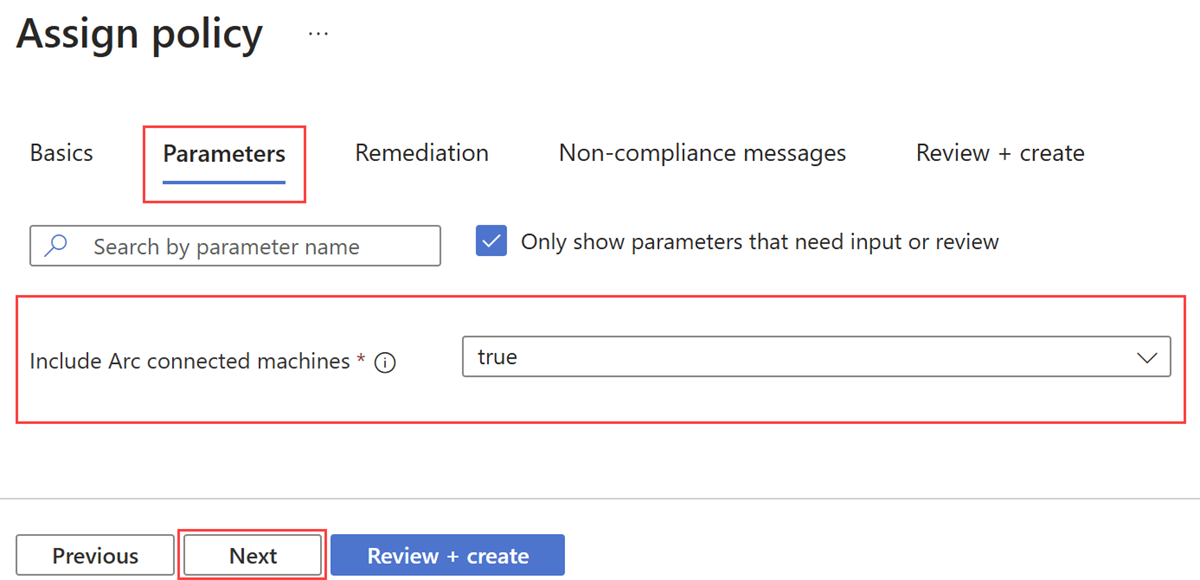
字段 操作 Scope 此字段已预填充在创建策略定义期间定义的作用域。 如果要更改策略分配的范围,可以使用省略号 ( ...),然后选择订阅和(可选)资源组。 然后选择“ 选择” 以应用范围。排除项 可选。 使用省略号 ( ...) 选择要从策略分配中排除的资源。策略定义 此字段预填充了在 “创建策略定义”步骤中创建的策略定义 名称。 分配名称 此字段预填充了所选策略定义的名称。 如有必要,可以更改它。 策略实施 默认为“已启用”。 有关详细信息,请参阅强制模式。 选择“下一步”以查看“参数”选项卡。如果在“基本信息”选项卡上选择的策略定义包含参数,它们会显示在“参数”选项卡上。
例如,用于修复 AMA 的策略显示 Include Arc 连接的计算机 参数。 选择 True 以在策略分配中包含 Arc 连接的计算机。
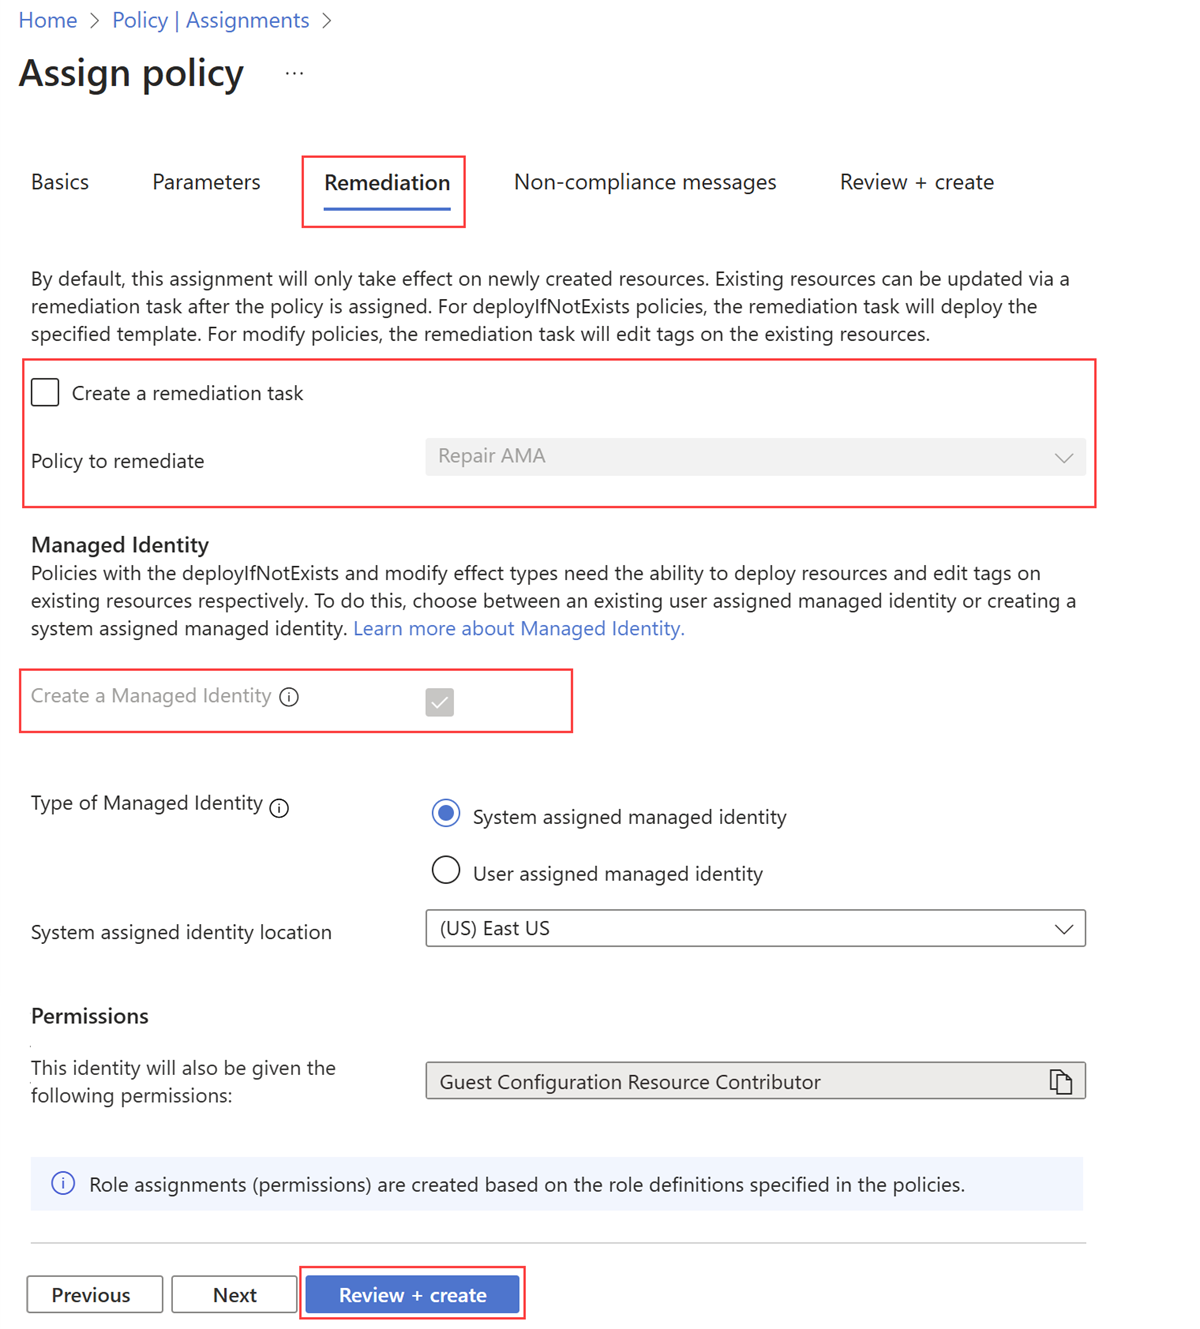
选择“ 下一步 ” 以查看“修正 ”选项卡。此选项卡上不需要执行任何操作。策略定义模板支持 deployIfNotExists 效果,因此自动修正不符合策略规则的资源。 此外,请注意, 默认情况下会选择“创建托管标识 ”参数,因为策略定义模板使用 deployIfNotExists 效果。
选择“ 审阅 + 创建 ”以查看作业。
选择“创建”来创建分配。
你会收到角色分配和策略分配创建成功的通知。 创建分配后,Azure Policy 引擎将标识范围中的所有 Azure 本地系统,并将策略配置应用于每个系统。 通常情况下,策略分配生效需要 5 到 15 分钟。
查看符合性状态
创建策略分配后,可以在 Azure Policy 主页的“修正”下监视符合性和修正状态下的资源符合性。 新策略分配的“符合性状态”需要几分钟才会变为活动状态并提供关于策略状态的结果。
若要查看策略的符合性状态,请执行以下步骤:
在 Azure 门户中,导航到 Azure Policy 服务。
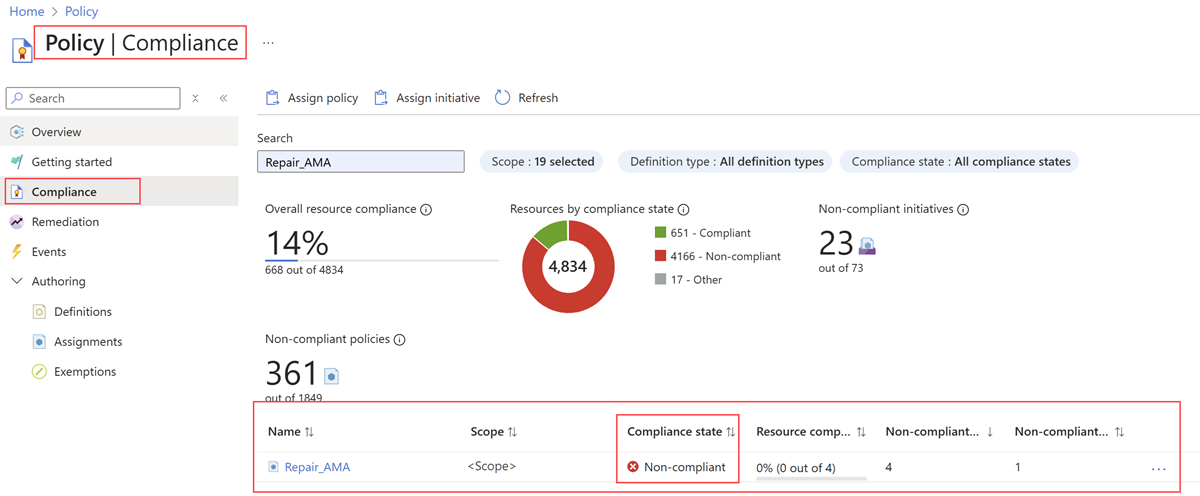
选择“合规性”。
筛选在“创建策略分配”步骤中创建 的策略分配 的名称的结果。 “ 符合性”状态 列将符合性状态显示为 “合规 ”或 “不符合”。
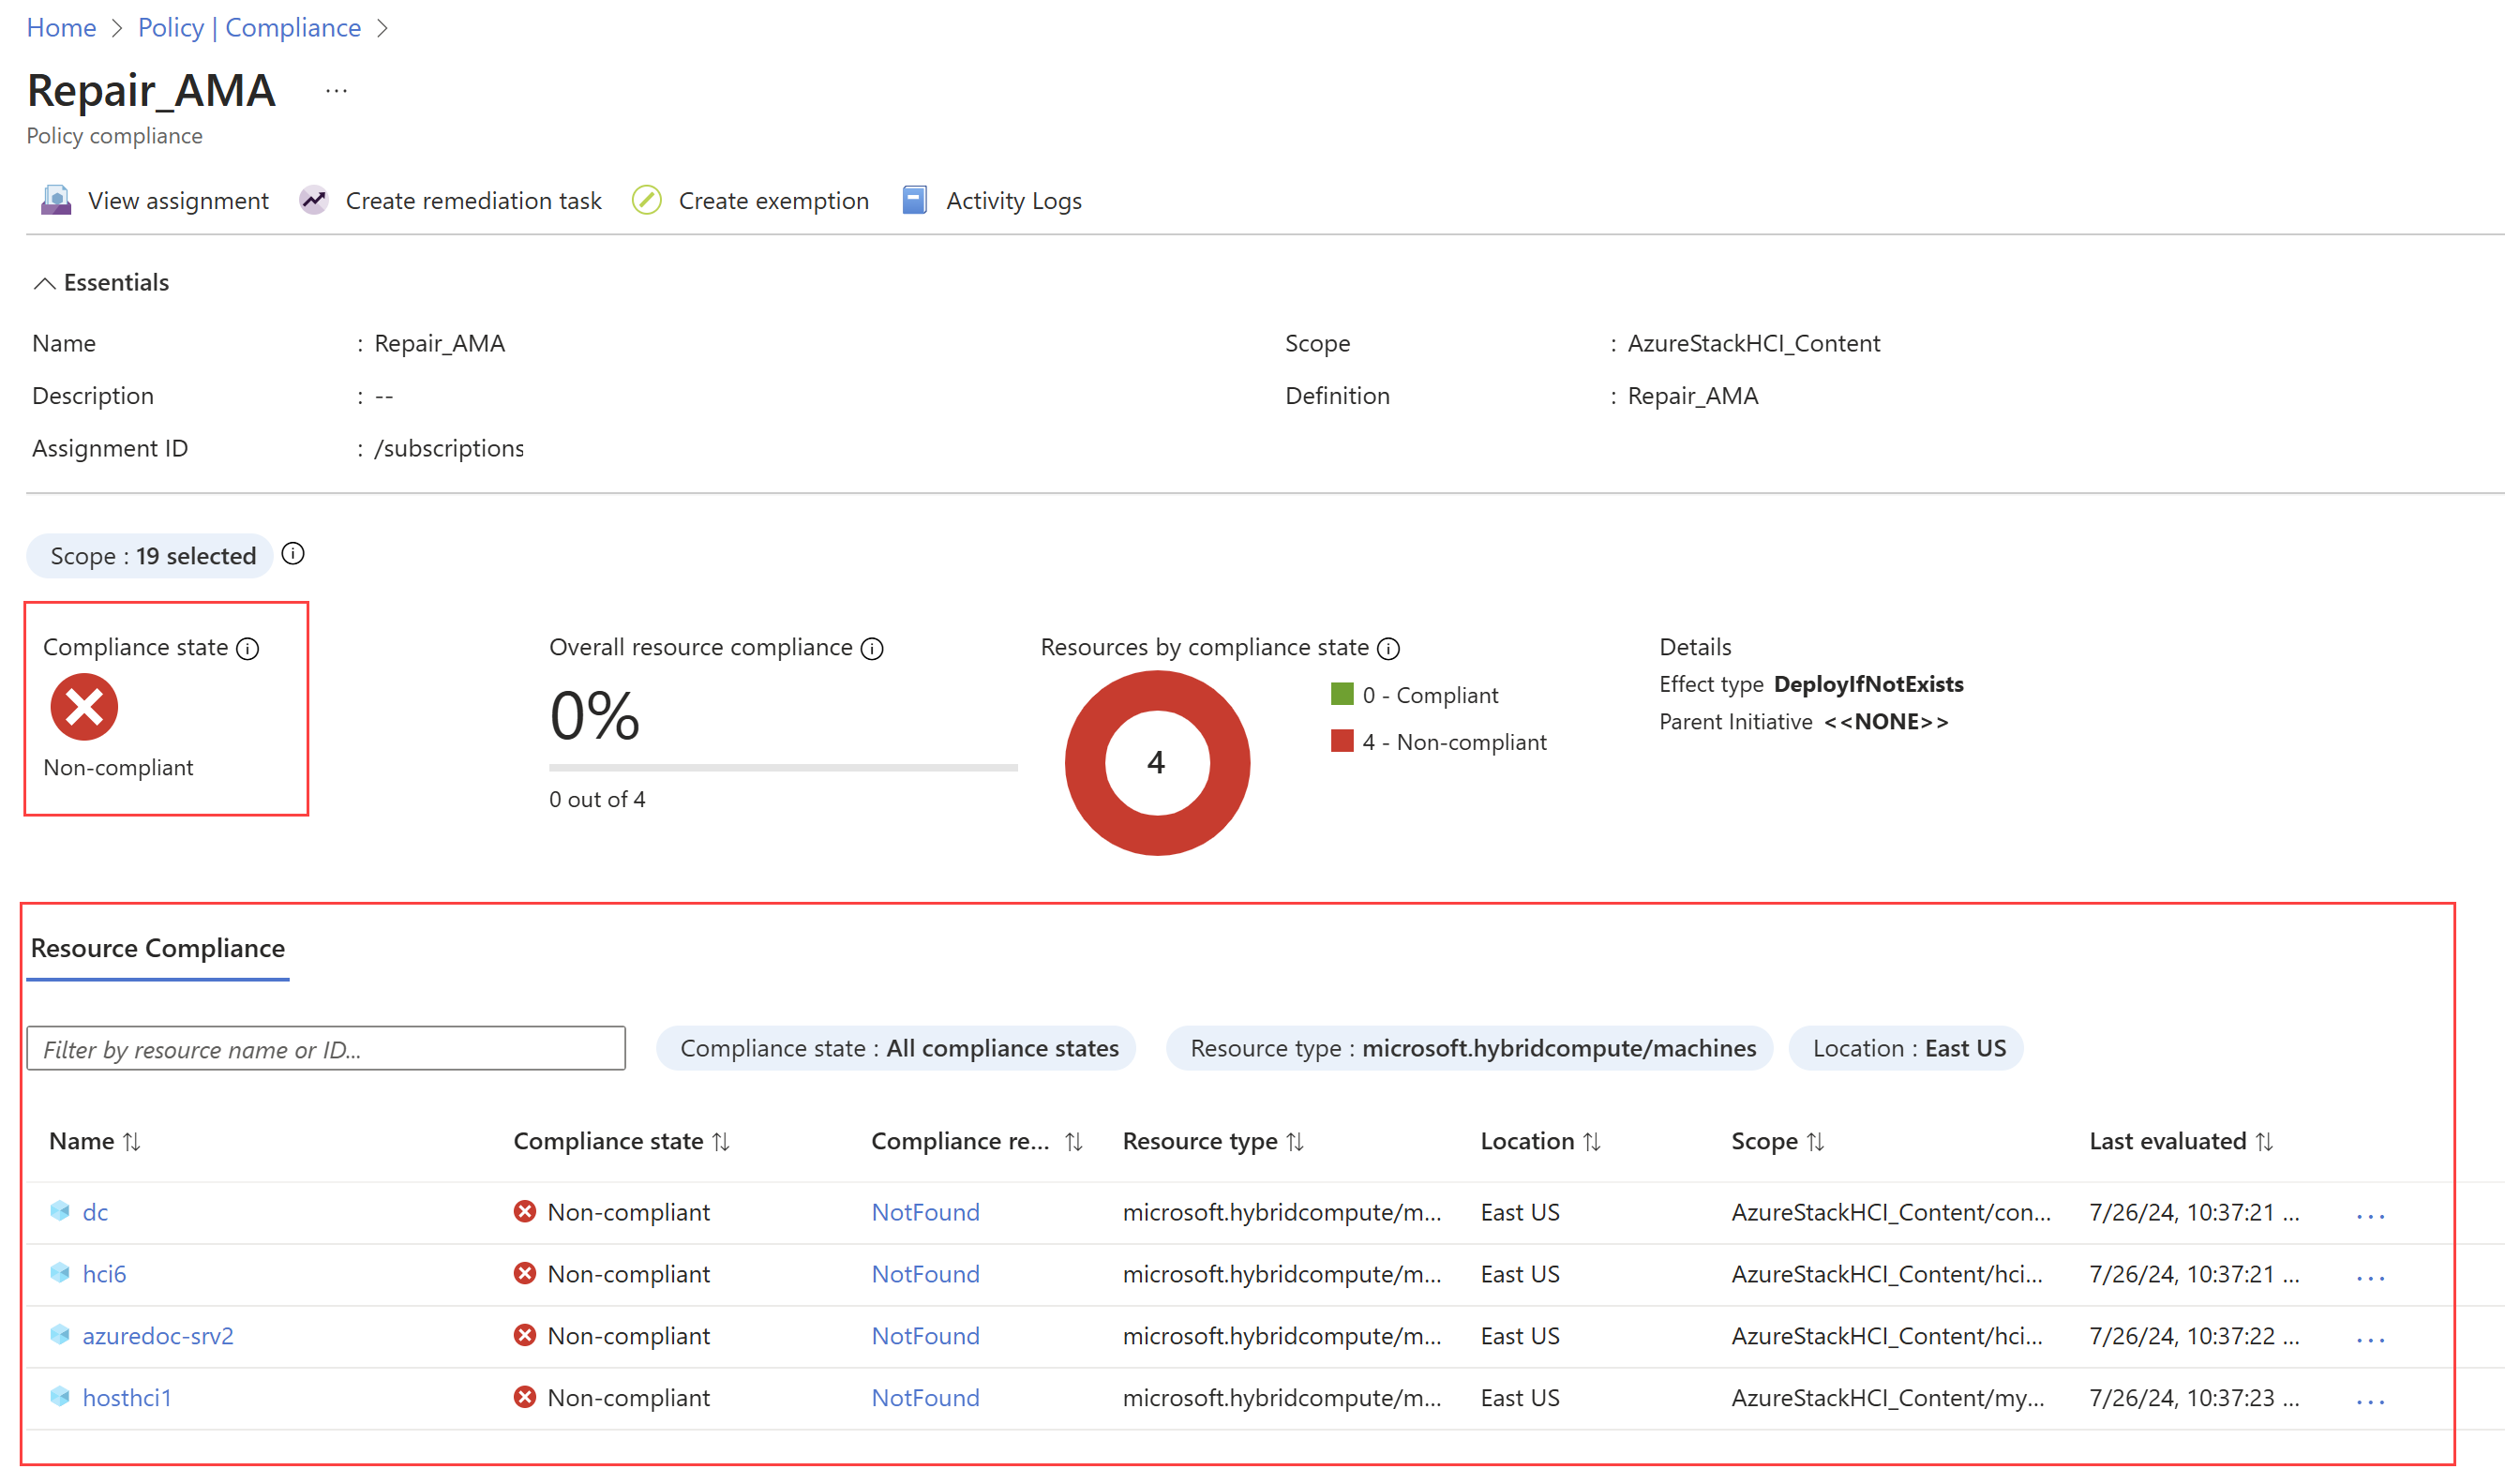
选择策略分配名称以查看 资源符合性 状态。 例如,修复 AMA 策略的符合性报告显示需要修复的节点:
知道哪些资源不符合要求后,可以创建修正任务以使其符合性。
修正不符合资源
若要修正不符合的资源并跟踪修正任务进度,请执行以下步骤:
在 Azure 门户中,导航到 Azure Policy 服务。
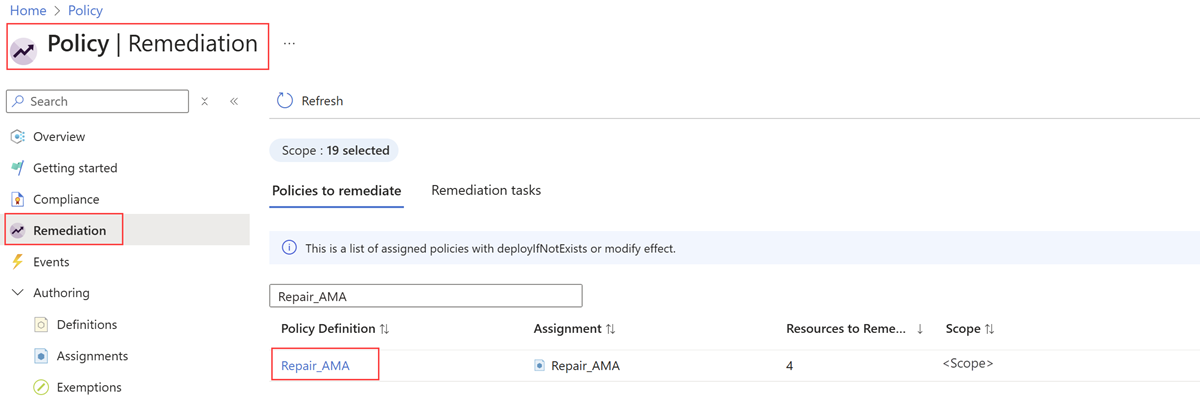
选择“修正”。
“ 修正 ”页显示具有不合规资源的已分配策略列表。 筛选在“创建策略分配”步骤中创建 的策略分配 的名称的结果。
选择“策略定义”链接。
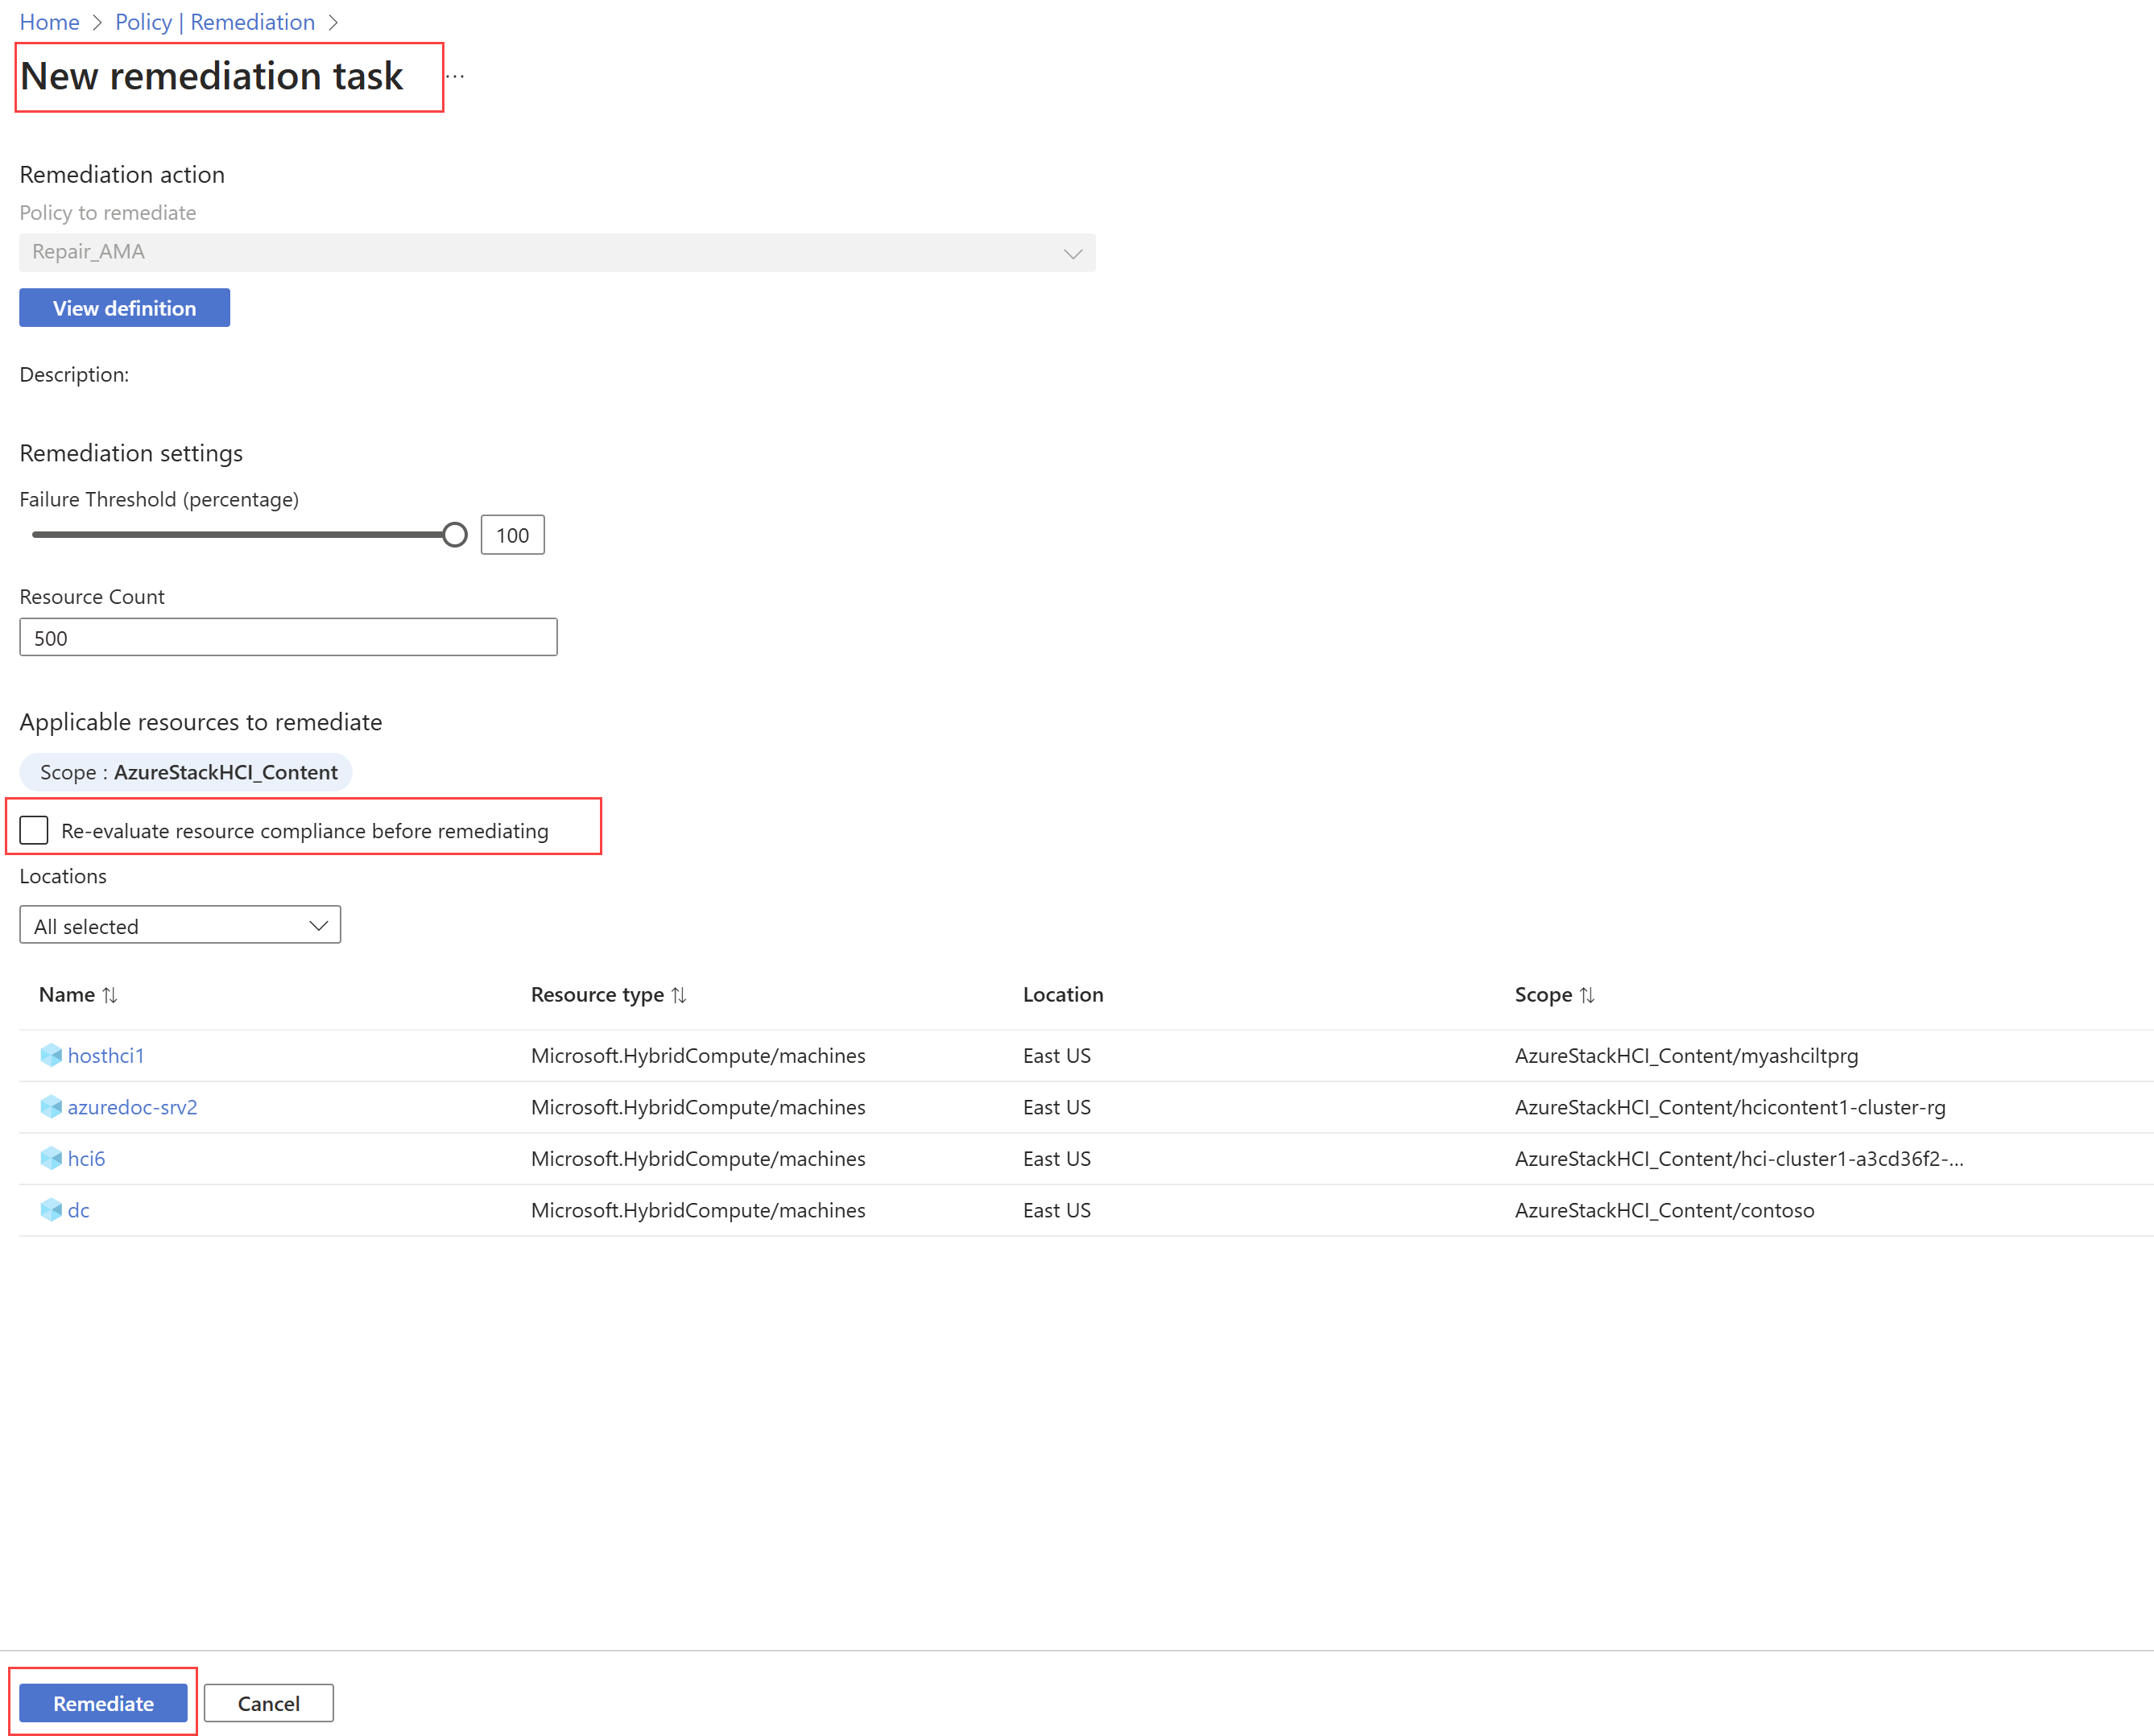
“ 新建修正任务 ”页显示需要修正的资源。 在 修正 之前选择“重新评估资源符合性”复选框,然后选择“ 修正”。
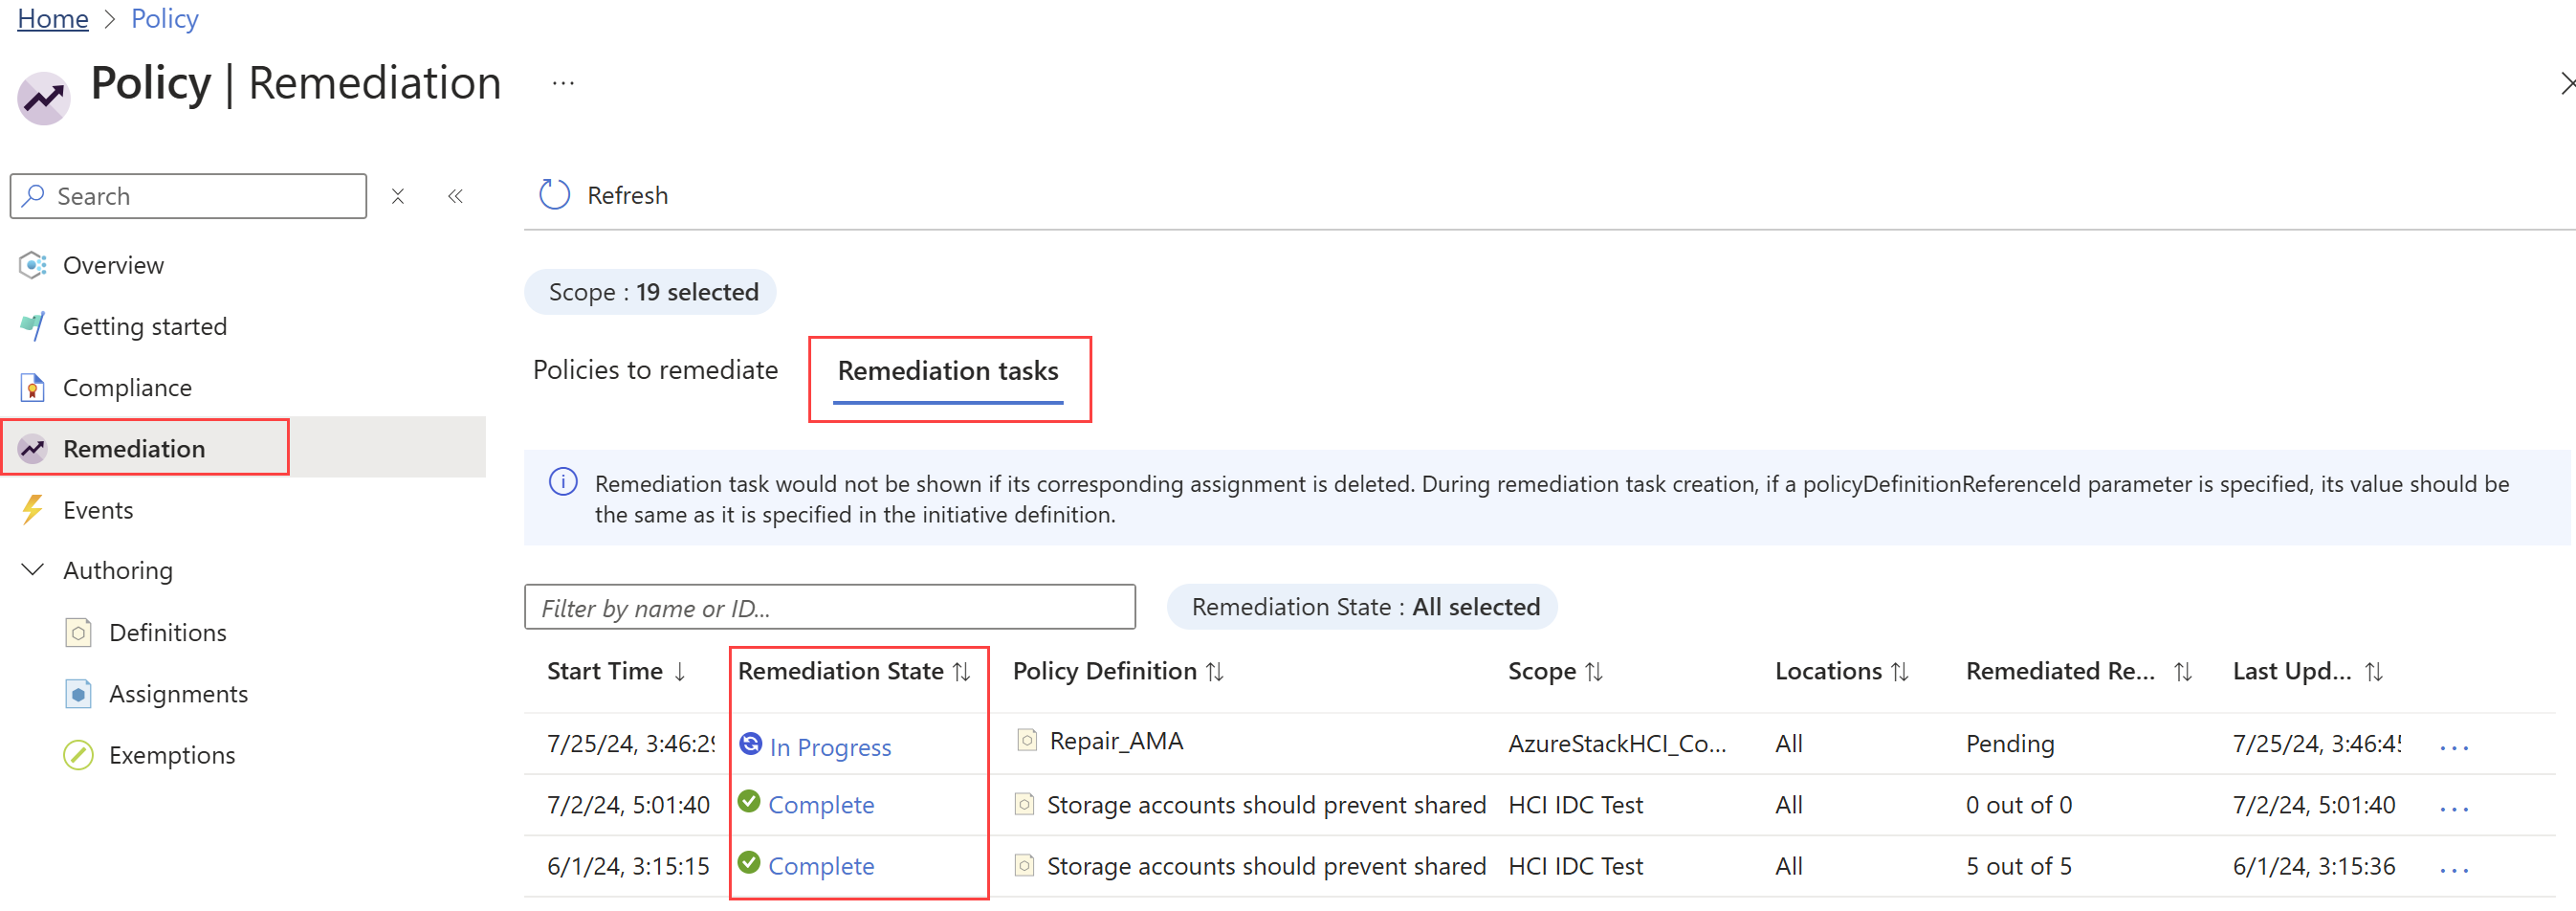
你会收到一条通知,指出已创建修正任务,并定向到 “修正任务 ”选项卡。此选项卡显示不同修正任务的状态。 你创建的可能处于 “正在 评估”或 “正在进行 ”状态。
修正完成后,状态将更改为 “完成”。
有关修正的详细信息,请参阅 使用 Azure Policy 修正不符合的资源。
