通过 Azure 本地 Azure 网关的注册脚本配置 Arc 代理(预览版)
适用于:Azure 本地 2408 及更高版本
在 Azure 订阅中创建 Arc 网关资源后,可以启用新的 Arc 网关预览功能。 本文详细介绍了如何使用 Azure 本地 Arc 网关的注册脚本在 Arc 注册之前配置 Arc 代理。
使用此方法时,无需手动跨 WinInet、WinHttp 或环境变量配置 Arc 代理。
重要
此功能目前处于预览状态。 有关 beta 版本、预览版或尚未正式发布的版本的 Azure 功能所适用的法律条款,请参阅 Microsoft Azure 预览版的补充使用条款。
先决条件
在继续操作之前,请确保满足以下先决条件:
有权访问运行版本 23H2 的 Azure 本地实例。
在用于部署 Azure Local 的同一订阅中创建的 Arc 网关资源。 有关详细信息,请参阅 在 Azure 中创建 Arc 网关资源。
步骤 1:获取 ArcGatewayID
需要 Azure 中的代理和 ArcGatewayID 才能在 Azure 本地计算机上运行注册脚本。 可以在资源的 Azure 门户概述页上找到 Arc 网关 ID。
步骤 2:在 Azure Arc 中注册新计算机
若要在 Azure Arc 中注册新版本 2408 或版本 2411 计算机,请通过传递ArcGatewayIDProxy server和Proxy bypass list参数来运行初始化脚本。
下面是一个示例,说明应如何更改初始化脚本的 Invoke-AzStackHciArcInitialization 这些参数。 注册完成后,Azure 本地计算机将使用 Arc 网关在 Azure Arc 中注册:
#Define the subscription where you want to register your server as Arc device.
$Subscription = "yoursubscription"

#Define the resource group where you want to register your server as Arc device.
$RG = "yourresourcegroupname"

#Define the tenant to use to register your server as Arc device.
$Tenant = "yourtenant"

#Define Proxy Server if necessary
$ProxyServer = "http://x.x.x.x:port"

#Define the Arc gateway resource ID from Azure
$ArcgwId = "/subscriptions/yourarcgatewayid/resourceGroups/yourresourcegroupname/providers/Microsoft.HybridCompute/gateways/yourarcgatewayname"

#Define the bypass list for the proxy. Use semicolon to separate each item from the list.
# Use "localhost" instead of <local>
# Use specific IPs such as 127.0.0.1 without mask
# Use * for subnets allowlisting. 192.168.1.* for /24 exclusions. Use 192.168.*.* for /16 exclusions.
# Append * for domain names exclusions like *.contoso.com
# DO NOT INCLUDE .svc on the list. The registration script takes care of Environment Variables configuration.

$ProxyBypassList = "localhost;127.0.0.1;*.contoso.com;machine1;machine2;machine3;machine4;machine5;192.168.*.*;AzureLocal-1"

#Connect to your Azure account and Subscription
Connect-AzAccount -SubscriptionId $Subscription -TenantId $Tenant -DeviceCode

#Get the Access Token and Account ID for the registration
$ARMtoken = (Get-AzAccessToken).Token

#Get the Account ID for the registration
$id = (Get-AzContext).Account.Id

#Invoke the registration script with Proxy and ArcgatewayID
Invoke-AzStackHciArcInitialization -SubscriptionID $Subscription -ResourceGroup $RG -TenantID $Tenant -Region australiaeast -Cloud "AzureCloud" -ArmAccessToken $ARMtoken -AccountID $id -Proxy $ProxyServer -ArcGatewayID $ArcgwId -ProxyBypass $ProxyBypassList
步骤 3:验证设置是否成功
部署验证启动后,可以从系统连接到第一台计算机并打开 Arc 网关日志,以监视哪些终结点被重定向到 Arc 网关,以及哪些终结点继续使用防火墙或代理。
可在以下位置找到 Arc 网关日志: c:\programdata\AzureConnectedMAchineAgent\Log\arcproxy.log。
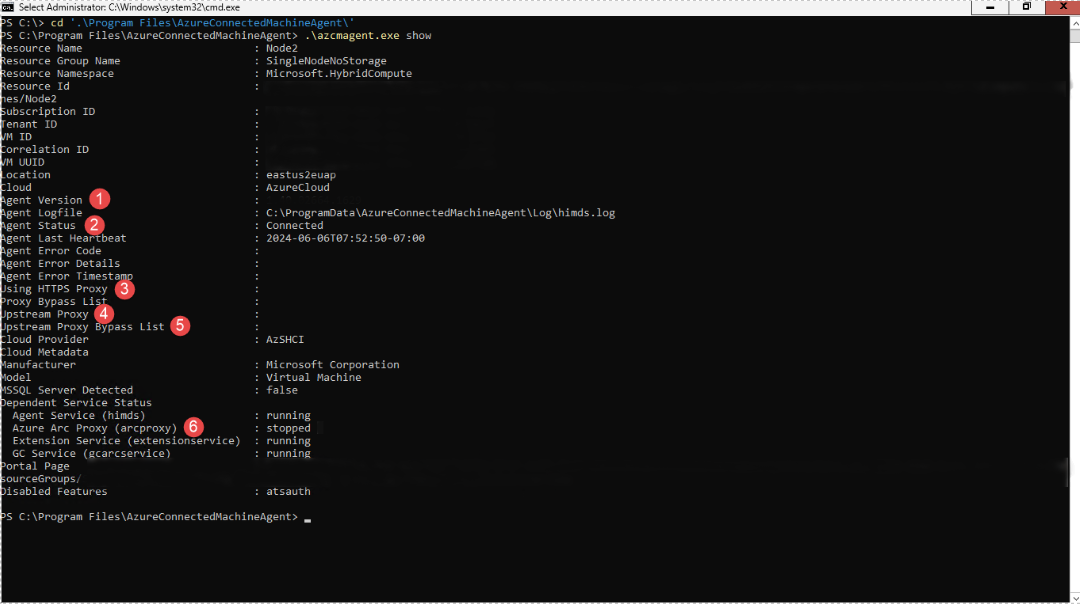
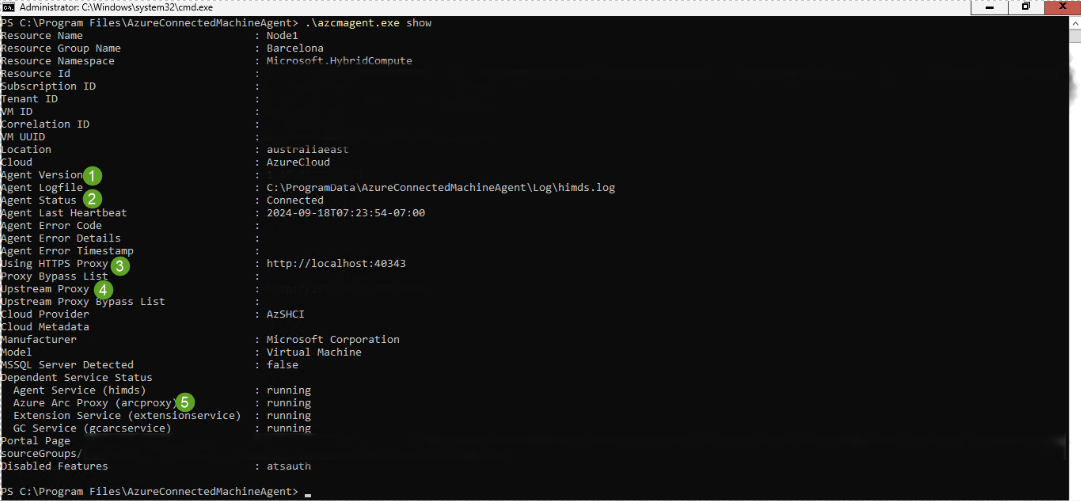
若要检查 Arc 代理配置并验证它是否正在使用网关,请运行以下命令: c:\program files\AzureConnectedMachineAgent>.\azcmagent show
显示的值应如下所示:
代理版本 为 1.45 或更高版本。
“代理状态”应显示为“已连接”。
当 Arc 网关未使用时,使用 HTTPS 代理 为空。 它应显示为
http://localhost:40343启用 Arc 网关时。上游代理 显示企业代理服务器和端口。
未使用 Arc 网关时,Azure Arc 代理 显示为已停止。 启用 Arc 网关时运行。
没有 Arc 网关的 Arc 代理:
使用 Arc 网关的 Arc 代理:
此外,若要验证设置是否已成功完成,可以运行以下命令: c:\program files\AzureConnectedMachineAgent>.\azcmagent check
响应应指示 connection.type 设置为网关,并且 Reachable 列应指示所有 URL 的 true。
没有 Arc 网关的 Arc 代理:
使用 Arc 网关的 Arc 代理:
还可以通过查看网关路由器日志来审核网关流量。
若要查看 Windows 上的网关路由器日志,请在 azcmagent logs PowerShell 中运行命令。 在生成的.zip文件中,日志位于 C:\ProgramData\Microsoft\ArcGatewayRouter 文件夹中。


