为 Azure 本地上的 Azure 网关手动配置 Arc 代理(预览版)
适用于:Azure 本地 2411.1 及更高版本
在 Azure 订阅中创建 Arc 网关资源后,可以启用新的 Arc 网关预览功能。 本文详细介绍了如何在 Arc 注册之前手动配置 Arc 代理。
重要
此功能目前处于预览状态。 有关 beta 版本、预览版或尚未正式发布的版本的 Azure 功能所适用的法律条款,请参阅 Microsoft Azure 预览版的补充使用条款。
先决条件
在继续操作之前,请确保满足以下先决条件:
有权访问运行版本 23H2 的 Azure 本地实例。
在用于部署 Azure Local 的同一订阅中创建的 Arc 网关资源。 有关详细信息,请参阅 在 Azure 中创建 Arc 网关资源。
步骤 1:手动配置代理
如果需要在启动 Arc 注册过程之前在 Azure 本地计算机上配置 Arc 代理,请按照配置 Azure 本地版本 23H2 的代理设置中的说明进行操作。
确保为系统上的所有计算机配置代理和旁路列表。
步骤 2:获取 ArcGatewayID
需要 Azure 中的代理和 Arc 网关 ID(ArcGatewayID),才能在 Azure 本地计算机上运行注册脚本。 可以在资源的Azure 门户概述页上找到 Arc 网关 ID。
步骤 3:在 Azure Arc 中注册新计算机
若要在 Azure Arc 中注册新版本 2408 或版本 2411 计算机,可以通过传递 ArcGatewayID 参数和代理服务器参数来运行初始化脚本。 下面是如何更改 Invoke-AzStackHciArcInitialization 初始化脚本上的参数的示例:
#Define the subscription where you want to register your server as Arc device.

$Subscription = "yoursubscription>"

#Define the resource group where you want to register your server as Arc device.

$RG = "yourresourcegroupname"

#Define the tenant you will use to register your server as Arc device.

$Tenant = "yourtenant"

#Define Proxy Server if necessary

$ProxyServer = "http://x.x.x.x:port"

#Define the Arc gateway resource ID from Azure

$ArcgwId = "/subscriptions/yoursubscription/resourceGroups/yourresourcegroupname/providers/Microsoft.HybridCompute/gateways/yourarcgatewayname"

#Connect to your Azure account and subscription

Connect-AzAccount -SubscriptionId $Subscription -TenantId $Tenant -DeviceCode

#Get the Access Token and Account ID for the registration

$ARMtoken = (Get-AzAccessToken).Token

#Get the Account ID for the registration

$id = (Get-AzContext).Account.Id

#Invoke the registration script with Proxy and ArcgatewayID

Invoke-AzStackHciArcInitialization -SubscriptionID $Subscription -ResourceGroup $RG -TenantID $Tenant -Region australiaeast -Cloud "AzureCloud" -ArmAccessToken $ARMtoken -AccountID $id -Proxy $ProxyServer -ArcGatewayID $ArcgwId
步骤 4:启动 Azure 本地云部署
在 Azure Arc 中注册 Azure 本地计算机并安装所有扩展后,可以从Azure 门户或使用以下文章中记录的 ARM 模板开始部署:
使用Azure 门户部署 Azure 本地实例。
Azure 资源管理器 Azure 本地版本 23H2 的模板部署。
步骤 5:验证设置是否成功
部署验证启动后,可以从系统连接到第一台 Azure 本地计算机,并打开 Arc 网关日志,以监视哪些终结点重定向到 Arc 网关,以及哪些终结点继续使用防火墙或代理。
可在以下位置找到 Arc 网关日志: c:\programdata\AzureConnectedMAchineAgent\Log\arcproxy.log。
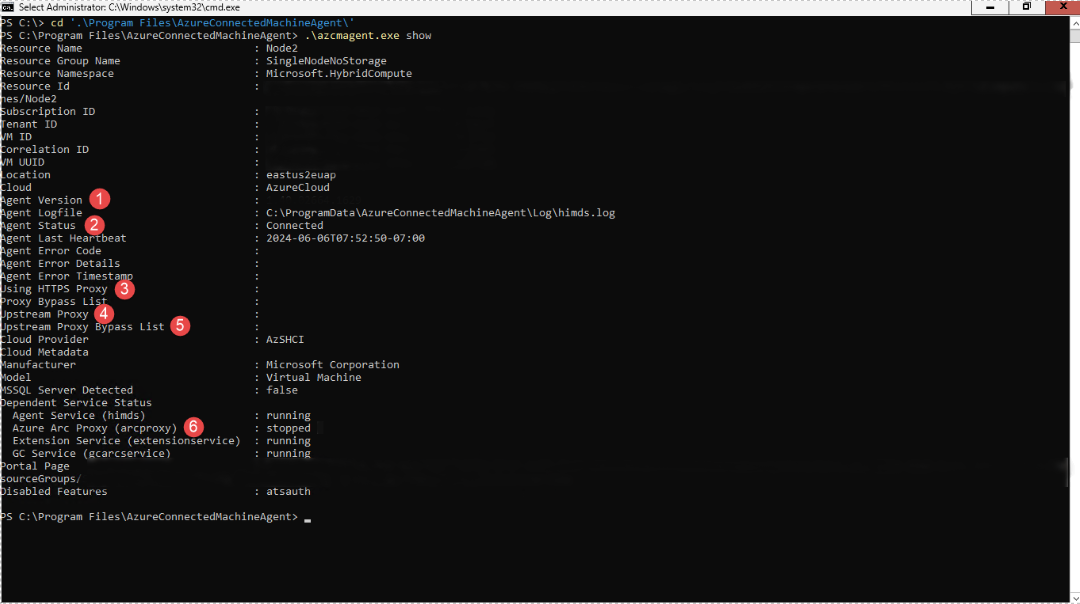
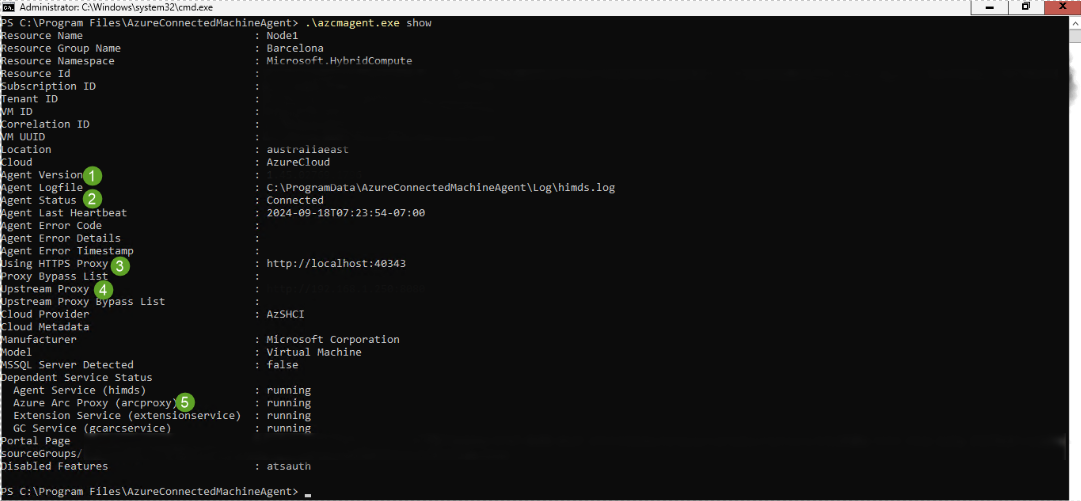
若要检查 Arc 代理配置并验证它是否使用 Arc 网关,请运行以下命令: c:\program files\AzureConnectedMachineAgent>.\azcmagent show
结果应显示以下值:
代理版本 为 1.45 或更高版本。
代理状态 已 连接。
当 Arc 网关未使用时,使用 HTTPS 代理 为空。 它应显示为
http://localhost:40343启用 Arc 网关时。上游代理 显示企业代理服务器和端口。
Azure Arc 代理 在未使用 Arc 网关时显示为 已 停止,并在 启用 Arc 网关时运行 。
没有 Arc 网关的 Arc 代理:
使用 Arc 网关的 Arc 代理:
此外,若要验证安装程序是否成功,可以运行以下命令: c:\program files\AzureConnectedMachineAgent>.\azcmagent check
响应应指示已 connection.type 设置为 gateway,可 访问 列应为所有 URL 指示 true ,如下所示:
没有 Arc 网关的 Arc 代理:
已启用 Arc 网关的 Arc 代理:
还可以通过查看网关路由器日志来审核网关流量。
若要查看 Windows 上的网关路由器日志,请在 azcmagent logs PowerShell 中运行命令。 在生成的.zip文件中,日志位于 C:\ProgramData\Microsoft\ArcGatewayRouter 文件夹中。
后续步骤
此功能仅在 Azure Local 2411.1 或更高版本中可用。


