你当前正在访问 Microsoft Azure Global Edition 技术文档网站。 如果需要访问由世纪互联运营的 Microsoft Azure 中国技术文档网站,请访问 https://docs.azure.cn。
教程:在 ASP.NET Core 应用程序中使用变体功能标志
在本教程中,你将使用变体功能标志来管理示例应用程序中不同用户段的体验,今日名言。 利用在使用变体功能标志创建的变体功能标志。 在继续操作之前,请确保在应用程序配置存储中创建名为 Greeting 的变体功能标志。
先决条件
创建一个 ASP.NET Core Web 应用
在命令提示符中运行以下代码。 此命令将使用个人帐户身份验证在 ASP.NET Core 中创建新的 Razor Pages 应用程序,并将其置于名为 QuoteOfTheDay 的输出文件夹中。
dotnet new razor --auth Individual -o QuoteOfTheDay导航到 QuoteOfTheDay 目录,通过运行以下命令为应用程序创建用户机密。 将
<your-App-Configuration-endpoint>占位符替换为应用程序配置存储区的终结点。 在 Azure 门户中,可以在应用程序配置存储区的“概览”边栏选项卡中找到终结点。dotnet user-secrets init dotnet user-secrets set Endpoints:AppConfiguration "<your-App-Configuration-endpoint>"添加所需包的最新版本。
dotnet add package Azure.Identity
dotnet add package Microsoft.Extensions.Configuration.AzureAppConfiguration
dotnet add package Microsoft.FeatureManagement.AspNetCore
连接到应用程序配置进行功能管理
打开 Program.cs 并添加以下 using 语句。
using Azure.Identity;
using Microsoft.Extensions.Configuration.AzureAppConfiguration;
using Microsoft.FeatureManagement;
添加以下代码以连接到应用程序配置存储区,并调用
UseFeatureFlags以拉取所有没有标签的功能标志。可以使用
DefaultAzureCredential向应用程序配置存储区进行身份验证。 按照说明为凭据分配应用程序配置数据读取者角色。 在运行应用程序之前,请务必留出足够的时间来传播权限。var builder = WebApplication.CreateBuilder(args); // Retrieve the endpoint string endpoint = builder.Configuration.GetValue<string>("Endpoints:AppConfiguration") ?? throw new InvalidOperationException("The setting `Endpoints:AppConfiguration` was not found."); // Load configuration and feature flags from Azure App Configuration builder.Configuration .AddAzureAppConfiguration(options => { options.Connect(new Uri(endpoint), new DefaultAzureCredential()) .UseFeatureFlags(); });添加 Azure 应用程序配置和功能管理服务,并为功能管理启用目标。
// Add Azure App Configuration and feature management services to the container.
builder.Services.AddAzureAppConfiguration()
    .AddFeatureManagement()
    .WithTargeting();
在行
var app = builder.Build();下,添加 Azure 应用程序置中间件进行动态配置刷新。// Use Azure App Configuration middleware for dynamic configuration refresh. app.UseAzureAppConfiguration();
使用变体功能标志
打开 QuoteOfTheDay>Pages>Index.cshtml.cs ,并将内容替换为以下代码。
using Microsoft.AspNetCore.Mvc;
using Microsoft.AspNetCore.Mvc.RazorPages;
using Microsoft.FeatureManagement;

namespace QuoteOfTheDay.Pages;

public class Quote
{
    public string Message { get; set; }

    public string Author { get; set; }
}

public class IndexModel(IVariantFeatureManagerSnapshot featureManager) : PageModel
{
    private readonly IVariantFeatureManagerSnapshot _featureManager = featureManager;

    private Quote[] _quotes = [
        new Quote()
        {
            Message = "You cannot change what you are, only what you do.",
            Author = "Philip Pullman"
        }];

    public Quote? Quote { get; set; }

    public string GreetingMessage { get; set; }

    public async void OnGet()
    {
        Quote = _quotes[new Random().Next(_quotes.Length)];

        Variant variant = await _featureManager.GetVariantAsync("Greeting", HttpContext.RequestAborted);

        if (variant != null)
        {
            GreetingMessage = variant.Configuration?.Get<string>() ?? "";
        }
        else
        {
            _logger.LogWarning("No variant given. Either the feature flag named 'Greeting' is not defined or the variants are not defined properly.");
        }
    }
}
调用
GetVariantAsync检索当前用户的 Greeting 功能标志的变体,并将其值分配给页面模型的GreetingMessage属性。在 QuoteOfTheDay>Pages>Shared>_Layout.cshtml中,在添加
QuoteOfTheDay.styles.css处的下方,添加以下对 font-awesome CSS 库的引用。<link rel="stylesheet" href="https://cdnjs.cloudflare.com/ajax/libs/font-awesome/5.15.3/css/all.min.css">打开 Index.cshtml,并将其内容替换为以下代码。
@page @model IndexModel @{ ViewData["Title"] = "Home page"; ViewData["Username"] = User.Identity?.Name ?? string.Empty; } <style> body { font-family: Arial, sans-serif; background-color: #f4f4f4; color: #333; } .quote-container { background-color: #fff; margin: 2em auto; padding: 2em; border-radius: 8px; max-width: 750px; box-shadow: 0px 4px 8px rgba(0, 0, 0, 0.2); display: flex; justify-content: space-between; align-items: start; position: relative; } .vote-container { position: absolute; top: 10px; right: 10px; display: flex; gap: 0em; } .vote-container .btn { background-color: #ffffff; /* White background */ border-color: #ffffff; /* Light blue border */ color: #333 } .vote-container .btn:focus { outline: none; box-shadow: none; } .vote-container .btn:hover { background-color: #F0F0F0; /* Light gray background */ } .greeting-content { font-family: 'Georgia', serif; /* More artistic font */ } .quote-content p.quote { font-size: 2em; /* Bigger font size */ font-family: 'Georgia', serif; /* More artistic font */ font-style: italic; /* Italic font */ color: #4EC2F7; /* Medium-light blue color */ } </style> <div class="quote-container"> <div class="quote-content"> <h3 class="greeting-content">@(Model.GreetingMessage)</h3> <br /> <p class="quote">“@(Model.Quote?.Message ?? "< Quote not found >")”</p> <p>- <b>@(Model.Quote?.Author ?? "Unknown")</b></p> </div> <div class="vote-container"> <button class="btn btn-primary" onclick="heartClicked(this)"> <i class="far fa-heart"></i> <!-- Heart icon --> </button> </div> </div> <script> function heartClicked(button) { var icon = button.querySelector('i'); icon.classList.toggle('far'); icon.classList.toggle('fas'); } </script>此代码显示今日名言应用程序的 UI,并显示页面模型中的
GreetingMessage。 单击红心按钮时,将触发 JavaScript 处理程序heartClicked。
生成并运行应用
生成并运行应用程序。
dotnet build dotnet run加载应用程序后,选择右上角注册以注册新用户。

注册名为 usera@contoso.com 的新用户。
在输入用户信息后,选择“单击此处验证电子邮件”。

重复相同的步骤,注册名为 userb@contoso.com 的第二个用户。
注意
对于本教程而言,准确使用这些名称非常重要。 只要该功能已按预期进行配置,两个用户应会看到不同的变体。
选择右上角的“登录”以 usera@contoso.com 身份登录。

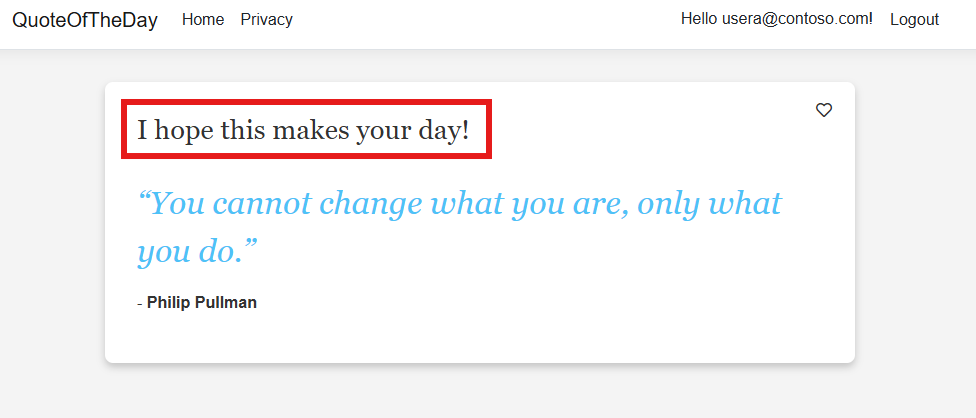
登录后,会看到对 usera@contoso.com 的长问候语消息

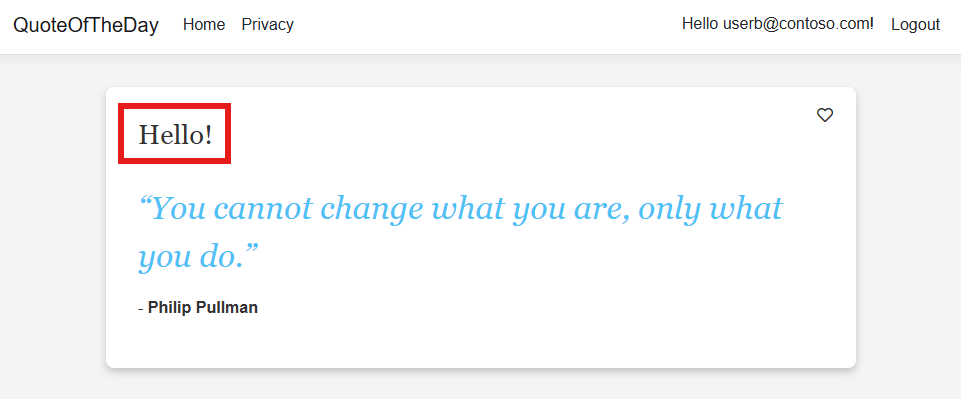
单击“注销并作为 userb@contoso.com 登录,会看到简单的问候消息。

后续步骤
有关 .NET 功能管理库的完整功能概要,请参阅以下文档。