你当前正在访问 Microsoft Azure Global Edition 技术文档网站。 如果需要访问由世纪互联运营的 Microsoft Azure 中国技术文档网站,请访问 https://docs.azure.cn。
快速入门:Azure AI 内容理解 REST API
开始使用 Azure AI 内容理解 REST API (2024-12-01-preview) 的最新预览版。
Azure AI 内容理解是基于生成式 AI 的新 Azure AI 服务,用于分析任何形式(文档、图像、视频和音频)的文件,并提取用户定义的字段格式的结构化输出。
通过调用 REST API 轻松将内容理解服务集成到工作流和应用程序中。
本快速入门将指导你使用内容理解 REST API 创建自定义分析器,并从输入中提取内容和字段。
先决条件
首先需要一个有效的 Azure 订阅。 如果没有 Azure 订阅,可以创建一个免费订阅。
获得 Azure 订阅后,请在 Azure 门户中创建 Azure AI 服务资源。 此多服务资源允许使用一组凭据访问多个 Azure AI 服务。
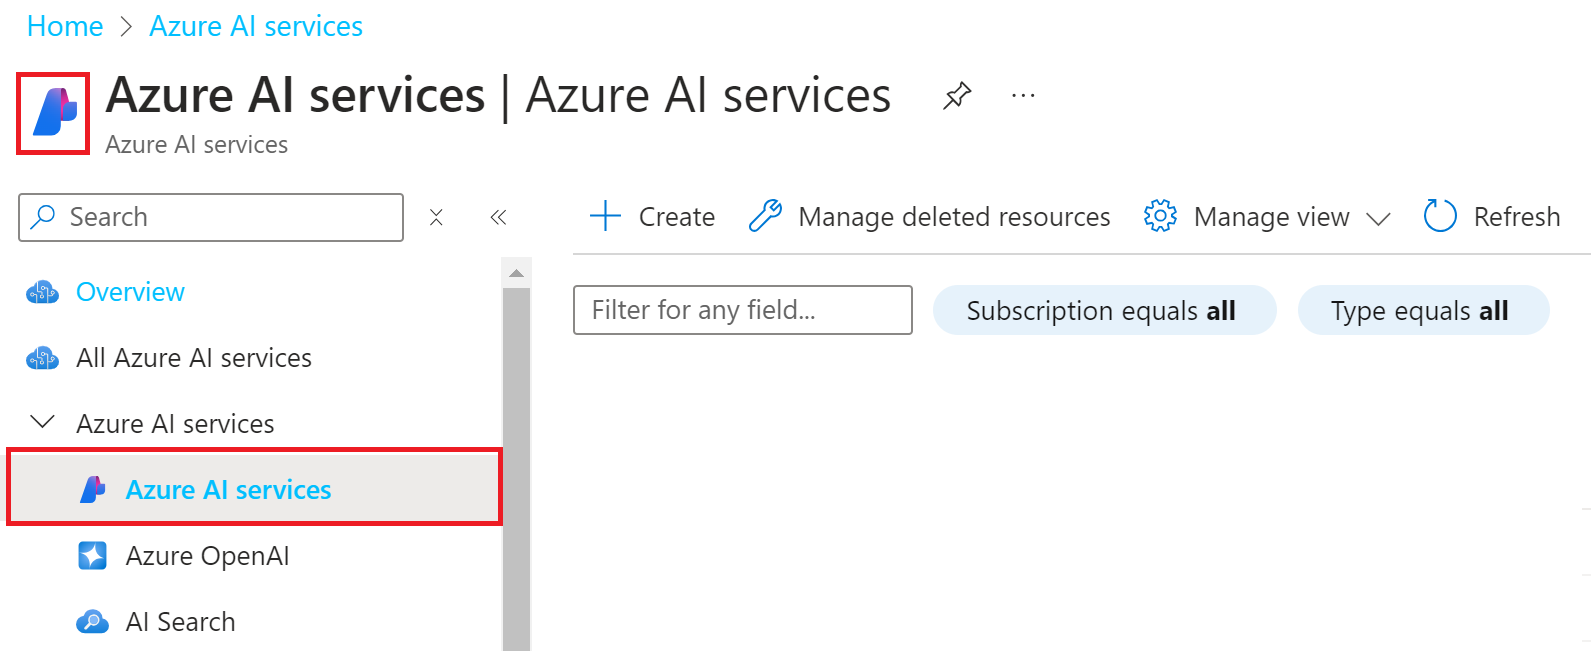
此资源在门户中的 Azure AI 服务 → Azure AI 服务下列出。
重要
Azure 提供了多个名为“Azure AI 服务”的资源类型。 确保选择 Azure AI 服务 → Azure AI 服务下列出的服务,如下图所示。 有关详细信息,请参阅创建 Azure AI 服务资源。
在本快速入门中,我们使用 cURL 命令行工具。 如果未安装,可以下载开发环境的版本:
创建自定义分析器
若要创建自定义分析器,需要定义描述要提取的结构化数据的字段架构。 在以下示例中,我们定义了一个架构,用于从发票文档中提取基本信息。
首先,创建包含以下内容的名为 request_body.json 的 JSON 文档:
{
  "description": "Sample invoice analyzer",
  "scenario": "document",
  "config": {
    "returnDetails": true
  },
  "fieldSchema": {
    "fields": {
      "VendorName": {
        "type": "string",
        "method": "extract",
        "description": "Vendor issuing the invoice"
      },
      "Items": {
        "type": "array",
        "method": "extract",
        "items": {
          "type": "object",
          "properties": {
            "Description": {
              "type": "string",
              "method": "extract",
              "description": "Description of the item"
            },
            "Amount": {
              "type": "number",
              "method": "extract",
              "description": "Amount of the item"
            }
          }
        }
      }
    }
  }
}
在运行以下 cURL 命令之前,请对 HTTP 请求进行以下更改:
- 将
{endpoint}和{key}替换为 Azure 门户 Azure AI 服务实例中的终结点和密钥值。 - 将
{analyzerId}替换为新分析器的名称并创建,例如myInvoice。
PUT 请求
curl -i -X PUT "{endpoint}/contentunderstanding/analyzers/{analyzerId}?api-version=2024-12-01-preview" \
  -H "Ocp-Apim-Subscription-Key: {key}" \
  -H "Content-Type: application/json" \
  -d @request_body.json
PUT 响应
201 (Created) 响应包括一个 Operation-Location 标头,其中包含可用于跟踪此异步创建操作的状态的 URL。
201 Created
Operation-Location: {endpoint}/contentunderstanding/analyzers/{analyzerId}/operations/{operationId}?api-version=2024-12-01-preview
完成后,对 URL 执行 HTTP GET 将返回 "status": "succeeded"。
curl -i -X GET "{endpoint}/contentunderstanding/analyzers/{analyzerId}/operations/{operationId}?api-version=2024-12-01-preview" \
  -H "Ocp-Apim-Subscription-Key: {key}"
分析文件
可以使用创建的自定义分析器分析文件,以提取架构中定义的字段。
在运行 cURL 命令之前,请对 HTTP 请求进行以下更改:
- 将
{endpoint}和{key}替换为 Azure 门户 Azure AI 服务实例中的终结点和密钥值。 - 将
{analyzerId}替换为之前创建的自定义分析器的名称。 - 将
{fileUrl}替换为要分析的文件的可公开访问 URL,例如具有共享访问签名 (SAS) 或示例 URLhttps://github.com/Azure-Samples/cognitive-services-REST-api-samples/raw/master/curl/form-recognizer/rest-api/invoice.pdf的 Azure 存储 Blob 的路径。
POST 请求
curl -i -X POST "{endpoint}/contentunderstanding/analyzers/{analyzerId}:analyze?api-version=2024-12-01-preview" \
  -H "Ocp-Apim-Subscription-Key: {key}" \
  -H "Content-Type: application/json" \
  -d "{\"url\":\"{fileUrl}\"}"
POST 响应
202 (Accepted) 响应包括一个 Operation-Location 标头,其中包含可用于跟踪此异步分析操作的状态的 URL。
202 Accepted
Operation-Location: {endpoint}/contentunderstanding/analyzers/{analyzerId}/results/{resultId}?api-version=2024-12-01-preview
获取分析结果
使用上一 POST 响应返回的 Operation-Location 标头中的 resultId,并检索分析结果。
- 将
{endpoint}和{key}替换为 Azure 门户 Azure AI 服务实例中的终结点和密钥值。 - 将
{analyzerId}替换为之前创建的自定义分析器的名称。 - 将
{resultId}替换为从POST请求返回的resultId。
GET 请求
curl -i -X GET "{endpoint}/contentunderstanding/analyzers/{analyzerId}/results/{resultId}?api-version=2024-12-01-preview" \
  -H "Ocp-Apim-Subscription-Key: {key}"
GET 响应
200 (OK) JSON 响应包括一个指示操作状态的 status 字段。 如果操作未完成,则 status 的值为 running 或 notStarted。 在这种情况下,应再次手动或通过脚本调用 API。 两次调用之间等待一秒或更长时间。
示例响应
{
  "id": "bcf8c7c7-03ab-4204-b22c-2b34203ef5db",
  "status": "Succeeded",
  "result": {
    "analyzerId": "sample_invoice_analyzer",
    "apiVersion": "2024-12-01-preview",
    "createdAt": "2024-11-13T07:15:46Z",
    "warnings": [],
    "contents": [
      {
        "markdown": "CONTOSO LTD.\n\n\n# INVOICE\n\nContoso Headquarters...",
        "fields": {
          "VendorName": {
            "type": "string",
            "valueString": "CONTOSO LTD.",
            "spans": [ { "offset": 0, "length": 12 } ],
            "confidence": 0.941,
            "source": "D(1,0.5729,0.6582,2.3353,0.6582,2.3353,0.8957,0.5729,0.8957)"
          },
          "Items": {
            "type": "array",
            "valueArray": [
              {
                "type": "object",
                "valueObject": {
                  "Description": {
                    "type": "string",
                    "valueString": "Consulting Services",
                    "spans": [ { "offset": 909, "length": 19 } ],
                    "confidence": 0.971,
                    "source": "D(1,2.3264,5.673,3.6413,5.673,3.6413,5.8402,2.3264,5.8402)"
                  },
                  "Amount": {
                    "type": "number",
                    "valueNumber": 60,
                    "spans": [ { "offset": 995, "length": 6 } ],
                    "confidence": 0.989,
                    "source": "D(1,7.4507,5.6684,7.9245,5.6684,7.9245,5.8323,7.4507,5.8323)"
                  }
                }
              }, ...
            ]
          }
        },
        "kind": "document",
        "startPageNumber": 1,
        "endPageNumber": 1,
        "unit": "inch",
        "pages": [
          {
            "pageNumber": 1,
            "angle": -0.0039,
            "width": 8.5,
            "height": 11,
            "spans": [ { "offset": 0, "length": 1650 } ],
            "words": [
              {
                "content": "CONTOSO",
                "span": { "offset": 0, "length": 7 },
                "confidence": 0.997,
                "source": "D(1,0.5739,0.6582,1.7446,0.6595,1.7434,0.8952,0.5729,0.8915)"
              }, ...
            ],
            "lines": [
              {
                "content": "CONTOSO LTD.",
                "source": "D(1,0.5734,0.6563,2.335,0.6601,2.3345,0.8933,0.5729,0.8895)",
                "span": { "offset": 0, "length": 12 }
              }, ...
            ]
          }
        ],
        "paragraphs": [
          {
            "content": "CONTOSO LTD.",
            "source": "D(1,0.5734,0.6563,2.335,0.6601,2.3345,0.8933,0.5729,0.8895)",
            "span": { "offset": 0, "length": 12 }
          }, ...
        ],
        "sections": [
          {
            "span": { "offset": 0, "length": 1649 },
            "elements": [ "/sections/1", "/sections/2" ]
          },
          {
            "span": { "offset": 0, "length": 12 },
            "elements": [ "/paragraphs/0" ]
          }, ...
        ],
        "tables": [
          {
            "rowCount": 2,
            "columnCount": 6,
            "cells": [
              {
                "kind": "columnHeader",
                "rowIndex": 0,
                "columnIndex": 0,
                "rowSpan": 1,
                "columnSpan": 1,
                "content": "SALESPERSON",
                "source": "D(1,0.5389,4.5514,1.7505,4.5514,1.7505,4.8364,0.5389,4.8364)",
                "span": { "offset": 512, "length": 11 },
                "elements": [ "/paragraphs/19" ]
              }, ...
            ],
            "source": "D(1,0.4885,4.5543,8.0163,4.5539,8.015,5.1207,0.4879,5.1209)",
            "span": { "offset": 495, "length": 228 }
          }, ...
        ]
      }
    ]
  }
}
后续步骤
- 在本快速入门中,你学习了如何调用 REST API 以创建自定义分析器。 若要获得用户体验,请尝试 Azure AI Foundry 门户。