你当前正在访问 Microsoft Azure Global Edition 技术文档网站。 如果需要访问由世纪互联运营的 Microsoft Azure 中国技术文档网站,请访问 https://docs.azure.cn。
配置 Azure Active Directory B2C 和 Bluink eID-Me 以进行身份验证
开始之前
Azure Active Directory B2C (Azure AD B2C) 提供两种方法来定义用户与应用程序的交互:预定义的用户流,或可配置的自定义策略。 自定义策略可解决复杂的场景。 在大多数场景下,我们推荐用户流。 请参阅用户流和自定义策略概述
将 Azure AD B2C 身份验证与 eID-Me 集成
了解如何将 Azure AD B2C 身份验证与 Bluink eID-Me(一种面向加拿大公民的身份验证和分散式数字标识解决方案)集成。 使用 eID-Me 时,Azure AD B2C 租户可以验证用户身份,获取已验证的注册和登录标识声明。 集成支持使用安全数字标识进行多重身份验证和无密码登录。 组织可以满足身份保证级别 (IAL) 2 和“了解你的客户”(KYC) 的要求。
若要了解详细信息,请转到 bluink.ca:Bluink Ltd
先决条件
要开始,需要:
- 具有 eID-Me 的信赖方帐户
- 转到 bluink.ca 了解详细信息并请求演示
- Azure 订阅
- 如果没有,获取一个 Azure 免费帐户
- 一个关联到 Azure 订阅的 Azure AD B2C 租户
- eID-Me 数字 ID 应用的试用版或生产版本
- 转到 bluink.ca 下载 eID-Me 数字 ID 应用
另外请参阅教程:在 Azure AD B2C 中创建用户流和自定义策略。
方案描述
eID-Me 作为 OpenID Connect (OIDC) 标识提供者与 Azure AD B2C 集成。 以下组件构成了带有 Azure AD B2C 的 eID-Me 解决方案:
- Azure AD B2C 租户 - 在 eID-Me 中配置为信赖方,使 eID-Me 能够信任 Azure AD B2C 租户进行注册和登录
-
Azure AD B2C 租户应用程序 - 假设是租户需要 Azure AD B2C 租户应用程序
- 应用程序会在事务期间接收 Azure AD B2C 收到的标识声明
- eID-Me 智能手机应用 - Azure AD B2C 租户用户需要 iOS 或 Android 版的该应用
-
已颁发的 eID-Me 数字标识 - 来自 eID-Me 标识校对
- 用户会向应用中的数字钱包颁发数字标识。 需要有效的标识文档。
eID-Me 应用在事务期间对用户进行身份验证。 X509 公钥身份验证使用 eID-Me 数字标识中的私钥提供无密码 MFA。
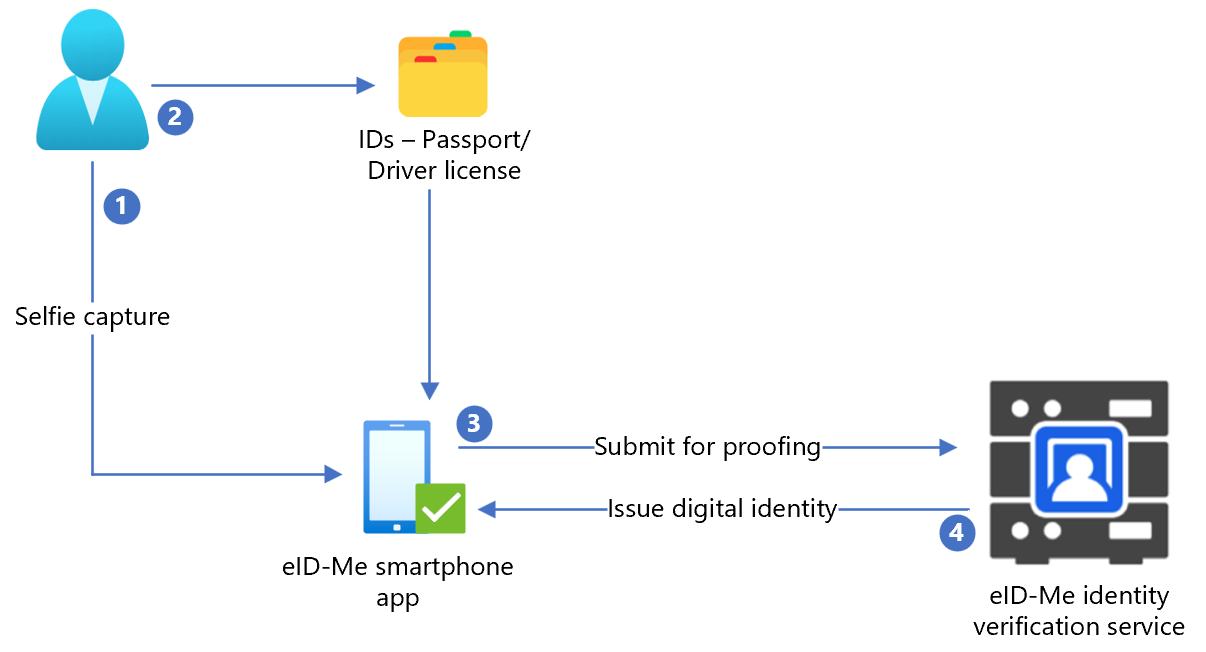
下图演示了发生在 Azure AD B2C 流之外的 eID-Me 标识校对。

- 用户将自拍上传到 eID-Me 智能手机应用程序中。
- 用户扫描政府颁发的身份证件(例如护照或驾照)并将其上传到 eID-Me 智能手机应用程序中。
- eID-Me 将数据提交到标识服务以进行验证。
- 向用户颁发一个数字标识,该标识保存在应用程序中。
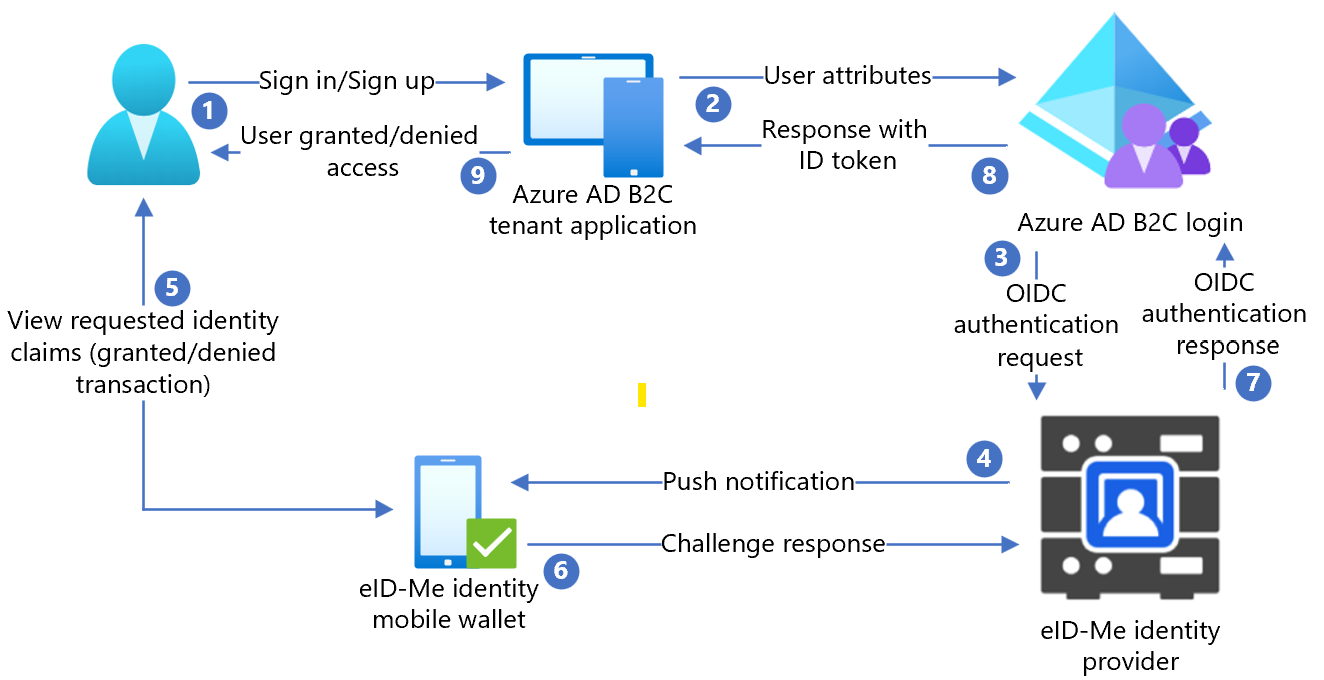
下图演示了 Azure AD B2C 与 eID-Me 的集成。

- 用户打开 Azure AD B2C 登录页面,使用用户名登录或注册。
- 用户被转发到 Azure AD B2C 登录和注册策略。
- Azure AD B2C 使用 OIDC 授权代码流将用户重定向到 eID-Me 标识路由器。
- 路由器向用户移动应用发送推送通知,其中包含身份验证和授权请求详细信息。
- 此时会显示用户身份验证质询,然后显示标识声明提示。
- 质询响应发送到路由器。
- 路由器使用身份验证结果回复 Azure AD B2C。
- Azure AD B2C ID 令牌响应发送到应用程序。
- 授权或拒绝用户访问。
开始使用 eID-Me
转到 bluink.ca 联系我们页,请求演示,目标是配置测试或生产环境,将 Azure AD B2C 租户设置为信赖方。 租户确定注册 eID-Me 的使用者所需的标识声明。
在 eID-Me 中配置应用程序
若要在 eID-Me 中将租户应用程序配置为 eID-ME 信赖方,请提供以下信息:
| 属性 | 说明 |
|---|---|
| 名称 | Azure AD B2C,或其他应用程序名称 |
| 域 | name.onmicrosoft.com |
| 重定向 URI | https://jwt.ms |
| 重定向 URL | https://your-B2C-tenant-name.b2clogin.com/your-B2C-tenant-name.onmicrosoft.com/oauth2/authresp例如: https://fabrikam.b2clogin.com/fabrikam.onmicrosoft.com/oauth2/authresp对于自定义域,请输入 https://your-domain-name/your-tenant-name.onmicrosoft.com/oauth2/authresp. |
| 应用程序主页 URL | 对最终用户显示 |
| 应用程序隐私策略 URL | 对最终用户显示 |
注意
信赖方可配置后,ID-Me 会提供客户端 ID 和客户端密码。 请记下客户端 ID 和客户端密码,以在 Azure AD B2C 中配置标识提供者 (IdP)。
在 Azure AD B2C 中添加新的标识提供者
有关以下说明,请将目录与 Azure AD B2C 租户配合使用。
- 以 Azure AD B2C 租户的全局管理员身份登录到 Azure 门户。
- 在顶部菜单中,选择“目录 + 订阅”。
- 选择包含租户的目录。
- 在 Azure 门户左上角,选择“所有服务”。
- 搜索并选择“Azure AD B2C”。
- 导航到“仪表板”>“Azure Active Directory B2C”>“标识提供者”。
- 选择“新的 OpenID Connect 提供程序”
- 选择 添加 。
配置标识提供者
若要配置标识提供者,请执行以下操作:
- 选择“标识提供者类型”>“OpenID Connect”。
- 在标识提供者窗体中,在“名称”中输入 eID-Me 无密码或其他名称。
- “客户端 ID”输入 eID-Me 中的客户端 ID。
- “客户端密码”输入 eID-Me 中的客户端密码。
- “范围”选择“OpenID 电子邮件配置文件”。
- 对于“响应类型”,请选择“代码”。
- “响应模式”选择 form post。
- 选择“确定”。
- 选择“映射此标识提供者的声明”。
- “用户 ID”使用 sub。
- “显示名称”使用 name。
- “给定名称”使用 given_name。
- “姓氏”使用 family_name。
- “电子邮件”使用 email。
- 选择“保存”。
配置多重身份验证
eID-Me 是一个多重身份验证器,因此不需要用户流多重身份验证配置。
创建用户流策略
对于以下说明,eID-Me 会在 B2C 标识提供者中显示为新的 OIDC 标识提供者。
- 在 Azure AD B2C 租户中的“策略”下,选择“用户流”。
- 选择“新建用户流”。
- 选择“注册和登录”>“版本”>“创建”。
- 输入策略名称。
- 在“标识提供者”中,选择创建的 eID-Me 标识提供者。
- “本地帐户”选择“无”。 该选择将禁用电子邮件和密码身份验证。
- 选择“运行用户流”。
- 输入 回复 URL,例如
https://jwt.ms。 - 浏览器将重定向到 eID-Me 登录页。
- 输入用户注册中的帐户名称。
- 用户在有 eID-Me 的移动设备上接收推送通知。
- 会显示身份验证质询。
- 接受质询,浏览器重定向到回复 URL。
注意
Azure Active Directory B2C (Azure AD B2C) 提供两种方法来定义用户与应用程序的交互:预定义的用户流,或可配置的自定义策略。 自定义策略可解决复杂的场景。 在大多数场景下,我们推荐用户流。 请参阅用户流和自定义策略概述
创建策略密钥
存储 Azure AD B2C 租户中记录的客户端密码。 有关以下说明,请将目录与 Azure AD B2C 租户配合使用。
- 登录 Azure 门户。
- 在门户工具栏中,选择“目录 + 订阅”。
- 在“门户设置,目录 + 订阅”页上的“目录名称”列表中,找到你的 Azure AD B2C 目录。
- 选择“切换”。
- 在 Azure 门户左上角,选择“所有服务”。
- 搜索并选择“Azure AD B2C”。
- 在“概述”页上选择“标识体验框架”。
- 选择“策略密钥”。
- 选择 添加 。
- 对于“选项”,选择“手动”。
- 输入策略密钥的名称。 例如,
eIDMeClientSecret。 前缀B2C_1A_会添加到密钥名称。 - 在“机密”中,输入前面记下的客户端密码。
- 对于“密钥用法”,请选择“签名” 。
- 选择“创建”。
将 eID-Me 配置为标识提供者
将 eID-Me 定义为声明提供程序,使用户能够使用 eID-Me 登录。 Azure AD B2C 通过某个终结点与其通信。 终结点提供 Azure AD B2C 用于在其设备上使用数字 ID 验证用户身份验证的声明。
若要将 eID-Me 定义为声明提供程序,请将其添加到策略扩展文件中的 ClaimsProvider 元素。
打开
TrustFrameworkExtensions.xml。找到 ClaimsProviders 元素。 如果它不出现,请在根元素下面添加它。
添加新的 ClaimsProvider:
   <ClaimsProvider>
   <Domain>eID-Me</Domain>
   <DisplayName>eID-Me</DisplayName>
   <TechnicalProfiles>
     <TechnicalProfile Id="eID-Me-OIDC">
       <!-- The text in the following DisplayName element is shown to the user on the claims provider
selection screen. -->
       <DisplayName>eID-Me for Sign In</DisplayName>
       <Protocol Name="OpenIdConnect" />
       <Metadata>
         <Item Key="ProviderName">https://eid-me.bluink.ca</Item>
         <Item Key="METADATA">https://demoeid.bluink.ca/.well-known/openid-configuration</Item>
         <Item Key="response_types">code</Item>
         <Item Key="scope">openid email profile</Item>
         <Item Key="response_mode">form_post</Item>
         <Item Key="HttpBinding">POST</Item>
         <Item Key="token_endpoint_auth_method">client_secret_post</Item>
         <Item Key="client_id">eid_me_rp_client_id</Item>
         <Item Key="UsePolicyInRedirectUri">false</Item>
       </Metadata>
       <CryptographicKeys>
         <Key Id="client_secret" StorageReferenceId="B2C_1A_eIDMeClientSecret" />
       </CryptographicKeys>
       <InputClaims />
       <OutputClaims>
         <OutputClaim ClaimTypeReferenceId="issuerUserId" PartnerClaimType="sub" />
         <OutputClaim ClaimTypeReferenceId="tenantId" PartnerClaimType="tid" />
         <OutputClaim ClaimTypeReferenceId="givenName" PartnerClaimType="given_name" />
         <OutputClaim ClaimTypeReferenceId="surName" PartnerClaimType="family_name" />
         <OutputClaim ClaimTypeReferenceId="displayName" PartnerClaimType="name" />
         <OutputClaim ClaimTypeReferenceId="email" PartnerClaimType="email" />
         <OutputClaim ClaimTypeReferenceId="IAL" PartnerClaimType="identity_assurance_level_achieved" DefaultValue="unknown IAL" />
         <OutputClaim ClaimTypeReferenceId="authenticationSource" DefaultValue="socialIdpAuthentication" AlwaysUseDefaultValue="true" />
         <OutputClaim ClaimTypeReferenceId="identityProvider" PartnerClaimType="iss" />
         <OutputClaim ClaimTypeReferenceId="locality" PartnerClaimType="locality" DefaultValue="unknown locality" />
         <OutputClaim ClaimTypeReferenceId="region" PartnerClaimType="region" DefaultValue="unknown region" />
       </OutputClaims>
       <OutputClaimsTransformations>
         <OutputClaimsTransformation ReferenceId="CreateRandomUPNUserName" />
         <OutputClaimsTransformation ReferenceId="CreateUserPrincipalName" />
         <OutputClaimsTransformation ReferenceId="CreateAlternativeSecurityId" />
         <OutputClaimsTransformation ReferenceId="CreateSubjectClaimFromAlternativeSecurityId" />
       </OutputClaimsTransformations>
       <UseTechnicalProfileForSessionManagement ReferenceId="SM-SocialLogin" />
     </TechnicalProfile>
   </TechnicalProfiles>
 </ClaimsProvider>
为 eid_me_rp_client_id 输入 eID-Me 信赖方客户端 ID。
选择“保存”。
支持的标识声明
可以添加 eID-Me 支持的更多标识声明。
- 打开
TrustFrameworksExtension.xml。 - 查找
BuildingBlocks元素。
注意
在 OID 存储库中查找支持的 eID-Me 标识声明列表,在 well-known/openid-configuration 上查找 OIDC 标识符。
<BuildingBlocks>
<ClaimsSchema>
 <ClaimType Id="IAL">
     <DisplayName>Identity Assurance Level</DisplayName>
     <DataType>string</DataType>
     <DefaultPartnerClaimTypes>
       <Protocol Name="OpenIdConnect" PartnerClaimType="identity_assurance_level_achieved" />
     </DefaultPartnerClaimTypes>
     <AdminHelpText>The Identity Assurance Level Achieved during proofing of the digital identity.</AdminHelpText>
     <UserHelpText>The Identity Assurance Level Achieved during proofing of the digital identity.</UserHelpText>
     <UserInputType>Readonly</UserInputType>
   </ClaimType>

<ClaimType Id="picture">
     <DisplayName>Portrait Photo</DisplayName>
     <DataType>string</DataType>
     <DefaultPartnerClaimTypes>
       <Protocol Name="OpenIdConnect" PartnerClaimType="thumbnail_portrait" />
     </DefaultPartnerClaimTypes>
     <AdminHelpText>The portrait photo of the user.</AdminHelpText>
     <UserHelpText>Your portrait photo.</UserHelpText>
     <UserInputType>Readonly</UserInputType>
   </ClaimType>

 <ClaimType Id="middle_name">
     <DisplayName>Portrait Photo</DisplayName>
     <DataType>string</DataType>
     <DefaultPartnerClaimTypes>
       <Protocol Name="OpenIdConnect" PartnerClaimType="middle_name" />
     </DefaultPartnerClaimTypes>
     <UserHelpText>Your middle name.</UserHelpText>
     <UserInputType>TextBox</UserInputType>
   </ClaimType>

<ClaimType Id="birthdate">
     <DisplayName>Date of Birth</DisplayName>
     <DataType>string</DataType>
     <DefaultPartnerClaimTypes>
       <Protocol Name="OpenIdConnect" PartnerClaimType="birthdate" />
     </DefaultPartnerClaimTypes>
     <AdminHelpText>The user's date of birth.</AdminHelpText>
     <UserHelpText>Your date of birth.</UserHelpText>
     <UserInputType>TextBox</UserInputType>
   </ClaimType>

 <ClaimType Id="gender">
     <DisplayName>Gender</DisplayName>
     <DataType>string</DataType>
     <DefaultPartnerClaimTypes>
       <Protocol Name="OpenIdConnect" PartnerClaimType="gender" />
     </DefaultPartnerClaimTypes>
     <AdminHelpText>The user's gender.</AdminHelpText>
     <UserHelpText>Your gender.</UserHelpText>
     <UserInputType>TextBox</UserInputType>
   </ClaimType>

 <ClaimType Id="street_address">
     <DisplayName>Locality/City</DisplayName>
     <DataType>string</DataType>
     <DefaultPartnerClaimTypes>
       <Protocol Name="OpenIdConnect" PartnerClaimType="street_address" />
     </DefaultPartnerClaimTypes>
     <AdminHelpText>The user's full street address, which MAY include house number, street name, post office box.</AdminHelpText>
     <UserHelpText>Your street address of residence.</UserHelpText>
     <UserInputType>TextBox</UserInputType>
   </ClaimType>

<ClaimType Id="locality">
     <DisplayName>Locality/City</DisplayName>
     <DataType>string</DataType>
     <DefaultPartnerClaimTypes>
       <Protocol Name="OpenIdConnect" PartnerClaimType="locality" />
     </DefaultPartnerClaimTypes>
     <AdminHelpText>The user's current city or locality of residence.</AdminHelpText>
     <UserHelpText>Your current city or locality of residence.</UserHelpText>
     <UserInputType>TextBox</UserInputType>
   </ClaimType>

   <ClaimType Id="region">
     <DisplayName>Province or Territory</DisplayName>
     <DataType>string</DataType>
     <DefaultPartnerClaimTypes>
       <Protocol Name="OpenIdConnect" PartnerClaimType="region" />
     </DefaultPartnerClaimTypes>
     <AdminHelpText>The user's current province or territory of residence.</AdminHelpText>
     <UserHelpText>Your current province or territory of residence.</UserHelpText>
     <UserInputType>TextBox</UserInputType>
   </ClaimType>

   <ClaimType Id="country">
     <DisplayName>Country</DisplayName>
     <DataType>string</DataType>
     <DefaultPartnerClaimTypes>
       <Protocol Name="OpenIdConnect" PartnerClaimType="country" />
     </DefaultPartnerClaimTypes>
     <AdminHelpText>The user's current country of residence.</AdminHelpText>
     <UserHelpText>Your current country of residence.</UserHelpText>
     <UserInputType>TextBox</UserInputType>
   </ClaimType>

   <ClaimType Id="dl_number">
     <DisplayName>Driver's Licence Number</DisplayName>
     <DataType>string</DataType>
     <DefaultPartnerClaimTypes>
       <Protocol Name="OpenIdConnect" PartnerClaimType="dl_number" />
     </DefaultPartnerClaimTypes>
     <AdminHelpText>The user's driver's licence number.</AdminHelpText>
     <UserHelpText>Your driver's licence number.</UserHelpText>
     <UserInputType>TextBox</UserInputType>
   </ClaimType>

   <ClaimType Id="dl_class">
     <DisplayName>Driver's Licence Class</DisplayName>
     <DataType>string</DataType>
     <DefaultPartnerClaimTypes>
       <Protocol Name="OpenIdConnect" PartnerClaimType="dl_class" />
     </DefaultPartnerClaimTypes>
     <AdminHelpText>The user's driver's licence class.</AdminHelpText>
     <UserHelpText>Your driver's licence class.</UserHelpText>
     <UserInputType>TextBox</UserInputType>
   </ClaimType>
 </ClaimsSchema>
添加用户旅程
对于以下说明,标识提供者已设置,但不在任何登录页中。 如果你没有自定义的用户旅程,请复制用户旅程模板。
- 在入门包中,打开
TrustFrameworkBase.xml文件。 - 找到并复制包含 ID=
SignUpOrSignIn的 UserJourney 元素的内容。 - 打开
TrustFrameworkExtensions.xml。 - 找到 UserJourneys 元素。 如果该元素未显示,请添加一个。
- 将 UserJourney 元素的内容粘贴为 UserJourneys 元素的子项。
- 重命名用户旅程 ID,例如 ID=
CustomSignUpSignIn。
将标识提供者添加到用户旅程
将新的标识提供者添加到用户旅程。
- 在用户旅程中,找到包含 Type=
CombinedSignInAndSignUp或 Type=ClaimsProviderSelection的业务流程步骤元素。 这通常是第一个业务流程步骤。 ClaimsProviderSelections 元素具有用户登录所用的标识提供者的列表。 元素顺序控制了向用户显示登录按钮的顺序。 - 添加 ClaimsProviderSelection XML 元素。
- 将 TargetClaimsExchangeId 值设为易记名称。
- 在下一个业务流程步骤中,添加 ClaimsExchange 元素。
- 将 ID 设为目标声明交换 ID 值。
- 将 vTechnicalProfileReferenceId 值更新为你创建的技术配置文件 ID。
以下 XML 演示了使用标识提供者执行的 7 个用户旅程业务流程步骤:
 <UserJourney Id="eIDME-SignUpOrSignIn">
   <OrchestrationSteps>
     <OrchestrationStep Order="1" Type="CombinedSignInAndSignUp" ContentDefinitionReferenceId="api.signuporsignin">
       <ClaimsProviderSelections>
         <ClaimsProviderSelection TargetClaimsExchangeId="eIDMeExchange" />
        </ClaimsProviderSelections>
   </OrchestrationStep>
     <!-- Check if the user has selected to sign in using one of the social providers -->
     <OrchestrationStep Order="2" Type="ClaimsExchange">
       <Preconditions>
         <Precondition Type="ClaimsExist" ExecuteActionsIf="true">
           <Value>objectId</Value>
           <Action>SkipThisOrchestrationStep</Action>
         </Precondition>
       </Preconditions>
       <ClaimsExchanges>
         <ClaimsExchange Id="eIDMeExchange" TechnicalProfileReferenceId="eID-Me-OIDC" />
       </ClaimsExchanges>
     </OrchestrationStep>
     <!-- For social IDP authentication, attempt to find the user account in the directory. -->
     <OrchestrationStep Order="3" Type="ClaimsExchange">
       <Preconditions>
         <Precondition Type="ClaimEquals" ExecuteActionsIf="true">
           <Value>authenticationSource</Value>
           <Value>localAccountAuthentication</Value>
           <Action>SkipThisOrchestrationStep</Action>
         </Precondition>
       </Preconditions>
       <ClaimsExchanges>
         <ClaimsExchange Id="AADUserReadUsingAlternativeSecurityId" TechnicalProfileReferenceId="AAD-UserReadUsingAlternativeSecurityId-NoError" />
       </ClaimsExchanges>
     </OrchestrationStep>
     <!-- Show self-asserted page only if the directory does not have the user account already (i.e. we do not have an objectId).  -->
     <OrchestrationStep Order="4" Type="ClaimsExchange">
       <Preconditions>
         <Precondition Type="ClaimsExist" ExecuteActionsIf="true">
           <Value>objectId</Value>
           <Action>SkipThisOrchestrationStep</Action>
         </Precondition>
       </Preconditions>
       <ClaimsExchanges>
         <ClaimsExchange Id="SelfAsserted-Social" TechnicalProfileReferenceId="SelfAsserted-Social" />
       </ClaimsExchanges>
     </OrchestrationStep>
     <!-- This step reads any user attributes that we may not have received when authenticating using ESTS so they can be sent in the token. -->
     <OrchestrationStep Order="5" Type="ClaimsExchange">
       <Preconditions>
         <Precondition Type="ClaimEquals" ExecuteActionsIf="true">
           <Value>authenticationSource</Value>
           <Value>socialIdpAuthentication</Value>
           <Action>SkipThisOrchestrationStep</Action>
         </Precondition>
       </Preconditions>
       <ClaimsExchanges>
         <ClaimsExchange Id="AADUserReadWithObjectId" TechnicalProfileReferenceId="AAD-UserReadUsingObjectId" />
       </ClaimsExchanges>
     </OrchestrationStep>
     <!-- The previous step (SelfAsserted-Social) could have been skipped if there were no attributes to collect
          from the user. So, in that case, create the user in the directory if one does not already exist
          (verified using objectId which would be set from the last step if account was created in the directory. -->
     <OrchestrationStep Order="6" Type="ClaimsExchange">
       <Preconditions>
         <Precondition Type="ClaimsExist" ExecuteActionsIf="true">
           <Value>objectId</Value>
           <Action>SkipThisOrchestrationStep</Action>
         </Precondition>
       </Preconditions>
       <ClaimsExchanges>
         <ClaimsExchange Id="AADUserWrite" TechnicalProfileReferenceId="AAD-UserWriteUsingAlternativeSecurityId" />
       </ClaimsExchanges>
     </OrchestrationStep>
     <OrchestrationStep Order="7" Type="SendClaims" CpimIssuerTechnicalProfileReferenceId="JwtIssuer" />
   </OrchestrationSteps>
   <ClientDefinition ReferenceId="DefaultWeb" />
 </UserJourney>
配置信赖方策略
信赖方策略指定 Azure AD B2C 执行的用户旅程。 可以控制传递给应用程序的声明。 调整 eID-Me-OIDC-Signup TechnicalProfile 元素的 OutputClaims 元素。 在以下示例中,应用程序会接收用户的邮政编码、地区、区域、IAL、肖像、中间名和出生日期。 它会接收指示是否创建了帐户的布尔型 signupConditionsSatisfied 声明。
 <RelyingParty>
     <DefaultUserJourney ReferenceId="eIDMe-SignUpOrSignIn" />
     <TechnicalProfile Id="PolicyProfile">
       <DisplayName>PolicyProfile</DisplayName>
       <Protocol Name="OpenIdConnect" />
       <OutputClaims>
         <OutputClaim ClaimTypeReferenceId="displayName" />
         <OutputClaim ClaimTypeReferenceId="givenName" />
         <OutputClaim ClaimTypeReferenceId="surname" />
         <OutputClaim ClaimTypeReferenceId="email" />
         <OutputClaim ClaimTypeReferenceId="objectId" PartnerClaimType="sub"/>
         <OutputClaim ClaimTypeReferenceId="identityProvider" />
         <OutputClaim ClaimTypeReferenceId="tenantId" AlwaysUseDefaultValue="true" DefaultValue="{Policy:TenantObjectId}" />
         <OutputClaim ClaimTypeReferenceId="postalCode" PartnerClaimType="postal_code" DefaultValue="unknown postal_code" />
         <OutputClaim ClaimTypeReferenceId="locality" PartnerClaimType="locality" DefaultValue="unknown locality" />
         <OutputClaim ClaimTypeReferenceId="region" PartnerClaimType="region" DefaultValue="unknown region" />
         <OutputClaim ClaimTypeReferenceId="IAL" PartnerClaimType="identity_assurance_level_achieved" DefaultValue="unknown IAL" />
         <OutputClaim ClaimTypeReferenceId="picture" PartnerClaimType="thumbnail_portrait" DefaultValue="unknown portrait" />
         <OutputClaim ClaimTypeReferenceId="middle_name" PartnerClaimType="middle_name" DefaultValue="unknown middle name" />
         <OutputClaim ClaimTypeReferenceId="birthdate" PartnerClaimType="birthdate" DefaultValue="unknown DOB" />
         <OutputClaim ClaimTypeReferenceId="newUser" PartnerClaimType="signupConditionsSatisfied" DefaultValue="false" />
       </OutputClaims>
       <SubjectNamingInfo ClaimType="sub" />
     </TechnicalProfile>
   </RelyingParty>
上传自定义策略
有关以下说明,请将目录与 Azure AD B2C 租户配合使用。
- 登录 Azure 门户。
- 在门户工具栏中,选择“目录 + 订阅”。
- 在“门户设置,目录 + 订阅”页上的“目录名称”列表中,找到 Azure AD B2C 目录。
- 选择“切换”。
- 在 Azure 门户中,搜索并选择“Azure AD B2C”。
- 在“策略”下,选择“Identity Experience Framework”。
- 选择“上传自定义策略”。
- 按以下顺序上传你更改的两个策略文件:
- 扩展策略,例如
TrustFrameworkBase.xml - 信赖方策略,例如
SignUp.xml
测试自定义策略
- 选择信赖方策略,例如
B2C_1A_signup。 - 为“应用程序”选择已注册的 Web 应用程序。
-
回复 URL 为
https://jwt.ms。 - 选择“立即运行”。
- 注册策略调用 eID-Me。
- 为登录选择“eID-Me”。
- 浏览器重定向到
https://jwt.ms。 - 将显示 Azure AD B2C 返回的令牌内容。
详细了解:教程:在 Azure AD B2C 中注册 Web 应用程序