你当前正在访问 Microsoft Azure Global Edition 技术文档网站。 如果需要访问由世纪互联运营的 Microsoft Azure 中国技术文档网站,请访问 https://docs.azure.cn。
使用 Azure Active Directory B2C 自定义策略验证用户输入
使用 Azure Active Directory B2C (Azure AD B2C) 自定义策略,不仅可以强制要求用户输入,还可以对其进行验证。 可以将用户输入标记为“必需”,例如 <DisplayClaim ClaimTypeReferenceId="givenName" Required="true"/>,但这并不意味着用户将输入有效的数据。 Azure AD B2C 提供了各种方法来验证用户输入。 本文介绍如何编写自定义策略,以使用以下方法收集用户输入并对其进行验证:
通过提供要从中选取的选项列表来限制用户输入的数据。 此方法使用你在发布声明时添加的枚举值。
定义用户输入必须匹配的模式。 此方法使用你在发布声明时添加的正则表达式。
定义一组规则,并要求用户输入遵循一个或多个规则。 此方法使用你在发布声明时添加的谓词。
使用特殊声明类型 reenterPassword 来验证用户在收集用户输入期间是否已正确地重新输入其密码。
配置验证技术配置文件,以定义无法在声明发布级别定义的复杂业务规则。 例如,你收集用户输入,而该输入需要根据另一个声明中的值或设置值进行验证。
先决条件
如果没有租户,请创建链接到 Azure 订阅的 Azure AD B2C 租户。
注册 Web 应用程序并启用 ID 令牌隐式授权。 对于“重定向 URI”,使用 https://jwt.ms。
必须已在计算机上安装 Visual Studio Code (VS Code)。
完成《使用 Azure AD B2C 自定义策略收集和操作用户输入》中的步骤。 本文是《创建和运行自己的自定义策略操作指南系列教程》的一部分。
注意
本文是《在 Azure Active Directory B2C 中创建和运行自己的自定义策略操作指南系列教程》的一部分。 建议从第一篇文章开始本系列教程。
步骤 1 - 通过限制用户输入选项来验证用户输入
如果知道用户可以为给定输入而输入的所有可能值,则可以提供一组用户必须从中选择的有限的值。 为此,可以使用 DropdownSinglSelect、CheckboxMultiSelect 和 RadioSingleSelectUserInputType。 在本文中,你将使用 RadioSingleSelect 输入类型:
在 VS Code 中,打开
ContosoCustomPolicy.XML文件。在
ContosoCustomPolicy.XML文件的ClaimsSchema元素中,声明以下声明类型:<ClaimType Id="accountType"> <DisplayName>Account Type</DisplayName> <DataType>string</DataType> <UserHelpText>The type of account used by the user</UserHelpText> <UserInputType>RadioSingleSelect</UserInputType> <Restriction> <Enumeration Text="Contoso Employee Account" Value="work" SelectByDefault="true"/> <Enumeration Text="Personal Account" Value="personal" SelectByDefault="false"/> </Restriction> </ClaimType>我们已声明 accountType 声明。 从用户收集声明的值时,用户必须为值“工作”选择“Contoso 员工帐户”,或为值“个人”选择“个人帐户”。
借助 Azure AD B2C,可以让策略适应不同的语言,并提供多种语言的帐户类型限制。 有关详细信息,请查看《添加用户属性》一文的本地化 UI。
使用
Id="UserInformationCollector"找到技术配置文件,并使用以下代码将 accountType 声明添加为显示声明:<DisplayClaim ClaimTypeReferenceId="accountType" Required="true"/>在包含
Id="UserInformationCollector"的技术配置文件中,使用以下代码将 accountType 声明添加为输出声明:<OutputClaim ClaimTypeReferenceId="accountType"/>要在访问令牌中包含帐户类型声明,请找到
RelyingParty元素,并使用以下代码将 accountType 声明添加为令牌声明:<OutputClaim ClaimTypeReferenceId="accountType" />
步骤 2 - 使用正则表达式验证用户输入
如果无法提前知道所有可能的用户输入值,则允许用户自行输入数据。 在这种情况下,可以使用正则表达式 (regex) 或模式来指示需要如何设置用户输入的格式。 例如,电子邮件文本中某处必须具有 at (@) 符号和 句点 (.)。
在发布声明时,自定义策略允许定义用户输入必须匹配的正则表达式。 可以选择提供一条消息,如果用户输入与表达式不匹配,则会向用户显示该消息。
找到
ClaimsSchema元素,并使用以下代码声明电子邮件声明:<ClaimType Id="email"> <DisplayName>Email Address</DisplayName> <DataType>string</DataType> <DefaultPartnerClaimTypes> <Protocol Name="OpenIdConnect" PartnerClaimType="email"/> </DefaultPartnerClaimTypes> <UserHelpText>Your email address. </UserHelpText> <UserInputType>TextBox</UserInputType> <Restriction> <Pattern RegularExpression="^[a-zA-Z0-9.!#$%&'^_`{}~-]+@[a-zA-Z0-9-]+(?:\.[a-zA-Z0-9-]+)*$" HelpText="Please enter a valid email address something like maurice@contoso.com"/> </Restriction> </ClaimType>使用
Id="UserInformationCollector"找到技术配置文件,并使用以下代码将电子邮件声明添加为显示声明:<DisplayClaim ClaimTypeReferenceId="email" Required="true"/>在包含
Id="UserInformationCollector"的技术配置文件中,使用以下代码将电子邮件声明添加为输出声明:<OutputClaim ClaimTypeReferenceId="email"/>找到
RelyingParty元素,并使用以下代码将电子邮件添加为令牌声明:<OutputClaim ClaimTypeReferenceId="email" />
步骤 3 - 使用谓词验证用户输入
你已使用正则表达式来验证用户输入。 但正则表达式有一个弱点,即在你更正输入之前将一直显示错误消息,而不会向你显示输入未能满足的特定要求。
使用谓词验证,可以通过定义一组规则(谓词),并为每项规则定义独立的错误消息来解决此问题。 在自定义策略中,谓词具有一个内置方法,可以定义你要进行的检查。 例如,可以使用 IsLengthRange 谓词方法来检查用户密码是否在(值)指定的最小和最大参数范围内。
虽然谓词定义了根据声明类型进行检查的验证,但 PredicateValidations 会对一组谓词进行分组,以构成可应用于声明类型的用户输入验证。 例如,可创建验证谓词组,用于验证可用于密码的不同类型的允许字符。 谓词和 PredicateValidations 元素都是策略文件 BuildingBlocks 部分的子元素。
找到
ClaimsSchema元素,并使用以下代码声明密码声明:<ClaimType Id="password"> <DisplayName>Password</DisplayName> <DataType>string</DataType> <AdminHelpText>Enter password</AdminHelpText> <UserHelpText>Enter password</UserHelpText> <UserInputType>Password</UserInputType> </ClaimType>使用以下代码将
Predicates元素添加为BuildingBlocks节的子元素。 在ClaimsSchema元素下方添加Predicates元素:<Predicates> </Predicates>在
Predicates元素中,使用以下代码定义谓词:<Predicate Id="IsLengthBetween8And64" Method="IsLengthRange" HelpText="The password must be between 8 and 64 characters."> <Parameters> <Parameter Id="Minimum">8</Parameter> <Parameter Id="Maximum">64</Parameter> </Parameters> </Predicate> <Predicate Id="Lowercase" Method="IncludesCharacters" HelpText="a lowercase letter"> <Parameters> <Parameter Id="CharacterSet">a-z</Parameter> </Parameters> </Predicate> <Predicate Id="Uppercase" Method="IncludesCharacters" HelpText="an uppercase letter"> <Parameters> <Parameter Id="CharacterSet">A-Z</Parameter> </Parameters> </Predicate> <Predicate Id="Number" Method="IncludesCharacters" HelpText="a digit"> <Parameters> <Parameter Id="CharacterSet">0-9</Parameter> </Parameters> </Predicate> <Predicate Id="Symbol" Method="IncludesCharacters" HelpText="a symbol"> <Parameters> <Parameter Id="CharacterSet">@#$%^&*\-_+=[]{}|\\:',.?/`~"();!</Parameter> </Parameters> </Predicate> <Predicate Id="PIN" Method="MatchesRegex" HelpText="The password must be numbers only."> <Parameters> <Parameter Id="RegularExpression">^[0-9]+$</Parameter> </Parameters> </Predicate> <Predicate Id="AllowedCharacters" Method="MatchesRegex" HelpText="An invalid character was provided."> <Parameters> <Parameter Id="RegularExpression">(^([0-9A-Za-z\d@#$%^&*\-_+=[\]{}|\\:',?/`~"();! ]|(\.(?!@)))+$)|(^$)</Parameter> </Parameters> </Predicate> <Predicate Id="DisallowedWhitespace" Method="MatchesRegex" HelpText="The password must not begin or end with a whitespace character."> <Parameters> <Parameter Id="RegularExpression">(^\S.*\S$)|(^\S+$)|(^$)</Parameter> </Parameters> </Predicate>我们定义了几个规则,这些规则在组合起来后描述了可接受的密码。 接下来,可以对谓词进行分组,以形成一组可在策略中使用的密码策略。
使用以下代码将
PredicateValidations元素添加为BuildingBlocks节的子元素。 将PredicateValidations元素添加为BuildingBlocks节的子元素(但它位于Predicates元素下方):<PredicateValidations> </PredicateValidations>在
PredicateValidations元素中,使用以下代码定义 PredicateValidations:<PredicateValidation Id="SimplePassword"> <PredicateGroups> <PredicateGroup Id="DisallowedWhitespaceGroup"> <PredicateReferences> <PredicateReference Id="DisallowedWhitespace"/> </PredicateReferences> </PredicateGroup> <PredicateGroup Id="AllowedCharactersGroup"> <PredicateReferences> <PredicateReference Id="AllowedCharacters"/> </PredicateReferences> </PredicateGroup> <PredicateGroup Id="LengthGroup"> <PredicateReferences> <PredicateReference Id="IsLengthBetween8And64"/> </PredicateReferences> </PredicateGroup> </PredicateGroups> </PredicateValidation> <PredicateValidation Id="StrongPassword"> <PredicateGroups> <PredicateGroup Id="DisallowedWhitespaceGroup"> <PredicateReferences> <PredicateReference Id="DisallowedWhitespace"/> </PredicateReferences> </PredicateGroup> <PredicateGroup Id="AllowedCharactersGroup"> <PredicateReferences> <PredicateReference Id="AllowedCharacters"/> </PredicateReferences> </PredicateGroup> <PredicateGroup Id="LengthGroup"> <PredicateReferences> <PredicateReference Id="IsLengthBetween8And64"/> </PredicateReferences> </PredicateGroup> <PredicateGroup Id="CharacterClasses"> <UserHelpText>The password must have at least 3 of the following:</UserHelpText> <PredicateReferences MatchAtLeast="3"> <PredicateReference Id="Lowercase"/> <PredicateReference Id="Uppercase"/> <PredicateReference Id="Number"/> <PredicateReference Id="Symbol"/> </PredicateReferences> </PredicateGroup> </PredicateGroups> </PredicateValidation> <PredicateValidation Id="CustomPassword"> <PredicateGroups> <PredicateGroup Id="DisallowedWhitespaceGroup"> <PredicateReferences> <PredicateReference Id="DisallowedWhitespace"/> </PredicateReferences> </PredicateGroup> <PredicateGroup Id="AllowedCharactersGroup"> <PredicateReferences> <PredicateReference Id="AllowedCharacters"/> </PredicateReferences> </PredicateGroup> </PredicateGroups> </PredicateValidation>我们有三个已定义的谓词验证,分别是 StrongPassword、CustomPassword 和 SimplePassword。 根据希望用户输入的密码的特征,可以在谓词验证上使用其中任何一项。 在本文中,我们将使用强密码。
找到 密码 声明类型声明,并使用以下代码将 StrongPassword 谓词验证添加到它包含的 UserInputType 元素后面:
<PredicateValidationReference Id="StrongPassword" />使用
Id="UserInformationCollector"找到技术配置文件,并使用以下代码将密码声明添加为显示声明:<DisplayClaim ClaimTypeReferenceId="password" Required="true"/>在包含
Id="UserInformationCollector"的技术配置文件中,使用以下代码将密码声明添加为输出声明:<OutputClaim ClaimTypeReferenceId="password"/>
注意
出于安全原因,我们不会在策略生成的令牌中添加用户密码作为声明。 因此,我们不会将密码声明添加到信赖方元素。
步骤 4 - 验证密码并确认密码
你可以要求用户输入密码两次,以此确认用户是否记得他们输入的密码。 在这种情况下,必须检查两个条目的值是否匹配。 自定义策略提供了一种简单的方法来实现此要求。 声明类型 password 和 reenterPassword 被视为特殊类型,因此当它们用于收集用户输入时,UI 会验证用户是否正确地重新输入了其密码。
在自定义策略中使用以下步骤验证密码重新输入:
在
ContosoCustomPolicy.XML文件的ClaimsSchema部分中,使用以下代码在密码声明后立即声明 reenterPassword 声明:<ClaimType Id="reenterPassword"> <DisplayName>Confirm new password</DisplayName> <DataType>string</DataType> <AdminHelpText>Confirm new password</AdminHelpText> <UserHelpText>Reenter password</UserHelpText> <UserInputType>Password</UserInputType> </ClaimType>要收集用户的密码确认输入,请找到
UserInformationCollector自断言技术配置文件,并使用以下代码将 reenterPassword 声明添加为显示声明:<DisplayClaim ClaimTypeReferenceId="reenterPassword" Required="true"/>在
ContosoCustomPolicy.XML文件中,找到UserInformationCollector自断言技术配置文件,然后使用以下代码添加 reenterPassword 声明作为输出声明:<OutputClaim ClaimTypeReferenceId="reenterPassword"/>
步骤 5 - 上传自定义策略文件
此时,你已构建了策略来处理前三种用户输入验证方法。
按照上传自定义策略文件中的步骤进行操作。 如果要上传与门户中已有文件同名的文件,请确保选择“覆盖自定义策略(如果已存在)”。
步骤 6 - 测试自定义策略
在“自定义策略”下,选择“B2C_1A_CONTOSOCUSTOMPOLICY”。
对于自定义策略概述页面上的“选择应用程序”,选择 Web 应用程序,例如之前注册的 webapp1。 确保将“选择回复 URL”的值设置为“
https://jwt.ms”。选择“立即运行”按钮。
输入 名字 和 姓氏。
选择“帐户类型”。
对于“电子邮件地址”,请输入格式不正确的电子邮件值,例如 maurice@contoso。
对于“密码”,请输入未遵循所设置强密码全部特征的密码值。
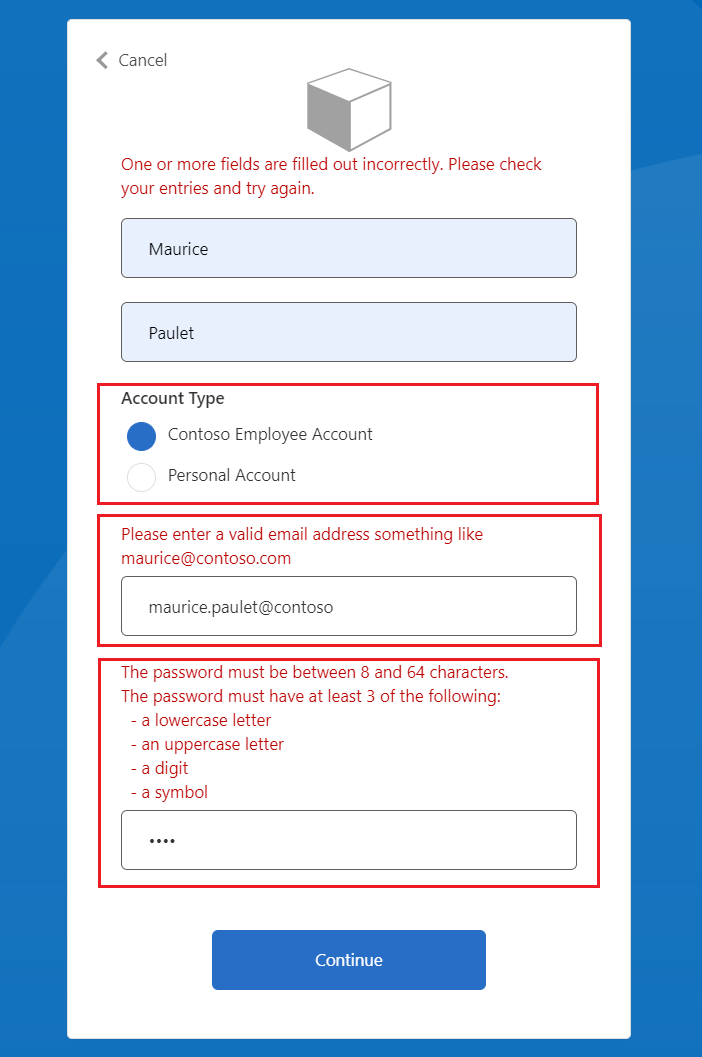
选择“继续”按钮。 你会看到与下面显示的屏幕类似的屏幕:

在继续操作之前,必须更正输入。
输入错误消息建议的正确值,然后再次选择“继续”按钮。 策略执行完成后,系统会将你重定向到
https://jwt.ms,然后你会看到已解码的 JWT 令牌。 令牌外观类似于以下 JWT 令牌代码片段:
    {
      "typ": "JWT",
      "alg": "RS256",
      "kid": "pxLOMWFg...."
    }.{
      ...
      "sub": "c7ae4515-f7a7....",
      ...
      "acr": "b2c_1a_contosocustompolicy",
      "accountType": "work",
      ...
      "email": "maurice@contoso.com",
      "name": "Maurice Paulet",
      "message": "Hello Maurice Paulet"
    }.[Signature]
步骤 7 - 使用验证技术配置文件验证用户输入
我们在步骤 1、步骤 2 和步骤 3 中使用的验证技术并不适用于所有方案。 如果在声明发布级别定义业务规则比较复杂,则可以配置 验证技术文件,然后从自断言技术配置文件中调用它。
注意
只有自断言技术配置文件可以使用验证技术配置文件。 详细了解验证技术配置文件
方案概述
我们要求,如果用户的 帐户类型 是 Contoso 员工帐户,必须确保其电子邮件域基于一组预定义域。 这些域是 contoso.com、fabrikam.com 和 woodgrove.com。 否则,在用户使用有效的 Contoso 员工帐户或切换到个人帐户之前,我们将向用户显示错误。
使用以下步骤了解如何使用验证技术配置文件来验证用户输入。 你使用了声明转换类型验证技术配置文件,但也可以调用 REST API 服务来验证数据,本系列稍后将介绍。
在
ContosoCustomPolicy.XML文件的ClaimsSchema部分中,使用以下代码声明 domain 和 domainStatus 声明:<ClaimType Id="domain"> <DataType>string</DataType> </ClaimType> <ClaimType Id="domainStatus"> <DataType>string</DataType> </ClaimType>找到
ClaimsTransformations部分,然后使用以下代码配置声明转换:<ClaimsTransformation Id="GetDomainFromEmail" TransformationMethod="ParseDomain"> <InputClaims> <InputClaim ClaimTypeReferenceId="email" TransformationClaimType="emailAddress"/> </InputClaims> <OutputClaims> <OutputClaim ClaimTypeReferenceId="domain" TransformationClaimType="domain"/> </OutputClaims> </ClaimsTransformation> <ClaimsTransformation Id="LookupDomain" TransformationMethod="LookupValue"> <InputClaims> <InputClaim ClaimTypeReferenceId="domain" TransformationClaimType="inputParameterId"/> </InputClaims> <InputParameters> <InputParameter Id="contoso.com" DataType="string" Value="valid"/> <InputParameter Id="fabrikam.com" DataType="string" Value="valid"/> <InputParameter Id="woodgrove.com" DataType="string" Value="valid"/> <InputParameter Id="errorOnFailedLookup" DataType="boolean" Value="true"/> </InputParameters> <OutputClaims> <OutputClaim ClaimTypeReferenceId="domainStatus" TransformationClaimType="outputClaim"/> </OutputClaims> </ClaimsTransformation>GetDomainFromEmail 声明转换使用 ParseDomain 方法从电子邮件中提取域,并将其存储在 domain 声明中。 LookupDomain 声明转换使用提取的域来检查它是否有效,其方法是在预定义域中查找该域,并将“有效”分配给 domainStatus 声明。
使用以下代码在与带有
Id=UserInformationCollector的技术配置文件相同的声明提供程序中添加技术配置文件:<TechnicalProfile Id="CheckCompanyDomain"> <DisplayName>Check Company validity </DisplayName> <Protocol Name="Proprietary" Handler="Web.TPEngine.Providers.ClaimsTransformationProtocolProvider, Web.TPEngine, Version=1.0.0.0, Culture=neutral, PublicKeyToken=null"/> <InputClaimsTransformations> <InputClaimsTransformation ReferenceId="GetDomainFromEmail"/> </InputClaimsTransformations> <OutputClaims> <OutputClaim ClaimTypeReferenceId="domain"/> </OutputClaims> <OutputClaimsTransformations> <OutputClaimsTransformation ReferenceId="LookupDomain"/> </OutputClaimsTransformations> </TechnicalProfile>我们已声明了声明转换技术配置文件,该配置文件可执行 GetDomainFromEmail 和 LookupDomain 声明转换。
使用以下代码在
OutputClaims元素后面找到包含Id=UserInformationCollector的技术配置文件和ValidationTechnicalProfile:<ValidationTechnicalProfiles> <ValidationTechnicalProfile ReferenceId="CheckCompanyDomain"> <Preconditions> <Precondition Type="ClaimEquals" ExecuteActionsIf="false"> <Value>accountType</Value> <Value>work</Value> <Action>SkipThisValidationTechnicalProfile</Action> </Precondition> </Preconditions> </ValidationTechnicalProfile> </ValidationTechnicalProfiles>我们已将验证技术配置文件添加到 UserInformationCollector 自断言技术配置文件。 仅当 accountType 值不等于工作时,才会跳过该技术配置文件。 如果执行技术配置文件,并且电子邮件域无效,则会引发错误。
找到带有
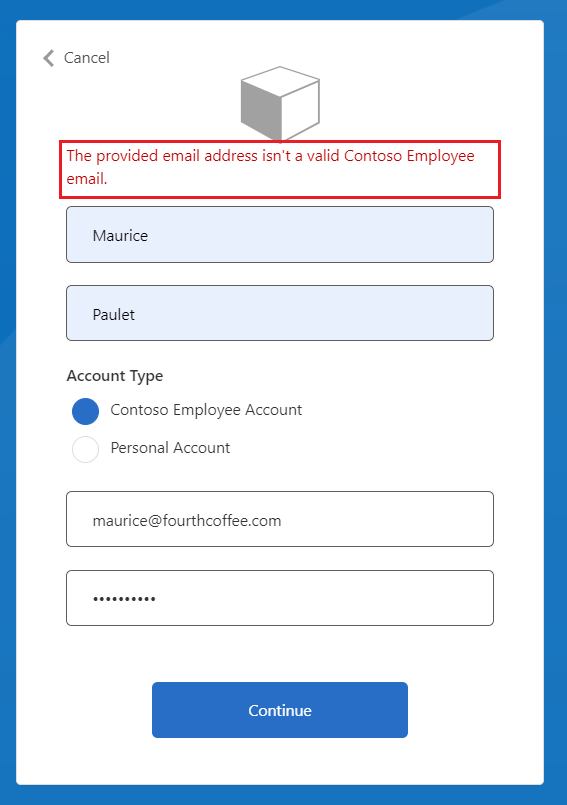
Id=UserInformationCollector的技术配置文件,并在metadata标记中添加以下代码。<Item Key="LookupNotFound">The provided email address isn't a valid Contoso Employee email.</Item>我们已设置自定义错误,以防用户未使用有效电子邮件。
按照上传自定义策略文件中的说明上传策略文件。
按照步骤 6 中的说明测试自定义策略:
- 对于“帐户类型”,可选择“Contoso 员工帐户”
- 对于“电子邮件地址”,请输入无效的电子邮件地址,例如 maurice@fourthcoffee.com。
- 输入需要的其余详细信息,然后选择“继续”
由于 maurice@fourthcoffee.com 不是有效的电子邮件,因此你将看到类似于以下屏幕截图中所示的错误。 必须使用有效的电子邮件地址才能成功运行自定义策略和接收 JWT 令牌。
