批量更新 (VB)
作者 :斯科特·米切尔
了解如何在单个操作中更新多个数据库记录。 在用户界面层中,我们生成一个 GridView,其中每一行都是可编辑的。 在数据访问层中,我们会在事务中包装多个更新操作,以确保所有更新都成功或回滚所有更新。
简介
在 前面的教程 中,我们了解了如何扩展数据访问层,以添加对数据库事务的支持。 数据库事务保证将一系列数据修改语句视为一个原子操作,这可确保所有修改都将失败或全部成功。 有了这种低级别 DAL 功能,我们就可以开始关注如何创建批处理数据修改接口。
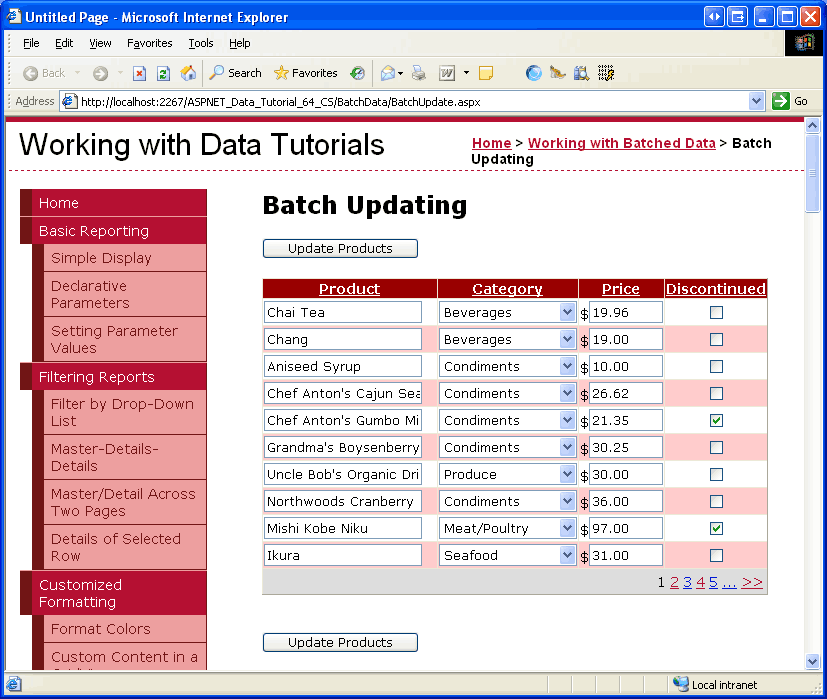
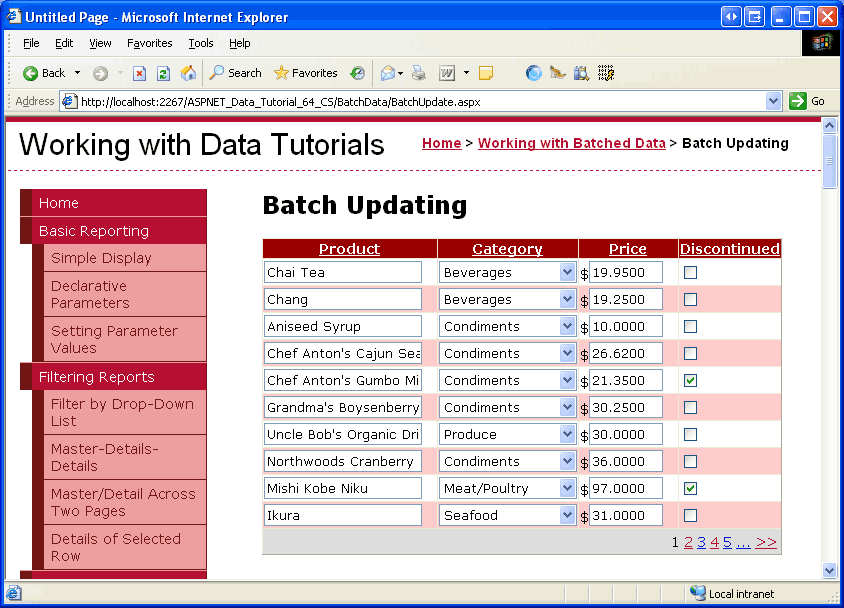
在本教程中,我们将生成一个 GridView,其中每一行都是可编辑的(请参阅图 1)。 由于每一行都呈现在其编辑界面中,因此无需一列“编辑”、“更新”和“取消”按钮。 相反,页面上有两个“更新产品”按钮,单击后,枚举 GridView 行并更新数据库。

图 1:GridView 中的每个行都是可编辑的(单击可查看全尺寸图像)
让我们开始吧!
注意
在 “执行批处理更新 ”教程中,我们使用 DataList 控件创建了批处理编辑界面。 本教程与前面使用的 GridView 不同,批处理更新是在事务范围内执行的。 完成本教程后,建议返回到前面的教程,并更新它以使用前面教程中添加的数据库事务相关功能。
检查使所有 GridView 行可编辑的步骤
如“插入、更新和删除数据概述”教程中所述,GridView 提供基于每行编辑其基础数据的内置支持。 在内部,GridView 会记录通过其 EditIndex 属性可编辑的行。 当 GridView 绑定到其数据源时,它会检查每一行,以查看该行的索引是否等于其值 EditIndex。 如果是这样,则使用行的编辑接口呈现该行的字段。 对于 BoundFields,编辑接口是一个 TextBox,其 Text 属性被分配给 BoundField s DataField 属性指定的数据字段的值。 对于 TemplateFields, EditItemTemplate 将使用模板字段代替 ItemTemplate。
回想一下,当用户单击行的“编辑”按钮时,编辑工作流将启动。 这会导致回发,将 GridView 属性 EditIndex 设置为单击的行索引,并将数据重新绑定到网格。 当单击行“取消”按钮时,在回发时,该 EditIndex 按钮将设置为一个值 -1 ,然后再将数据重新绑定到网格。 由于 GridView 的行从零开始编制索引,所以设置为EditIndex-1具有以只读模式显示 GridView 的效果。
该 EditIndex 属性适用于每行编辑,但不适用于批处理编辑。 若要使整个 GridView 可编辑,我们需要使用其编辑界面让每一行呈现。 实现此目的的最简单方法是创建每个可编辑字段作为 TemplateField 实现的位置,并在其中定义了 ItemTemplate其编辑界面。
在接下来的几个步骤中,我们将创建一个完全可编辑的 GridView。 在步骤 1 中,首先创建 GridView 及其 ObjectDataSource,并将其 BoundFields 和 CheckBoxField 转换为 TemplateFields。 在步骤 2 和步骤 3 中,我们将编辑接口从 TemplateFields EditItemTemplate 移动到其 ItemTemplate S。
步骤 1:显示产品信息
在担心创建可编辑行的 GridView 之前,让我们首先只显示产品信息。 BatchUpdate.aspx打开文件夹中的页面BatchData,并将 GridView 从工具箱拖到设计器上。 将 GridView 设置为IDProductsGrid,并从其智能标记中选择将其绑定到名为 ProductsDataSource 的新 ObjectDataSource。 配置 ObjectDataSource 以从 ProductsBLL 类 s GetProducts 方法检索其数据。
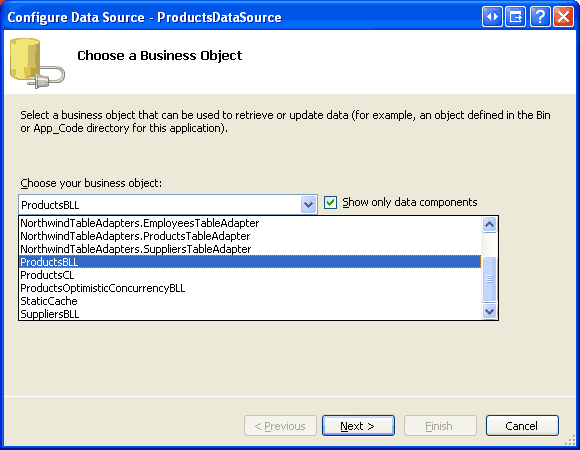
图 2:将 ObjectDataSource 配置为使用 ProductsBLL 类(单击以查看全尺寸图像)
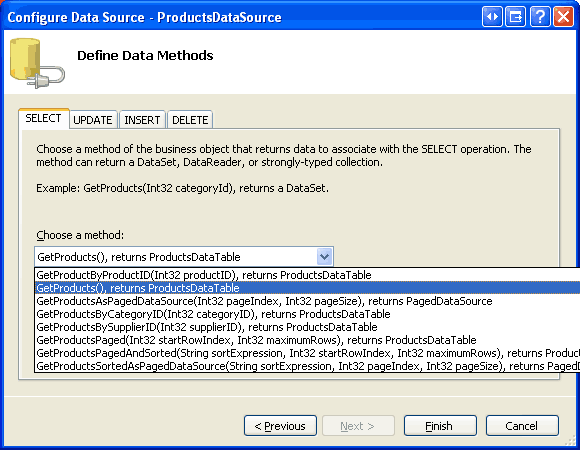
图 3:使用 GetProducts 方法检索产品数据(单击以查看全尺寸图像)
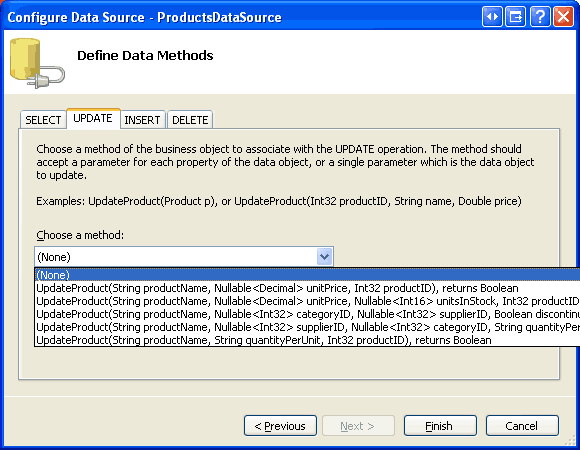
与 GridView 一样,ObjectDataSource 的修改功能旨在按行工作。 为了更新一组记录,我们需要在 ASP.NET 页的代码隐藏类中编写一些代码,该类对数据进行批处理并将其传递给 BLL。 因此,将 ObjectDataSource 的 UPDATE、INSERT 和 DELETE 选项卡中的下拉列表设置为 (None)。 单击“完成”,完成向导。

图 4:将 UPDATE、INSERT 和 DELETE 选项卡中的下拉列表设置为(无)(单击可查看全尺寸图像)
完成“配置数据源”向导后,ObjectDataSource 的声明性标记应如下所示:
<asp:ObjectDataSource ID="ProductsDataSource" runat="server"
    OldValuesParameterFormatString="original_{0}"
    SelectMethod="GetProducts" TypeName="ProductsBLL">
</asp:ObjectDataSource>
完成“配置数据源”向导还会导致 Visual Studio 为 GridView 中的产品数据字段创建 BoundFields 和 CheckBoxField。 在本教程中,我们仅允许用户查看和编辑产品名称、类别、价格和已停用状态。 删除除“CategoryNameUnitPrice产品”、“类别”和Discontinued“价格”这三个字段的ProductName所有其他字段,并将前三个字段的属性分别重命名HeaderText为“产品”、“类别”和“价格”。 最后,选中 GridView 智能标记中的“启用分页”和“启用排序”复选框。
此时,GridView 有三个 BoundFields (ProductName和CategoryNameUnitPrice) 和 CheckBoxField (Discontinued)。 我们需要将这四个字段转换为 TemplateFields,然后将编辑界面从 TemplateField s EditItemTemplate 移动到其 ItemTemplate。
注意
我们在自定义数据修改接口教程中探讨了如何创建和自定义 TemplateFields。 我们将逐步完成将 BoundFields 和 CheckBoxField 转换为 TemplateFields 并在模板 ItemTemplate 字段中定义其编辑接口的步骤,但如果遇到问题或需要刷新,请毫不犹豫地参考前面的教程。
在 GridView 智能标记中,单击“编辑列”链接以打开“字段”对话框。 接下来,选择每个字段,然后单击“将此字段转换为 TemplateField”链接。
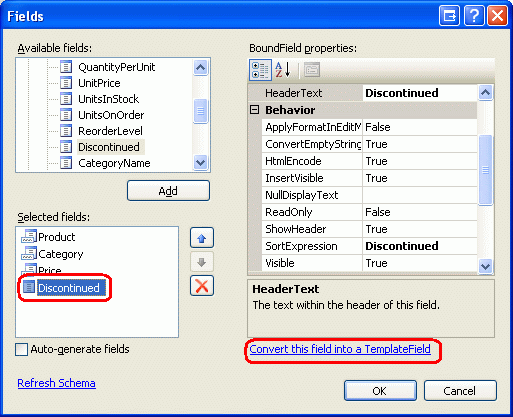
图 5:将现有 BoundFields 和 CheckBoxField 转换为 TemplateFields
现在,每个字段都是 TemplateField,我们便可以将编辑界面从 EditItemTemplate s 移动到 ItemTemplate s。
步骤 2:创建ProductName和UnitPriceDiscontinued编辑接口
ProductName创建、UnitPrice编辑Discontinued接口是此步骤的主题,而且非常简单,因为模板字段中EditItemTemplate已经定义了每个接口。 CategoryName创建编辑界面有点复杂,因为我们需要创建适用类别的 DropDownList。 此 CategoryName 编辑界面在步骤 3 中处理。
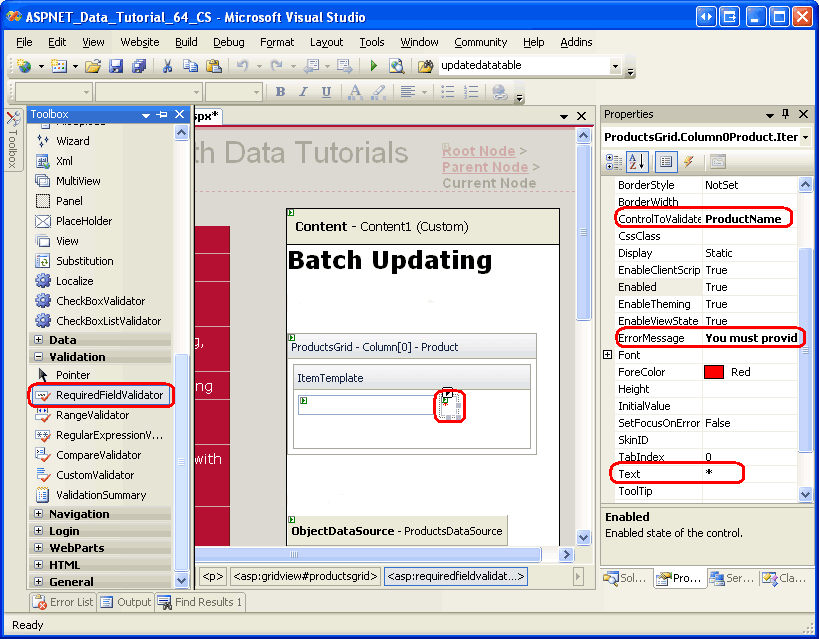
让我们从 TemplateField 开始 ProductName 。 单击 GridView 智能标记中的“编辑模板”链接,向下钻取到 ProductName TemplateFields EditItemTemplate。 选择 TextBox,将其复制到剪贴板,然后将其粘贴到 ProductName TemplateField s ItemTemplate。 将 TextBox s ID 属性更改为 ProductName.
接下来,将 RequiredFieldValidator 添加到 ItemTemplate 以确保用户为每个产品名称提供值。 将 ControlToValidate 属性设置为 ProductName,属性 ErrorMessage 必须提供产品名称。 Text和属性到 *。 添加 ItemTemplate这些内容后,屏幕应类似于图 6。

图 6: ProductName TemplateField 现在包括一个 TextBox 和 RequiredFieldValidator(单击以查看全尺寸图像)
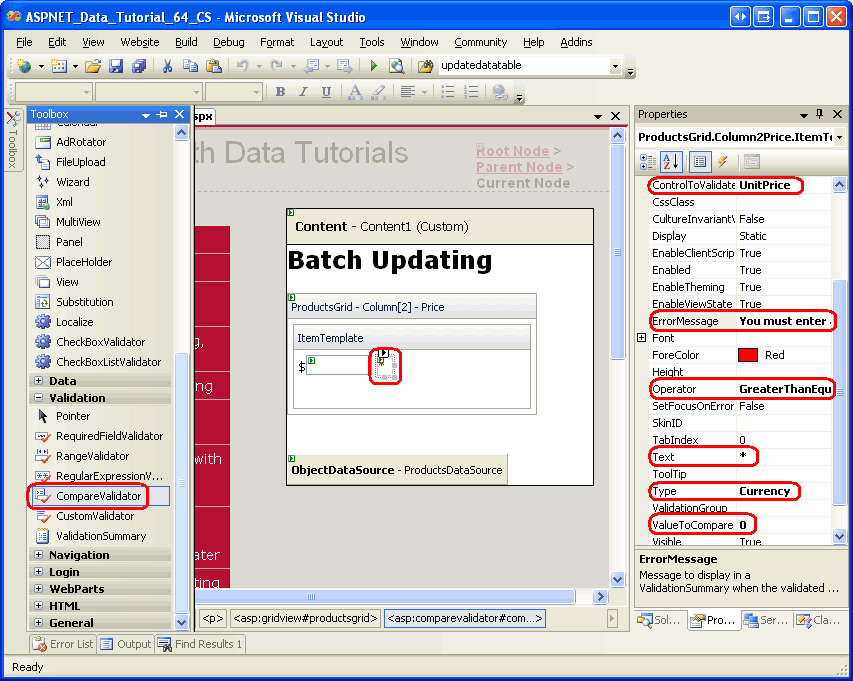
UnitPrice对于编辑界面,请首先从 TextBox 复制到 EditItemTemplate 。ItemTemplate 接下来,将 $置于 TextBox 前面,并将其 ID 属性设置为 UnitPrice,并将其 Columns 属性设置为 8。
此外, UnitPrice 将 CompareValidator 添加到 s ItemTemplate ,以确保用户输入的值是大于或等于 $0.00 的有效货币值。 将验证程序的属性 ControlToValidate 设置为 UnitPrice,其 ErrorMessage 属性必须输入有效的货币值。 请省略任何货币符号。它的Text属性为 *,其属性到Currency,其Type属性到GreaterThanEqual,其OperatorValueToCompare属性为 0。

图 7:添加 CompareValidator 以确保输入的价格是非负货币值(单击以查看全尺寸图像)
Discontinued对于 TemplateField,可以使用已在中ItemTemplate定义的 CheckBox。 只需将其 ID 设置为“已停止”,其 Enabled 属性设置为 True..
步骤 3:创建CategoryName编辑界面
TemplateField 中的编辑界面CategoryName包含一个 TextBox,用于显示数据字段的值CategoryName。EditItemTemplate 我们需要将其替换为列出可能类别的 DropDownList。
注意
自定义数据修改接口教程包含更全面、更完整的讨论,介绍如何自定义模板以包含 DropDownList 而不是 TextBox。 虽然此处的步骤已完成,但它们呈现得非常顺利。 若要更深入地了解如何创建和配置类别 DropDownList,请参阅 自定义数据修改接口 教程。
将一个 DropDownList 从工具箱拖到 CategoryName TemplateField s 上 ItemTemplate,将其 ID 设置为 Categories。 此时,我们通常会通过其智能标记定义 DropDownLists 数据源,从而创建新的 ObjectDataSource。 但是,这会在内 ItemTemplate添加 ObjectDataSource,这将导致为每个 GridView 行创建 ObjectDataSource 实例。 相反,让我们在 GridView s TemplateFields 外部创建 ObjectDataSource。 结束模板编辑并将 ObjectDataSource 从工具箱拖动到 ObjectDataSource 下的 ProductsDataSource 设计器上。 命名新的 ObjectDataSource CategoriesDataSource 并将其配置为使用 CategoriesBLL 类的方法 GetCategories 。
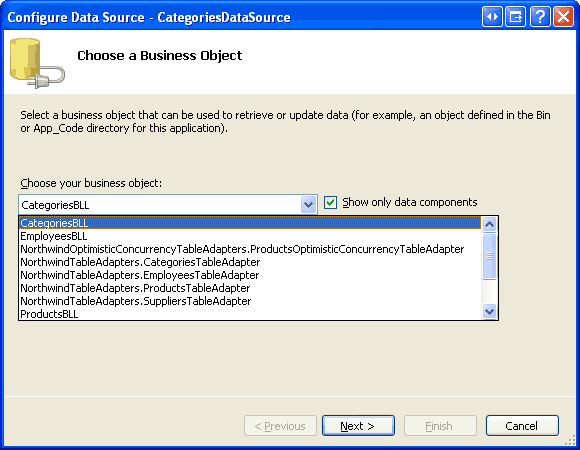
图 8:将 ObjectDataSource 配置为使用 CategoriesBLL 类(单击以查看全尺寸图像)

图 9:使用 GetCategories 方法检索类别数据(单击以查看全尺寸图像)
由于此 ObjectDataSource 仅用于检索数据,因此请将 UPDATE 和 DELETE 选项卡中的下拉列表设置为 “无”。 单击“完成”,完成向导。
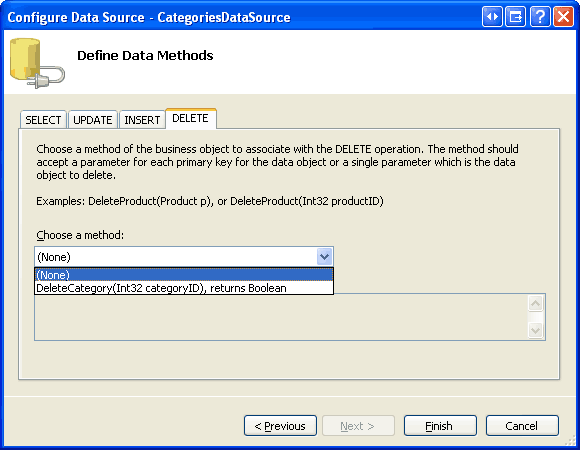
图 10:将“更新”和“删除”选项卡中的下拉列表设置为“无”(单击以查看全尺寸图像)
完成向导后, CategoriesDataSource 声明性标记应如下所示:
<asp:ObjectDataSource ID="CategoriesDataSource" runat="server"
    OldValuesParameterFormatString="original_{0}"
    SelectMethod="GetCategories" TypeName="CategoriesBLL">
</asp:ObjectDataSource>
创建并配置后 CategoriesDataSource ,返回到 CategoryName TemplateField s, ItemTemplate 并从 DropDownList 智能标记中单击“选择数据源”链接。 在数据源配置向导中,从第一个下拉列表中选择 CategoriesDataSource 该选项,并选择 CategoryName 用于显示和 CategoryID 作为值。
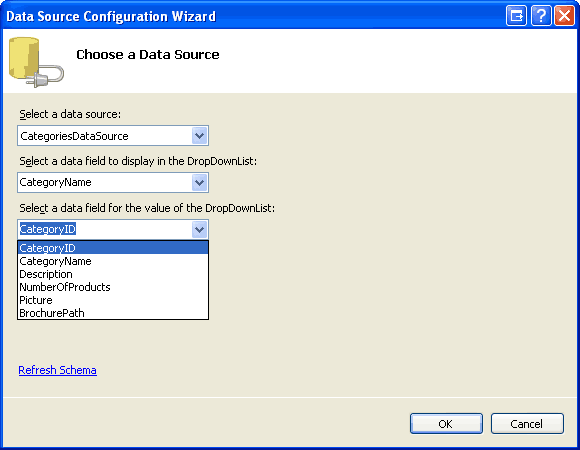
图 11:将 DropDownList CategoriesDataSource 绑定到 (单击可查看全尺寸图像)
此时 Categories ,DropDownList 列出了所有类别,但它尚未自动为绑定到 GridView 行的产品选择适当的类别。 为此,我们需要将 Categories DropDownList s SelectedValue 设置为产品 CategoryID 值。 单击 DropDownList 智能标记中的“编辑 DataBindings”链接,并将 SelectedValue 属性与 CategoryID 数据字段相关联,如图 12 所示。
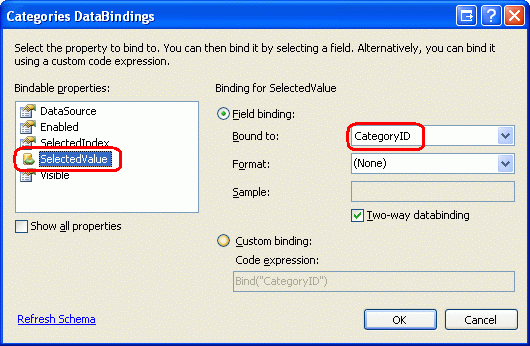
图 12:将 Product s CategoryID 值绑定到 DropDownList s SelectedValue 属性
最后一个问题是:如果产品未 CategoryID 指定值,则数据绑定语句 SelectedValue 将引发异常。 这是因为 DropDownList 仅包含类别的项,并且没有为具有 NULL 数据库值的 CategoryID这些产品提供选项。 若要解决此问题,请将 DropDownList s 属性设置为 True DropDownList 并将AppendDataBoundItems新项添加到 DropDownList,省Value略声明性语法中的属性。 也就是说,请确保 Categories DropDownList 的声明性语法如下所示:
<asp:DropDownList ID="Categories" runat="server" AppendDataBoundItems="True"
    DataSourceID="CategoriesDataSource" DataTextField="CategoryName"
    DataValueField="CategoryID" SelectedValue='<%# Bind("CategoryID") %>'>
    <asp:ListItem Value=">-- Select One --</asp:ListItem>
</asp:DropDownList>
请注意 ,“选择一个”属性Value如何<asp:ListItem Value="">显式设置为空字符串。 请参阅自定义数据修改接口教程,更深入地讨论为什么需要此附加 DropDownList 项来处理NULL大小写,以及为什么将Value属性分配给空字符串至关重要。
注意
此处存在潜在的性能和可伸缩性问题,值得一提。 由于每行都有一个 DropDownList,该 DropDownList 使用 CategoriesDataSource 其数据源, CategoriesBLL 因此每个页面访问的类 GetCategories 方法将调用 n 次,其中 n 是 GridView 中的行数。 这些 n 次调用会导致GetCategories对数据库的 n 个查询。 通过在每请求缓存中缓存返回的类别或使用 SQL 缓存依赖项或基于时间非常短的到期时间,来降低对数据库的影响。
步骤 4:完成编辑界面
我们对 GridView 模板进行了许多更改,无需暂停即可查看进度。 花点时间通过浏览器查看进度。 如图 13 所示,每行都使用包含 ItemTemplate单元格编辑界面的行呈现。

图 13:每个 GridView 行都是可编辑的(单击以查看全尺寸图像)
此时,我们应注意一些次要格式问题。 首先,请注意,该值 UnitPrice 包含四个小数点。 若要解决此问题,请返回到 UnitPrice TemplateField s, ItemTemplate 并从 TextBox 智能标记中单击“编辑 DataBindings”链接。 接下来,指定属性 Text 的格式应为数字。
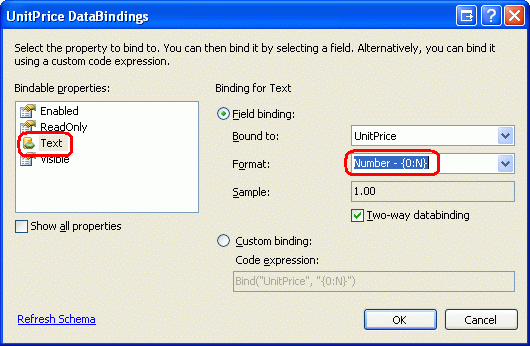
图 14:将 Text 属性格式化为数字
其次,让我们将复选框居中 Discontinued (而不是左对齐)。 单击 GridView 智能标记中的“编辑列”,然后 Discontinued 从左下角的字段列表中选择 TemplateField。 向下 ItemStyle 钻取属性并将其 HorizontalAlign 设置为中心,如图 15 所示。
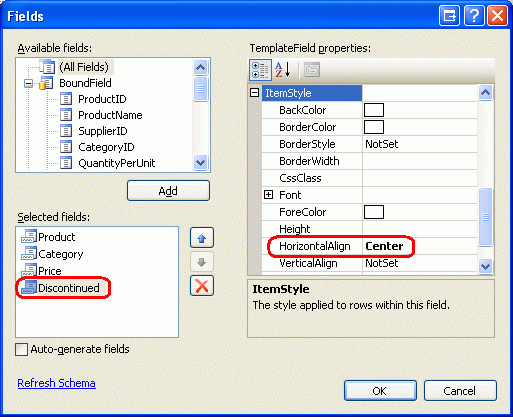
图 15:将 CheckBox 居中Discontinued
接下来,向页面添加 ValidationSummary 控件,并将其ShowMessageBox属性True设置为及其ShowSummary属性。False 此外,添加按钮 Web 控件,单击时,将更新用户的更改。 具体而言,添加两个按钮 Web 控件,一个在 GridView 上方,一个在它下面,将这两个控件 Text 属性设置为更新产品。
由于 GridView 的编辑界面在其 TemplateFields 中 ItemTemplate 定义, EditItemTemplate 因此 s 是多余的,可以删除。
在进行上述格式更改、添加按钮控件和删除不必要的 EditItemTemplate 设置后,页面的声明性语法应如下所示:
<p>
    <asp:Button ID="UpdateAllProducts1" runat="server" Text="Update Products" />
</p>
<p>
    <asp:GridView ID="ProductsGrid" runat="server" AutoGenerateColumns="False"
        DataKeyNames="ProductID" DataSourceID="ProductsDataSource"
        AllowPaging="True" AllowSorting="True">
        <Columns>
            <asp:TemplateField HeaderText="Product" SortExpression="ProductName">
                <ItemTemplate>
                    <asp:TextBox ID="ProductName" runat="server"
                        Text='<%# Bind("ProductName") %>'></asp:TextBox>
                    <asp:RequiredFieldValidator ID="RequiredFieldValidator1"
                        ControlToValidate="ProductName"
                        ErrorMessage="You must provide the product's name."
                        runat="server">*</asp:RequiredFieldValidator>
                </ItemTemplate>
            </asp:TemplateField>
            <asp:TemplateField HeaderText="Category"
                SortExpression="CategoryName">
                <ItemTemplate>
                    <asp:DropDownList ID="Categories" runat="server"
                        AppendDataBoundItems="True"
                        DataSourceID="CategoriesDataSource"
                        DataTextField="CategoryName"
                        DataValueField="CategoryID"
                        SelectedValue='<%# Bind("CategoryID") %>'>
                        <asp:ListItem>-- Select One --</asp:ListItem>
                    </asp:DropDownList>
                </ItemTemplate>
            </asp:TemplateField>
            <asp:TemplateField HeaderText="Price"
                SortExpression="UnitPrice">
                <ItemTemplate>
                    $<asp:TextBox ID="UnitPrice" runat="server" Columns="8"
                        Text='<%# Bind("UnitPrice", "{0:N}") %>'></asp:TextBox>
                    <asp:CompareValidator ID="CompareValidator1" runat="server"
                        ControlToValidate="UnitPrice"
                        ErrorMessage="You must enter a valid currency value.
                                      Please omit any currency symbols."
                        Operator="GreaterThanEqual" Type="Currency"
                        ValueToCompare="0">*</asp:CompareValidator>
                </ItemTemplate>
            </asp:TemplateField>
            <asp:TemplateField HeaderText="Discontinued" SortExpression="Discontinued">
                <ItemTemplate>
                    <asp:CheckBox ID="Discontinued" runat="server"
                        Checked='<%# Bind("Discontinued") %>' />
                </ItemTemplate>
                <ItemStyle HorizontalAlign="Center" />
            </asp:TemplateField>
        </Columns>
    </asp:GridView>
</p>
<p>
    <asp:Button ID="UpdateAllProducts2" runat="server" Text="Update Products" />
    <asp:ObjectDataSource ID="ProductsDataSource" runat="server"
        OldValuesParameterFormatString="original_{0}"
        SelectMethod="GetProducts" TypeName="ProductsBLL">
    </asp:ObjectDataSource>
    <asp:ObjectDataSource ID="CategoriesDataSource" runat="server"
        OldValuesParameterFormatString="original_{0}"
        SelectMethod="GetCategories" TypeName="CategoriesBLL">
    </asp:ObjectDataSource>
    <asp:ValidationSummary ID="ValidationSummary1" runat="server"
        ShowMessageBox="True" ShowSummary="False" />
</p>
图 16 显示了在添加按钮 Web 控件并更改格式设置后通过浏览器查看此页面。

图 16:页面现在包含两个更新产品按钮(单击以查看全尺寸图像)
步骤 5:更新产品
当用户访问此页面时,他们将进行修改,然后单击两个更新产品按钮之一。 此时,我们需要以某种方式将每一行的用户输入的值保存到一个 ProductsDataTable 实例中,然后将该值传递给 BLL 方法,然后将该 ProductsDataTable 实例传递给 DAL s UpdateWithTransaction 方法。 在UpdateWithTransaction前面的教程中创建的方法可确保将更改批处理更新为原子操作。
创建名为 BatchUpdate.aspx.vb 的方法并添加以下代码:
Private Sub BatchUpdate()
    ' Enumerate the GridView's Rows collection and create a ProductRow
    Dim productsAPI As New ProductsBLL()
    Dim products As Northwind.ProductsDataTable = productsAPI.GetProducts()
    For Each gvRow As GridViewRow In ProductsGrid.Rows
        ' Find the ProductsRow instance in products that maps to gvRow
        Dim productID As Integer = _
            Convert.ToInt32(ProductsGrid.DataKeys(gvRow.RowIndex).Value)
        Dim product As Northwind.ProductsRow = products.FindByProductID(productID)
        If product IsNot Nothing Then
            ' Programmatically access the form field elements in the
            ' current GridViewRow
            Dim productName As TextBox = _
                CType(gvRow.FindControl("ProductName"), TextBox)
            Dim categories As DropDownList = _
                CType(gvRow.FindControl("Categories"), DropDownList)
            Dim unitPrice As TextBox = _
                CType(gvRow.FindControl("UnitPrice"), TextBox)
            Dim discontinued As CheckBox = _
                CType(gvRow.FindControl("Discontinued"), CheckBox)
            ' Assign the user-entered values to the current ProductRow
            product.ProductName = productName.Text.Trim()
            If categories.SelectedIndex = 0 Then
                product.SetCategoryIDNull()
            Else
                product.CategoryID = Convert.ToInt32(categories.SelectedValue)
            End If
            If unitPrice.Text.Trim().Length = 0 Then
                product.SetUnitPriceNull()
            Else
                product.UnitPrice = Convert.ToDecimal(unitPrice.Text)
            End If
            product.Discontinued = discontinued.Checked
        End If
    Next
    ' Now have the BLL update the products data using a transaction
    productsAPI.UpdateWithTransaction(products)
End Sub
此方法首先通过调用 BLL 方法GetProducts将所有产品传回ProductsDataTable。 然后,它会枚举 ProductGrid GridView 集合Rows。 该 Rows 集合包含 GridViewRow GridView 中显示的每一行的实例 。 由于我们每页最多显示 10 行,因此 GridView 集合 Rows 的项数不超过 10 个。
对于每一行,将从 ProductID 集合中抓取 DataKeys ,并从中选择相应的 ProductsRow 值 ProductsDataTable。 以编程方式引用四个 TemplateField 输入控件及其分配给 ProductsRow 实例属性的值。 在每个 GridView 行的值都用于更新之后 ProductsDataTable,它将传递给 BLL s UpdateWithTransaction 方法,正如我们在前面的教程中看到的那样,只需调用 DAL 方法 UpdateWithTransaction 。
本教程使用的批处理更新算法会更新与 GridView 中的 ProductsDataTable 行对应的每一行,而不考虑产品信息是否已更改。 虽然此类盲目更新通常不是性能问题,但如果正在审核数据库表的更改,它们可能会导致多余的记录。 回到“执行批处理更新”教程中,我们探索了一个包含 DataList 的批处理更新接口,并添加了仅更新用户实际修改的记录的代码。 如果需要,可以随意使用执行 Batch 更新 中的技术来更新本教程中的代码。
注意
通过智能标记将数据源绑定到 GridView 时,Visual Studio 会自动将数据源的主键值(s)分配给 GridView 属性 DataKeyNames 。 如果未按照步骤 1 中所述,通过 GridView 智能标记将 ObjectDataSource 绑定到 GridView,则需要将 GridView 属性DataKeyNames手动设置为 ProductID,以便通过DataKeys集合访问ProductID每行的值。
中使用的 BatchUpdate 代码与 BLL 方法 UpdateProduct 中使用的代码类似,主要区别在于方法中 UpdateProduct 只有一个 ProductRow 实例从体系结构中检索。 分配该属性的代码ProductRow在方法与循环BatchUpdate中的For Each代码之间UpdateProducts是相同的,就像总体模式一样。
若要完成本教程,我们需要在 BatchUpdate 单击任一更新产品按钮时调用该方法。 为 Click 这两个 Button 控件的事件创建事件处理程序,并在事件处理程序中添加以下代码:
BatchUpdate()
ClientScript.RegisterStartupScript(Me.GetType(), "message", _
    "alert('The products have been updated.');", True)
首先调用 BatchUpdate。 接下来,该 ClientScript 属性 用于注入 JavaScript,用于显示读取产品已更新的消息框。
花点时间测试此代码。 浏览 BatchUpdate.aspx 浏览器,编辑多行,然后单击其中一个“更新产品”按钮。 假设没有输入验证错误,应会看到一个消息框,用于读取产品已更新。 若要验证更新的原子性,请考虑添加一个随机 CHECK 约束,就像禁止 UnitPrice 1234.56 的值一样。 然后,编辑 BatchUpdate.aspx一些记录,确保将产品 UnitPrice 值之一设置为禁止值(1234.56)。 单击“更新产品”时,该批处理操作期间的其他更改将回滚到其原始值时,这将导致错误。
替代BatchUpdate方法
BatchUpdate我们刚刚检查的方法从 BLL s GetProducts 方法检索所有产品,然后仅更新显示在 GridView 中的记录。 如果 GridView 不使用分页,但如果这样做,则可能有数百、数千或数万个产品,但 GridView 中只有十行,则此方法是理想的方法。 在这种情况下,仅从数据库获取所有产品以修改其中 10 个产品并不理想。
对于这些类型的情况,请考虑改用以下 BatchUpdateAlternate 方法:
Private Sub BatchUpdateAlternate()
    ' Enumerate the GridView's Rows collection and create a ProductRow
    Dim productsAPI As New ProductsBLL()
    Dim products As New Northwind.ProductsDataTable()
    For Each gvRow As GridViewRow In ProductsGrid.Rows
        ' Create a new ProductRow instance
        Dim productID As Integer = _
            Convert.ToInt32(ProductsGrid.DataKeys(gvRow.RowIndex).Value)
        Dim currentProductDataTable As Northwind.ProductsDataTable = _
            productsAPI.GetProductByProductID(productID)
        If currentProductDataTable.Rows.Count > 0 Then
            Dim product As Northwind.ProductsRow = currentProductDataTable(0)
            Dim productName As TextBox = _
                CType(gvRow.FindControl("ProductName"), TextBox)
            Dim categories As DropDownList = _
                CType(gvRow.FindControl("Categories"), DropDownList)
            Dim unitPrice As TextBox = _
                CType(gvRow.FindControl("UnitPrice"), TextBox)
            Dim discontinued As CheckBox = _
                CType(gvRow.FindControl("Discontinued"), CheckBox)
            ' Assign the user-entered values to the current ProductRow
            product.ProductName = productName.Text.Trim()
            If categories.SelectedIndex = 0 Then
                product.SetCategoryIDNull()
            Else
                product.CategoryID = Convert.ToInt32(categories.SelectedValue)
            End If
            If unitPrice.Text.Trim().Length = 0 Then
                product.SetUnitPriceNull()
            Else
                product.UnitPrice = Convert.ToDecimal(unitPrice.Text)
            End If
            product.Discontinued = discontinued.Checked
            ' Import the ProductRow into the products DataTable
            products.ImportRow(product)
        End If
    Next
    ' Now have the BLL update the products data using a transaction
    productsAPI.UpdateProductsWithTransaction(products)
End Sub
BatchMethodAlternate 首先创建一个名为 的新空 ProductsDataTable 名称 products。 然后,它逐步执行 GridView 集合 Rows ,并针对每一行使用 BLL 方法 GetProductByProductID(productID) 获取特定产品信息。 检索的ProductsRow实例的属性与更新后的属性相同BatchUpdate,但在更新行后,它通过 DataTable s ImportRow(DataRow) 方法导入该productsProductsDataTable行。
For Each循环完成后,products包含 GridView 中每一行的一个ProductsRow实例。 由于每个 ProductsRow 实例都已添加到 products (而不是更新),因此如果我们盲目地将其 UpdateWithTransaction 传递给方法,则会 ProductsTableAdapter 尝试将每个记录插入数据库中。 相反,我们需要指定已修改每一行(未添加)。
这可以通过将新方法添加到名为 UpdateProductsWithTransactionBLL 的 BLL 来实现。 UpdateProductsWithTransaction如下所示,设置RowStateProductsRow传入的每个实例ModifiedProductsDataTable,然后将该实例传递给 ProductsDataTable DAL s UpdateWithTransaction 方法。
Public Function UpdateProductsWithTransaction _
    (ByVal products As Northwind.ProductsDataTable) As Integer
    ' Mark each product as Modified
    products.AcceptChanges()
    For Each product As Northwind.ProductsRow In products
        product.SetModified()
    Next
    ' Update the data via a transaction
    Return UpdateWithTransaction(products)
End Function
总结
GridView 提供每行内置编辑功能,但不支持创建完全可编辑的接口。 正如我们在本教程中看到的,此类接口是可能的,但需要一些工作。 若要创建可编辑每一行的 GridView,我们需要将 GridView 字段转换为 TemplateFields,并在其中定义编辑接口 ItemTemplate 。 此外,必须将“全部更新”类型的按钮 Web 控件添加到页面,与 GridView 分开。 这些 Buttons Click 事件处理程序需要枚举 GridView 集合 Rows 、将更改存储在 a ProductsDataTable中,并将更新的信息传递到相应的 BLL 方法。
在下一教程中,我们将了解如何创建用于批量删除的接口。 具体而言,每个 GridView 行都将包含一个复选框,而不是“全部更新”类型按钮,我们将有“删除所选行”按钮。
快乐编程!
关于作者
斯科特·米切尔,七本 ASP/ASP.NET 书籍的作者和 4GuysFromRolla.com 的创始人,自1998年以来一直在与Microsoft Web 技术合作。 斯科特担任独立顾问、教练和作家。 他的最新书是 山姆斯在24小时内 ASP.NET 2.0。 他可以通过他的博客联系到mitchell@4GuysFromRolla.com他,可以在该博客中找到http://ScottOnWriting.NET。
特别感谢
本教程系列由许多有用的审阅者审阅。 本教程的主要审阅者是 Teresa Murphy 和 David Suru。 有兴趣查看即将发布的 MSDN 文章? 如果是这样,请把我扔一条线。mitchell@4GuysFromRolla.com