作者 :斯科特·米切尔
在本教程中,我们将为 DataList 创建更丰富的编辑界面,其中包括 DropDownList 和 CheckBox。
简介
DataList 中的 EditItemTemplate 标记和 Web 控件定义其可编辑的接口。 到目前为止,我们检查的所有可编辑 DataList 示例都由 TextBox Web 控件组成。 在 前面的教程 中,我们通过添加验证控件改进了编辑时用户体验。
可以进一步展开该 EditItemTemplate 控件以包括除 TextBox 以外的 Web 控件,例如 DropDownLists、RadioButtonLists、Calendars 等。 与 TextBoxes 一样,自定义编辑界面以包含其他 Web 控件时,请执行以下步骤:
- 将 Web 控件添加到 .
EditItemTemplate - 使用数据绑定语法将相应的数据字段值分配给相应的属性。
- 在事件处理程序中
UpdateCommand,以编程方式访问 Web 控件值并将其传递到相应的 BLL 方法中。
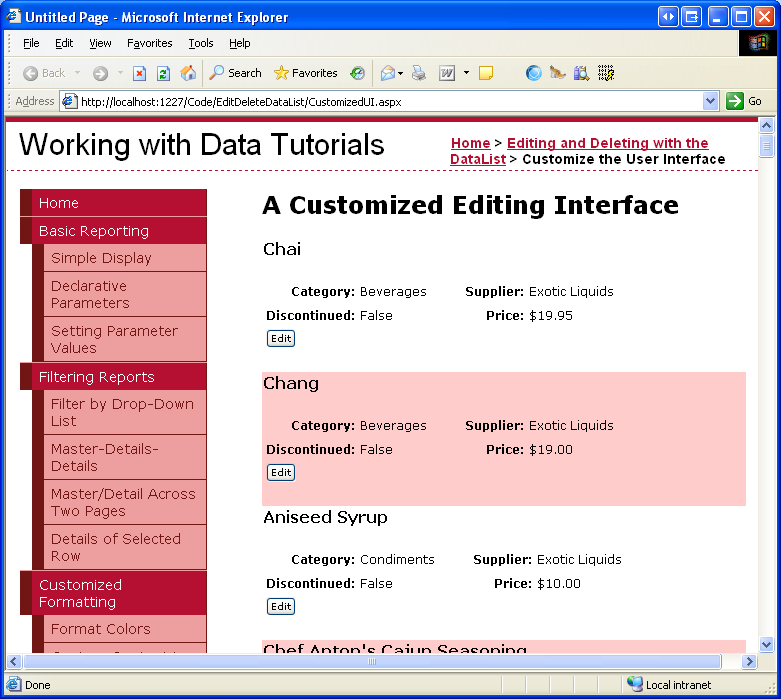
在本教程中,我们将为 DataList 创建更丰富的编辑界面,其中包括 DropDownList 和 CheckBox。 具体而言,我们将创建一个 DataList,其中列出了产品信息,并允许更新产品名称、供应商、类别和停止使用状态(请参阅图 1)。

图 1:编辑界面包括一个 TextBox、两个 DropDownList 和一个 CheckBox(单击以查看全尺寸图像)
步骤 1:显示产品信息
在创建 DataList 的可编辑接口之前,首先需要生成只读接口。 首先从文件夹打开CustomizedUI.aspx页面,然后从设计器向页面添加一个 DataList,并将其ID属性设置为 Products。EditDeleteDataList 从 DataList 的智能标记中创建新的 ObjectDataSource。 将此新的 ObjectDataSource ProductsDataSource 命名,并将其配置为从 ProductsBLL 类方法 GetProducts 检索数据。 与前面的可编辑 DataList 教程一样,我们将直接转到业务逻辑层来更新编辑的产品信息。 相应地,将 UPDATE、INSERT 和 DELETE 选项卡中的下拉列表设置为“无”。
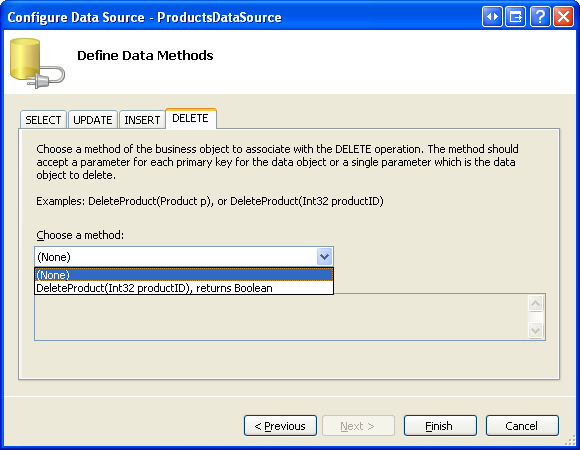
图 2:将 UPDATE、INSERT 和 DELETE 选项卡下拉列表设置为 (无) (单击可查看全尺寸图像)
配置 ObjectDataSource 后,Visual Studio 将为 DataList 创建一个默认值 ItemTemplate ,其中列出了返回的每个数据字段的名称和值。 修改模板 ItemTemplate ,以便模板在元素中 <h4> 列出产品名称以及类别名称、供应商名称、价格和已停用状态。 此外,添加“编辑”按钮,确保其 CommandName 属性设置为“编辑”。 我的 ItemTemplate 声明性标记如下:
<ItemTemplate>
    <h4>
        <asp:Label ID="ProductNameLabel" runat="server"
            Text='<%# Eval("ProductName") %>' />
    </h4>
    <table border="0">
        <tr>
            <td class="ProductPropertyLabel">Category:</td>
            <td class="ProductPropertyValue">
                <asp:Label ID="CategoryNameLabel" runat="server"
                    Text='<%# Eval("CategoryName") %>' />
            </td>
            <td class="ProductPropertyLabel">Supplier:</td>
            <td class="ProductPropertyValue">
                <asp:Label ID="SupplierNameLabel" runat="server"
                    Text='<%# Eval("SupplierName") %>' />
            </td>
        </tr>
        <tr>
            <td class="ProductPropertyLabel">Discontinued:</td>
            <td class="ProductPropertyValue">
                <asp:Label ID="DiscontinuedLabel" runat="server"
                    Text='<%# Eval("Discontinued") %>' />
            </td>
            <td class="ProductPropertyLabel">Price:</td>
            <td class="ProductPropertyValue">
                <asp:Label ID="UnitPriceLabel" runat="server"
                    Text='<%# Eval("UnitPrice", "{0:C}") %>' />
            </td>
        </tr>
        <tr>
            <td colspan="4">
                <asp:Button runat="Server" ID="EditButton"
                    Text="Edit" CommandName="Edit" />
            </td>
        </tr>
    </table>
    <br />
</ItemTemplate>
上述标记使用 <h4> 标题为产品名称和剩余字段的四列 <table> 来布局产品信息。 ProductPropertyLabel前面教程中已讨论过定义Styles.css类和 ProductPropertyValue CSS 类。 图 3 显示了通过浏览器查看时的进度。

图 3:显示每个产品的名称、供应商、类别、停用状态和价格(单击以查看全尺寸图像)
步骤 2:将 Web 控件添加到编辑界面
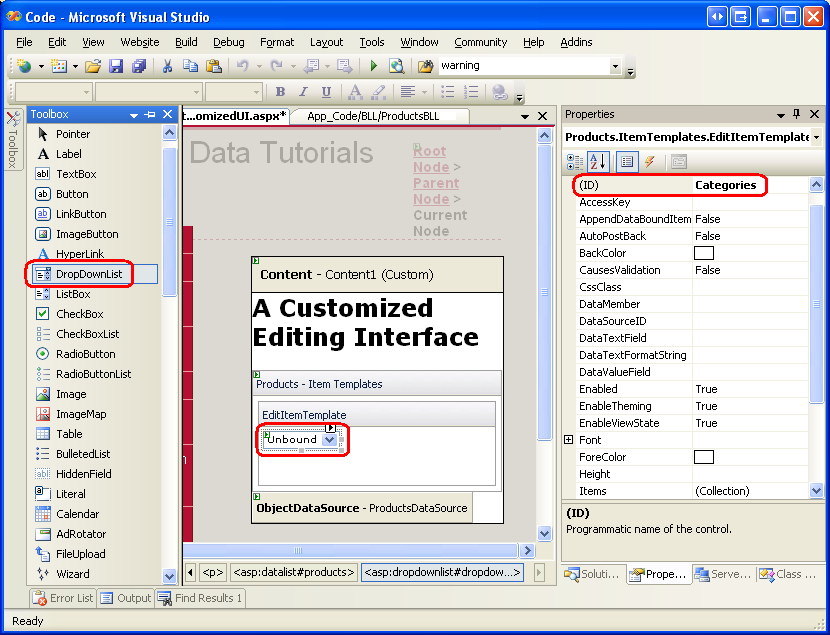
生成自定义 DataList 编辑界面的第一步是向 <
若要自定义编辑界面,请单击 DataList 智能标记中的“编辑模板”链接,然后从下拉列表中选择 EditItemTemplate 该选项。 将 DropDownList 添加到 EditItemTemplate 该列表并将其设置为 ID Categories.

图 4:为类别添加 DropDownList(单击以查看全尺寸图像)
接下来,从 DropDownList 的智能标记中,选择“选择数据源”选项并创建名为 CategoriesDataSource 的新 ObjectDataSource。 将此 ObjectDataSource 配置为使用 CategoriesBLL 类 s GetCategories() 方法(请参阅图 5)。 接下来,DropDownList 的数据源配置向导会提示数据字段用于每个 ListItem S Text 和 Value 属性。 让 DropDownList 显示 CategoryName 数据字段并使用 CategoryID 该值,如图 6 所示。
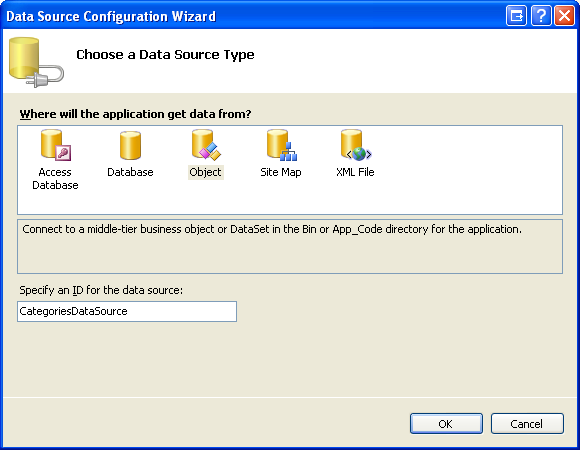
图 5:创建名为 CategoriesDataSource 的新 ObjectDataSource (单击可查看全尺寸图像)
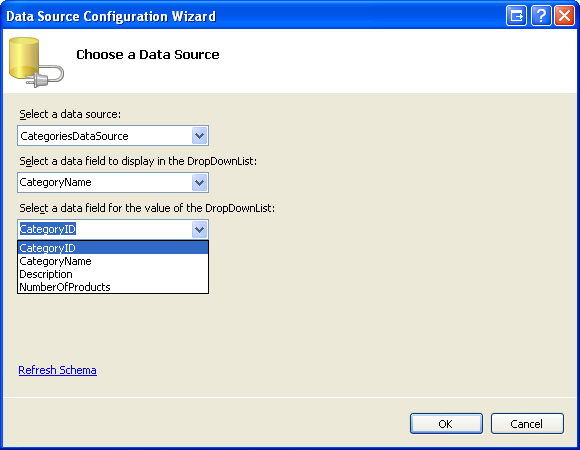
图 6:配置 DropDownList 的显示和值字段(单击以查看全尺寸图像)
重复这一系列步骤,为供应商创建 DropDownList。 将此 ID DropDownList 设置为 Suppliers 并将其命名为其 ObjectDataSource SuppliersDataSource。
添加两个 DropDownList 后,为已停用状态添加 CheckBox,并为产品名称添加 TextBox。 将 ID CheckBox 和 TextBox 的 s 分别设置为 Discontinued 和 ProductName设置。 添加 RequiredFieldValidator 以确保用户为产品名称提供值。
最后,添加“更新”和“取消”按钮。 请记住,对于这两个按钮,必须分别将其 CommandName 属性设置为“更新”和“取消”。
你可以随意布局编辑界面,但你喜欢。 我已选择从只读界面使用相同的四列 <table> 布局,如以下声明性语法和屏幕截图所示:
<EditItemTemplate>
    <h4>
        <asp:Label ID="ProductNameLabel" runat="server"
            Text='<%# Eval("ProductName") %>' />
    </h4>
    <table border="0">
        <tr>
            <td class="ProductPropertyLabel">Name:</td>
            <td colspan="3" class="ProductPropertyValue">
                <asp:TextBox runat="server" ID="ProductName" Width="90%" />
                <asp:RequiredFieldValidator ID="RequiredFieldValidator1"
                    ControlToValidate="ProductName"
                    ErrorMessage="You must enter a name for the product."
                    runat="server">*</asp:RequiredFieldValidator>
            </td>
        </tr>
        <tr>
            <td class="ProductPropertyLabel">Category:</td>
            <td class="ProductPropertyValue">
                <asp:DropDownList ID="Categories" runat="server"
                    DataSourceID="CategoriesDataSource"
                    DataTextField="CategoryName" DataValueField="CategoryID" />
            </td>
            <td class="ProductPropertyLabel">Supplier:</td>
            <td class="ProductPropertyValue">
                <asp:DropDownList ID="Suppliers"
                    DataSourceID="SuppliersDataSource" DataTextField="CompanyName"
                    DataValueField="SupplierID" runat="server" />
            </td>
        </tr>
        <tr>
            <td class="ProductPropertyLabel">Discontinued:</td>
            <td class="ProductPropertyValue">
                <asp:CheckBox runat="server" id="Discontinued" />
            </td>
            <td class="ProductPropertyLabel">Price:</td>
            <td class="ProductPropertyValue">
                <asp:Label ID="UnitPriceLabel" runat="server"
                    Text='<%# Eval("UnitPrice", "{0:C}") %>' />
            </td>
        </tr>
        <tr>
            <td colspan="4">
                <asp:Button runat="Server" ID="UpdateButton" CommandName="Update"
                    Text="Update" />

                <asp:Button runat="Server" ID="CancelButton" CommandName="Cancel"
                    Text="Cancel" CausesValidation="False" />
            </td>
        </tr>
    </table>
    <br />
    <asp:ObjectDataSource ID="CategoriesDataSource" runat="server"
        OldValuesParameterFormatString="original_{0}" SelectMethod="GetCategories"
        TypeName="CategoriesBLL">
    </asp:ObjectDataSource>
    <asp:ObjectDataSource ID="SuppliersDataSource" runat="server"
        OldValuesParameterFormatString="original_{0}" SelectMethod="GetSuppliers"
        TypeName="SuppliersBLL">
    </asp:ObjectDataSource>
</EditItemTemplate>

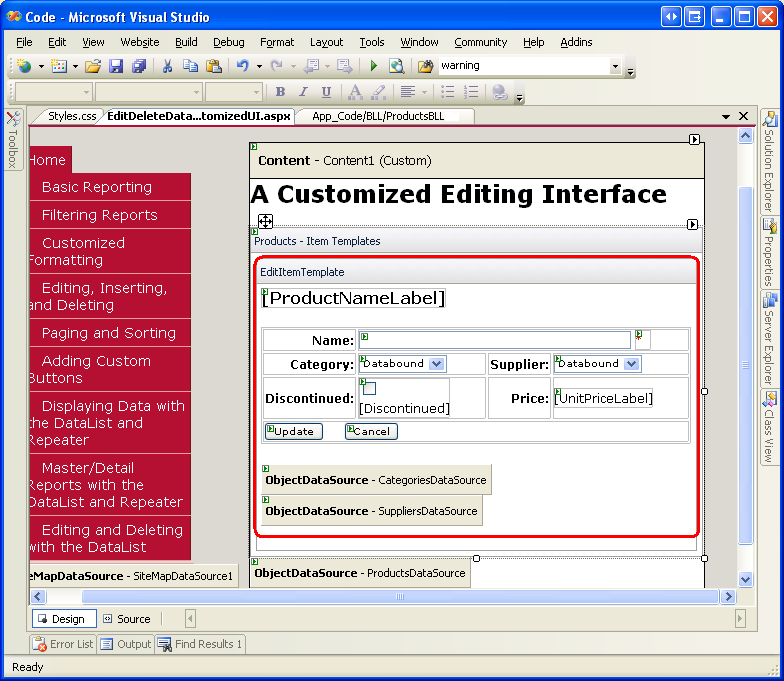
图 7:编辑界面布局类似于只读界面(单击以查看全尺寸图像)
步骤 3:创建 EditCommand 和 CancelCommand 事件处理程序
目前,除了UnitPriceLabel从ItemTemplate中逐字复制的数据绑定语法外,没有数据绑定语法EditItemTemplate。 我们将暂时添加数据绑定语法,但首先让我们为 DataList 和EditCommandCancelCommand事件创建事件处理程序。 回想一下,事件处理程序的责任 EditCommand 是呈现被单击其“编辑”按钮的 DataList 项的编辑界面,而 CancelCommand 该作业是将 DataList 返回到其预编辑状态。
创建这两个事件处理程序,并让它们使用以下代码:
Protected Sub Products_EditCommand(source As Object, e As DataListCommandEventArgs) _
    Handles Products.EditCommand
    ' Set the DataList's EditItemIndex property to the
    ' index of the DataListItem that was clicked
    Products.EditItemIndex = e.Item.ItemIndex
    ' Rebind the data to the DataList
    Products.DataBind()
End Sub
Protected Sub Products_CancelCommand(source As Object, e As DataListCommandEventArgs) _
    Handles Products.CancelCommand
    ' Set the DataList's EditItemIndex property to -1
    Products.EditItemIndex = -1
    ' Rebind the data to the DataList
    Products.DataBind()
End Sub
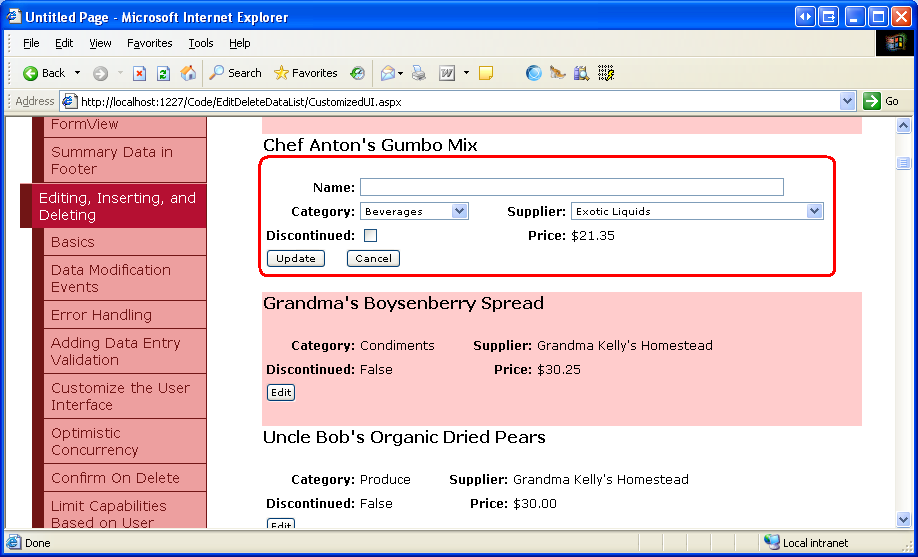
有了这两个事件处理程序,单击“编辑”按钮将显示编辑界面,然后单击“取消”按钮将编辑的项目返回到其只读模式。 图 8 显示“编辑”按钮在为 Chef Anton s Gumbo Mix 单击之后的 DataList。 由于尚未将任何数据绑定语法添加到编辑界面,因此 TextBox 为空、 ProductName Discontinued CheckBox 未选中,以及从 Categories Suppliers DropDownLists 中选择的第一个项目。

图 8:单击“编辑”按钮显示编辑界面(单击以查看全尺寸图像)
步骤 4:将 DataBinding 语法添加到编辑接口
若要让编辑界面显示当前产品的值,我们需要使用数据绑定语法将数据字段值分配给相应的 Web 控件值。 可以通过设计器应用数据绑定语法,方法是转到“编辑模板”屏幕,并从 Web 控件智能标记中选择“编辑 DataBindings”链接。 或者,可以将数据绑定语法直接添加到声明性标记。
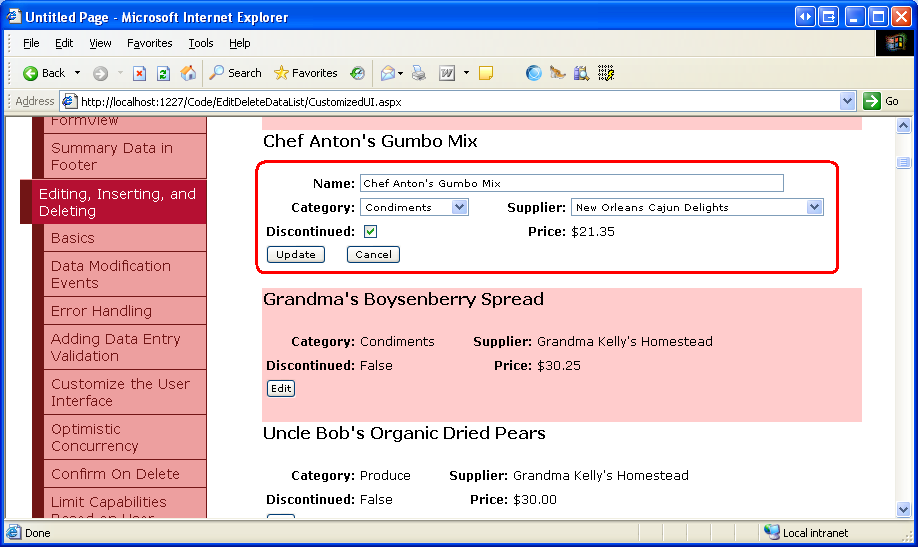
将ProductName数据字段值分配给 ProductName TextBox s Text 属性、SupplierID CategoryID Data 字段值以及 Categories Suppliers DropDownLists SelectedValue 属性,并将Discontinued数据字段值分配给 Discontinued CheckBox s Checked 属性。 进行这些更改后,通过设计器或直接通过声明性标记重新访问页面,然后通过浏览器重新访问页面,然后单击 Chef Anton s Gumbo Mix 的“编辑”按钮。 如图 9 所示,数据绑定语法已将当前值添加到 TextBox、DropDownLists 和 CheckBox 中。

图 9:单击“编辑”按钮显示编辑界面(单击以查看全尺寸图像)
步骤 5:在 UpdateCommand 事件处理程序中保存用户的更改
当用户编辑产品并单击“更新”按钮时,将发生回发,并且 DataList 的事件 UpdateCommand 会触发。 在事件处理程序中,我们需要从 Web 控件中 EditItemTemplate 读取值,并使用 BLL 接口更新数据库中的产品。 如前一教程所示, ProductID 可通过集合访问 DataKeys 更新的产品。 通过以编程方式引用 Web 控件 FindControl("controlID")来访问用户输入的字段,如以下代码所示:
Protected Sub Products_UpdateCommand(source As Object, e As DataListCommandEventArgs) _
    Handles Products.UpdateCommand
    If Not Page.IsValid Then
        Exit Sub
    End If
    ' Read in the ProductID from the DataKeys collection
    Dim productID As Integer = Convert.ToInt32(Products.DataKeys(e.Item.ItemIndex))
    ' Read in the product name and price values
    Dim productName As TextBox = CType(e.Item.FindControl("ProductName"), TextBox)
    Dim categories As DropDownList=CType(e.Item.FindControl("Categories"), DropDownList)
    Dim suppliers As DropDownList = CType(e.Item.FindControl("Suppliers"), DropDownList)
    Dim discontinued As CheckBox = CType(e.Item.FindControl("Discontinued"), CheckBox)
    Dim productNameValue As String = Nothing
    If productName.Text.Trim().Length > 0 Then
        productNameValue = productName.Text.Trim()
    End If
    Dim categoryIDValue As Integer = Convert.ToInt32(categories.SelectedValue)
    Dim supplierIDValue As Integer = Convert.ToInt32(suppliers.SelectedValue)
    Dim discontinuedValue As Boolean = discontinued.Checked
    ' Call the ProductsBLL's UpdateProduct method...
    Dim productsAPI As New ProductsBLL()
    productsAPI.UpdateProduct(productNameValue, categoryIDValue, supplierIDValue, _
        discontinuedValue, productID)
    ' Revert the DataList back to its pre-editing state
    Products.EditItemIndex = -1
    Products.DataBind()
End Sub
代码首先咨询 Page.IsValid 属性,以确保页面上的所有验证控件都有效。 True如果是Page.IsValid,则从DataKeys集合中读取编辑的产品ProductID值,并且以编程方式引用其中EditItemTemplate的数据输入 Web 控件。 接下来,这些 Web 控件中的值将读取到变量中,然后传递到相应的 UpdateProduct 重载中。 更新数据后,DataList 将返回到其预编辑状态。
注意
我省略了在处理 BLL 和 DAL 级异常教程中添加的异常处理逻辑,以便保持代码和此示例的焦点。 作为练习,在完成本教程后添加此功能。
步骤 6:处理 NULL CategoryID 和 SupplierID 值
Northwind 数据库允许NULL表ProductsCategoryID和SupplierID列的值。 但是,我们的编辑界面当前不能容纳 NULL 值。 如果尝试编辑具有NULL其值或SupplierID列的产品,则会收到ArgumentOutOfRangeException类似于“Categories”的错误消息,该错误消息无效,因为它不存在于项列表中。 CategoryID此外,目前无法将产品类别或供应商值从非NULL值更改为非NULL值。
若要支持 NULL 类别和供应商 DropDownLists 的值,我们需要添加一个附加 ListItem值。 我已选择将 (None) 用作 Text 此值 ListItem,但如果愿意,则可以将其更改为其他内容(如空字符串)。 最后,请记住将 DropDownList 设置为AppendDataBoundItemsTrue;如果忘记这样做,绑定到 DropDownList 的类别和供应商将覆盖静态添加ListItem的类别和供应商。
进行这些更改后,DataList s EditItemTemplate 中的 DropDownLists 标记应如下所示:
<asp:DropDownList ID="Categories" DataSourceID="CategoriesDataSource"
    DataTextField="CategoryName" DataValueField="CategoryID"  runat="server"
    SelectedValue='<%# Eval("CategoryID") %>' AppendDataBoundItems="True">
    <asp:ListItem Value=" Selected="True">(None)</asp:ListItem>
</asp:DropDownList>
...
<asp:DropDownList ID="Suppliers" DataSourceID="SuppliersDataSource"
    DataTextField="CompanyName" DataValueField="SupplierID" runat="server"
    SelectedValue='<%# Eval("SupplierID") %>' AppendDataBoundItems="True">
    <asp:ListItem Value=" Selected="True">(None)</asp:ListItem>
</asp:DropDownList>
注意
静态 ListItem s 可以通过设计器或直接通过声明性语法添加到 DropDownList。 添加 DropDownList 项来表示数据库 NULL 值时,请务必通过声明性语法添加 ListItem 。 如果在设计器中使用 ListItem 集合编辑器,则生成的声明性语法将在分配空白字符串时完全省略 Value 该设置,从而创建声明性标记,如下所示 <asp:ListItem>(None)</asp:ListItem>。 虽然这看起来可能无害,但缺失 Value 会导致 DropDownList 在其位置使用 Text 属性值。 这意味着,如果选择了此值NULLListItem,则会尝试将值 (None) 分配给产品数据字段(CategoryID或SupplierID本教程中),这将导致异常。 通过显式设置Value="",在选择产品数据字段时NULLListItem,将向产品数据字段分配一个NULL值。
花点时间通过浏览器查看进度。 编辑产品时,请注意 Categories Suppliers DropDownList 和 DropDownList 在 DropDownList 的开头都有一个 (None) 选项。
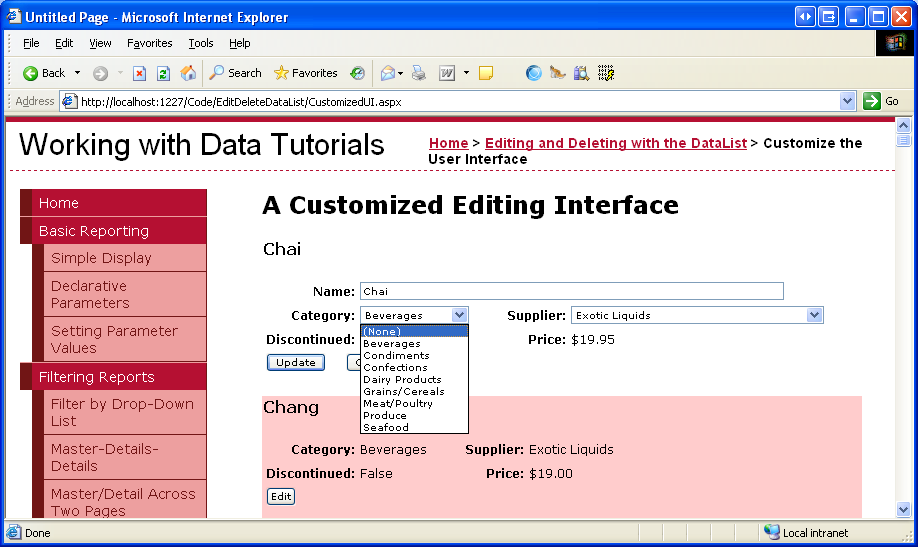
图 10:和 DropDownLists 包括一个 (无) 选项 (单击以查看全尺寸图像)Suppliers Categories
若要将 “无” 选项保存为数据库 NULL 值,需要返回到 UpdateCommand 事件处理程序。 将categoryIDValue变量supplierIDValue更改为可为 null 的整数,并仅当 DropDownList s SelectedValue 不是空字符串时才为其赋值Nothing:
Dim categoryIDValue As Nullable(Of Integer) = Nothing
If Not String.IsNullOrEmpty(categories.SelectedValue) Then
    categoryIDValue = Convert.ToInt32(categories.SelectedValue)
End If
Dim supplierIDValue As Nullable(Of Integer) = Nothing
If Not String.IsNullOrEmpty(suppliers.SelectedValue) Then
    supplierIDValue = Convert.ToInt32(suppliers.SelectedValue)
End If
通过此更改,如果用户从任一下拉列表中选择了与数据库值相对应的 NULL (None) 选项,则会将值Nothing传递到 UpdateProduct BLL 方法中。
总结
在本教程中,我们了解了如何创建更复杂的 DataList 编辑界面,其中包括 TextBox、两个 DropDownList 和 CheckBox 以及验证控件的三个不同的输入 Web 控件。 生成编辑界面时,无论使用的 Web 控件如何,这些步骤都是相同的:首先将 Web 控件添加到 DataList s EditItemTemplate;使用数据绑定语法向相应的 Web 控件属性分配相应的数据字段值;在事件处理程序中 UpdateCommand ,以编程方式访问 Web 控件及其相应属性, 将其值传递到 BLL。
创建编辑界面时,无论它只由 TextBox 或不同 Web 控件的集合组成,都必须正确处理数据库 NULL 值。 在考虑 NULL s 时,必须不仅在编辑界面中正确显示现有 NULL 值,而且必须提供将值 NULL标记为的方法。 对于 DataLists 中的 DropDownLists,这通常意味着添加一个静态 ListItem ,其 Value 属性显式设置为空字符串(Value=""),并将一些代码添加到 UpdateCommand 事件处理程序,以确定是否 NULL``ListItem 选择了该字符串。
快乐编程!
关于作者
斯科特·米切尔,七本 ASP/ASP.NET 书籍的作者和 4GuysFromRolla.com 的创始人,自1998年以来一直在与Microsoft Web 技术合作。 斯科特担任独立顾问、教练和作家。 他的最新书是 山姆斯在24小时内 ASP.NET 2.0。 他可以通过他的博客联系到mitchell@4GuysFromRolla.com他,可以在该博客中找到http://ScottOnWriting.NET。
特别感谢
本教程系列由许多有用的审阅者审阅。 本教程的主要审阅者是丹尼斯·帕特森、大卫·苏鲁和兰迪·施密特。 有兴趣查看即将发布的 MSDN 文章? 如果是这样,请把我扔一条线。mitchell@4GuysFromRolla.com