Use the Deploy to Azure Button for your Parse Migration
I was thrilled to have participated in assembling the recent guidance to help Parse-hosted app developers move their cloud code and data to Azure, including authoring the very popular post Azure welcomes Parse developers. This guidance was the culmination, starting with the shocking announcement about Facebook’s shutting-down Parse, of a wild weekend working with some very smart developers on the Azure App Service team to get the Parse server running seamlessly on Azure App Service.
 While I was happy with the post overall, there was one nifty bit of work that didn’t get featured. As part of the effort, the team created a App Service deployment template, which is basically a hosted site for creating a new app service and deploying the Parse server from the GitHub repo to the new site all in a single step. (If you recall, creating a new app service took quite a few steps.) This deployment is triggered by the Deploy to Azure button, which you may have seen in other samples in the Azure repos. If you were wondering, the deployment is powered by Azure Resource Manager.
One of the best parts about the deploy button is that you can even pick the pricing tier for the newly created App Service plan as part of the template. Basically, the deploy button replaces these three manual sections in the original blog post:
- Create a new backend in App Service
- Clone the Parse server repo and deploy to Azure
- Configure the backend
Here’s the streamlined procedure using the Deploy to Azure button:
- Fork the Azure Parse server example project in GitHub into your GitHub account, then click Deploy to Azure.

This displays the Deploy to Azure wizard. - Complete the deployment template to create a new resource group. Choose a meaningful Site Name and Resource Group Name for your new web app, then click Next.

In this template, SKU determines the pricing tier for the App Service plan for your resource group. Also, when you supply Mongo Connection String, Parse App ID and Parse Master Key values in this template, they become environment variables stored securely in App Service (not on your local machine or in a repo). - The deployment template confirms that you you are about to create and deploy a new web app based on the Parse server example repo. When you are ready, click Deploy.

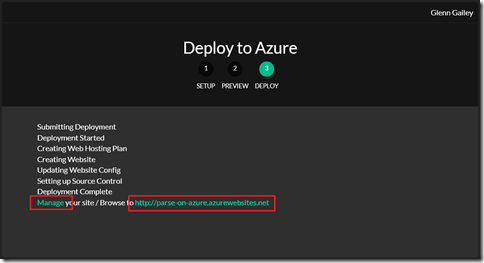
That’s it! - After deployment completes successfully, you will see the URL for your new service. Click Manage to navigate to your new backend in the Azure portal.

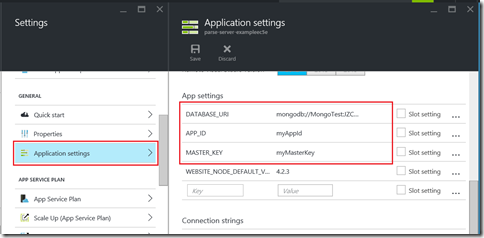
- Click All settings > Application settings and scroll down the in the Application settings blade to App settings.

Notice that the MongoDB and Parse keys you provided earlier are now are stored as app settings.
At this point, you can go back to the main procedure starting with Try out the Hello World. If you find any issues using the deployment button, please let the Azure team in in the Mobile forums.
Even cooler is that the Deploy to Azure button got accepted into the main ParsePlatform/parse-server-example repo:
This is pretty great stuff, and it’s awesome that it came together so fast. I’ve traditionally been mostly a .NET developer, but I have to say that there is something about an open and collaborative platform like Node.js where it seems like things can just get done faster.
Cheers!
