Setting up Application Gateway with an App Service that uses Azure Active Directory Authentication and URL Authorization Rules
This blog post is an optional extension of my previous post about properly configuring an Azure App Service using authentication behind an Azure Application Gateway. In the previous post, we had the whole App Service covered by Azure App Service Authentication. For this post, I will show you how to use a Preview feature to have a health check page not covered by authentication, allowing you to adjust the expected response code being returned by your App Service. If you haven’t gone through my other blog post, do that first: https://blogs.msdn.microsoft.com/waws/2017/11/21/setting-up-application-gateway-with-an-app-service-that-uses-azure-active-directory-authentication/.
Configuration on the App Service
We are going to be using a similar method to what is discussed in this blog: https://blogs.msdn.microsoft.com/jpsanders/2017/02/06/azure-traffic-manager-probe-degraded-due-to-401-from-azure-web-app/. We are instead going to use this for our Application Gateway configuration. Please note that the feature we will use is in Preview, but this is just one way to do the action.
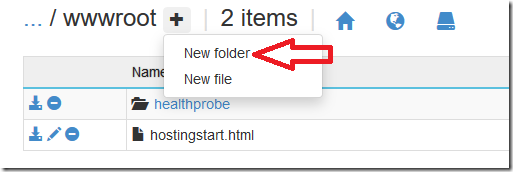
Go to the Kudu endpoint of your App Service at https://<app_name>.scm.azurewebsites.net/. From there, go to the console by going to “Debug console” and then clicking on “CMD”. In the file directory there, go to the d:\home\site\wwwroot folder. We will create a folder called “healthprobe” here by clicking on the plus icon next to the “wwwroot” name and selecting “New folder”.
After creating the new folder, click on it to browse into the folder. In here we will create a new file named “probe.html”. After the file is created, click on the pencil icon to the left of the file name to add some text into the file. Any text will do. I put “Health probe check” into mine. Once you are done editing the file, click “Save” to save the file.
Once we have the file created, go back to the wwwroot folder. Here we will follow the above blog and create the “authorization.json” file in this folder to help with routing of the requests. In this file, I have set up the following routes:
{
"routes": [{
"path_prefix": "/",
"policies": { "unauthenticated_action": "RedirectToLoginPage" }
},{
"path_prefix": "/healthprobe",
"policies": { "unauthenticated_action": "AllowAnonymous" }
}]
}
This will allow anything under the “healthprobe” folder we created to allow anonymous requests, but it will require the rest of the site to redirect to our Azure Active Directory authentication.
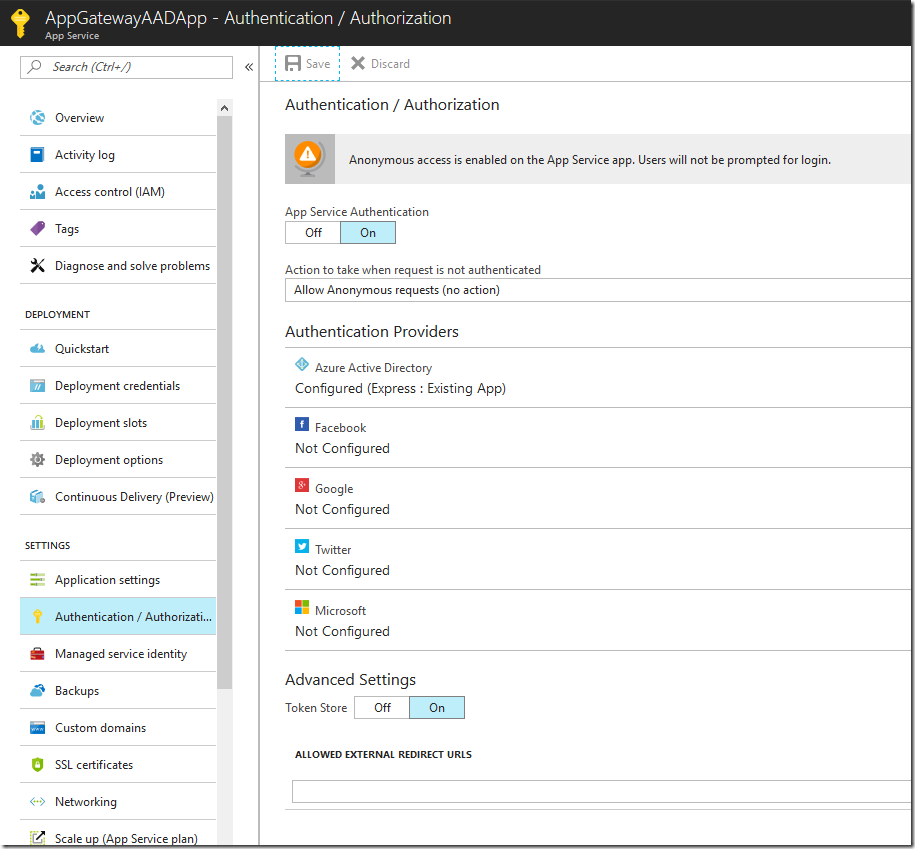
The final step for us is to change our App Service’s “Authentication / Authorization” setting to allow anonymous requests for any unauthenticated request. This will allow the authorization rules to work properly.
Configuring the Application Gateway
With adjusting the App Service to allow for an unauthenticated path, we need to adjust our Application Gateway configuration to use the file in that path as the health probe endpoint. The PowerShell has been updated to check for a different status code range as well as the different path. Here is that script:
 # FQDN of the web app
$webappFQDN = "<enter your webapp FQDN i.e mywebsite.azurewebsites.net>"

# Retrieve an existing application gateway
$gw = Get-AzureRmApplicationGateway -Name AppGatewayAAD -ResourceGroupName AppGatewayAADBlog

# Define the status codes to match for the probe
$match=New-AzureRmApplicationGatewayProbeHealthResponseMatch -StatusCode 200-399

# Add a new probe to the application gateway
Add-AzureRmApplicationGatewayProbeConfig -name AppGatewayAADProbe -ApplicationGateway $gw -Protocol Https -Path /healthprobe/probe.html -Interval 30 -Timeout 120 -UnhealthyThreshold 3 -PickHostNameFromBackendHttpSettings -Match $match

# Retrieve the newly added probe
$probe = Get-AzureRmApplicationGatewayProbeConfig -name AppGatewayAADProbe -ApplicationGateway $gw

# Configure an existing backend http settings
Set-AzureRmApplicationGatewayBackendHttpSettings -Name appGatewayBackendHttpSettings -ApplicationGateway $gw -HostName "<enter your custom domain i.e www.contoso.com>" -Port 443 -Protocol https -CookieBasedAffinity Disabled -RequestTimeout 30 -Probe $probe

# Add the web app to the backend pool
Set-AzureRmApplicationGatewayBackendAddressPool -Name appGatewayBackendPool -ApplicationGateway $gw -BackendFqdns $webappFQDN

# Update the application gateway
Set-AzureRmApplicationGateway -ApplicationGateway $gw
Note that we didn’t change anything else about the configuration from the previous blog, just the probe information.
At this point, if you followed the previous blog post and did this optional configuration, you should be all set. Browse to your custom domain over HTTPS, authenticate, and browse your App Service through your Application Gateway.

