Consuming secure Azure websites using Salesforce’s Lightning Connect
Salesforce’s Lightning Connect easily integrate external oData data with Salesforce. A good step-by-step blog on how to build WCF oData Service and how to deploy to Azure is here
In this blog I am going to show you how to enable Azure AD authentication on your oData Service and how to configure oAuth settings in Salesforce.com website.
Here are the high-level steps
- Create an Azure Website
- Set Website Authentication to Azure AD
- Create a new Azure AD App for Salesforce.com
- Create an Auth provider in Salesforce.com website
- Create an External Data Source
Create Azure Website
- Log into portal.azure.com
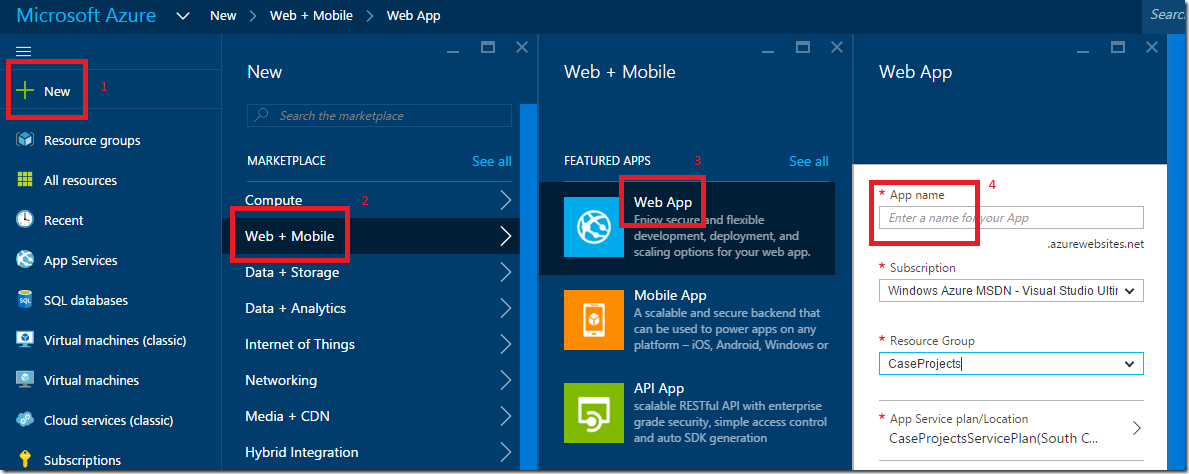
- Click on the + and select “Web +Mobile” | “Web App”
- Give a name
- Click create
- Deploy your WCF oData application
- No need to add any authentication within your application code (Azure will take care of authentication)
Set website authentication to Azure AD
- Once this website is created
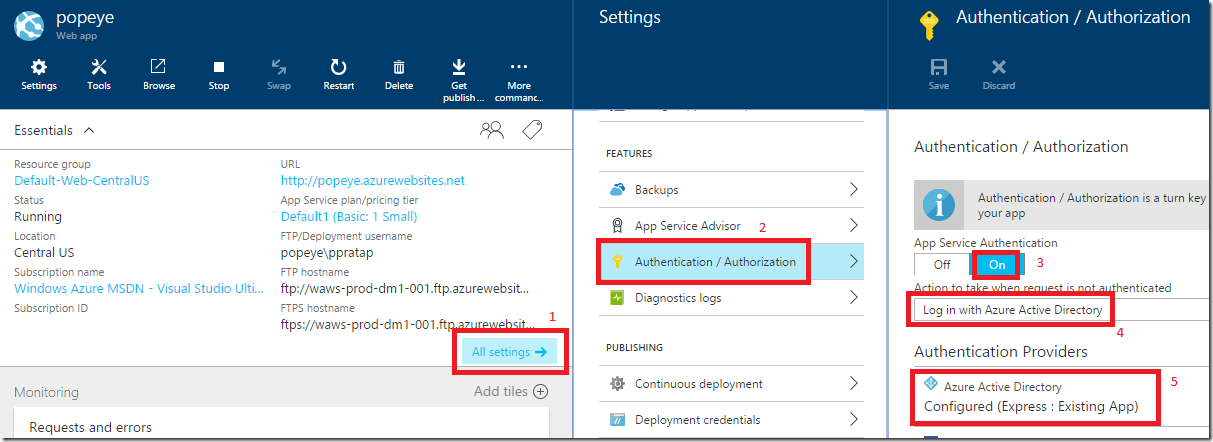
- Click on the “All Settings”
- Click on the “Authentication / Authorization”
- Turn on “App Service Authentication”
- Select “Log in with Azure Active Directory”
- Click on the configure in Azure Active Directory
- You can click on “Express” and create a new Azure AD App
- Or select an existing Azure AD app
Create a new Auth Provider in Salesforce.com
- Log into developer.force.com
- In the quick find textbox, type auth providers
- Click on Auth. Providers
- Click on New button
- Select “Microsoft Access Control Service” as Provider Type
- Entry dump values for rest of the textboxes for now
- Click save button
- Copy the Auth and callback URLs
Create a new Azure AD App for Salesforce
- In the Azure portal, click on Browse on the left menu and click on “Active Directory” to goto Azure AD
- Click on Applications
- Click on the Add button at the bottom middle
- Select “add an application my organization is developing”
- Click next
- In the name textbox, type salesforce
- Select “Web application” checkbox
- Click next
- In the sign-on url and app id url, we need to enter the Salesforce Auth provider callback urls as shown below
Create key for this new Salesforce AD App
- Once this AD app is created
- Add this below Reply url from Salesforce Auth provider
- Click Save button
- In the keys section, select the one year dropdown box and hit save
- Copy the KEY to a notepad
- In the “permissions to other applications”
- Click on the “add application” button
- Search for the app we created during in step#2 (website AD app)
- Set the delegated permissions, check on the “access <website AD app>”
- Click on the save button
Update Salesforce settings
- In the auth provider, enter client id and secret key of the salesforce AD App (and not the website AD App)
- In the authorize Endpoint URL, we need to provide the resource id as shown below
- Now use this updated auth provider in the external data source
Two key points are :
1. We need to create two Azure AD Apps. One for our Azure oData Website and another for Salesforce.com. The reason we need to create two accounts is, first account is for the resource and second account is for user to access that resource. We need to tell Azure AD that a resource (oData website) needs authentication, so we create the first account for oData Website. In Azure AD, we are going to list all users who can access this oData website. One of the user is Salesforce.com, so we create a second account. We provide this second account’s clientid/key to salesforce.com so that salesforce.com website can impersonate as second account and access our oData website. If you configure salesforce.com website to use the first account’s clientid/key, Azure AD will say error “I verified that you are xyz and now you are asking permission to access yourself?”
2. In the Salesforce.com Auth provider, we need to provide the resource id i.e. in the oAuth authorize URL i.e. we need to add the query string ?resource=https%3A%2F%2Fpopeye.azurewebsites.net. There is a MSDN documentation bug which says resource parameter is optional https://msdn.microsoft.com/en-us/library/azure/dn645542.aspx


