Windows Phone 8.1 in Kiosk Mode (Assigned Access) using Intune and ConfigMgr
It’s possible to configure Windows Phone 8.1 in kiosk mode, allowing you to only allow specific settings/applications and hiding all the other stuff. In this post I will explain how to achieve just that. A big thanks goes out to Mike Danoski form our GBS department who came up with all the content – all credits should go to him.
Overview: Customize a XML that enables Assigned Access (Kiosk mode). This will lock the phone down to specified applications and feature list. The XML must be pushed using System Center Configuration Manger 2012 R2 together with the Windows Intune connector.
The picture below is what the device boots to and cannot navigate away from. This is specified by the XML we pushed. This can be configured to work for a specific app or set of apps on the device. The other installed apps are still on the phone, but cannot be accessed.
Open ConfigMgr and navigate to the Configuration Item (CI) section
Choose to configure a new Configuration Item:
Name and describe the configuration item. Target “Mobile device” and hit next.
Select “Configure additional setting…” and hit Next.
Hit the “Add” button
Choose “Create Setting”
In the settings shown above, enter the following details:
Name – Can be anything
Description - Can be anything
Setting type - OMA URI
Data type - string
OMA-URI - ./Vendor/MSFT/EnterpriseAssignedAccess/AssignedAccess/AssignedAccessXml (This is case sensitive!)
Hit “Ok”
In the target platforms select “Windows Phone 8.1” and hit Next until you reach the summary page.
Finish the Configuration Item by choosing “Close”
The next step is to right click the new Configuration Item and choose “Properties”
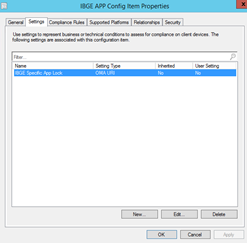
Hit the “Settings” tab, select the new setting and click “Edit”
Navigate to the “Compliance Rules” tab and select “New”
Name – Can be anything
Description - Can be anything
Rule Type – Value
Make sure “Equals” is select in the dropdown list-box.
Paste the following XML formatted to a single line in standard XML format using the default tags like “< >”.
Do NOT use tags like < >.
Configuration Manager will automatically convert this to an embedded XML when it processes the Configuration Item.
Example xml to limit to settings and about phone, WiFi, and feedback. Also disables the search button.
<?xml version="1.0" encoding="utf-8"?>
<HandheldLockdown version="1.0">
<Default>
<ActionCenter enabled="true" />
<Apps>
<Application productId="{5B04B775-356B-4AA0-AAF8-6491FFEA5601}" autoRun="true">
<PinToStart>
<Size>Medium</Size>
<Location>
<LocationX>0</LocationX>
<LocationY>0</LocationY>
</Location>
</PinToStart>
</Application>
</Apps>
<Buttons>
<ButtonLockdownList>
<!-- Lockdown all buttons –>
<Button name="Search">
<ButtonEvent name="Press" />
<ButtonEvent name="PressAndHold" />
</Button>
<Button name="Camera">
<ButtonEvent name="Press" />
<ButtonEvent name="PressAndHold" />
</Button>
<Button name="Custom1">
<ButtonEvent name="Press" />
<ButtonEvent name="PressAndHold" />
</Button>
<Button name="Custom2">
<ButtonEvent name="Press" />
<ButtonEvent name="PressAndHold" />
</Button>
<Button name="Custom3">
<ButtonEvent name="Press" />
<ButtonEvent name="PressAndHold" />
</Button>
</ButtonLockdownList>
<ButtonRemapList />
</Buttons> <MenuItems>
<DisableMenuItems />
</MenuItems>
<Settings>
<System name="Microsoft.WiFi" />
<System name="Microsoft.About" />
<System name="Microsoft.Feedback" /
</Settings>
<StartScreenSize>Small</StartScreenSize>
</Default>
</HandheldLockdown>
For use, this needs to be formatted to one line.
<?xml version="1.0" encoding="utf-8"?><HandheldLockdown version="1.0"> <Default> <ActionCenter enabled="true" /> <Apps> <Application productId="{5B04B775-356B-4AA0-AAF8-6491FFEA5601}" autoRun="true"> <PinToStart> <Size>Medium</Size> <Location> <LocationX>0</LocationX> <LocationY>0</LocationY> </Location> </PinToStart> </Application> </Apps><Buttons> <ButtonLockdownList> <!-- Lockdown all buttons --> <Button name="Search"> <ButtonEvent name="Press" /> <ButtonEvent name="PressAndHold" /> </Button> <Button name="Camera"> <ButtonEvent name="Press" /> <ButtonEvent name="PressAndHold" /> </Button> <Button name="Custom1"> <ButtonEvent name="Press" /> <ButtonEvent name="PressAndHold" /> </Button> <Button name="Custom2"> <ButtonEvent name="Press" /> <ButtonEvent name="PressAndHold" /> </Button> <Button name="Custom3"> <ButtonEvent name="Press" /> <ButtonEvent name="PressAndHold" /> </Button> </ButtonLockdownList> <ButtonRemapList /> </Buttons> <MenuItems> <DisableMenuItems /> </MenuItems> <Settings> <System name="Microsoft.WiFi" /> <System name="Microsoft.About" /> <System name="Microsoft.Feedback" /> </Settings> <StartScreenSize>Small</StartScreenSize> </Default> </HandheldLockdown>
After that the Configuration Item should be complete and is ready to be wrapped up in a Baseline.
Add to CI to a Baseline and deploy this to the target User Group.
Have fun! In case this information helped, please consider leaving a reply.
Comments
- Anonymous
January 01, 2003
The comment has been removed - Anonymous
January 01, 2003
Hello Pieter,
Has this been released in Intune Standalone? How do I go about configuring it? - Anonymous
October 12, 2014
Thanks Pieter! Excellent stuff - Anonymous
November 03, 2014
One option could be to wait a few months for this to be configured via Intune Standalone, you do not need to invest in any infrastructure. I've never heard about another option to configure this outside of the MDM channel but ill ask around. - Anonymous
April 19, 2015
Same thing here... mms did you find a better way?
Thanks. - Anonymous
June 30, 2015
This feature shall be available since February 2015 in Intune Standalone - Anonymous
April 12, 2016
Has this feature been published yet?


