Tip of the Day: Configuring VPN Profiles using the SCCM/WMI Bridge – Part 4
Today’s Tip…
In today’s tip we will finish the VPN script, considerations include:
- Providing the Profile name
- Providing the ParentID for the ProfileXML property
- Providing the escaped formatted profile XML
- Making sure all this executes properly at runtime
Adding the Profile Name
The profile name is set by the value of MDM_VPNv2_01’s InstanceID property. This can be set manually in the Set-WmiInstance command, but why not just pass it as a variable as shown here:
$profileName = 'ContosoVPN'
The Parent Path
The parent path for the ProfileXML object is set using ParentID. Like the profile name. create a variable holding the value to pass in the Set-WmiInstance command.
$nodeCSPURI = './Vendor/MSFT/VPNv2'
Escaped XML Characters
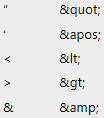
ProfileXML expects requires that its string value be in escaped XML format. XML escape characters include the following:
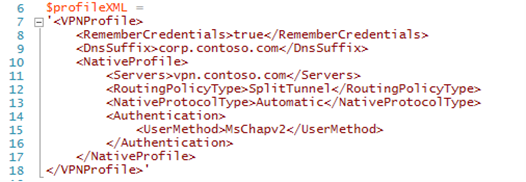
Recall the ProfileXML example in tip 3, which pulls the XML string value into the $profileXML variable.
The formatting is easily readable, but will not execute as is due to the ‘<’ and ‘>’ characters. These can be easily replaced on the fly by adding a few lines into the script:
$profileXML = $profileXML –replace ‘<’, ‘<’
$profileXML = $profileXML –replace ‘>’, ‘>’
Keep in mind that more complex scripts may require additional escape characters.
Set-WmiInstance
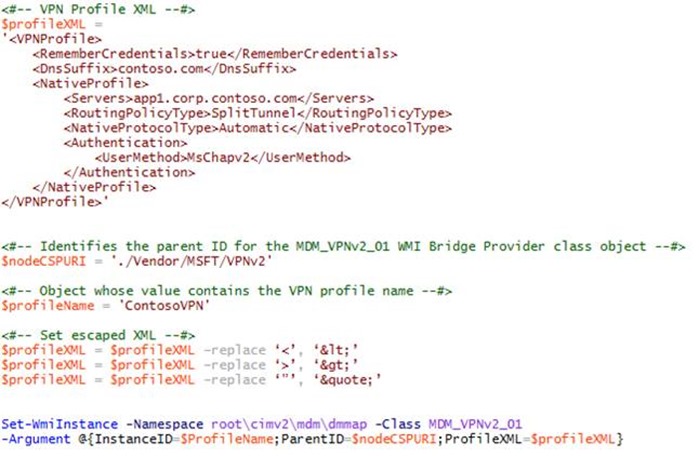
With everything now in place, we can now focus on making sure it all properly executes when the Set-WmiInstance command. Review the example from tip 2, taking a closer look at the values used for InstanceID, ParentID, and ProfileXML.
Here’s what’s happening.
- InstanceID – The VPN connection profile name is passed using the value held in $profileName
- ParentID – The parent ID for the ProfileXML object is passed by the value held in $nodeCSPURI
- ProfileXML – The configuration XML is passed using the value held in $profileXMLn executed. The additional –replace commands elsewhere in the script will escape the necessary characters
Executing the Finished Script
Now that everything is in place we can see the finished script in its entirety. The following example shows a completed script that can be executed at the PowerShell command prompt. Click run and watch the sparks fly.
Once executed, you can check the VPN Settings UI and the network control panel applet to verify creation and view settings.
Next Steps
The example profile demonstrated in this tip contains only the most basic. The Windows 10 v1607 Anniversary VPN client offers a very feature rich platform and you definitely want to explore its many capabilities. As a next step, take this basic example and do some experimentation on your own, systematically adding and testing features you think might best meet the needs of your users. Keep the following points in mind.
- Start with the basics. Add and test additional capabilities one-by-one.
- Don’t forget to enclose the Profile XML tag in opening and closing ' ' characters.
- Keep the configuration string readable.
- Tabbing child tags helps keep each setting easily identifiable.
- Don’t forget the closing tag for a parent containing nested settings.
- Don’t forget to replace any characters in the profile XML that need to be escaped.
- After you’ve checked for typos, check again.
- Finally, use the VPNv2 tree diagram as a reference when adding new features or modifying values.
Comments
- Anonymous
April 28, 2017
Great write up. One question—this powershell command requires admin privileges, so the resultant VPN is only visible to the admin that created it, which will be tricky for the end-user who can't see it (whom it is intended for)? Any thoughts? - Anonymous
July 03, 2017
Hi,I am very interested to see you final script. Can you add it to download it ? - Anonymous
July 21, 2017
Hi,Thank you for the 4 posts blog you deed arround VPN. I have the same issue as Kirk. How the VPN profil can be visible to end users ?


