Using the Library Package Manager with Add-on Libraries in Visual Studio
Have you ever noticed how complex it can be to add, remove, and update libraries of code functionality in Visual Studio? First you have to hunt all over the place to find the library you want. Then you have to download it, and figure out how to install it. Often, you find it has dependencies, which then means finding, downloading, and installing other libraries too. After everything is installed and working, suppose one of the libraries you installed gets updated. How will you find out about the update? How will you install it? And if there are dependencies among libraries, how will they be affected? Finally, when it’s time to remove a library, unless the library and its dependencies were installed as an integrated package, you get to experience the joy of reversing the installation process and removing each library. As you know if you’ve done this, working with libraries can quickly become painful.
Microsoft has released some new tools to streamline the process of finding, adding, and managing libraries and add-on packages in Visual Studio. NuGet is an open source package management system based on the .NET Framework. The NuGet application has been added into Visual Studio in the form of the Library Package Manager. In this post, I’ll demonstrate how to use the new Library Package Manager to install and remove a library in Visual Studio 2010. This also works in Visual Web Developer 2010 Express, which is what I’ll use here.
Installing the Library Package Manager
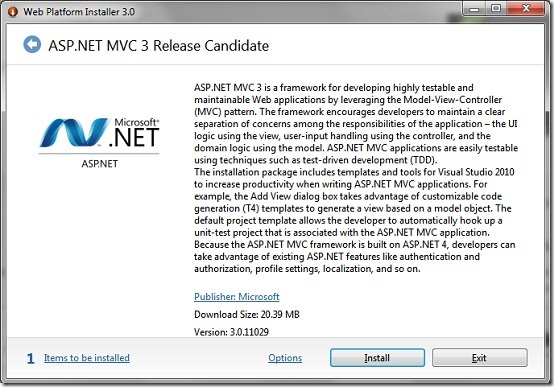
You can install the Library Package Manager by downloading it directly as a Visual Studio extension (*.vsix file) from the NuGet downloads page, or you can install the latest Web Platform Installer and then install the ASP.NET MVC3 Release Candidate. Here we’ll use the second approach.
To install the Library Package Manager in Visual Studio:
- Run the latest release of Web Platform Installer (version 3.0). You may have to click Allow in your browser one or more times to enable the Web Platform Installer to load.
- Click Install to start installing the ASP.NET MVC3 Release Candidate.
Working with Libraries and Packages
There are two ways you can use the Library Package Manager in Visual Studio to work with packages:
- The package manager window. This is a simple UI window for adding, removing, and updating packages.
- The package manager console. This is a console-type window in which you can enter Powershell commands for adding, removing, and updating packages.
Using the Package Manager Window
In this section we’ll show how to use the package manager window to manage packages in Visual Studio.
To add a package using the package manager window:
Start Visual Studio (in this post, I am using the free edition, Visual Web Developer 2010 Express).
Click New Web Site, and then create a new site or project. In this post I will create an ASP.NET web site (Razor) to use with the package manager.

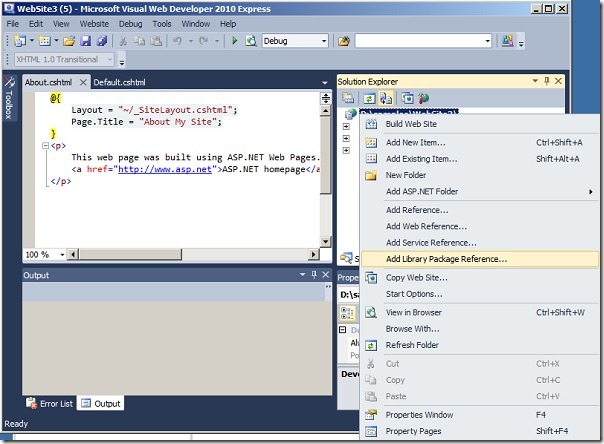
After the site is created, right-click the node for the site in Solution Explorer, and then click Add Library Package Reference.
In the Add Library Package Reference window, click Online to display the list of available online packages.
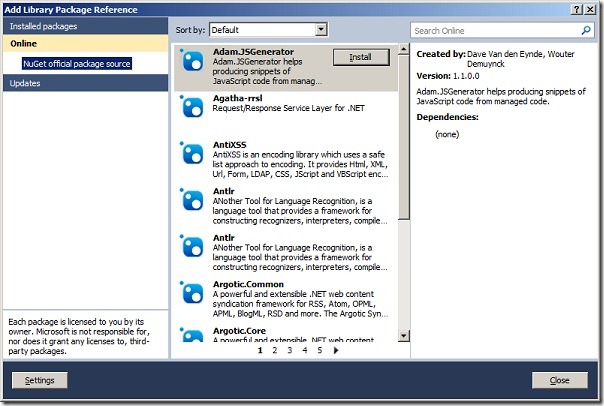
In the Search Online box type “logging” to search for available libraries with enhanced logging functionality.
Use the paging links at the bottom of the results window to scroll through the packages until you find the Elmah package.

Note: This is a good example of how the Library Package Manager helps you find useful packages. If you didn’t know ahead of time that you wanted the Elmah logging package, you can search more generally to find a list of packages that supply the features you want.Select the elmah package and then click Install.
After the installation, completes, click Close.
You can see the Elmah assembly appears in the bin folder in Solution Explorer. To demonstrate that you can now use the library, add the following block of Razor syntax and type Elmah. to see that Intellisense recognizes the library.
 @{
     Elmah.
}
The following screen shot shows the Elmah assembly in bin, and Intellisense working when you type “Elmah.” in a Razor code block.
After you see the Intellisense working with the Elmah library, remove the code block you just added.
Now that you’ve seen how to add a package, let’s remove the same package.
To remove a package using the package manager window:
In Solution Explorer, right-click the node for the site, and then click Add Library Package Reference.
Click Uninstall on the elmah package in the Add Library Package Reference window.
Close the window. The Elmah assembly has been removed from the bin folder in Solution Explorer.
Using the Package Manager Console
We’ve seen how to add and remove the Elmah library in a Visual Studio project, using the package manager window. Now we’ll go through the same process using the package manager console. This console gives you the ability to manage packages in a more powerful way, using Windows Powershell commands.
To add a package using the package manager console:
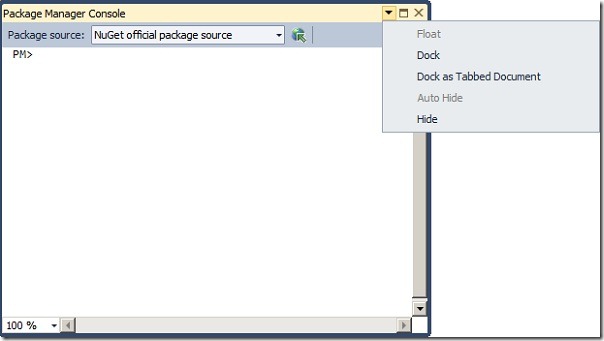
In Visual Studio click Tools | Library Package Manager | Package Manager Console. The package manager console window appears. If you click the drop-down icon in the upper right corner of the window, you can select whether to display it as a floating or a docked window, or as a tabbed document.
To see the list of available packages in the console, at the prompt type list-package and then press Enter.

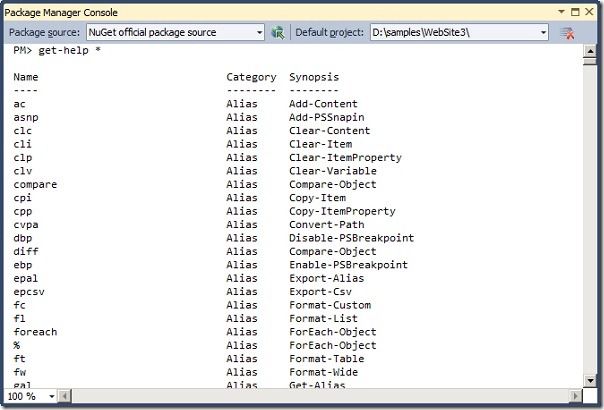
If you are new to Windows Powershell command, at the prompt you can type get-help * and then press Enter to display a list of available commands.
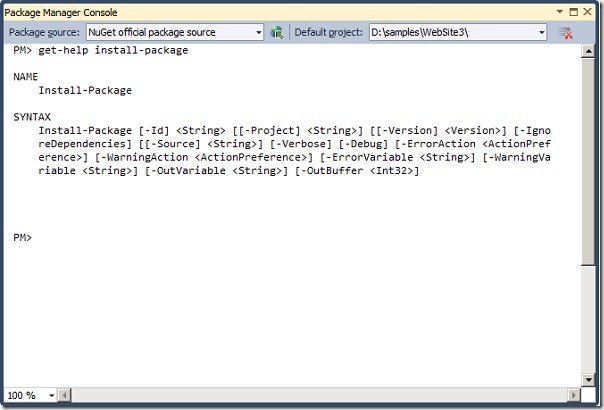
To get help on a particular command, type get-help [command] . To display help for the install-package command, type get-help install-package and then press Enter.
The syntax and options for the install-package command are displayed.To install the Elmah package, type install-package elmah and then press Enter. After the installation completes, the Elmah assembly again appears in the bin folder in Solution Explorer.
Optionally, you can add a block of code in the editor and type “Elmah.” as you did in the previous section, to demonstrate that the library is recognized by Intellisense.
After you establish that Intellisense recognizes the Elmah library, remove the test block of code.
Now that you’ve seen how to add a package, let’s remove the same package.
To remove a package using the package manager console:
To remove the Elmah package, at the prompt type uninstall-package elmah and then press Enter. After the removal completes, the Elmah assembly is no longer visible in the bin folder.
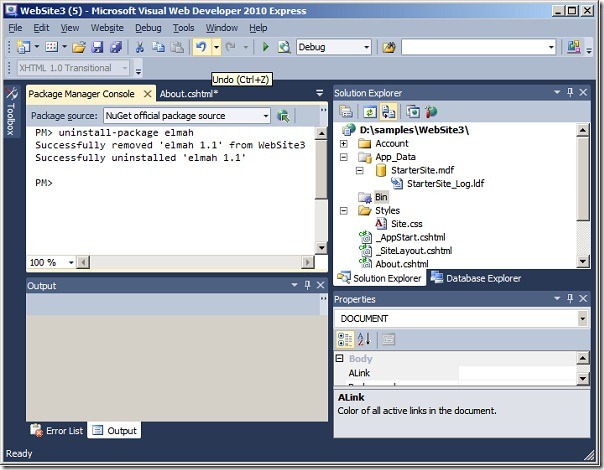
Close the package manager console.
Summary
You’ve seen how you can use the Library Package Manager in Visual Studio to find, add, and manage libraries and packages. You can use the package manager window, or the package manager console, to do the same basic tasks. In addition to adding and removing packages, you can also use these tools to update a package. When updates are available, they are automatically displayed for your installed packages when you display them, and you can simply click an Update button (in package manager window) or run an update-package [package name] command (in package manager console) to update a package. The nice thing is that this updates both a package and its dependencies if needed.
You can also use the NuGet package management application to create packages of the type you installed here. For information on creating basic packages, see Creating a Package at the NuGet project.
Comments
Anonymous
November 11, 2010
Whre is the link for Web Platform installer 3.0...??!??!?Anonymous
November 15, 2010
The installer now links directly to the latest 3.0 release. The above link points to it or you can access it directly at: www.microsoft.com/.../install.aspxAnonymous
February 20, 2011
Installing packages using the package manager (specifically from Nuget) causes me to temporarily lose access to TFS. This can only be rectified by closing VS and re-opening. Also, subsequently downloading a second package and the manager doesn't remember anything about the first. However it does actually checkout the solution files and add the references correctly once you re-open. I wonder if it is not a cross-threading issue like in WP7 when you don't use the Dispatcher to invoke an update on the UI thread after making an asynchronous call to get data.Anonymous
April 10, 2012
In which secure corporate environment do you have direct internet access from developer work stations ? How you wanna manage 50-100 VS installations with this approach ?


