Azure Multi-Factor Authentication and Identity, Step-by-step….
By Blain Barton
First let’s discuss why you need Multi-Factor Authentication referred to as MFA.
When filling out an online form, have you ever been asked “ARE YOU A ROBOT?
This is simply to verify that you are who you are. Robots in these terms do nasty things to computers and devices. Attackers can overtake your shared key secrets and perform “man-in-the-middle” invasions, capture authentication information and intercept the process then pose as that user to the party seeking authentication and vice versa. In other words, they take your username and password and then use it against you or in their best interest.
MFA is a method of computer access control and identity which a user can pass by successfully presenting authentication factors from at least two of the three categories that may include a phone call, text with PIN, biometrics including facial recognition, fingerprint readers, ATM smartcards with PIN, retina scan and others.
So to make sure you’re not a robot during this process, there are authentication methods in place to make sure that if you forget your password and want to reset it, you can do it via Azure AD.
Azure Multi-Factor Authentication can be used to provide multi-factor capabilities to all of your cloud applications and services hosted in Azure. Using a variety of authentication options, you can secure Microsoft and 3rd party applications hosted in Azure.
The figure below (Azure Website Reference) does a great job of explaining the process and is pretty straight forward in terms of identity and authentication. You login with username and password and then you have a Windows Multi-Factor Authentication challenge and verification, then the user responds to the challenge from the device which could be a phone call or a text message as well as personal questions only the user would know, like mother’s maiden name or your high school.
What Authentication Options are Available?
(Reference, Azure Portal) https://msdn.microsoft.com/en-us/library/azure/dn249466
There are two main modes for MFA -
Notification - In this mode, the Azure Multi-Factor Authentication app prevents unauthorized access to accounts and stops fraudulent transactions. This is done using a push notification to your phone or registered device. Simply view the notification and if it is legitimate select Authenticate. Otherwise you may choose Deny or choose to deny and report the fraudulent notification. For information on reporting fraudulent notifications see How to use the Deny and Report Fraud Feature for Multi-Factor Authentication.
One-Time Passcode - In this mode, the Azure Multi-Factor Authentication app can be used as software token to generate an OATH passcode. Using a one-time passcode option, Azure Multi-Factor Authentication provides flexibility for users and a backup option in the event the user is not able to authenticate using their preferred method. You’ve seen this when you have mistyped information for your username and password and it asks you to put in your phone number to validate who you are. You then add a One-Time Passcode to get your password sent or reset. This passcode can then be entered along with the username and password to provide the second form of authentication. This option is great in instances of spotty phone coverage.
-
Automated phone calls can be placed by the Multi-Factor Authentication service to any phone, landline or mobile. The user simply answers the call and presses # on the phone keypad to complete their sign in.
Text messages can be sent by the Multi-Factor Authentication service to any mobile phone. The text message contains a one-time passcode. The user is prompted to either reply to the text message with the passcode or enter the passcode into the sign in screen. Only phone call and text message options are currently available for the Multi-Factor Authentication SDK.
Let’s take a look at an Azure Active Directory I setup and we’ll walk through setting up a user and exploring the MFA options.
First create an Azure Active Directory or use an existing one. Here well use a new one.
Go to ACTIVE DIRECTORY then go down to NEW
Create your Azure Active Directory.
Fill out your Azure Active Directory information
Next, we’ll add a user that will use MFA. You can see that I am the Global Administrator for this newly created AAD. Down below, click ADD USER
Fill out the user information.
For the user select and Enable Multi-Factor Authentication
Create your temporary password
You now see the new user in the Azure Active Directory.
To configure MFA for the AAD you can go to CONFIGURE and set the MFA options.
You can see the service settings for MFA and includes app passwords and user device MFA management.
Make your selections and update.
To change options for the users you can go down to MANAGE MULTI-FACTOR AUTH
Under Users you see the user now enabled for MFA.
When you select the user you can see other options below on the right hand side, and select Manage user setings
Under Manage user settings, as Admin you can require selected users to provide contact methods again, delete all existing app passwords generated by the selected users, restore MFA on all suspended devices (Preview) and more to come.
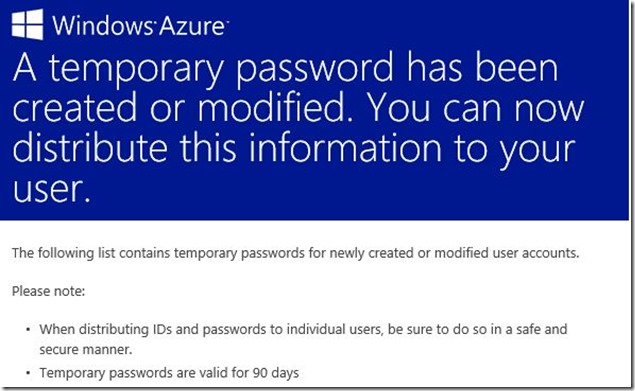
The Admin would get the temporary password for their user, and email this to them and they will change on first logon.
This is the bottom part of the same email, which shows temporary password for new account.
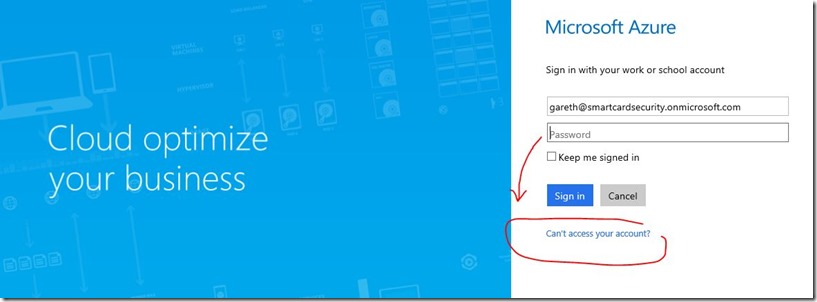
They can login and use the temporary password
Fill out the password form
See the options the user gets with more info because they can’t access their account.
Select Set it up now
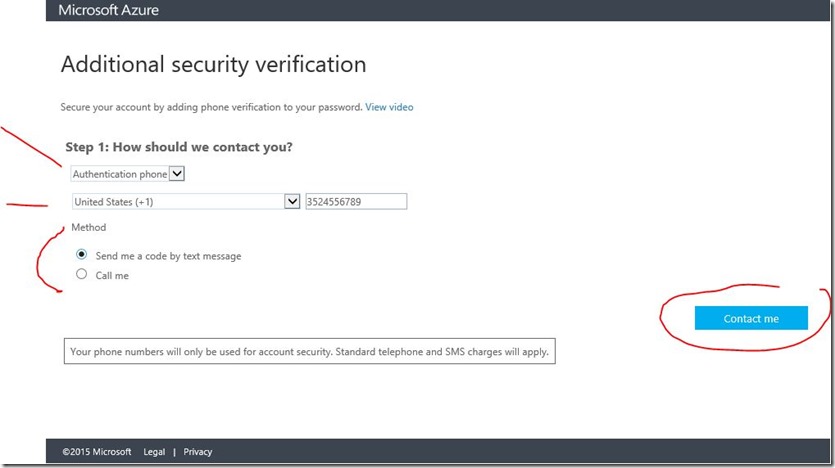
Here the options for Authentication phone, Office phone, Mobile app. To ask whether to send a code by text message or call.
Further information, then select contact me
Taxt message sent
Verify six-digit code
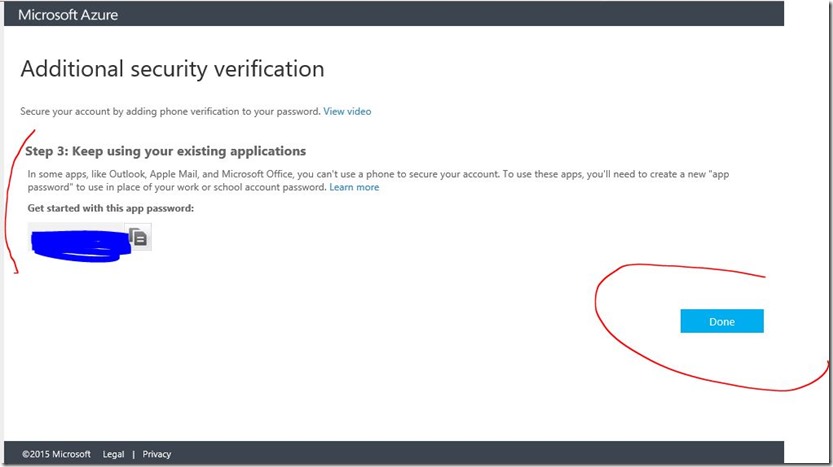
App password verification
The user will then have the MFA enabled and access to the options for authentication.
Multi-Factor Authentication apps are available for Windows Phone, Android , and IOS devices. Read notes at bottom of this post for more information on Android.
What applications can I secure?
Office 365
Multi-factor authentication is available for Office 365 SKUs and administrators of a Azure subscription. The following lists the various versions of multi-factor authentication available and the resources that can be secured with them.
- Multi-Factor Authentication for Office 365 – allows you to secure Office 365 resources for users licensed for Office 365.
- Multi-Factor Authentication for Azure Administrators – allows you to secure Azure resources for administrators.
- Azure Multi-Factor Authentication – allows you to secure all Microsoft Online Services, multiple SaaS app resources, resources that span on-premises and cloud including VPN and LOB apps.
To enable Multi-Factor Authentication on your Office 365 users see Enable multi-factor authentication for a user account
To sign-in the first time and complete the registration process see Signing in for the first time using Azure Multi-Factor Authentication
To configure app passwords see App Passwords with Azure Multi-Factor Authentication
For advanced settings such as fraud alert, one-time bypass, and configuring your own customized voice messages see Configuring Advanced Multi-Factor Authentication Settings.
See the following sections for additional information on securing cloud services using Azure Multi-Factor Authentication.
- Securing access to cloud services - Information for Administrators
- Signing in for the first time using Azure Multi-Factor Authentication
- Using Multi-Factor Authentication to Sign In to Cloud Apps
- Managing your Azure Multi-Factor Authentication User Settings
The following topics provide more detailed information about Azure Multi-Factor Authentication:
- Adding Multi-Factor Authentication to Azure Active Directory
- Enabling Multi-Factor Authentication for On-Premises Applications and Windows Server
- Building Multi-Factor Authentication into Custom Apps (SDK)
- Managing Azure Multi-Factor Authentication
- Multi-Factor Authentication for Office 365
- Azure Multi-Factor Authentication options for Federated Users
- Azure Multi-Factor Authentication FAQ
 Important
The Multi-Factor Authentication app functionality has now been added to the Azure Authenticator app for Android devices. The old MFA app will still work for Android devices but going forward Azure Authenticator will replace this app. The Windows Phone and IOS versions are still in development and will be released shortly.
Users can download the free app from the device store and activate it using a code provided during set up. When the user signs-in, a notification is pushed to the app on their mobile device. The user taps to approve or deny the authentication request. Cellular or Wi-Fi access is required for installing and setting up the app. Once the app is installed it can operate in 2 different modes to provide the additional security that a multi-factor authentication service can provide. These are the following:
Choose the model that works best for your organization. Note that after you create a Multi-Factor Authentication provider, you cannot change the billing model. You can create a new provider, but configuration and user settings will not be transferred over. For more information about purchasing Azure Multi-Factor Authentication, see Azure Pricing Details.
Hope this help get you on your way to using MFA with AAD.
Blain Barton
Senior Technical Evangelist
US Developer Experience and Evangelism - DX Team
East Region – Florida
Microsoft Corporation
Meetup https://www.meetup.com/Florida-IT-Professionals
Blog - https://aka.ms/blainbarton
Early Experts - https://aka.ms/itproexpert
Microsoft Azure - https://aka.ms/try-azure
BizSpark Champ - BizSpark Program https://aka.ms/go-bizspark
Twitter @blainbar
Facebook and LinkedIn – Blain Barton


