How to Extend Your Hardware Inventory Using the SMS_DEF.MOF File
With SMS you can run a hardware inventory and discover all kinds of cool information about the computers in your environment. Without going into too much detail, SMS does this by querying WMI and collecting the results. So how does SMS know what exactly to query? That's where the SMS_DEF.MOF file comes in. SMS_DEF.MOF (located in \SMS\Inboxes\Clifiles.src\Hinv) tells SMS what data to gather whenever a hardware inventory is run on a client. So this is great and everything, but what if the information you're looking for is not included in the default report? Fortunately, since SMS_DEF.MOF is really just a text file we can customize it to include all kinds of things and I'll show you how to do this below.
A basic understanding of how the SMS_DEF.MOF works and WBEM/WMI are assumed, and some programming experience is also helpful but not required.
In this article I will explain how to:
1) Create a new WMI class named ‘Custom_Class’ on your SMS clients.
2) Create a property named ‘Custom_Property’ for that class.
3) Populate that property with data.
4) Transfer that data so that it can be read by SMS and seen in Resource Explorer.
*** It is HIGHLY recommended that you perform these steps in a test environment before implementing in production.
Create the Class and Property
To create a custom class in WMI we'll need to edit the <smsdrive>\SMS\inboxes\clifiles.src\hinv\SMS_DEF.MOF file.
First create a copy of the file, and then edit it with a standard text editor such as Notepad.
Copy and paste the following at the very bottom of the file:
#pragma namespace ("\\\\.\\root\\CIMv2")
class Custom_Class
{
[key]
string Custom_Property;
};
#pragma namespace ("\\\\.\\root\\CIMv2\\sms")
[SMS_Report(TRUE),
SMS_Group_Name("Custom Information"),
SMS_Class_ID("Microsoft|Custom Inventory Info|1.0"),
Namespace("\\\\\\\\.\\\\root\\\\CIMv2\\\\Custom_Class")]
class Custom_Class : SMS_Class_Template
{
[SMS_Report(TRUE),key]
string Custom_Property;
};
Save the file.
Run the mofcomp.exe –check <MofFileName> to make sure that your new .mof file has the correct syntax before compiling (Mofcomp.exe can be found in c:\windows\system32\wbem).
Backup and then delete the current sms_def.mof from <smsdrive>\SMS\inboxes\clifiles.src\hinv and copy the new file to that same folder.
The .mof file is automatically compiled by the Inventory Data Loader. Open Site Status > Component Status and view all status messages for SMS_INVENTORY_DATA_LOADER
If you skipped the mofcomp –check or it failed, you may see error 2721:
SMS Inventory Data Loader failed to compile E:\SMS\inboxes\clifiles.src\hinv\sms_def.mof. The failing MOF file has been moved to E:\SMS\data\hinvarchive\sms_def.mof.bad.bak, and the last successfully compiled version has been restored.
Possible cause: The file has been edited with changes that are not valid for MOF file syntax.
Solution: Review the last set of changes to the file for adherence to MOF file syntax.
If the MOF compiles correctly, you will not receive success messages here, instead go to <smsdrive>\SMS\logs\dataldr.log. Look for the following line:
End of cimv2\sms-to-policy conversion; returning 0x0
You are now ready to create the class on the client. I recommend you save the mofcomp and MOF file to a network share where all clients have access.
Just compile the MOF file using a script or batch file using the following syntax:
<path to mof>\mofcomp.exe <path to .mof file>\<mofFileName>.mof
If all is successful, you should have a new class and property in WMI.
To check, click Start > Run > type: wbemtest and hit enter.
Change the path to root\cimv2
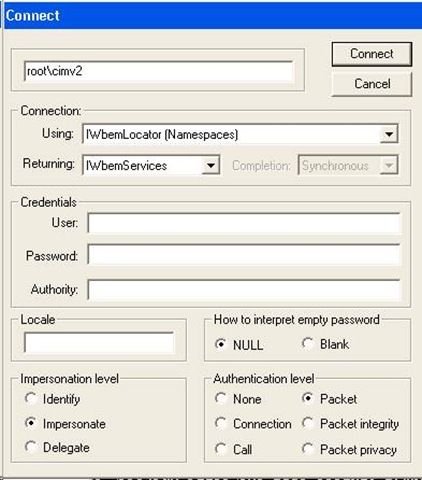
Click Connect > Enum Classes > Select Recursive > Click OK
Scroll down and you should now see Custom_Class listed. Double-click on it, scroll to the bottom of the Properties window and you should also see your Custom_Property
Populate the Property with Data
To populate our new Custom_Property, we must first create an instance of our new Custom class:
Set oWMI = GetObject("winmgmts:root\cimv2")
Set oClass = oWMI.Get("Custom_Class")
Set oInstance = oClass.SpawnInstance_
Now just assign data to the instance:
oInstance.Custom_Property = "Test_data"
oInstance.Put_()
Save the code above as <filename>.vbs and run it on your clients (after the mof file has successfully compiled, of course).
Collect the Data
This is the easy part: Just run a Hardware Inventory Scan on the client.
If you think that your inventory has completed and been processed by the SMS server, and you still don’t see the information in Resource Explorer, double-check to see that you have a new instance of Custom_Class named Custom_Property and that it is set to “Test_data”:
To check, click Start > Run > type: wbemtest and hit enter.
Change the path to root\cimv2
Click Connect > Enum Classes > Select Recursive
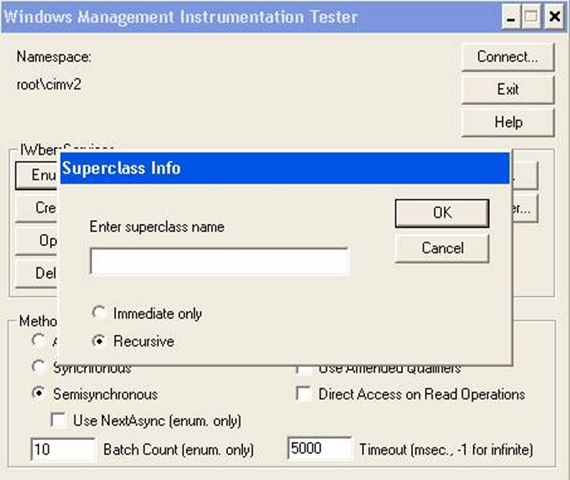
Click OK Then scroll down to “Custom_Class”

Double-click on it then scroll to the bottom of your Properties

Highlight “Custom_Property” and click on Instances (on the right).
You should see info similar to this:

When your hardware inventory completes you will see this in SMS Resource Explorer:

And that’s it! Piece of cake, right? If you're looking for more information about collecting inventory or extending your hardware inventory, take a look at https://technet.microsoft.com/en-us/library/bb680518.aspx. This page has information on:
How to Encrypt Client Inventory Reports
How to Set Display Names for Inventoried Products
How to Exclude Files From Software Inventory
How to Collect Files from Clients
How to View Files Collected From Clients
How to Start Resource Explorer Using the Configuration Manager Console
How to Start Resource Explorer From the Command Line
How to Extend Hardware Inventory
How to Change the Default MIF Storage Location
-Mike Ory
Comments
- Anonymous
January 01, 2003
I met the same problem, and resolved by changed the mof file as: #pragma namespace ("\.\root\CIMv2") class Custom_Class { [key] string Custom_Property; }; #pragma namespace ("\.\root\CIMv2\sms") [SMS_Report(TRUE), SMS_Group_Name("Custom Information"), SMS_Class_ID("Microsoft|Custom Inventory Info|1.0"), Namespace("\\.\root\CIMv2")] class Custom_Class : SMS_Class_Template { [SMS_Report(TRUE),key] string Custom_Property; };
I changed the code here: Namespace("\\.\root\CIMv2")]
Anonymous
January 01, 2003
http://blogs.technet.com/smsandmom/archive/2007/08/30/how-to-extend-your-hardware-inventory-using-theAnonymous
January 01, 2003
Hi, Thanks for a good blog. It really helpful. I followed all the steps. I am able to see "Test_Data" in instances . But after HW inventory ,I am not able to see in resource explorer. do you have any idea why it is so? regards Abhishek JoshiAnonymous
January 01, 2003
Did you get any response to this as i have the same problem. Able to se the instance, able to see the table in sql but unable to see the new data in resource explorer