How to Authenticate with Microsoft Account in a Chrome Extension
A couple of weeks ago, at our internal OneNote Hackathon, a couple of folks were trying to build a Chrome extension that uses the OneNote API. So they needed to be able to authenticate against Microsoft Account (MSA), which is a OAuth 2.0 provider. Authenticating against MSA in a web browser extension isn’t a well-documented process, so I want to provide some help in case this is what you are trying to do.
High-level Steps
Here are the things you need to do at a high-level:
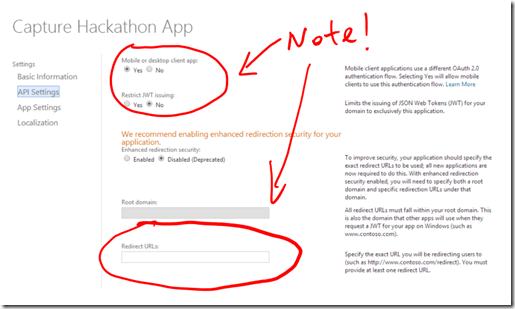
- Create a Client ID and make sure the API settings are set correctly.
- Set up your Chrome extension properly to use at least 1 content script. We will need it in #4 below.
- Create the UI in your Chrome extension to sign in, making sure you are setting the redirect URL properly to “**https://login.live.com/oauth20\_desktop.srf**” and response type set to “token”.
- In your Chrome extension’s content script, watch for the popup window from the Microsoft Account sign in flow. At the right point in time, we will catch the auth_token, store it, and then close the popup window.
Now, let’s get started.
Client ID and API Settings
First of all, you need to obtain a client ID from the Microsoft Account Developer Center as usual. The way you set the API settings need to follow my screenshot below.
Setting up the Chrome Extension
Now, let’s talk about what you need in your Chrome extension. I am assuming you are somewhat familiar with the basic anatomy of a Chrome extension, so I am not going to go through that. If you are not, you can start reading about it here.
The manifest.json file describes your Chrome extension. You can see the sample manifest.json file here.
A few things to point out:
- We included js/script.js as a content script. These scripts load each time a document is loaded in a window or tab. We need this to perform #4 above.
- We also included lib/jquery.min.js as a content script because I wanted to be able to use jquery in my script.js file.
- We included “storage” in the permissions set because we will use Chrome storage later to store the auth_token.
- We included this line: "content_security_policy": "script-src 'self' https://js.live.net; object-src 'self'" so the LiveSDK JavaScript library can be successfully loaded from popup.html
- browser_action.default_popup is set to “./html/popup.html” – this specifies the HTML that will show up when user clicks the browser extension button. We will use this to show the login UI.
Popup.html and popup.js
Next, you can take a look at popup.html. This is the HTML that gets shown when user clicks on your extension’s button near the URL bar. Things to note:
- We have included popup.js and the Live SDK JavaScript library (https://js.live.net/v5.0/wl.js) in this file.
- We have a <div> with ID=”signin” – you will see that in our popup.js script, we will have code there handle the click event to start the sign in flow.
In popup.js, note the following snippet:
 $('a#signin').click(function() {
     $('div#signin_status').text('');
     WL.init({
         client_id: "000000004410CD1A",    // replace with your own Client ID!!
         redirect_uri: "https://login.live.com/oauth20_desktop.srf",
         response_type: "token"
     });
     WL.login({
         scope: ["wl.signin", "office.onenote_create"]
     });

     return false;

 });
You should obviously replace client_id with your own client_id here. When the user clicks on the sign in link, a new browser window will open to ask the user to sign in with the Microsoft account.
Content Script (script.js)
The last thing we need to do now is to watch for the sign in browser window. When the user is successfully signed in, that browser window will be redirected to a URL that starts with https://login.live.com and the URL will contain “#access_token”. So in the content script, we have the following code to look for this:
 $(window).load(function() {

     if (window.location.origin == "https://login.live.com") {

         var hash = window.location.hash;

         // get access token
         var start = hash.indexOf("#access_token=");
         if ( start >= 0 ) {
             start = start + "#access_token=".length;

             var end = hash.indexOf("&token_type");
             var access_token = hash.substring(start, end);

             // Store it
             chrome.storage.local.set({"access_token":access_token});

             // Close the window
             window.close();
         }
     }
 });
That’s basically it. When the sign in window closes, the access_token will be stored in the Chrome local storage. You can then use the access_token in any calls to the OneNote API as you normally would. You can take a look at the sendToOneNote function for an example:
 function sendToOneNote(access_token, title, text) {
      $.ajax({
         accept: "application/json",
         type: "POST",
         url: "https://www.onenote.com/api/v1.0/pages",
         headers: { "Authorization": "Bearer " + access_token },
         data: "<html><head><title>"+ title +"</title></head>" +
             "<body><p>" + text + "</p>" +
             "</body></html>",
         contentType: "text/html",
         success: function (data, status, xhr) {
             alert(status);
         },
         complete: function (data, status, xhr) {
             alert(status);
         },
          error: function (request, status, error) {
             alert(status);
         }
      });

 }
Hope that was helpful. You can get the complete code from GitHub here. Please let us know if you have any other questions about this topic!
Cheers,
James (@jmslau)
Comments
Anonymous
October 15, 2014
That was my team building the Chrome extension! It was a great experience and I hope someone can speed up their development using your article here. Authentication was one of the most time consuming element for our extension development.Anonymous
March 25, 2015
Should this sample extension just work adding a onenote to my one drive without any changesAnonymous
September 04, 2015
Hey dude thanks for your great information. It's help me to understood the concept to get access token and redirect to OneNote
