Kickstarting your first Cloud Enabled App–Part 1
In this blog post we will be covering Azure Mobile Services, one of the popular PaaS (Platform as a Service) workloads on Microsoft Azure. Mobile services is a cloud-based backend service to client applications, and contrary to belief, it is supports non-Microsoft platforms such as iOS, Android and cross platform tools such as Xamarin, PhoneGap and HTML/JavaScript. It is a super easy way to create your, out of the box cloud-enabled mobile application. You can host it as .NET or Node.js web API for the server logic side. It is an auto-scalable and high availability service that can use powerful authentication such as Active Directory or Facebook and can push notifications to individual users and dynamic audiences.
Let’s get started with our first mobile service
1. Log into the Management Portal
2. Bottom left, click +NEW
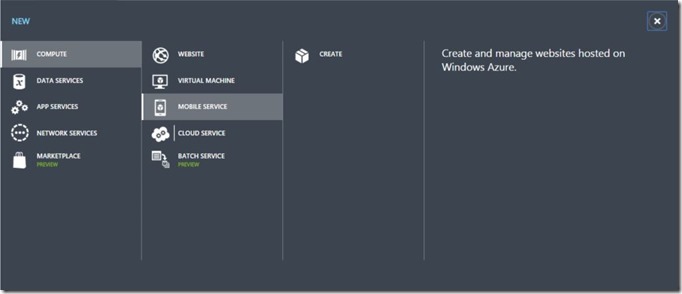
3. Compute > Mobile Service > Create
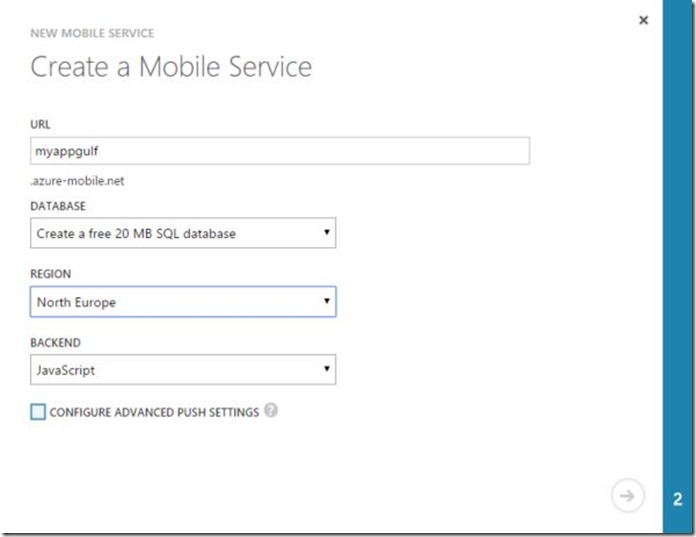
4. Put in your desired URL in the textbox and wait for name verification. Select Create a free 20 MB SQL database pick the region as North Europe (this is the lowest latency option for now for the Gulf region). Select the backend as JavaScript.
Good to know: Although you can create a free 20 MB SQL database in this tutorial, you can also configure the mobile service to connect to a database that you already have.
5. Last step is to fill in the desired name and the login credentials for the database.
Good to know: If you choose to select Use an existing SQL database option, you will be prompted to enter the database credentials rather than creating the credentials.
After you complete these steps, you’ll see that Azure will create the mobile service. Congratulations! You have your cloud backend up and running.
Developing the Client Application
Since we have the mobile service up and running now, find the mobile service you have under the mobile services tab from the left and click on it to enter its dashboard.
Once you are in the dashboard of your mobile service, you will see a selection of platforms to start developing with. The good thing about mobile services is that it is platform agnostic. You can choose to develop the client side from technologies such as Windows, iOS, Android, HTML/JavaScript, Xamarin, PhoneGap. For this tutorial we will choose Windows platform.
On the GET STARTED section, expand the “Create a New Windows or Windows Phone App”. Follow the steps for getting the tools- if you don’t already have them- and click on “Create TodoItem Table” to create the sample table for an example To do item application scenario. The tables you create using the portal will be created and stored in the database that the mobile service is configured to connect.
Good to know: In the get started section you can create a new app from scratch or connect the mobile service to any existing code you have. This tutorial will cover creating an app from scratch.
After a couple of seconds you will see a confirmation that the table is successfully created.
Last step is to download the sample code that is preconfigured to be connected to your very own mobile service you’ve just created. After selecting the language click download and the sample code will be downloaded. Double click the .sln file to launch Microsoft Visual Studio to start editing the client code.
In the Solution Explorer on the left, you will notice something different. The sample you’ve downloaded is actually a Universal App and shares some of the code for both deployments (Windows 8.1 and Windows Phone). Client code will be covered in the next part but for now, let’s build the application and see if everything is on track.
In the Solution Explorer on the left, right click the Windows 8.1 project and select “Set as StartUp project”. This will tell visual studio to Run the app as a Windows 8.1 app on the local machine after the build. Alternatively you can right click on the Windows Phone application and use it as the starting project.
Application has a textbox that accepts and pushes the input to your mobile service where it is added to the table you’ve created-“ToDoItem”. On the right side you’ll see the actual to do list and checkboxes.
Try typing in a couple of example items and check some of them as completed. This will come handy when we go back to the data to observe the changes.
Switch back to the azure portal and click the data tab of your mobile service.
Click on the“TodoItem” table to see the content.
You can observe the example entries you’ve created are here in the table with pre-created columns. If you tick the to do items from the app, it will disappear from the list and the corresponding complete column record here will be updated as “true”.
Now with the sample project in place with the connection to the cloud backend, you can tweak different parts of the code and observe the changes to learn, or modify the project completely to come up with your own scenario. Enjoy!
Data validation on the server side logic, authentication and the client side code will be covered in “Kickstarting your first Cloud Enabled App-Part 2“, so stay tuned.
For more resources on Mobile Services, don’t forget to check https://azure.microsoft.com/en-us/documentation/services/mobile-services/
Comments
- Anonymous
November 25, 2014
This is what I need, Thanks.


