從無到有- 程式碼小於 50 行的 Windows Store App 開發及上架之旅 (程式供下載)
本文内容
本計畫是: 要趁著在 2012 年底時,撰寫一個程式碼小於50行的簡單小程式,並且將整個開發過程及上架流程作一個記錄讓大家參考:
首先我的 App 名稱為”台北市公車動態”,目標客戶是針對台北市的公車一族,讓他們能:
1. 隨時查詢想搭公車的預估到站時間。
2. 可以將常用公車加到「我的最愛」之中;同時希望讓使用者即便使用不同的裝置,也能看到一樣的「我的最愛」公車列表。
3. 實作「搜尋」合約,讓使用者可直接透過右側常用工具列 (Charms Bar) 來直接搜尋公車動態。
我首先簡單勾勒一下 App 的未來主畫面如下:
開始coding!
於 Visual Studio 2012 中開啟一個 C# 的空白 Windows 市集專案,打開 MainPage.xaml ,將以上的控制項由左側的「工具箱」中直接拉入設計畫面中,接下來在各控制項之中加入 x:Name 參數,以方便日後在程式碼中能直接操作這些控制項。
接下來我需要台北市的公車列表清單,這資料可以在台北市公車動態資訊的公開網站 (https://pda.5284.com.tw/MQS/businfo1.jsp ) 中找到,只要在此網站中按右鍵->檢視原始檔,就會看到一個 routeArray 變數中含有完整的公車列表:
直接拷貝這個 routeArray 清單,然後在 MainPage.xaml.cs 的 OnNavigatedTo() 方法中加到 comboBusLine 控制項中:
     protected override void OnNavigatedTo(NavigationEventArgs e)
    {
        string[] routeArray = { "0南", "0東", "1", "108", "108區(二子坪)", "以下省略"};
        for(int i = 0; i < routeArray.Length; i++)
        {
            comboBusLines.Items.Add(routeArray[i]);
        }
        comboBusLines.SelectedIndex = 0;
    }
我們要到哪裡查詢公車即時動態呢? 我發現在 https://pda.5284.com.tw 的網站中,查詢公車動態頁面的Url只是加上”公車號”作為 query string:
     private void Button_Query_Click_1(object sender, RoutedEventArgs e)
    {
        string strSelectedBus = comboBusLines.SelectedValue.ToString();
        webviewQuery.Source =
        new Uri(Uri.EscapeUriString("https://pda.5284.com.tw/MQS/businfo2.jsp?routeId="
        + strSelectedBus));
    }
其中使用了 EscapeUriString() 是要避免在 Uri string 之中出現中文亂碼。
按 F5 測試之後應該就能看到 WebView 控制項會顯示如下畫面:
之後,要開始實作「我的最愛」功能了。這部份同時要使用到 Windows 8 的資料漫遊 (Raoming) 機制,讓使用者若以同一個 Microsoft ID 登入不同的裝置,都能看到相同的「我的最愛」公車列表。
     public Windows.Storage.ApplicationDataContainer roamingSettings =
Windows.Storage.ApplicationData.Current.RoamingSettings;
     private void addToFavorite_Click_1(object sender, RoutedEventArgs e)
    {
        string strBusToAdd = comboBusLines.SelectedItem.ToString();
        if (strBusToAdd.Length > 0 && !myFavorite.Items.Contains(strBusToAdd))
        {
            this.myFavorite.Items.Add(strBusToAdd);<br>            roamingSettings.Values["MyFavorites"] += strBusToAdd + ",";
        }
    }
     private void delete_bus(object sender, RoutedEventArgs e)
    {
        if (myFavorite.SelectedItem != null)
        {
            string strTmp = roamingSettings.Values["MyFavorites"].ToString();
            roamingSettings.Values["MyFavorites"] =<br>                strTmp.Remove(strTmp.IndexOf(myFavorite.SelectedItem.ToString()), <br>                myFavorite.SelectedItem.ToString().Length);<br>            myFavorite.Items.Remove(myFavorite.SelectedItem);
        }
    }
最後,記得要在程式一開始的時候,即 OnNavigatedTo() 的方法中,檢查是否存在既有的「我的最愛」清單並匯入:
     if (roamingSettings.Values["MyFavorites"] == null)
    {
        roamingSettings.Values["MyFavorites"] = "";
    }

    strFavorites = roamingSettings.Values["MyFavorites"].ToString().Split(',');
    for (int i = 0; i < strFavorites.Length-1; i++)
    {
        this.myFavorite.Items.Add(strFavorites[i]);
    }
至此,我們已經完成文章一開頭所要完成的第1、2項功能了!
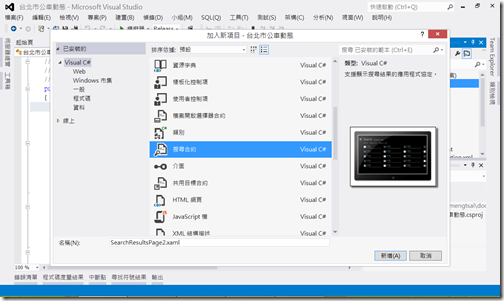
接下來要實作第3項的「搜尋」功能,首先在專案中新增一個「搜尋合約」的新項目:
然後打開 SearchResultsPage1.xaml 後拉入一個 WebView 控制項。
之後在 SearchResultsPage1.xaml.cs 的 Filter_SelectionChanged() 方法中實作:
     void Filter_SelectionChanged(object sender, SelectionChangedEventArgs e)
    {
        string[] routeArray = { "0南","0東","1","108","108區(二子坪)","以下省略"};

        if (routeArray.Contains(strQuery))
        {
            searchWebView.Source =
            new Uri(Uri.EscapeUriString("https://pda.5284.com.tw/MQS/businfo2.jsp?routeId="
            + strQuery));
            VisualStateManager.GoToState(this, "ResultsFound", true);
        }
        else
        {
            VisualStateManager.GoToState(this, "NoResultsFound", true);
        }
    }
就簡單完成我們的第3項功能了! 最後為了讓畫面不致太單調,我加入一個台北的夜景作為背景:
首先將圖片檔直接拉到 Assets 的資料夾之中,就能在 Grid 中作好背景設定:
為了能讓此程式順利上架 Windows Store ,需要準備一些 logos ,如程式一開始的 Splash screen logo、出現在 Windows Store市集時的logo等,這部份我是用一個 Syncfusion 公司提供,目前免費的工具來製作https://www.syncfusion.com/downloads/metrostudio . 製作時記得在.appxmanifest之中查一下所需logos的大小喔!
同時,因為我的確使用了網際網路 (Internet) 的功能,所以必需宣告隱私權原則 (延伸閱讀: 最常見的退件原因- 隱私權聲明 ),我的作法如下:
第三步: 在App.xaml.cs中加入以下程式碼,讓使用者可以在Charms Bar的設定中找到「隱私權」的連結:
         private void OnCommandsRequested(SettingsPane sender, SettingsPaneCommandsRequestedEventArgs args)
        {
            UICommandInvokedHandler handler =                      new UICommandInvokedHandler(onSettingsCommand);<br>            SettingsCommand privacy1Command =                      new SettingsCommand("privacystatementPage", "隱私權原則", handler);<br>            args.Request.ApplicationCommands.Add(privacy1Command);


        }
        async void onSettingsCommand(IUICommand command)
        {
            SettingsCommand settingsCommand = (SettingsCommand)command;            if (settingsCommand.Id.ToString().Equals("privacystatementPage"))<br>            {<br>                var success = <br>                     await Windows.System.Launcher.LaunchUriAsync(                             new Uri(@"https://mengtsai.azurewebsites.net/?p=51"));


            }
        }
並記得在同一檔案的 OnLanuched() 方法最後,加入以下這行,以登記 OnCommandsRequested() 這個 event:
    // Register handler for CommandsRequested events from the settings pane
   SettingsPane.GetForCurrentView().CommandsRequested <br>                                   += OnCommandsRequested;
我親自撰寫的程式碼部份僅止於此,若不計開發工具自動產生的程式碼的話,是個總計不到50行statements的簡單App。這個第一版本的 App 跑起來的長相大致如下:
搜尋畫面的部份:
下一篇文章 則會記錄上架的過程及需要注意的眉角!


