Configuring email enabled Document libraries in MOSS
This article will help you to configure your MOSS2007 environment for libraries to receive incoming e-mail using a standard e-mail address that can be used both internally and externally.
In order to describe the steps to achieve the above task, we take the SharePoint farm as follows
Win2k3-DC :
Domain controller
Exchange server 2003
DNS server
SQL server 2005
Win2k3-MOSS :
MOSS 2007 SP2
SMTP
Step 1
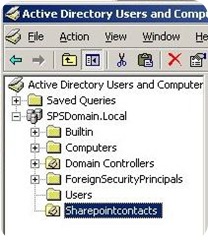
MOSS creates and uses AD contacts to configure Email enabled document libraries. So we need to first determine where in AD these contacts can be created . I prefer if these contacts can be created in a separate or dedicated OU so that the troubleshooting becomes easier. Here is an example from my test environment.
Step 2
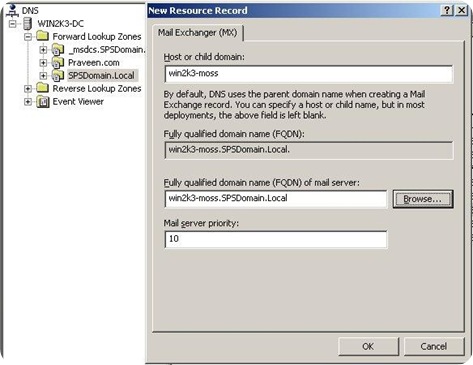
Now, we need to configure an MX record for the MOSS server in DNS. Follow the below step
- Open DNS manager in DC (start->run and type dnsmgmgt.msc and hit enter)
- Traverse to the Domain name under “Forward lookup zone” and right click –>select “New Mail exchanger(MX)”
- Provide the host name of the MOSS server and the FQDN of the SMTP server ( in our case MOSS server itself)
This will look like:-
Step 3
Install and configure SMTP service
- Login to MOSS server and click on start –>run then type appwiz.cpl
- Click on Add/Remove windows components –>application server->details->IIS->details-> enable SMTP service and click OK
- Provide Windows installation CD to copy the necessary files
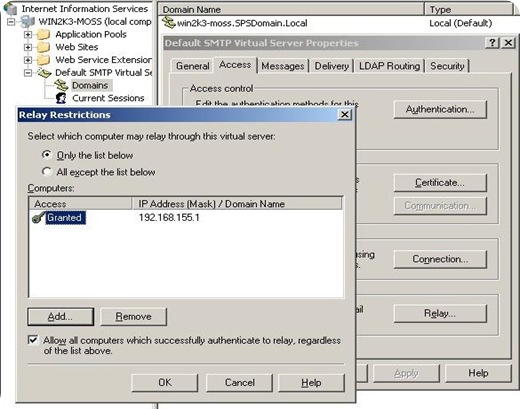
- Once the installation completes , Start, Administrative Tools, Internet Information Services
- Right click on Properties of Default SMTP Virtual Server
- Click the Access Tab, Relay. Add the IP address of the servers that can relay through this server. In my case this was the Exchange server in my domain
- Click Ok, Ok, and Apply
Step 4
- Open MOSS2007 Central Administration and click on the Operations Tab
- Click Yes to enable incoming mail and the settings mode on Automatic
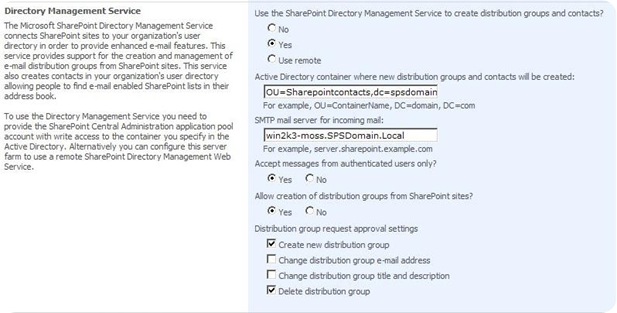
- Under the Directory Management Servicesection select Yes
- In the Active Directory Field type the name of your Organizational unit that we created earlier. example: OU=Sharepointcontacts,dc=spsdomain,dc=local.
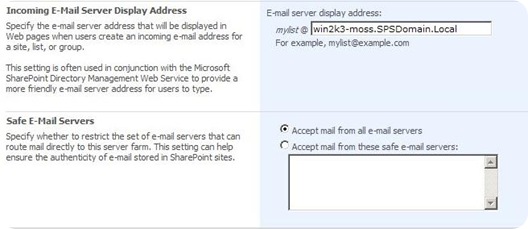
- In the SMTP mail server field type the name of your moss server tat has the SMTP server installed. Example win2k3-moss.SPSDomain.local
- Leave the value to default for all other columns Directory management section on this page
Under “Incoming email server display address” , make sure we have the right right SMTP server address
You can set “Accept mail from all email servers” or “accept mail from these safe email servers” depending up on your wish
Click on OK
Step 5
Now, we will create a new document library on a existing site , to do that
- Open the site with administrator privilege
- Click on “View all site content”
- Click on create and then document library
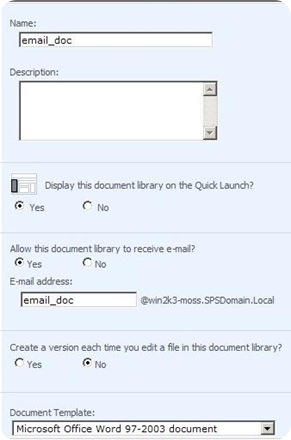
- Enter the name of the document library (example :- email_doc)
- Click on Yes for “Allow this document library to receive email”
- Provide the email id for the document library ( its always good to keep the similar name as the library name)
- Click ok Create
Step 6
- Open the document library we have just created
- Click Settings – document library settings
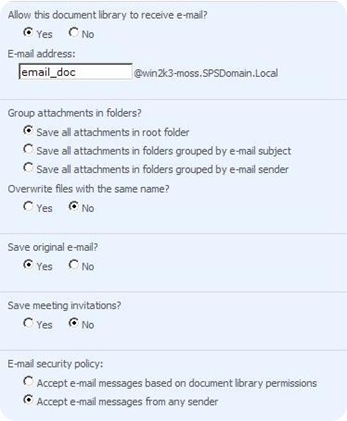
- Under Communication Settings click E-Mail Settings
- In the E-Mail Message Section Select Yes for save original e-mail
- In the E-Mail Security section Select Yes to Accept e-mail messages from any sender (optional)
- Click OK
Step 7
- Login back to DC and open dsa.msc
- Navigate to the OU “Sharepointcontacts” and make sure we have new contact in the name “email_doc” present there
- You can open the contact and verify the email id
- Make sure the username with which the Windows SharePoint services timer service is configured has proper permission on the drop folder located at “c:\inetpub\mailroot\drop”
Now, open up your outlook and start sending emails to email_doc@win2k3-moss.spsdomain.local with or without attachments. Wait for the timer service to run and the mails with / without attachments will appear in the document library list
