Getting Started with Windows Azure Active Directory – Setting up the Windows Azure AD Tenant
Windows Azure Active Directory (WAAD) is a new Windows Azure service that provide Identity and Access management capabilities via the Windows Azure cloud. It is primarily designed for providing this service for cloud/web based applications that need to access your local Active Directory information. But it can also be integrated directly with your on-premise Active Directory to enable single sign-on capabilities through directory synchronization. This allows your application developers to integrate their applicatons with your existing Windows Active Directory without having to maintain a separate unique user base for identity management.
In this post, I am going to walk through the process of
Creating a Windows Azure account
Create a new directory in Windows Azure Active Directory
Preparing for Directory Synchronization
Configuring Directory Synchronization
Creating a Windows Azure account
If you do not have an account, you can get one here – Sign up for a Free 90 Day Windows Azure Account
Create a new directory in Windows Azure Active Directory
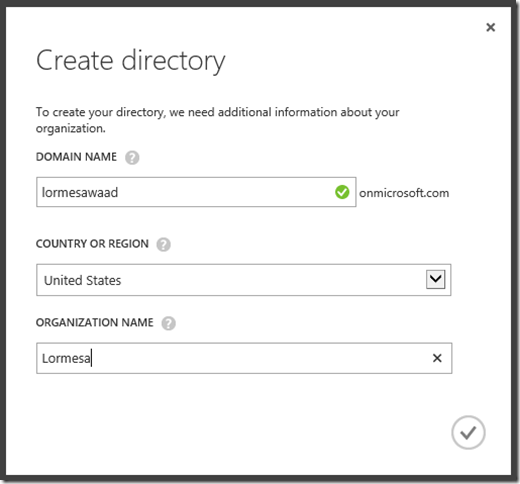
Once you have logged into the Windows Azure Admin portal, you will need to create a new directory -
You will be prompted to create a new directory name. By default, this will reside in a “.onmicrosoft.com” domain space, but you will be given the opportunity later on to join to an existing, on-premise AD domain (like “mycompany.local”)
Once you continue from this screen, Windows Azure will begin provisioning the AD Name space provided. In my experience, this usually takes no more than 1-2 minutes.
Once it has been provisioned, click on the name space. here you will have several options -
Users - Allows you to add users to the default name space we just created
Integrated Apps – Allows you to enable single sign-on for web based applications that require access to your Active Directory data. This requires you to register the application with AD. To register the app you have to tell WAAD the name of the application and the type of access it needs to AD – Single Sign-On, Single Sign-On + Read Directory Data, or Single Sign-On +Read/Write Directory Data. in all cases, you will also have to provide the URL endpoint for the application and a unique App ID URI. The APP URI is a logical application identifier (app developers should read the following - Application Objects and Service Principal Objects)
Domains – Allows you to add custom internet domains to the Windows AD administration. This is NOT you on-premise domain for Active Directory. This is your public facing, custom domain name (ie, mycompany.com). You can add multiple domains to Windows Azure AD. However, you can’t add the same domain to multiple Windows Azure AD tenants. As such, for testing, I would NOT recommend that you start with your active production company domains. You can delete domains though so it is simple enough to delete a domain, then add it to another Windows AD Tenant.
Directory Integration – This is where we can synchronize our on-premise active directory with Windows Azure AD
Preparing for Active Directory Synchronization
NOTE - Activating directory synchronization should be considered a long-term commitment. After you have activated directory synchronization, you can only edit synchronized objects by using your on-premises Active Directory management tools. Before you start this process, I highly encourage you to read this article on – Preparing for Directory Synchronization .
One of the key elements to setting up Directory Synchronization between your on-premise active directory and Windows Azure AD is having a designated directory synchronization computer. This machine will have the Directory Synchronization tool installed to it which allows local AD to synchronize with WAAD.
The directory synchronization computer must meet the following requirements:
- It must run Windows Server as operating system. The following versions of the Windows Server operating system are supported:
- 64-bit edition of Windows Server 2008 Standard or Enterprise, Windows Server 2008 R2 Standard or Enterprise, or Windows Server 2008 Datacenter or Windows Server 2008 R2 Datacenter.
- 64-bit edition of Windows Server 2012 Standard or Datacenter.
- It must be joined to Active Directory. The computer must be joined to the Active Directory forest that you plan to synchronize. For the rich co-existence scenario, this is a requirement because the DirSync server explicitly enumerates and reaches out to all domain controllers in the forest in order to set permissions for writeback. This is not the case if you do not have rich co-existence enabled.
The computer also must be able to connect to all the other domain controllers for all the domains in your forest. A forest is one or more Active Directory domains that share the same class and attribute definitions, site and replication information, and forest-wide search capabilities. - It cannot be a domain controller. The Directory Sync tool cannot be installed on Active Directory domain controllers.
- It must run Microsoft .NET Framework 3.x. If you are running Windows Server 2008, the .NET Framework will already be installed; if not, you can download it from the following locations:
- It must run Windows PowerShell: If you are running Windows Server 2003, you need to download Windows PowerShell. If you are running Windows Server 2008, you need to enable Windows PowerShell. For more information, see Install Windows PowerShell on the directory sync computer.
- It must be located in an access-controlled environment. Access to the computer that is running the Directory Sync tool should be limited to those users who have access to your Active Directory domain controllers and other sensitive network components. Only users or administrators that have the necessary permissions to make changes to domain controllers in Active Directory should have access to this computer.
Once you have identified a machine to use as the Directory Synchronization machine, there are a series of items to walk through -
Add and verify domains – If you will be enabling single sign-on for applications, you will need to add at least one custom domain. This is performed on the Domains tab in the Windows Azure admin portal. In my example, I have added my public facing domain. It is listed as unverified. To verify it, click the Verify button at the bottom of the page. In my case, I was instructed to go back to the Directory Integration Page and follow the direction there.
Depending on how you have added your custom domain, you will have to verify it. in most cases, verification will be handled on the Directory Integration page
Note: You made need to force a refresh of the admin portal to see the verification steps. To force a refresh, hold the CTRL key on the keyboard while refreshing the page in your browser.
Each of the items links to necessary resources you should review.
Prepare for directory sync - Next, you should verify that your AD environment is properly configured and that any issues you have are resolved. You can verify this easily using the Microsoft Deployment Readiness Tool. This tool inspects your Active Directory environment, and then provides a report that includes a prerequisite check and an attribute assessment that are specific to the Directory Sync tool requirements. If your environment doesn’t meet these requirements, the tool lists the changes you have to make before you can begin directory synchronization. It’s much easier to make directory changes before you activate and install the Directory Sync tool than to troubleshoot configuration errors after you have activated directory synchronization.
One of the more common issue you will need to address is the addition of User Principal Names
Once you have addressed any issues revealed by the Microsoft Deployment Readiness Toolkit, you can move on to setting up directory synchronization.
Prepare for Single Sign-On – Follow the guidance in these articles if you will be performing SSO with Office365, Windows InTune, or other applications -
Download and install the prerequisites for Windows PowerShell cmdlets for Windows Azure AD
Note – these require that you have the .NET framework 3.5 SP1 or later enabled on the machine
Download and install the Windows PowerShell cmdlets for Windows Azure AD
Configure Domains for Single Sign-On
Verify Single Sign-On - Verify Single Sign-On is working between your on-premise AD and WAAD
Finally, activate directory synchronization in Windows Azure Active Directory by clicking on “Activated” next to Directory sync on the Directory Integration page, then click “Save” at the bottom of the page -
Windows Azure Active Directory is now enabled for directory synchronization. The next step is to make sure you have the Directory Sync tool installed to a capable machine then run it to synchronize from your local AD to WAAD.
The tool must be installed with LOCAL administrative rights. The only item to configure during the install is the install path. Be patient when you get to the “Installing Components” screen. It may take up to 10 minutes for this to complete.
Once setup is complete, click Finish to start the Configuration Wizard and start your first Sync.
The first thing you will be prompted for is the credentials the DirSync tool needs to connect to your Windows Azure Active Directory. Provide the credentials then click next -
Next, you will be prompted for the credentials for an on-premise Active Directory Enterprise Administrator. Enter the credentials then click next -
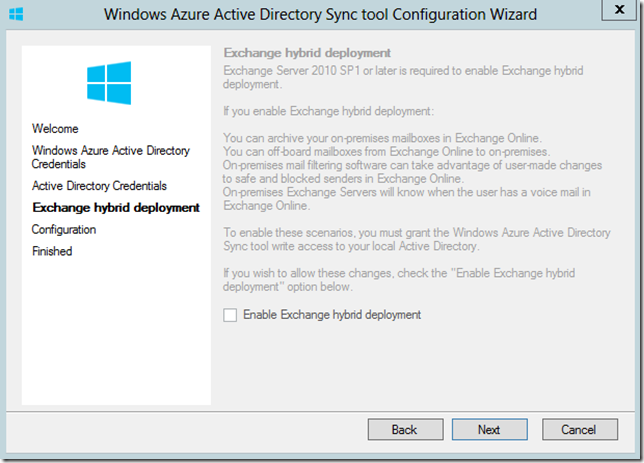
If you have Exchange in your environment, the tool will detect it in Active Directory and allow you to enable an Exchange Hybrid Deployment. In my case, I no longer have Exchange deployed locally and instead use Office365 (which is why I am configuring all of this!) – Click Next
The next screen shows the progress for the tool configuration. Click Next when it finishes -
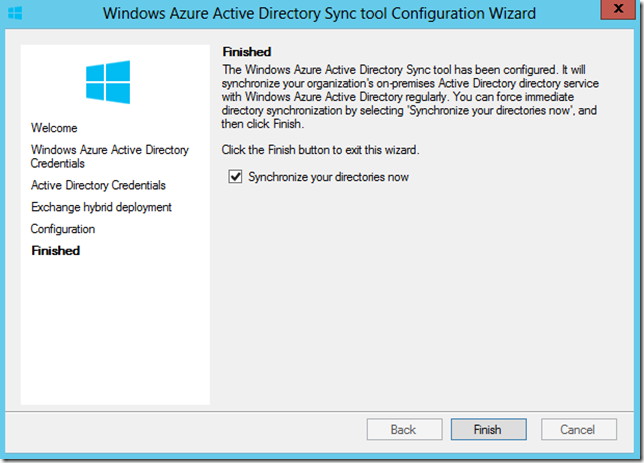
This final screen prompts you to synchronize your directories. Click Finish to start the sync. the amount of time it will take to synchronize will depends on how many objects you have in your local AD.
Next, we need to verify synchronization.
The simplest means of verifying is to just login to the Windows Azure portal, select Active Directory, then select the Users tab. You should see users from your local active directory begin to get populated in Windows Azure AD. In my example, all of the on-premise AD domain accounts for users have now been synchronized with Windows Azure Active Directory -
From here you have some additional options.
Manage Service Account – The Directory Sync tool creates and uses a service account called - MSOL_AD_SYNC – which will be subject to password policies set by your administrators and Group Policy.
Add a new custom domain with single sign-on - Use Windows PowerShell cmdlets to add a custom domain for federation to Windows Azure AD
Configure an existing custom domain for single sign-on - Use Windows PowerShell cmdlets to convert an existing standard domain to a federated domain
Convert to a standard domain - Use Windows PowerShell cmdlets to convert an existing federated domain to a standard domain
I hope this information helps you with getting Active Directory configured in Windows Azure!
Additional Resources:
Identity and Windows Azure Active Directory
WAAD – Integrated Applications
TechNet: Windows Azure Active Directory
TechNet: Prepare for directory synchronization
Cheers!
Comments
- Anonymous
January 02, 2014
Pingback from Windows Azure AD Replication | Will Code for Food - Anonymous
January 02, 2014
Pingback from Windows Azure AD Replication | Will Code for Food - Anonymous
January 02, 2014
Pingback from Windows Azure AD Replication | Will Code for Food - Anonymous
January 02, 2014
Pingback from Windows Azure AD Replication | Will Code for Food


