Visual Studio Tips and Tricks – Formatting your code
 With a little setup and a keyboard shortcut you can easily keep your code formatted the way you want it!
We all have our habits in terms of how we format our code. So why not take 5 minutes to modify the Visual Studio settings so the code looks the way you want all the time! No matter what programming language you work with, there are settings you can control that affect the readability of your code.
Find more Visual Studio tips and tricks here
In this post I’ll share tips on how to modify a number of formatting settings, including
- Fonts and Colors
- Indenting
- Spacing
- Braces
- Line Wrapping
Fonts and Colors
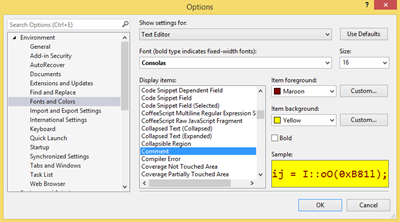
In addition to be able to changing the color theme in Visual Studio, you can also modify the font size or the colors used for different highlighting in your code. If you find the green hard to read for comments, you could change the font size, font color, or background color.
Just go to Tools | Options | Environment | Fonts and Colors (TIP: if you can’t remember that and are in Visual Studio 2012 or higher you could just use Quick Launch to find the Fonts and colors setting!)
Indenting code
Is the indenting too much or too little? You decide. The default indentation and tabs is 4 spaces, but you can increase or decrease the indents. Once again, you want to start in Tools | Options | Text Editor | C# | Tabs
When you return to your code, you will notice the changes have not taken effect. Just use the keyboard shortcut <CTRL><K><D> anywhere in your code to apply your formatting changes. Here you can see the code with the increased indentation after I apply the changes.
If you are using the Quick Launch featured just search for “tabs”
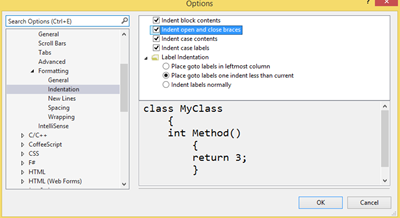
In addition to controlling the number of spaces used when code is indented, you can control what is indented. For example, do you prefer to have your braces indented? or inline with the method declaration?
Braces
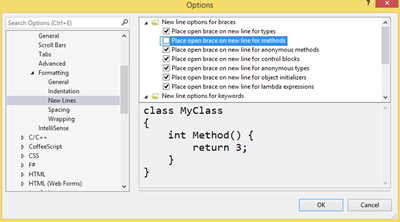
Does the opening brace for a method go after the method name or on the next line? I could start a whole debate over that, but instead I’m just going to let you set it up the way you want it to work! You can control where opening braces appear for method declarations, control blocks and more! Just go to Tools | Options | Text Editor | C# | Formatting | New Lines or search for braces in Quick Launch.
If you make a change in the settings, don’t forget you will have to use the keyboard shortcut <CTRL><K><D> to apply your formatting changes to existing code.
Spaces
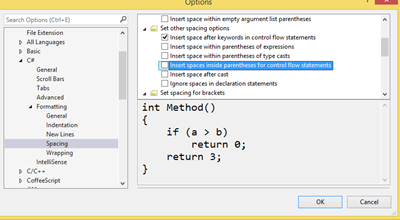
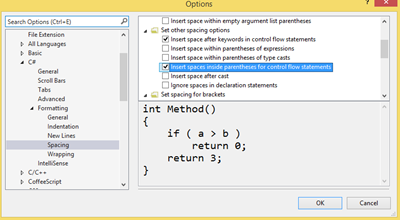
Did you know you can control whether you have spaces around parameters in method calls, or expressions in your if statements? Once again this is really a question of personal preference, but great that you can control the settings yourself! Just go to Tools | Options | Text Editor | C# | Formatting | Spacing
Some people prefer spaces around expressions in if statements to make them more readable.
Line wrapping
If you grew up coding in C or using Unix you probably love to fit as much code on one line as you can! But some programmers really like to keep code spaced out across line with clear indentation to make code more readable. Once again, it’s all up to you! Just go to Tools | Options | Text Editor | C# | Formatting | Wrapping and pick the settings you prefer .
Where can I get Visual Studio 2013?
All the features above are available in earlier editions of Visual Studio, but there is a lot of great stuff waiting for you in Visual Studio 2013. So if you haven't downloaded a copy yet. Download it and start exploring today.
- Students can download Visual Studio 2013 at Dreamspark www.dreamspark.com
- MSDN subscribers can download Visual Studio 2013 through their MSDN subscription
- Startup companies may qualify for MSDN through BizSpark www.Microsoft.com/bizspark
- Anyone can download Visual Studio 2013 Express or Trial versions at https://www.visualstudio.com/downloads
- Visual Studio Online – free for up to 5 users www.visualstudio.com/vsonline
Comments
- Anonymous
March 12, 2014
I have set these settings but they do not seem to apply themselves when I'm defining new methods. It automatically puts the ")" for the method declaration and then when I either type the "{" or press {Enter} it does not insert spaces after my "(" nor before my ")". Is there some trick to this? CTRL+K+D does not apply it either.
