UWP: Working with Bluetooth devices (part 1)
Code: Chapter26_BluetoothData on https://github.com/sbaidachni/Win10BookSamples
Universal Windows Platform supports really great Bluetooth API that allows us to build applications that are connected to various kinds of wiring devices. Your application can support Bluetooth LE (Low Energy, 4.x version) or even previous versions of the protocol, and I am going to cover how to use all of them, but let’s start with Bluetooth LE.
Bluetooth Low Energy
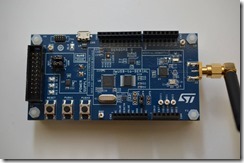
In order to build couple samples, I would recommend to use any BLE development board. The board should contain several sensors and a preinstalled example. In my case I have an evaluation board from STMicroelectronics (STEVAL-IDB007V1) based on BlueNRG-1 Bluetooth chip. This board contains a 3D digital accelerometer, a gyroscope (preinstalled example doesn’t return data from gyroscope by design) and a pressure sensor with an embedded temperature sensor. All these things we will be able to use in our application.
In fact, you can use any BLE device like a smart bulb that you can buy in Home Depot, but prior to buy anything you need to make sure that there is a document that describes all services and characteristics. Of course, using UWP API you will be able to read all available characteristics, but in the case of “no name” devices it’s really hard to understand how to interpret incoming data.
Universal Windows Platform contains five namespaces with Bluetooth keyword including Windows.Devices.Bluetooth. Exactly this namespace contains the BluetoothLEDevice class that will help us to get information about all available services and characteristics. But prior to start creating any instance of this class we need to implement interface that will allow a user to select our device from the list. Of course, we can list all device in code and connect to any of them without any interaction with the user, but it’s always better to get confirmation from the user.
Therefore, I am going to implement UI that will use some criteria to list all available devices and allows users to select one from the list. We can do it using the Windows.Devices.Enumeration namespace. In general, the namespace doesn’t contain any Bluetooth related classes. Instead, there are several universal classes that allow us to list anything that is connected to our computer/phone. This namespace even supports DevicePicker and DevicePickerFilter classes that can simplify our work thanks to embedded dialogs. But using these classes is a trivial task:
DevicePicker picker = new DevicePicker(); picker.Filter.SupportedDeviceSelectors.Add
BluetoothLEDevice.GetDeviceSelectorFromPairingState(false));
picker.Filter.SupportedDeviceSelectors.Add(
BluetoothLEDevice.GetDeviceSelectorFromPairingState(true));
picker.Show(new Rect(x, y, width, height));
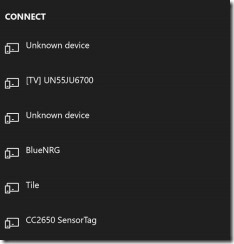
Code below will show the following dialog that display all paired and non-paired Bluetooth Low Energy devices:
The dialog support DeviceSelected event that helps us to understand which device is selected. Alternatively, you can use PickSingleDeviceAsync method to avoid any event handlers. You can see that DevicePicker can display any devices. So, in order to display just BLE devices we need to setup a filter using Advanced Query Syntax string. ADS can be a little bit complex to setup. That’s why we used the BluetoothLEDevice class to get access to some predefined strings. Using the GetDeviceSelectorFromPairingState method we can return all BLE devices that are paired or non-paired. Adding both strings to the filter, we can select all available BLE devices.
In my examples, I am not going to use embedded dialogs. Instead of using them, I decided to build my own interface. In order to implement it, I need to create a page that will display a list of all devices in my own way. Using the DeviceInformation class I can find all BLE devices using the FindAllAsync method, but this approach is not the best one, because, I have to assume that users can activate new Bluetooth devices “on fly”. So, we have to look at all changes all time rather than use a snapshot and we cannot use just the FindAllAsync method in the DeviceInformation class. Instead, we will create a watcher that will notify us about any changes in the list of available devices. In order to do that, we can use the DeviceWatcher class that is available in the Windows.Devices.Enumeration namespace. Let’s look at the following code:
DeviceWatcher deviceWatcher;
protected async override void OnNavigatedTo(NavigationEventArgs e)
{
deviceWatcher = DeviceInformation.CreateWatcher(
"System.ItemNameDisplay:~~\"BlueNRG\"",
new string[] {
"System.Devices.Aep.DeviceAddress",
"System.Devices.Aep.IsConnected" },
DeviceInformationKind.AssociationEndpoint);
deviceWatcher.Added += DeviceWatcher_Added;
deviceWatcher.Removed += DeviceWatcher_Removed;
deviceWatcher.Start();
base.OnNavigatedTo(e);
}
You can see that in order to create the watcher, we used the CreateWatcher static method that you can find in the DeviceInformation class. This method accepts several parameters. Using the first one we can provide a filter that can help us list just needed devices. It’s the same Advanced Query Syntax string that we used before, but in this case, we created it from scratch rather than using a predefined one. It’s a good idea to show different approaches and I used a filter that helps me find exactly devices that contain BlueNRG string in their names. To implement this filter I used the System.ItemNameDisplay property. Because all my dev kit is available as BlueNRG by default, my application will show just my device. Of course, we should not hardcode any names and it’s better to use less restrictive filter like we did in the first block of codeIf you want to find more information about possible ADS properties you can visit this page.
The second parameter is a set of properties that should be available for a device. In this case we requested DeviceAddress and IsConnected properties, but I used it just for the demo. I assume that you will not able to find many different devices with BlueNRG name around, so, you can simply remove this parameter.
Finally, we have to pass the DeviceInformationKind flag. In our case it should be AssociationEndpoint that is true for all Bluetooth LE devices that advertise their interface.
Once we create the watcher, we need to assign event handlers to Added and Removed events and start the watcher. Pay attention that if you forget to assign Removed event handler, the watcher will not work. I am not sure “why”, but once I assigned an empty event handler, the watcher started without any problem. Here is my code:
protected override void OnNavigatedFrom(NavigationEventArgs e)
{
deviceWatcher.Stop();
base.OnNavigatedFrom(e);
}
private void DeviceWatcher_Removed(DeviceWatcher sender, DeviceInformationUpdate args)
{
//throw new NotImplementedException();
}
private async void DeviceWatcher_Added(DeviceWatcher sender, DeviceInformation args)
{
var device = await BluetoothLEDevice.FromIdAsync(args.Id);
var services=await device.GetGattServicesAsync();
foreach(var service in services.Services)
{
Debug.WriteLine($"Service: {service.Uuid}");
var characteristics=await service.GetCharacteristicsAsync();
foreach (var character in characteristics.Characteristics)
{
Debug.WriteLine($"Characteristic: {character.Uuid}");
}
}
}
Now, you can run the code above and it will start looking for a BlueNRG device and once it’s available, it will print all supported services and characteristics to the Output window. I got the following data for my device:
Service: 00001801-0000-1000-8000-00805f9b34fb
Characteristic: 00002a05-0000-1000-8000-00805f9b34fb
Service: 00001800-0000-1000-8000-00805f9b34fb
Characteristic: 00002a00-0000-1000-8000-00805f9b34fb
Characteristic: 00002a01-0000-1000-8000-00805f9b34fb
Characteristic: 00002a04-0000-1000-8000-00805f9b34fb
Service: 02366e80-cf3a-11e1-9ab4-0002a5d5c51b
Characteristic: e23e78a0-cf4a-11e1-8ffc-0002a5d5c51b
Characteristic: 340a1b80-cf4b-11e1-ac36-0002a5d5c51b
Service: 42821a40-e477-11e2-82d0-0002a5d5c51b
Characteristic: a32e5520-e477-11e2-a9e3-0002a5d5c51b
Characteristic: cd20c480-e48b-11e2-840b-0002a5d5c51b
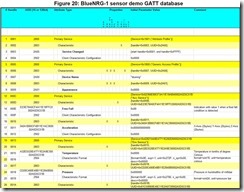
You can see that the device supports four services and each of them contains from one to three characteristics. In order to understand what is it, we need to visit STMicroelectronics web-site (st.com) and find a document that describes all these things. The document called UM2071 : BlueNRG-1 development kit. If you type this name in the Search box and open the Resource tab, you will be able to find it. This document contains much information, but we need just a table with characteristics (Figure 20):
Looking at this table we can note service UUIDs for Acceleration, Temperature and Pressure. It’s exactly that I am going to display in my application. Potentially we can check Free Fall, but I have just one board, and I will try to avoid any scary experiments.
Pay attention that Bluetooth LE standard contains some standard profiles that can help you recognize some standard services. Profiles, it’s something that operating system uses to connect any Bluetooth mouse or stream video/audio between different devices (not BLE, but the idea is the same). In some case you will need to rely on standard profiles, but in some cases, you can create your own. Looking at the table below you can see that our development board implements standard attribute and generic access profiles. Thanks to them Windows can read some information about the device like device name. But all other services implement custom profiles. It’s ok if your device is not going to support any standard feature and it can be a problem for you if you want to connect some low-cost Bluetooth devices to your application. I found that lots of devices from “no name” companies implement own custom profile and if you want to connect your phone or tablet to these devices you have to download an application. But once you want to create your own application, it’s really hard to find how the device works.
Ok. Now we know where to find information about supported services and characteristics, but we still didn’t finish our main page. So, let’s do it.
In order to store information about all available devices I will use a collection that will store references to DeviceInformation objects:
ObservableCollection<DeviceInformation> deviceList =
new ObservableCollection<DeviceInformation>();
The collection should be observable because we are going to bind it to our interface and it should track any changes dynamically.
Now, we can modify our event handlers:
private async void DeviceWatcher_Removed(DeviceWatcher sender, DeviceInformationUpdate args)
{
var toRemove = (from a in deviceList where a.Id == args.Id select a).FirstOrDefault();
if (toRemove != null)
await this.Dispatcher.RunAsync(
Windows.UI.Core.CoreDispatcherPriority.Normal,
() => { deviceList.Remove(toRemove); });
}
private async void DeviceWatcher_Added(DeviceWatcher sender, DeviceInformation args)
{
await this.Dispatcher.RunAsync(
Windows.UI.Core.CoreDispatcherPriority.Normal,
() => { deviceList.Add(args); });
}
You can see that we use the handlers to track changes in the list. Pay attention that both handlers are running in non-UI thread. So, we have to invoke dispatcher to modify our collection.
Finally, we can build UI. It will be primary a ListView that will display Id, Name and Pairing properties:
<ListView Grid.Row="2" Name="deviceListView" ItemsSource="{Binding}" IsItemClickEnabled="True" ItemClick="deviceListView_ItemClick" HorizontalAlignment="Center">
<ListView.ItemTemplate>
<DataTemplate>
<Grid Margin="10">
<Grid.ColumnDefinitions>
<ColumnDefinition Width="100"></ColumnDefinition>
<ColumnDefinition Width="Auto"></ColumnDefinition>
</Grid.ColumnDefinitions>
<Grid.RowDefinitions>
<RowDefinition></RowDefinition>
<RowDefinition></RowDefinition>
<RowDefinition></RowDefinition>
</Grid.RowDefinitions>
<Image Source="Assets/stlogo.png" Margin="10" Grid.RowSpan="3"></Image>
<TextBlock Grid.Column="1" Grid.Row="0" Text="{Binding Id}"></TextBlock>
<TextBlock Grid.Column="1" Grid.Row="1" Text="{Binding Name}"></TextBlock>
<StackPanel Grid.Column="1" Grid.Row="2" Orientation="Horizontal">
<TextBlock Text="Can be paired: "></TextBlock>
<TextBlock Text="{Binding Pairing, Converter={StaticResource pairingConv}, Mode=OneWay}"></TextBlock>
</StackPanel>
</Grid>
</DataTemplate>
</ListView.ItemTemplate>
</ListView>
To run this code, you need to add an empty event handler for ItemClick. We will implement it later. Additionally, you can use OnNavigatedTo to set DataContext property and activate binding:
this.DataContext = deviceList;
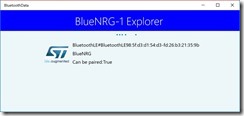
Running this code, we will see the following window:
Pay attention that our device is still not paired, but in order to start reading data from it we should not pair it. This feature is available since Windows 10 Creators Update. All previous UWP versions requires pairing prior start reading any data.
Ok. Now we can implement ItemClick event handler and once a user selects the device, we may navigate our application to the second page:
private void deviceListView_ItemClick(object sender, ItemClickEventArgs e)
{
this.Frame.Navigate(typeof(DevicePage), e.ClickedItem);
}
In order to simplify work with all sensors I created a base class that implements all needed features to read values from characteristics:
public class SensorBase:IDisposable
{
protected GattDeviceService deviceService;
protected string sensorDataUuid;
protected byte[] data;
protected bool isNotificationSupported = false;
private GattCharacteristic dataCharacteristic;
public SensorBase(GattDeviceService dataService, string sensorDataUuid)
{
this.deviceService = dataService;
this.sensorDataUuid = sensorDataUuid;
}
public virtual async Task EnableNotifications()
{
isNotificationSupported = true;
dataCharacteristic = (await deviceService.GetCharacteristicsForUuidAsync(
new Guid(sensorDataUuid))).Characteristics[0];
dataCharacteristic.ValueChanged += dataCharacteristic_ValueChanged;
GattCommunicationStatus status =
await dataCharacteristic.WriteClientCharacteristicConfigurationDescriptorAsync(
GattClientCharacteristicConfigurationDescriptorValue.Notify);
}
public virtual async Task DisableNotifications()
{
isNotificationSupported = false;
dataCharacteristic = (await deviceService.GetCharacteristicsForUuidAsync(
new Guid(sensorDataUuid))).Characteristics[0];
dataCharacteristic.ValueChanged -= dataCharacteristic_ValueChanged;
GattCommunicationStatus status =
await dataCharacteristic.WriteClientCharacteristicConfigurationDescriptorAsync(
GattClientCharacteristicConfigurationDescriptorValue.None);
}
protected async Task<byte[]> ReadValue()
{
if (!isNotificationSupported)
{
if (dataCharacteristic == null)
dataCharacteristic = (await deviceService.GetCharacteristicsForUuidAsync(
new Guid(sensorDataUuid))).Characteristics[0];
GattReadResult readResult =
await dataCharacteristic.ReadValueAsync(BluetoothCacheMode.Uncached);
data = new byte[readResult.Value.Length];
DataReader.FromBuffer(readResult.Value).ReadBytes(data);
}
return data;
}
private void dataCharacteristic_ValueChanged(GattCharacteristic sender,
GattValueChangedEventArgs args)
{
data = new byte[args.CharacteristicValue.Length];
DataReader.FromBuffer(args.CharacteristicValue).ReadBytes(data);
}
public async void Dispose()
{
await DisableNotifications();
}
}
In general, the most important method in this class is ReadValue, but BLE supports notification mechanism. From the GATT table, we can see that our board supports at least one sensor that allows us use notifications to receive updated data. This is accelerometer sensor. Of course, I could read data from accelerometer using just ReadValueAsync method, but I wanted to show how to use notifications. It’s not always true that your device will send updated data several time per second and in this case notifications allows to save some time, avoiding not needed queries. You can see that in order to enable notification for a characteristic we simply have to add a special descriptor using WriteClientCharacteristicConfigurationDescriptorAsync method. Once the descriptor is assigned, we will be able to receive messages with new values for the characteristic.
Using our base class, it’s not a problem to create three more classes that describe our sensors. Here is an example for the temperature sensor:
public class TemperatureSensor: SensorBase
{
public TemperatureSensor(GattDeviceService dataService) :
base(dataService, SensorUUIDs.UUID_ENV_TEMP) { }
public async Task<double> GetTemperature()
{
byte[] data = await ReadValue();
return ((double)BitConverter.ToInt16(data,0))/10;
}
}
Pay attention that by default our sensors don’t use notification mechanism. So, if you want to enable notification for accelerometer, it’s needed to call EnableNotification method.
protected async void InitializeAccelerationSensor(GattDeviceService service)
{
accSensor = new AccelerationSensor(service);
await accSensor.EnableNotifications();
}
Finally, we can create a view model and bind it to our interface. I am not going to discuss all aspects of the view model, but want to concentrate your attention around couple methods. The first one is a method that initializes everything:
public async void StartReceivingData()
{
leDevice = await BluetoothLEDevice.FromIdAsync(device.Id);
string selector = "(System.DeviceInterface.Bluetooth.DeviceAddress:=\"" +
leDevice.BluetoothAddress.ToString("X") + "\")";
var services = await leDevice.GetGattServicesAsync();
foreach (var service in services.Services)
{
switch (service.Uuid.ToString())
{
case SensorUUIDs.UUID_ENV_SERV:
InitializeTemperatureSensor(service);
InitializePressureSensor(service);
break;
case SensorUUIDs.UUID_ACC_SERV:
InitializeAccelerationSensor(service);
break;
}
}
timer.Interval = new TimeSpan(0, 0, 1);
timer.Tick += Timer_Tick;
timer.Start();
}
You can see that we simple list all available services and once we found needed service we initialize appropriate sensor. This code should work even if you select a wrong device from the list of all BLE devices. The user interface will simply display nothing. Because two of our characteristics don’t support notifications we will simply use a timer to update the UI once per second.
The second method is exactly Tick implementation. It simply read data from all available sensors (characteristics) and uses INotifyPropertyChanged to update bindings:
public async void UpdateAllData()
{
if (tempSensor != null)
{
temperature = String.Format(
$"{(await tempSensor.GetTemperature())} Celsius");
if (PropertyChanged!=null)
PropertyChanged(this,
new PropertyChangedEventArgs("Temperature"));
}
if (presSensor != null)
{
pressure = String.Format(
$"{(await presSensor.GetPressure()).ToString()} milliBar");
if (PropertyChanged != null)
PropertyChanged(this, new PropertyChangedEventArgs("Pressure"));
}
if (accSensor != null)
{
var data = await accSensor.GetAcceleration();
angleX = data[0];
angleY = data[1];
angleZ = data[2];
if (PropertyChanged != null)
{
PropertyChanged(this, new PropertyChangedEventArgs("AngleX"));
PropertyChanged(this, new PropertyChangedEventArgs("AngleY"));
PropertyChanged(this, new PropertyChangedEventArgs("AngleZ"));
}
}
}
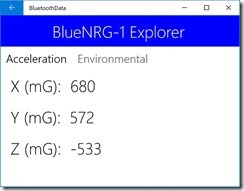
Running our code, we will be able to see two tabs. On the first tab (Acceleration), you will be able to see data from the accelerometer:
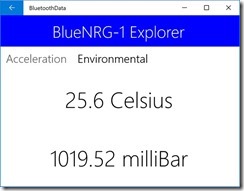
The second tab provides information about temperature and pressure:
Now, you know how to connect your application to any BLE device and get data from there. At the same time, we didn’t pair out device. Let’s see, how to use Bluetooth API to implement pairing and get some benefits from there.
