Part 4 of 4: Introduction to Consuming Azure Mobile Services from Android
Next Steps
- The next post will cover:
- Creating a new Android Application
- How to name your application and modules
- Application Name
- Project Name
- Package Name
- Creating a simple hello world application
- How to add a listview control
- Understanding and adding import statements
- Adding java code to populate the listview control with strings
- Download the httpclient library from the Apache Foundation
- Adding the httpclient library to our Android project
- Adding code to call into Azure Mobile Services
- Adding permissions to allow our Android app to call into Azure Mobile Services
- Adding all the java code needed to call into Azure Mobile Services
You will need a trial account for Windows Azure
- Please sign up for it here:
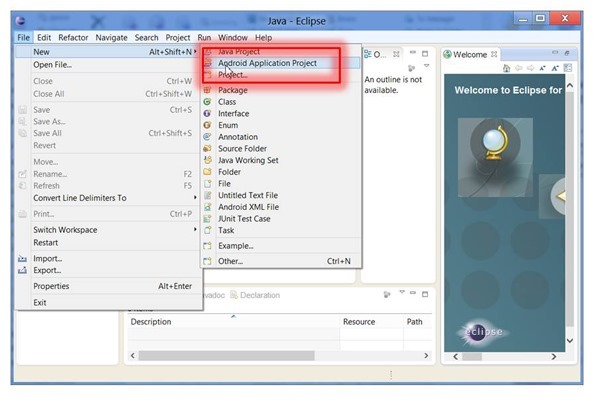
Creating a new application (Android, of course)
- This assumes you've installed:
- Eclipse
- Android SDK and tooling
Naming your Android Project
- Here you will specify:
- Application Name
- Project Name
- Package Name
Choosing default images, clip art, and text
- This is how you might brand your application
- We will just choose defaults
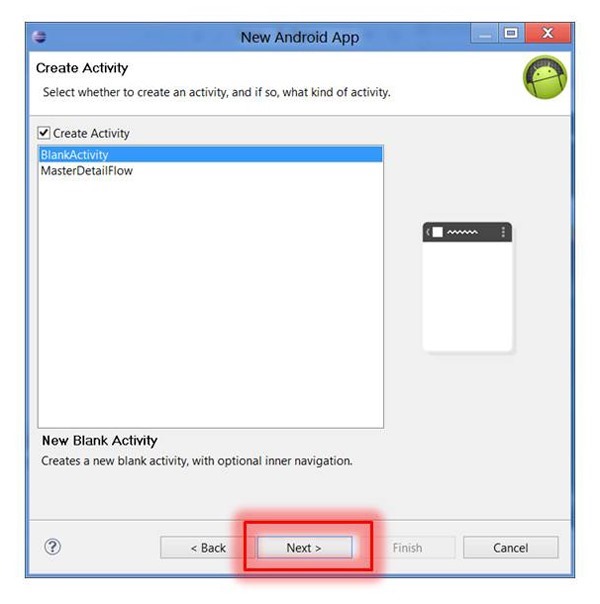
Choosing the default Blank Activity
- We will build everything from scratch, rather than have the tooling give us a master/detail interface.
- We will simply add one listview control
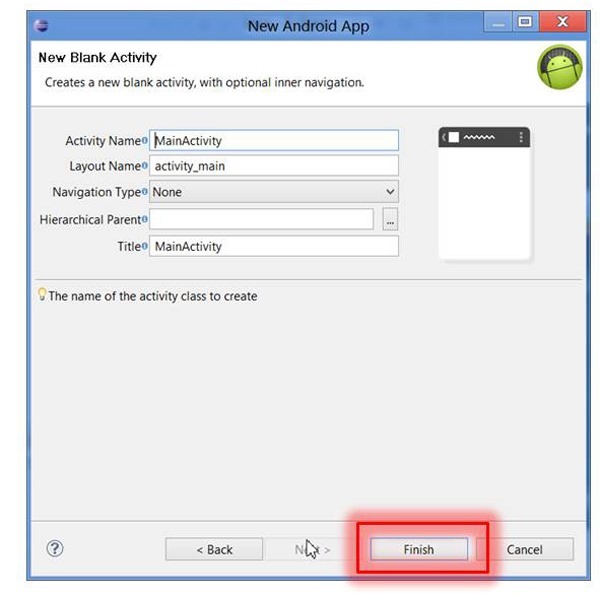
Choosing the default Activity Name
- Naming our activity.
- This will result in how some of the main user interface files and code are named
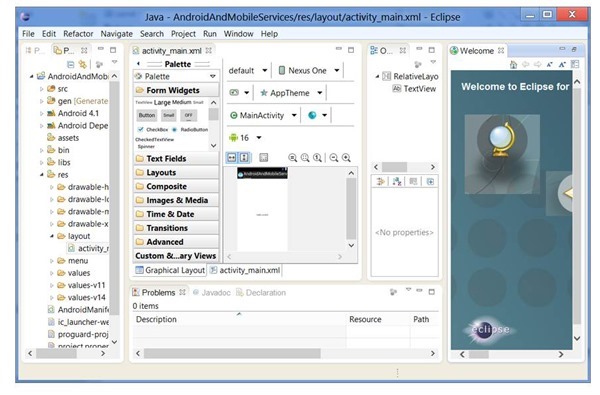
Viewing the default project that was created by the Eclipse wizard
- We will now start editing code and building the interface
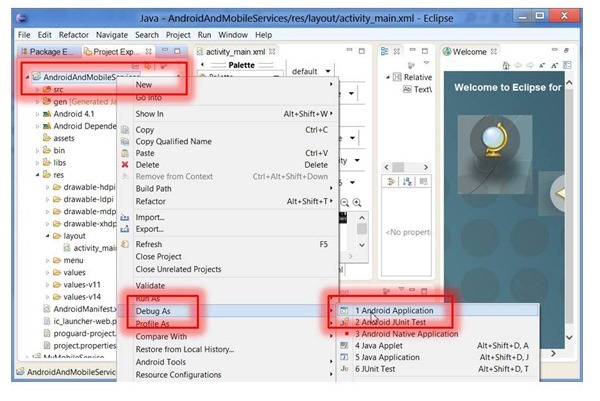
Running the default Android Template
- Let's run application just to see the default Hello World interface
- We will add our own code shortly.
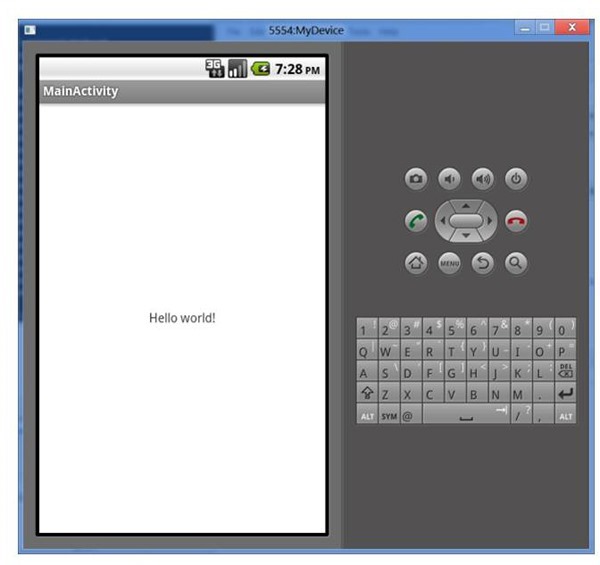
Viewing the running project
- This is just to verify that all the tooling is working.
- Frankly, the emulators are not entirely reliable.
- In many cases, I had to run my samples more than once to see a correct result.
Working with the ListView Control
- Adapters & ListView Controls
- A ListView receives its data via an adapter.
- The adapter also defines how each row is the ListView is displayed.
- The adapter is assigned to the list via the setAdapter method on the ListView object.
- Android provides several standard adapters; we will use ArrayAdapter
- ArrayAdapter can handle data based on Arrays or java.util.List.
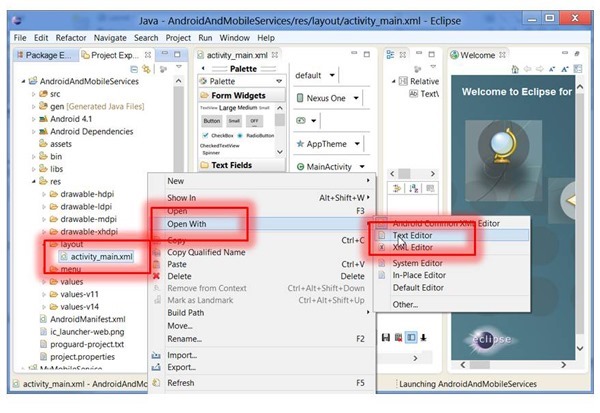
Opening a text editor and adding our ListView Control
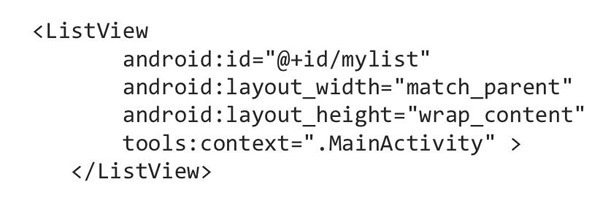
- We will now add our ListView control
- It is a simple case of modifying this XML file
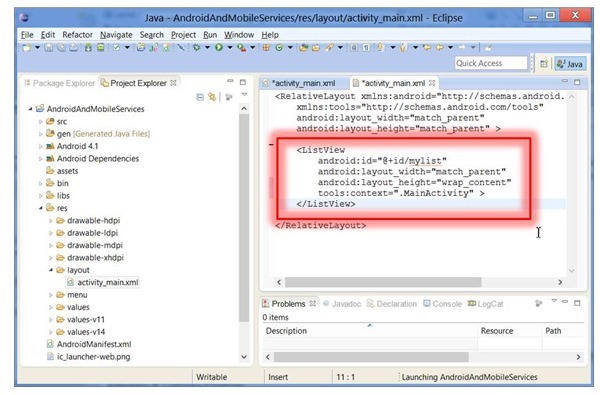
Implementing the ListView Control
- We simply need to paste in the following code.
activity_main.xml
| activity_main.xml | |
| 1 2 3 4 5 6 7 8 9 10 11 12 13 14 | <RelativeLayout xmlns:android="https://schemas.android.com/apk/res/android" xmlns:tools="https://schemas.android.com/tools" android:layout_width="match_parent" android:layout_height="match_parent" > <ListView android:id="\@+id/mylist" android:layout_width="match_parent" android:layout_height="wrap_content" tools:context=".MainActivity" > </ListView> </RelativeLayout> |
Modifying MainActivity.java - adding "import" statements
- I will present the whole source code module (MainActivity.java) shortly
- These import statements are needed for the listview
- More will be needed for the httpclient code that is needed to call into Azure Mobile Services
Adding code to onCreate()
- onCreate() is the startup method where we can add some code.
- We will populate the listview control with some simple strings.
- In the next section we will call into Azure Mobile Services to get data
- But first let's understand the listview control.
- We will first add some code to add items to the ListView control.
- Notice the following:
- We get the id for the ListView control so we can talk to it (note 1)
- Create a string array of what we will add to the listview (note 2)
- Create a ArrayAdapter and associate the strings from the previous step. (note 3)
- Associate the ArrayAdapter with the ListView control (note 4)
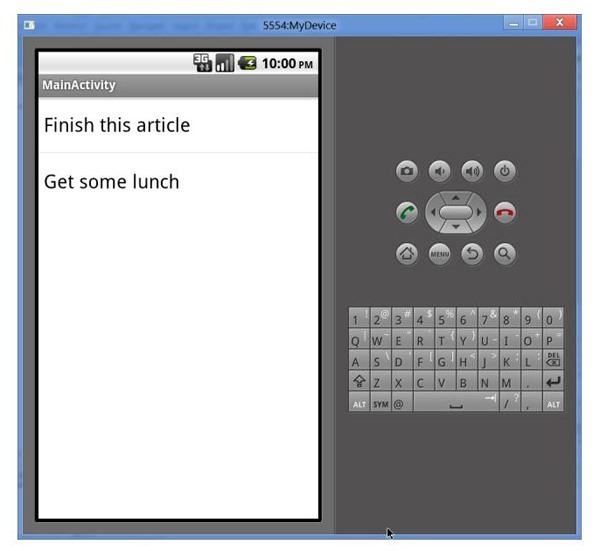
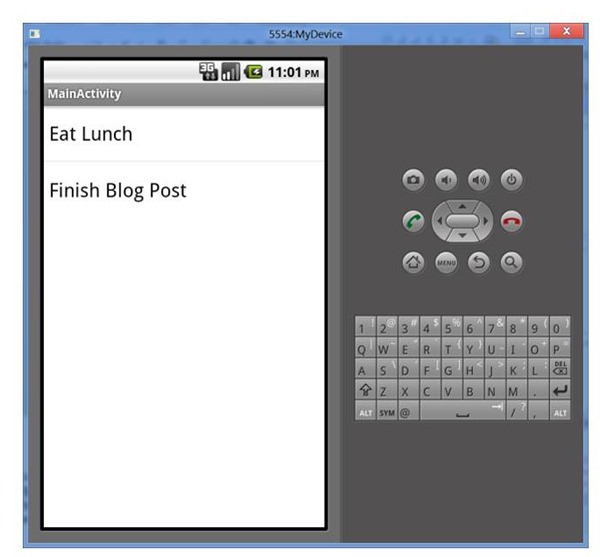
Viewing the application so far
- Our simple example is working so far.
- Follow these steps:
- From the menu, choose Run/Debug As/Android Application
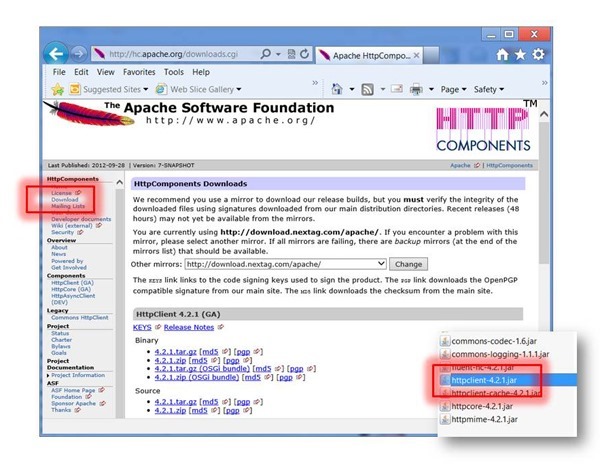
Download the httpclient library
- Follow these steps:
- Link is in the upper lift.
- It will be a zip file.
- Extract httpclient-4.2.1.jar to a folder.
- Navigate to the folder.
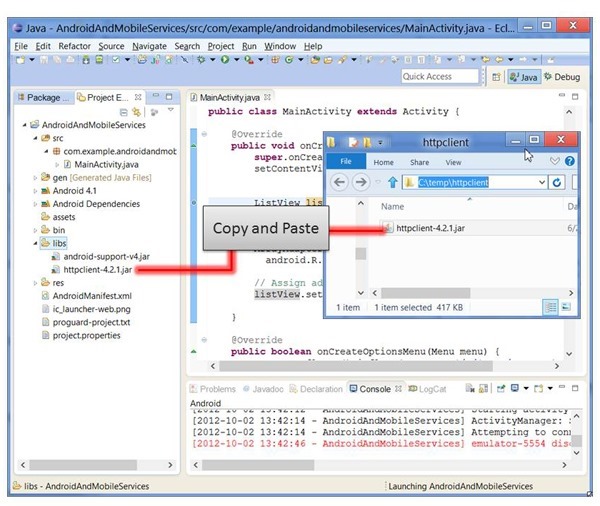
Copying the httpclient library to our project
- This is needed because we will be calling into Azure Mobile Services.
- httpclient.jar contains the code that allows use to make http calls into our Azure Mobile Service
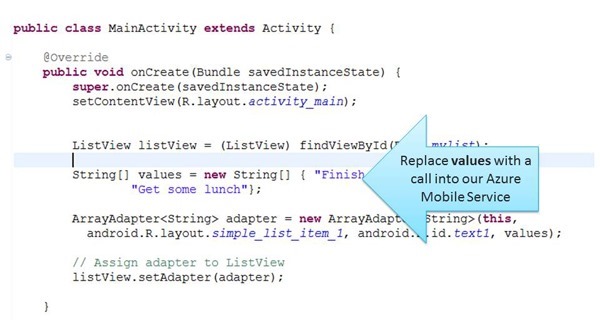
Editing the code to call into the Azure Mobile Service
- The array values will now be populated with values we get from the Azure Mobile Service.
- A few things to note:
- The URL that the Android client will call:
- public static final String kGetTodosUrl = https://brunotodoservice.azure-mobile.net/tables/TodoItem;
- Recall the brunotodoservice is something we defined when we created our Windows Azure Mobile Service.
- public static final String kGetTodosUrl = https://brunotodoservice.azure-mobile.net/tables/TodoItem;
- The URL that the Android client will call:
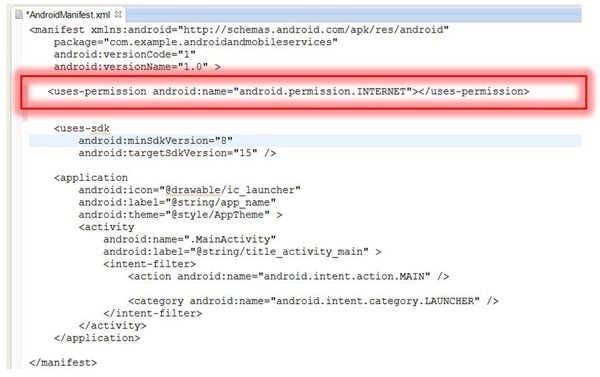
Opening the AndroidManifest.xml file
- We need to allow internet connectivity for our application.
- This is done in the AndroidManifest.xml file
AndroidManifest.xml
| AndroidManifest.xml | |
| 1234567891011121314151617181920212223242526272829 | <manifest xmlns:android="https://schemas.android.com/apk/res/android" package="com.example.androidandmobileservices" android:versionCode="1" android:versionName="1.0" > <uses-permission android:name="android.permission.INTERNET"></uses-permission> <uses-sdk android:minSdkVersion="8" android:targetSdkVersion="15" /> <application android:icon="\@drawable/ic_launcher" android:label="\@string/app_name" android:theme="\@style/AppTheme" > <activity android:name=".MainActivity" android:label="\@string/title_activity_main" > <intent-filter> <action android:name="android.intent.action.MAIN" /> <category android:name="android.intent.category.LAUNCHER" /> </intent-filter> </activity> </application> </manifest> |
- Our application will fail without this line.
- It is required.
Adding code to MainActivity.java
- You will now modify MainActivity.java to call into Azure Mobile Services
- You will two things from the portal to write this code:
- The URL for Azure Mobile Services
- The Application Id for Azure Mobile Services
- There are many important statements to add
| MainActivity.java | |
| 1 2 3 4 5 6 7 8 9 10 11 12 13 14 15 16 17 18 19 20 21 22 23 24 25 26 27 28 29 30 31 32 33 34 35 36 37 38 39 40 41 42 43 44 45 46 47 48 49 50 51 52 53 54 55 56 57 58 59 60 61 62 63 64 65 66 67 68 69 70 71 72 73 74 75 76 77 78 79 80 81 82 83 84 85 86 87 88 89 90 91 92 93 94 95 96 97 98 99 100 101 102 103 104 105 106 107 108 109 110 111 112 113 114 115 116 117 118 119 120 121 122 123 124 125 126 127 128 | package com.example.androidandmobileservices; import android.os.Bundle; import android.app.Activity; import android.view.Menu; import android.widget.ArrayAdapter; import android.widget.ListView; // Add these import statements import android.util.Log; // for logging import org.json.JSONArray; // for JSONArray import org.json.JSONObject; // for JSONObject import java.io.InputStream; // for reading the response as bytes import java.io.BufferedInputStream; // for reading the response as buffered bytes import java.io.BufferedReader; // for reading bytes in a buffered manner import java.io.InputStreamReader; // for reading bytes into BufferedReader import java.net.HttpURLConnection; // for HttpURLConnection import java.net.URL; // for URL public class MainActivity extends Activity { \@Override public void onCreate(Bundle savedInstanceState) { super.onCreate(savedInstanceState); setContentView(R.layout.activity_main); // Define needed constants: (1) url to our mobile service; // (2) service app id (from Azure Mobile Service Website) final String mobileServiceUrl = "https://brunotodoservice.azure-mobile.net/tables/TodoItem"; final String mobileServiceAppId = "FIoFunrUPBDhaFmmEXFHJCZoFEZILW45"; try { // Start building the request object to get the data URL url = new URL(mobileServiceUrl); // Build a request object to connect to Azure Mobile Services HttpURLConnection urlRequest = (HttpURLConnection) url.openConnection(); // Reading data so the http verb is "GET" urlRequest.setRequestMethod("GET"); // Start building up the request header // (1) The data is JSON format // (2) We need to pass the service app id (we get this from the Azure Portal) urlRequest.addRequestProperty("Content-Type", "application/json"); urlRequest.addRequestProperty("ACCEPT", "application/json"); urlRequest.addRequestProperty("X-ZUMO-APPLICATION", mobileServiceAppId); // We hold the json results JSONObject[] todos = null; // The listView control that will populate with data ListView listView = (ListView) findViewById(R.id.mylist); try { // Prepare some objects to receive the bytes of data // from the Azure Mobile Service InputStream in = new BufferedInputStream( urlRequest.getInputStream()); BufferedReader bufferReader = new BufferedReader( new InputStreamReader(in)); // responseString will hold our JSON data StringBuilder responseString = new StringBuilder(); String line; // Loop through the buffered input, reading JSON data while ((line = bufferReader.readLine()) != null) { responseString.append(line); } // Convert responseString into a JSONArray JSONArray jsonArray = new JSONArray(responseString.toString()); // Will hold an array of JSON objects todos = new JSONObject[jsonArray.length()]; // values is very important. It is the string array that will // get assigned to our ListView control. String[] values = new String[jsonArray.length()]; String s; // Loop through the objects. The ultimate goal is to have // an array of strings called "values" for (int i = 0; i < jsonArray.length(); i++) { todos[i] = jsonArray.getJSONObject(i); values[i] = todos[i].get("text").toString(); } // Create an array adapter using the string array called "values" ArrayAdapter<String> adapter = new ArrayAdapter<String>(this, android.R.layout.simple_list_item_1, android.R.id.text1, values); // Assign adapter to ListView listView.setAdapter(adapter); } catch (Exception ex) { Log.e("MainActivity Failure", "Error getting JSON from Server: "+ ex.getMessage()); } finally { urlRequest.disconnect(); } } catch (Exception ex) { Log.e("MainActivity Failure", "Error opening HTTP Connection: " + ex.getMessage()); } } \@Override public boolean onCreateOptionsMenu(Menu menu) { getMenuInflater().inflate(R.menu.activity_main, menu); return true; } } |
Conclusion
- We are now finished and have learned the following lessons:
- How to setup our Azure Mobile Services
- How to add tables, insert data to a relational database
- How to use http to issue GET and POST commands
- How to use low-level tooling (Fiddler) to interact with Azure Mobile Services
- How to create an Android application to read data from Azure Mobile Services.
- I bid you farewell. Thanks for reading.
You will need a trial account for Windows Azure
- Please sign up for it here:
Thanks..
I appreciate that you took the time to read this post. I look forward to your comments.
Comments
Anonymous
January 12, 2013
The comment has been removedAnonymous
January 30, 2013
You should not do any http calls in onCreate. Thanks, Simon. I agree. When writing demo code the goal is to avoid anything that distracts from the main code being demoed.Anonymous
August 14, 2013
Burno thank you for this series. I am trying to do something similar, but a bit different. I'm trying to call the Azure Management REST API from Android. Most of what you've put together here would apply with the exception of the SSL requirement for Azure Management. I'm so frustrated by this I'm about to create an bridge in WCF to wrap around the management services. I'm wondering if you have any words of advise on this. I have the management cert needed, the problem is figuring out the correct way to load that into the HTTP request object (C# makes it easy, Java not so much). I hit a lot of dead ends on this and am still a bit new to Android in general.Anonymous
April 27, 2014
Am getting this error Error getting JSON from Server: Not trusted server certificateAnonymous
June 15, 2014
Hi Burno, I found another blog about consuming Azure Mobile Service with Mobile Services SDK for Android hintdesk.com/android-how-to-consume-an-azure-mobile-services Is it better to use Microsoft Azure SDK than standard HttpClient?Anonymous
May 24, 2015
Am getting this error Error getting JSON from Server:Null Plz help me
