Getting Started with the SQL Server JDBC Driver
Okay, okay. I know that Java Database Connectivity (JDBC) doesn’t have much (if anything) to do with PHP, so I apologize in advance if you are tuning in expecting to find something PHP-related. However, I temper my apology with the idea that getting out of your comfort zone is generally beneficial to your growth. The fun part is that it is very often beneficial in ways you cannot predict. So, with that said, I’m embarking on an investigation of the Microsoft JDBC Driver for SQL Server in hopes that I will learn something new (maybe even many things). I do not plan to stop writing about PHP, so consider this trip to be a jaunt down a side street. In addition to my usual PHP-related content, I’ll aim to make Java/JDBC-related posts a couple times each month as I learn new and interesting things. But, when you start walking down side streets, you never know where you’ll end up…
What piqued my interest in the JDBC driver were two blog posts: Improving experience for Java developers with Windows Azure and JDBC 3.0 for SQL Server and SQL Azure Available. The latter post highlights SQL Azure connectivity using JDBC while the former post highlights the Windows Azure Starter Kit for Java. I’ve written several posts about PHP and the Azure platform, so I was curious about running Java in the Microsoft cloud. But first, I needed to figure out the basics of installation and executing simple queries, which is what I’ll cover in this post.
Installing the Java Development Kit (JDK)
The SQL Server JDBC documentation indicates that the SQL Server JDBC 3.0 driver is compliant with the JDBC 4.0 specification and is designed to work with all major Sun equivalent Java virtual machines, but is tested on Sun JRE 5.0 or later. Keeping my eye on the X.0’s, I installed the Java Development Kit (JDK) 6 (which you need for developing Java applications) from here: https://www.oracle.com/technetwork/java/javase/downloads/index.html. (Be sure to download the JDK, which includes the JRE. )
After you install the JDK, you need to make it accessible to your system by adding the path to the bin folder to your Path environment variable. If you haven’t done this before, here’s what you do:
1. Click Start –> Control Panel –> System –> Advanced Settings.
2. In the System Properties window, click Environment Variables:
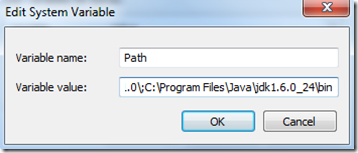
3. In the System Variables section, select the Path variable and click Edit.
4. At the end of the existing value, add a semi-colon followed by the path to your JDK bin directory and click OK:
You should now be ready to compile and run Java programs.
Installing the SQL Server JDBC Driver
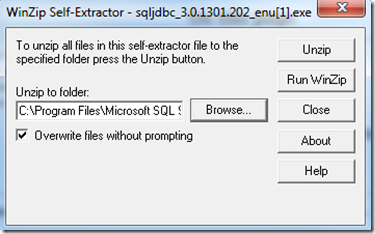
There are several versions of the SQL Server JDBC driver available for download on the Microsoft download site (mostly because each driver is compatible with different versions of Java). If you are ultimately interested in having SQL Azure access from Java, make sure you download this one: SQL Server JDBC Driver 3.0 for SQL Server and SQL Azure. Note that the download is a self extracting zip file. I recommend creating a directory such as this in advance: C:\Program Files\Microsoft SQL Server JDBC Driver. Then, you can simply unzip the file (sqljdbc_3.0) to that directory.
Next, you need to provide access to the JDBC driver classes from Java. There are a few ways to do this. I found the easiest way was to create a new environment variable, called classpath, and set its value to this:
To do this, follow steps 1 and 2 from above, then click on New in the User variables section:
Then enter classpath as the name of the variable and set it value to .;C:\Program Files\Microsoft SQL Server JDBC Driver\sqljdbc_3.0\enu\sqljdbc4.jar (or wherever your sqljdbc4.jar file is located) and click OK.
Click OK out of the Environment Variables, and System Properties dialogs.
Now we are ready to write some simple code.
Connecting and retrieving data
Finally, we can write some Java code that will connect to a database and retrieve some data. I won’t go into a Java tutorial here, but I will say that I have only written very little Java code in the past and I was able to figure out how to write the code below easily. Granted, I did find these topics in the docs helpful: Working with a Connection and JDBC Driver API Reference.
A few things did surprise me, probably because they are different than they are in PHP:
- Even though the classes are imported, I still had to use Class.forName to dynamically load the SQLServerDriver class.
- The connection string elements are different than they are with the SQL Server Driver for PHP (“user” vs. “UID”, “password” vs. “PWD”, and “database” vs. “Database”).
- The index for the returned columns starts at 1, not 0.
And, obviously, you have to put on your OOP hat when writing Java…
// Import the SQL Server JDBC Driver classes
import java.sql.*;
class Example
{
public static void main(String args[])
{
try
{
// Load the SQLServerDriver class, build the
// connection string, and get a connection
Class.forName("com.microsoft.sqlserver.jdbc.SQLServerDriver");
String connectionUrl = "jdbc:sqlserver://ServerName\\sqlexpress;" +
"database=DBName;" +
"user=UserName;" +
"password=Password";
Connection con = DriverManager.getConnection(connectionUrl);
System.out.println("Connected.");
// Create and execute an SQL statement that returns some data.
String SQL = "SELECT CustomerID, ContactName FROM Customers";
Statement stmt = con.createStatement();
ResultSet rs = stmt.executeQuery(SQL);
// Iterate through the data in the result set and display it.
while (rs.next())
{
System.out.println(rs.getString(1) + " " + rs.getString(2));
}
}
catch(Exception e)
{
System.out.println(e.getMessage());
System.exit(0);
}
}
}
To compile the code above, I first saved the file to C:\JavaApps as Example.java (class names are supposed to match file names). Then, I opened a command prompt, changed directories to C:\JavaApps and ran the following:
C:\JavaApps> javac Example.java
Doing that created a file called Example.class (in the same directory) which I could then run with this command:
C:\JavaApps> java Example
If you run the example against the Northwind database, you should see a nice list of customer IDs and names.
That’s it! Obviously, that’s just a start. I’ll continue to investigate with the idea of eventually getting things running on the Azure platform. if you have specific things you’d like me to investigate, please comment below.
Thanks.
-Brian
Comments
Anonymous
June 12, 2012
it was very helpfull....thank youAnonymous
September 05, 2012
Thanks a lot to provide this sweet piece of code with the community. It's basic, but very expendable. Really helped out.Anonymous
December 17, 2012
Thank you very much! This was very helpful :)Anonymous
May 21, 2013
I need to know How can I change the properties of JDBC driver? * Am using SqlServer 2008R2Anonymous
November 01, 2013
very helpful thanks a lot you make it clear to goAnonymous
January 16, 2014
Very NiceAnonymous
February 16, 2014
Thanks a lot!Anonymous
February 23, 2014
thank you so much!!!Anonymous
August 31, 2014
Great Work. Even XMPP server documentation couldn't explain this as clearly.ThanksAnonymous
March 03, 2015
Awesome! thank you! been trying to get this f*cking this working for ages.Anonymous
May 09, 2015
thanxxxx....Anonymous
July 02, 2015
Thanks - good & easy entry pointAnonymous
September 16, 2015
Hi test it but I recived ClassNotFoundException: com.microsoft ecc. Why?? Please help me, thanks.- Anonymous
March 22, 2016
Nicola,Are you using Eclipse or another IDE? I found this link which explains that the driver has to be referenced in the IDE.http://www.ccs.neu.edu/home/kathleen/classes/cs3200/JDBCtutorial.pdfHope this helps.
- Anonymous
Anonymous
May 04, 2016
The comment has been removed


