Silverlight 4 + RIA Services - Ready for Business: Search Engine Optimization (SEO)
To continue our series, let’s look at SEO and Silverlight. The vast majority of web traffic is driven by search. Search engines are the first stop for many users on the public internet and is increasingly so in corporate environments as well. Search is also the key technology that drives most ad revenue. So needless to say, SEO is important. But how does SEO work in a Silverlight application where most of the interesting content is dynamically generated? I will present an application pattern for doing SEO in a Silverlight with the minimum of extra work.
There are three fun-and-easy steps to making your Silverlight application SEO friendly.
- Step 1: Make important content deep linkable
- Step 2: Let the search engines know about all those deep links with a sitemap
- Step 3: Provide a “down level” version of important content
Let’s drill into each of these areas by walk through an example. I am going to use my PDC2009 demo “foodie Explorer” as a base line. You might consider reading my previous walk through (PDC09 Talk: Building Amazing Business Applications with Silverlight 4, RIA Services and Visual Studio 2010) to get some background before we begin.
Step 1: Make important content deep linkable
Any content on your site that you want to be individually searchable needs to be URL accessible. If I want you to be able to use Bing (or Google, or whatever) for “Country Fried Steak” and land on my page listing pictures of Country Fried Steak I need to offer a URL that brings you to exactly this content. https://foo.com/foodieExplorer.aspx is not good enough, I need to offer a URL such as https://foo.com/foodieExplorer.aspx?food=”Country Fried steak”. Note that there are other great benefits to this technique as well. For example, users can tweet, email and IM these URLs to discuss particular content from your application.
Luckily with the Silverlight navigation feature it is very easy to do add support for deep linking. Let’s take a look at how to do this in a Silverlight app.
What we want to do is provide a URL that can identify a given a given restaurant or a restaurant and a particular plate. For SEO as well as better human readability reasons, we’d like the URL format such as https://www.hanselman.com/abrams/restaurant/25/plate/4, to indicate that this is restaurant=25 and plate=4. To enable this, let’s define the routes in the web project in global.asax.
1: public class Global : HttpApplication
2: {
3: void Application_Start(object sender, EventArgs e)
4: {
5: RegisterRoutes(RouteTable.Routes);
6: }
7:
8: void RegisterRoutes(RouteCollection routes)
9: {
10: routes.MapPageRoute(
11: "deepLinkRouteFull",
12: "restaurant/{restaurantId}/plate/{plateId}",
13: "~/default.aspx",
14: false,
15: new RouteValueDictionary { { "restaurant", "-1" },
16: { "plate", "-1" } });
17:
18: routes.MapPageRoute(
19: "deepLinkRoute",
20: "restaurant/{restaurantId}",
21: "~/default.aspx",
22: false,
23: new RouteValueDictionary { { "restaurant", "-1" } });
24:
In line 12 and 20 we define the pattern of the deep links we support with the restaurantId and plateId place holders for the values in the URL. We define them in order from most complex to least complex. The defaults are given in 15 and 23 if the Ids are left off the URL.
Now, let’s look at how to parse this URL on the Silverlight client. In Plates.xaml.cs:
1: // Executes when the user navigates to this page.
2: protected override void OnNavigatedTo(NavigationEventArgs e)
3: {
4: int plateID = -1;
5: int restaurantId =-1;
6: var s = HtmlPage.Document.DocumentUri.ToString().Split(new char[] {'/','#'});
7: int i = Find(s, "plate");
8: if (i != -1)
9: {
10: plateID = Convert.ToInt32(s[i + 1]);
11: plateDomainDataSource.FilterDescriptors.Add(
12: new FilterDescriptor("ID",
13: FilterOperator.IsEqualTo, plateID));
14: }
15: i = Find(s, "restaurant");
16: if (i != -1) restaurantId = Convert.ToInt32(s[i + 1]);
17: else restaurantId = Convert.ToInt32(NavigationContext.QueryString["restaurantId"]);
18: plateDomainDataSource.QueryParameters.Add(
19: new Parameter()
20: {
21: ParameterName = "resId",
22: Value = restaurantId
23: }
24: );
25: }
26:
Basically what the code above does is get the full URL and parse out the parts of the URL and parse out the restaurant and plate ids. In lines 18-23, we are passing the restaurantId as a parameter to the query method and in lines 11-14 above, we are not using a query method, but rather than apply filter descriptor which adds a “where” clause to the LINQ query sent to the server. As a result, we don’t need to change any server code.
One other little thing we need to do, is make sure the client ends up on Plates page. That is handled by the silverlight navigation framework by using the “#/Plates” anchor tag. Because anchor tags are a client only feature, the search engines can’t deal with them very effectively. So we need to add this in on the client. I found it was easy enough to do it just a bit of JavaScript. I emit this from Default.aspx page on the server.
1: protected void Page_Init(object sender, EventArgs e)
2: {
3: string resId = Page.RouteData.Values["restaurant"] as string;
4: if (resId != null) { Response.Write("<script type=text/javascript>window.location.hash='#/Plates';</script"+">"); }
5: }
6:
One little thing to watch out for is that with this routing feature enabled, now the default.aspx page is actived from a different URL, so the relative paths from the silverlight.js and MyApp.xap will not work. For example you will see requests for https://www.hanselman.com/abrams/restaurant/25/plate/4/Silverlight.js rather than https://www.hanselman.com/abrams/silverlight.js. And this will result in an error such as:
Line: 56
Error: Unhandled Error in Silverlight Application
Code: 2104
Category: InitializeError
Message: Could not download the Silverlight application. Check web server settings
To address this,
<script type="text/javascript" src='<%= this.ResolveUrl("~/Silverlight.js") %>'></script>
and
<param name="source" value="<%= this.ResolveUrl("~/ClientBin/MyApp.xap") %>"/>
Now we give a URL that includes a PlateID such as:
https://localhost:30045/restaurant/48/plate/119#/Plates
As a result, we get our individual item…
Step 2: Let the search engines know about all those deep links with a Sitemap
Now we have our application deep linkable, with every interesting bit of data having a unique URL. But how is a search engine going to be able to find these URLs? We certainly hope as people talk about (and therefore link to) our site on social networks the search engines will pick up some of them, but we might want to do a more complete job. We might want to provide the search engine what ALL the deep links in the application. We can do that with a sitemap.
The Sitemap format is agreed to by all the major search engines.. you can find more information on it at https://sitemap.org.
To understand how this works, let’s look at the process a search engine would use to index an interesting data driven site: https://amazon.com. When a search engine first hits such a site it reads the robots.txt file at the root of the site. In this case: https://www.amazon.com/robots.txt
In this example, you can see at the top of the file there is a list of directories that the search engines are asked to skip Then at the bottom of this page, there is a list of sitemaps for the search engine to use to crawl all the site’s content.
Note: You don’t, strictly speaking have to use a sitemap. You can use the sitemaster tools provided by the major search engines to register your sitemap directly.
If we navigate to one of those URLs, we see a sitemap file, as shown below:
In this case, because Amazon.com is so huge, these links are actually to more sitemaps (this file is known as a Sitemap index file). When we bottom out, we do get to links to actual products.
As you can see the format looks like:
<urlset xmlns="https://www.google.com/schemas/sitemap/0.84">
<url>
<loc>https://www.amazon.com/GAITHER-COMMITTEE-EISENHOWER-COLD-WAR/dp/081425005X</loc>
</url>

<url>
<loc>https://www.amazon.com/CONTROLLING-VICE-REGULATING-PROSTITUTION-CRIMINAL/dp/0814250076</loc>
</url>
One thing that is interesting here is that these links are constantly changing as items are added and removed from the Amazon catalog.
Let’s look at how we build a sitemap like this for our site.
In the web project, add a new Search Sitemap using the Add New Item dialog in VS and selected the Search Sitemap item.
Be sure to install the RIA Services Toolkit to get this support.
When we do this we get a robots.txt file that looks like:
# This file provides hints and instructions to search engine crawlers.
# For more information, see https://www.robotstxt.org/.
# Allow all
User-agent: *
# Prevent crawlers from indexing static resources (images, XAPs, etc)
Disallow: /ClientBin/
# Register your sitemap(s) here.
Sitemap: /Sitemap.aspx
and a sitemap.aspx file.
For more information check out: Uncovering web-based treasure with Sitemaps
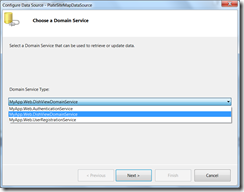
To build this sitemap,we need to create another view of the same data from our PlateViewDomainService. In this case we are consuming it from a ASP.NET webpage. To do this, we use the asp:DomainDataSource. You can configure this in the designer by:
By drag-and-dropping a Repeater control to the form we get the follow design experience:
then right click on it and configure the data source.
Select a new DataSource
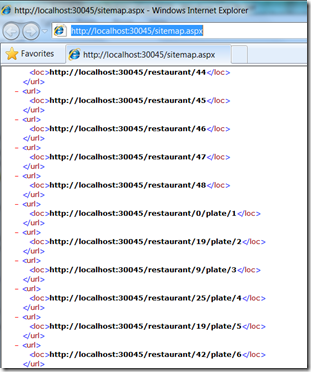
Finally, we end up with two sets of links in our sitemap.
1: <asp:DomainDataSource runat="server" ID="RestaurauntSitemapDataSource"
2: DomainServiceTypeName="MyApp.Web.DishViewDomainService"
3: QueryName="GetRestaurants" />
4:
5: <asp:Repeater runat="server" id="repeater" DataSourceID="RestaurauntSitemapDataSource" >
6: <HeaderTemplate>
7: <urlset xmlns="https://www.sitemaps.org/schemas/sitemap/0.9">
8: </HeaderTemplate>
9: <ItemTemplate>
10: <url>
11: <loc><%= Request.Url.AbsoluteUri.ToLower().Replace("sitemap.aspx",string.Empty) + "restaurant/"%><%# HttpUtility.UrlEncode(Eval("ID").ToString()) %></loc>
12: </url>
13: </ItemTemplate>
14: </asp:Repeater>
15:
16: <asp:DomainDataSource ID="PlatesSitemapDataSource" runat="server"
17: DomainServiceTypeName="MyApp.Web.DishViewDomainService"
18: QueryName="GetPlates">
19: </asp:DomainDataSource>
20:
21: <asp:Repeater runat="server" id="repeater2" DataSourceID="PlatesSitemapDataSource">
22: <ItemTemplate>
23: <url>
24: <loc><%= Request.Url.AbsoluteUri.ToLower().Replace("sitemap.aspx",string.Empty) + "restaurant/"%><%# HttpUtility.UrlEncode(Eval("RestaurantID").ToString()) + "/plate/" + HttpUtility.UrlEncode(Eval("ID").ToString()) %></loc>
25: </url>
26: </ItemTemplate>
27: <FooterTemplate>
28: </urlset>
29: </FooterTemplate>
30: </asp:Repeater>
31:
As you can see in line 3 and 20, we are calling the use the GetRestaurant and GetPlates method defined in our DomainService directly.
Now, for any reasonable set of data this is going to be a VERY expensive page to execute. It scans every row in the database. While it is nice to keep the data fresh, we’d like balance that server load. One easy way to do that is to use output caching for 1 hour. For more information see: ASP.NET Caching: Techniques and Best Practices
<%@ OutputCache Duration="3600" VaryByParam="None" %>
Another approach for really large datasets would be to factor the data into multiple sitemaps as the amazon.com example we saw above does.
If we grab one of those URLs and navigate to them, bingo! We get the right page.
Step 3: Provide a “down-level” version of important content
That is fantastic, we have deep links, we have a way for the search engines to discover all of those links, but what is the search engine going to find when it gets to this page? Well, search engines for the most part only parse HTML, so if we do a Page\View Source, we will see what the search engine sees:
Of if we browse with Silverlight disabled (Tools\Manage Addons), we see this:
We see a big old white page of nothing!
Certainly none of the dynamic content is presented. The code actually has to be run for the dynamic content to be loaded. I am pretty sure search engines are not going to be running this silverlight (or flash or ajax) code in their datacenters anytime soon. So what we need, is some alternate content.
Luckily this is pretty easy to do. First lets get any alternate content to render. It is important to note that this content is not just for the search engines. Content written solely for search engines is sometimes called search engine spoofing or Web Spam when it is done to mislead users of search engines about the true nature of the site. (the pernicious perfidy of page-level web spam) . Instead, this content is an alternate rendering of the page for anyone that doesn’t have Silverlight installed. It might not have all the features, but it is good down level experience. It just so happens that the search engine’s crawlers do not have Silverlight installed, so they get something meaningful and accurate to index.
Add this HTML code to your default.aspx page.
<div id="AlternativeContent" style="display: none;">
<h2>Hi, this is my alternative content</h2>
</div>
Notice it is display: none, meaning we don’t expect the browser to render it… unless Silverlight is not available. To accomplish that, add this bit of code to the page:
<script type="text/javascript">
if (!isSilverlightInstalled()) {
var obj = document.getElementById('AlternativeContent');
obj.style.display = "";
}
</script>
Note, the really cool isSilverlightInsalled method is taken from Petr’s old-but-good post on the subject. I simply added this function to my Silverlight.js file.
function isSilverlightInstalled() {
var isSilverlightInstalled = false;
try {
//check on IE
try {
var slControl = new ActiveXObject('AgControl.AgControl');
isSilverlightInstalled = true;
}
catch (e) {
//either not installed or not IE. Check Firefox
if (navigator.plugins["Silverlight Plug-In"]) {
isSilverlightInstalled = true;
}
}
}
catch (e) {
//we don't want to leak exceptions. However, you may
//to add exception tracking code here
}
return isSilverlightInstalled;
}
When we run it from a browser without Silverlight enabled we get the alternate content:
But with Silverlight installed, we get our beautiful Silverlight application content.
That is great, but how do we expose the right content? We want to display exactly the same data as is in the Silverlight app and we want to write as little code as possible. We really don’t want multiple pages to maintain. So let’s add some very basic code to the page in our AlternativeContent div. This ListView is for Restaurant details.
<asp:ListView ID="RestaurnatDetails" runat="server"
EnableViewState="false">
<LayoutTemplate>
<asp:PlaceHolder ID="ItemPlaceHolder" runat="server"/>
</LayoutTemplate>
<ItemTemplate>
<asp:DynamicEntity ID="RestaurnatEntity" runat="server"/>
</ItemTemplate>
</asp:ListView>
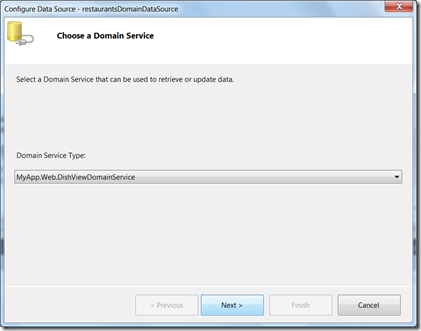
Now we need to bind it to our datasource… I find this is pretty easy in the design view in VS. Note, you do have make the div visible so you can work with it in the designer.
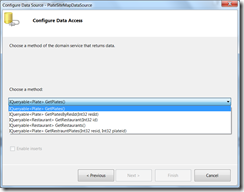
Then we configure the DataSource.. it is very easy to select the query method we want to use
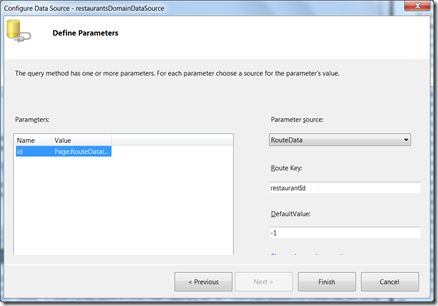
Next we bind the query method parameter based on the routes we defined.
Now do the exact same thing for our Plates ListView…
This gives us some very simple aspx code:
1: <asp:ListView ID="RestaurnatDetails" runat="server"
2: EnableViewState="false" DataSourceID="restaurantsDomainDataSource">
3: <LayoutTemplate>
4: <asp:PlaceHolder ID="ItemPlaceHolder" runat="server"/>
5: </LayoutTemplate>
6: <ItemTemplate>
7: <asp:DynamicEntity ID="RestaurnatEntity" runat="server"/>
8: </ItemTemplate>
9: </asp:ListView>
10:
11: <asp:DomainDataSource ID="restaurantsDomainDataSource" runat="server"
12: DomainServiceTypeName="MyApp.Web.DishViewDomainService"
13: QueryName="GetRestaurant">
14: <QueryParameters>
15: <asp:RouteParameter name="id" RouteKey="restaurantId"
16: DefaultValue ="-1" Type = "Int32"/>
17: </QueryParameters>
18: </asp:DomainDataSource>
19:
Next we want to enable these controls to dynamically generate the UI based on the data.
1: protected void Page_Init(object sender, EventArgs e)
2: {
3: RestaurnatDetails.EnableDynamicData(typeof(MyApp.Web.Restaurant));
4: PlateDetails.EnableDynamicData(typeof(MyApp.Web.Plate));
5: string resId = Page.RouteData.Values["restaurant"] as string;
6: if (resId != null) { Response.Write("<script type=text/javascript>window.location.hash='#/Plates';</script"+">"); }
7: }
8:
Notice we added lines 4-5 to enable dynamic data on these two ListViews.
The last step is we need to add the set of templates DynamicData uses. You can grab these from any Dynamic Data project. Just copy them into the root of the web project.
You can edit these templates to control exactly how your data is displayed.
In the EntityTemplates directory we need to templates for each of our entities (Plate and Restaurant in this case). This will control how they are displayed.
1: <%@ Control Language="C#" CodeBehind="Restaurant.ascx.cs" Inherits="MyApp.Web.RestaurantEntityTemplate" %>
2:
3: <asp:DynamicControl ID="DynamicControl8" runat="server" DataField="ImagePath" />
4: <ul class="restaurant">
5: <li>
6: <ul class="restaurantDetails">
7: <li><h2><asp:DynamicControl ID="NameControl" runat="server" DataField="Name" /> </h2> </li>
8: <li><asp:DynamicControl ID="DynamicControl1" runat="server" DataField="ContactName" /> (<asp:DynamicControl ID="DynamicControl2" runat="server" DataField="ContactTitle" />)</li>
9: <li><asp:DynamicControl ID="DynamicControl3" runat="server" DataField="Address" /> </li>
10: <li><asp:DynamicControl ID="DynamicControl4" runat="server" DataField="City" />, <asp:DynamicControl ID="DynamicControl5" runat="server" DataField="Region" /> <asp:DynamicControl ID="DynamicControl6" runat="server" DataField="PostalCode" /> </li>
11: <li><asp:DynamicControl ID="DynamicControl7" runat="server" DataField="Phone" /> </li>
12: <li><asp:HyperLink runat="server" ID="link" NavigateUrl="<%#GetDetailsUrl() %>" Text="details.."></asp:HyperLink></li>
13: </ul>
14: </li>
15: </ul>
16:
Notice here as well, we are only doing some basic formatting and just mentioning the fields we want to appear in the alternate content. Repeat for Plate..
Now we are ready to run it.
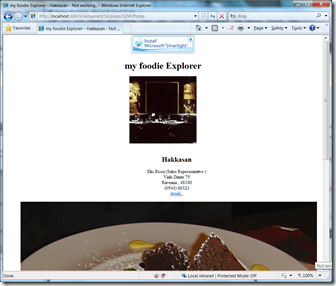
At the root, with no query string parameters we get the list of restaurants, all in HTML of course.
then we can add the routs to narrow down to one plate at a given restaurant.
But, let’s look at this in a real browser, to be sure we know what this looks like to a search engine. Lynx lives! Lynx was the first web browser I used back in 1992 on my DEC2100 machine in the Leazar lab on the campus of North Carolina State University.. And it still works just as well today.
and the details
This classic text based browser shows us just the text – just what the search engines crawlers will see.
Now for the real test.
We will use Bing for “my foodie Explorer Cooking Class with Joe..” and sure enough, it is there:
Clicking on the link?
..takes is to exactly the right page with the right data in our nice Silverlight view.
Of course this works with the other guys search engine equally well… if you are the type who uses that one ;-)
Summary
What you have seen here is are the basics of how to create a data driven Silverlight web application that is SEO ready! We walked through three fun-and-easy steps:
Step 1: Make app important content deep linkable
Step 2: Let the search engines know about all those deep links via a Sitemap
Step 3: Provide “down level” version of important content
Enjoy!
For more information see: Illuminating the path to SEO for Silverlight
Comments
Anonymous
March 20, 2010
The comment has been removedAnonymous
April 15, 2010
I'll ask my web developers to check for your link BradA! Deep links among pages help spiders much and we're trying to make it happen! Thanks, Du NguyenAnonymous
April 24, 2010
Hello, Brad. Could you rebuild your application with the Silverlight release? it can't be started now because beta version is expiredAnonymous
May 27, 2010
BTW I have published first part of my article SEO for Silverlight applications (http://bit.ly/9cBYaa). It describes how to build deep links in the MVVM-based Silverlight application.


