Xaml and WPF - A Primer
Xaml (pronounced zammel), eXtensible Application Markup Language, is a new declarative XML-based language developed by Microsoft that allows you to define a set of .Net objects that can be compiled into an assembly or dynamically instantiated at runtime. Windows Presentation Foundation (WPF) is the new user interface technology that is part of .Net 3.0. It provides a managed code programming model for creating modern user interfaces that are rendered by DirectX. You can easily combine traditional user interface elements with 2D, 3D, video, music, animation and effects.
Here is an example of Xaml that creates and displays a butonn:

<Button Width="300" Height="300">Hello World</Button>
Today Xaml is primarily used to define Windows Presentation Foundation (WPF) user interfaces and Windows Workflow Foundation (WF) workflow definitions but it is not relegated to only those purposes. Xaml , since it is an XML tag-based language, lends itself to auto-generation from tools such as Visual Studio, Expression Blend, Zam3D and many more. Overtime we will see more and more uses of Xaml and the tool space become more rich and powerful.
Let's look at some basic Xaml snippets that define WPF user interfaces to get a feel for how it works. If you want to try out these snippets, you will need the following configuration:
- Windows Vista or Windows Xp SP2 w/ .Net 3.0
- The Windows SDK for .Net 3.0
The Windows SDK provides a tool called XamlPad for testing Xaml chunks [mmmm Xaml chunks].
In this next example we will take our simple button and instead of displaying text let's embed an image:
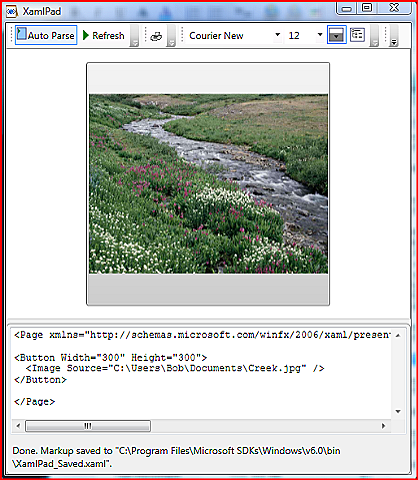
<Button Width="300" Height="300">
<Image Source="C:\Users\Bob\Documents\Creek.jpg" />
</Button>
This demonstrates the peer relationship that all WPF UI elements share. WPF UI elements are content, behavior and/or containers of content and behavior. The Button is a control that can contain any .Net object, text, an image, a video, a list of UI elements, etc. and provides Button behavior like click-ability.
Given this awesome power it is possible to create some really beautiful and functional user interfaces. It is also possible that if you nest a Button within a Button you may rip a whole in the space time continuum. So be careful. WPF and many of the tools that generate Xaml are to be used by designers, Designers are professionals who have been trained in good taste and judgement, subjects that are typically left out of the computer science curriculum. As you can see from my Xaml snippets, I am trained in computer science and should therefore not be allowed anywhere near the user interface.

<Button Width="300" Height="300">
<Button Width="200" Height="200">
<Button Width="100" Height="100">
<Button Width="50" Height="50">
Hi!
</Button>
</Button>
</Button>
</Button>
In order for a button to display content it has an object within itself called the ContentPresenter. A ContentPresenter is only capable of presenting one thing. So far that is all we have done, present a single object within the Button. If we want to present more than one thing in our Button we will need a Panel. A Panel is a control that knows how to layout content. There are 4 general purpose Panels in WPF:
- Canvas - coordinate based layout, you provide the coordinates
- Grid - row/column layout
- StackPanel - horizontal or vertical layout
- DockPanel - edge layout
Here is an example placing a StackPanel inside a Button in order to stack a series of UI elements inside the Button:

<Button Width="300" Height="300">
<StackPanel Orientation="Vertical">
<TextBlock FontSize="18" FontFamily="Elephant">Hello</TextBlock>
<Image Height="100" Source="C:\Users\Bob\Documents\Creek.jpg" />
<Ellipse Height="100" Fill="Blue"/>
</StackPanel>
</Button>
Note that I have also activated the Visual Tree Explorer in XamlPad so that I can see that tree of .Net objects that are being instantiated by the Xaml snippet.

<Grid>
<Grid.RowDefinitions>
<RowDefinition/>
<RowDefinition/>
<RowDefinition/>
</Grid.RowDefinitions>
<Grid.ColumnDefinitions>
<ColumnDefinition/>
<ColumnDefinition/>
<ColumnDefinition/>
</Grid.ColumnDefinitions>
<Button Grid.Row="0" Grid.Column="0" Grid.ColumnSpan="2">A</Button>
<Button Grid.Row="0" Grid.Column="2">B</Button>
<Button Grid.Row="1" Grid.Column="0" Grid.RowSpan="2">C</Button>
<Button Grid.Row="1" Grid.Column="1">D</Button>
<Button Grid.Row="1" Grid.Column="2">E</Button>
<Button Grid.Row="2" Grid.Column="1">F</Button>
<Button Grid.Row="2" Grid.Column="2">G</Button>
</Grid>
In this example, I am using a Grid panel to layout a set of Buttons. The Grid is easy enough to use. You simply define the number of rows and columns. The interesting part of this snippet is the use of the Xaml Attach Property Syntax. Since Grids don't know anything about Buttons and Buttons don't know anything about Grids, we need a syntax that allows us to relate the container to the content.
This syntax:
<Button Grid.Row="0" Grid.Column="0" Grid.ColumnSpan="2"...>
says that the Button will be placed in the Grid at Row 0, Column 0 and it will span 2 columns.
WPF has extensive support for animation. Here is how you define an animation using Xaml:
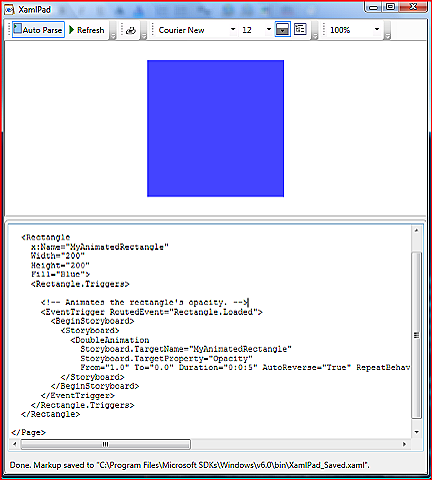
<Rectangle
x:Name="MyAnimatedRectangle"
Width="200"
Height="200"
Fill="Blue">
<Rectangle.Triggers>
<!-- Animates the rectangle's opacity. -->
<EventTrigger RoutedEvent="Rectangle.Loaded">
<BeginStoryboard>
<Storyboard>
<DoubleAnimation
Storyboard.TargetName="MyAnimatedRectangle"
Storyboard.TargetProperty="Opacity"
From="1.0" To="0.0" Duration="0:0:5" AutoReverse="True" RepeatBehavior="Forever" />
</Storyboard>
</BeginStoryboard>
</EventTrigger>
</Rectangle.Triggers>
</Rectangle>
Here we define a rectangle and then within the rectangle definition, we configure triggers on the rectangle. There are different types of triggers such as Property Triggers, Data Triggers and Event Triggers. Here we are interested in triggering off an event. The event of interest is when the rectangle is finished being drawn. Once that event fires, the animation begins.
Animation allow us to change some visible characteristic such as position, color, size, etc. over time. In this case, we want to change the Opacity (transparency) of the rectangle so we set the TargetProperty of the Storyboard to "Opacity". We also specify that we want the value of Opacity to change from 1.0 to 0.0 over a duration of 5 seconds and to automatically reverse those values and repeat that behavior forever.
I have only brushed the surface of what is possible with Xaml and WPF but I hope I have peaked your interest and eliminated any apprehension about diving in and getting started. For further reading I recommend:
- Programming Windows Presentation Foundation by Sells and Griffiths
- Applications = Code + Markup: A Guide to the Microsoft Windows Presentation Foundation by Charles Petzold
- Xaml in a Nutshell by Lori MacVittie
- XamlDev.com
- Xaml.Net
-Bob Familiar
Comments
Anonymous
April 04, 2007
PingBack from http://www.developers.org.ua/archives/koldovsky/2007/04/05/xaml-wpf-hello-world/Anonymous
May 21, 2007
Microsoft is releasing technology at the speed of light (Silverlight to be precise). This may or mayAnonymous
June 08, 2007
I had a great time speaking at the MSDN Events this week on the topics of Microsoft ASP.Net AJAX andAnonymous
June 22, 2007
Mix 2007 was simply awesome this year. I can't remember an event as exciting as this one except whenAnonymous
February 04, 2010
Bob, I am very sorry to bother you but I was looking at your blog and wanted to ask you if you know of any good consultants with good windows based development experience using WPF/XAML/.NET 3.5. This is for our LRS Sports division. This is a 6-8 week project based in Springfield, IL. I would really appreciate your input if you knew where to find someone with these skills. The job boards just aren't bringing in the talet we need. I appreciate any feedback you could offer me. Thank you, Kari Hannah Levi, Ray & Shoup, Inc. Corporate Technical Recruiter 217-793-3800 Ext. 1814