Creating your own Hadoop cluster on Windows Azure by using your own Windows Azure Subscription account
[As of now this functionality is not available with Hadoop on Windows Azure. These instruction are not applicable as of now and when things will change i will add more info here.. Thanks for your support]
Apache Hadoop distribution (currently in CTP) allows you to setup your own Hadoop cluster in Windows Azure cloud. This is article is written keeping those users in mind, who are very new to “Windows Azure” and “Hadoop on Windows Azure”. To have it running you would need the following:
- Active Windows Azure Subscription
- Preconfigured Windows Azure Storage service
- About 16 available cores
- You would need Extra larger instance – 8 Core for the head node
- The default installer creates 4 worker node each with medium instance – 2 core each medium instance
- So to start the default creation you would need 8 + 8 = 16 empty cores
- You sure can change the number of worker node later to a desired number
- The machine you will use to deploy IsotopeEMR much have direct connectivity to Azure Management Portal
- You would need the management certificate thumbprint
Get IsotopeEMR package and unzip it on your development machine which has connectivity to Azure Portal. After that edit IsotopEMR.exe.config as below:
<appSettings> <add key="SubscriptionId" value="Your_Azure_Subscription_ID"/> <add key="StorageAccount" value=" Your_Azure_Storage_Name"/> <add key="CertificateThumbprint" value=" Your_Azure_Management_Certificate_Thumbprint"/> <add key="ServiceVersion" value="CTP"/> <add key="ServiceAccount" value="UserName_To_Login_Cluster"/> <add key="ServicePassword" value=" Password_To_Login_Cluster "/> <add key=”DeploymentLocation” value=”Chooce_Any_Datacenter_location(Do_Not_Use_Any*)”/> </appSettings> |
After that launch the following command:
>isotopeEMR prep
This command access you Windows Azure storage and drop the package which will be used to build you head node and worker node machine within Hadoop Cluster.
|
Once prep command is completed successfully now you can start the cluster creation. Try to consider a unique name for your cluster because this name will be used as <your_hadoop_cluster_name>.cloudapp.net. Now launch the following command to start the cluster creation:
>> isotopeEMR create hadoopultra
Within a few seconds you will see a new service crated at your Windows Azure management portal as below:
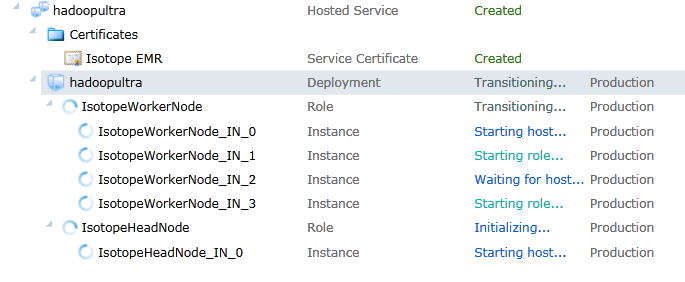
After a little while, you will see one full IIS Web Role as Headnode and 4 worker nodes are being created as below:
Then you will see some progress on your command windows as below explaining Bootstrapping is completed:
Now you will see “Creating VM” message on command prompt:
.. which shows that your roles are initializing and all the nodes are starting…
Finally you will see “Starting VM” message ….
And then you might find status showing “RoleStateUnknown” which is possible while your instance is getting ready:
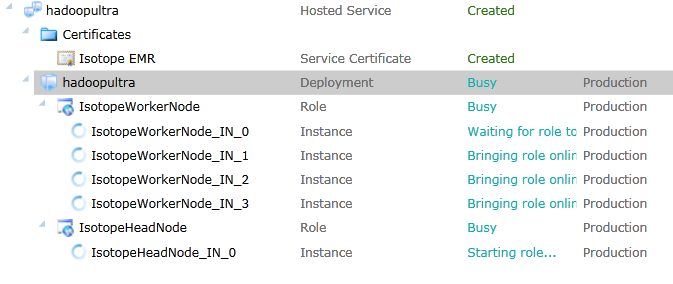
While looking at your Windows Azure Management portal you will see roles are in transitioning state:
For those who are very well known to Windows Azure role status they may see the familiar ‘Busy” status..
Portal will back the command windows status as well:
Finally the command windows will show the Hadoop cluster creation is completed:
And you will see all of you roles are running fine in “Ready” state:
Now you can take a look are you Azure service details and you will find all the endpoint in your service as well as how you use access most of cluster functionalities which are available in any Hadoop cluster:
Now you can open your browser and open your service at https://<yourservicename>.cloudapp.net. Opening the page will ask you to enter credentials which you have used in IsotopeEMR.exe.config:
And finally the web page will be open where you could explore all the Hadoop cluster management functions:
In my next blog entry I will dig further and provide more info on how to use your cluster and run map/reduce jobs.
Comments
- Anonymous
February 22, 2012
The comment has been removed - Anonymous
April 08, 2012
Hey Avkash, It seems there is a small mistake in this blog. The value of StorageAccount appsetting key should be "Your_Azure_Storage_Name" rather than "Your_Azure_Storage_Key".


