Two-hand manipulation with the new Mixed Reality Toolkit
The Mixed Reality team has recently released a major update to the stable version of the Mixed Reality Toolkit, labeled 2017.2.1.4, which includes many important features. The one I would like to show in this blog post in two-hand manipulation, which allows to recreate in your project the same type of interaction that you can see in the Mixed Reality Portal. If you have ever tried the Cliff House experience, you would have noticed that you are able to use your motion controllers to easily move, rotate and resize any object, thanks to a set of gestures that mimic the real world. For example, if you want to resize an object you just need to press the trigger on both motion controllers and then move your arms out (to make the object bigger) or in (to make the object smaller). Also on HoloLens, after the last RS4 update (which is currently in preview and you can install by following these instructions), you are able to leverage the same gesture just using your bare hands.
Thanks to the last version of the Mixed Reality Toolkit, now you’ll be able to easily implement the same manipulation in your project. Let’s see how with a step-by-step tutorial.
Create your Unity project
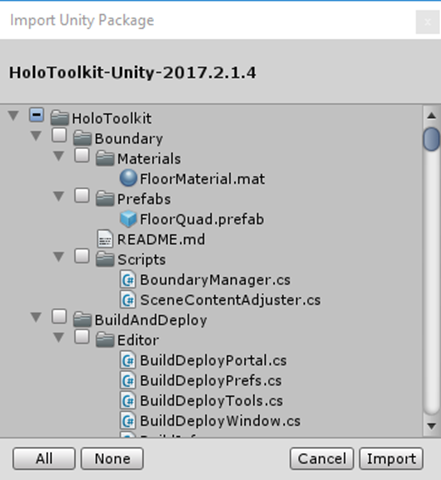
As first thing, create a new Unity project. The suggested version for developing Mixed Reality projects is 2017.2.1p2, even if in my case I’m using the LTS branch 2017.4.1f1 which works just fine. Then download the latest release of the Mixed Reality Toolkit from the GitHub page. The version that contains the two-hand manipulation feature is labeled 2017.2.1.4. To import the toolkit, right click on Assets in the Project panel, choose Import Package –> Custom Package and pick the .unitypackage file you have just downloaded. After that the content will be uncompressed, you will be asked if you want to import everything or just a subset of the toolkit. Make sure that everything is selected by pressing All and then press Import.
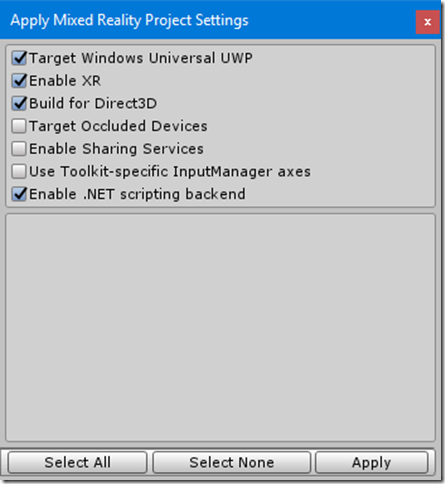
After that the Mixed Reality Toolkit has been imported, you can setup the scene and the project to support Mixed Reality. The toolkit helps you with this by extending Unity and adding a new menu called Mixed Reality Toolkit at the top. Click on it and choose first Configure –> Apply Mixed Reality Project Settings.
For our needs, it’s ok to leave all the default options turned on, as in the following image:
Just press Apply and wait for the operation to finish. This task will make sure to configure the project to support Mixed Reality development, by setting UWP as build target, enabling the XR APIs (the set of Unity APIs and features to build AR/VR projects) and leveraging Direct3D as graphics pipeline.
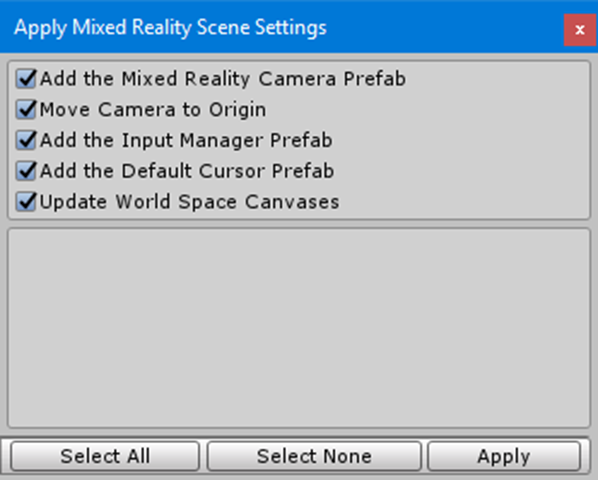
Now return again to the Mixed Reality Toolkit menu and, this time, choose Apply Mixed Reality Scene Settings.
Also in this case, leave all the settings turned on and choose Apply. This task will focus on the configuration of the scene and it will automatically add all the prefabs from the toolkit which are required to build a Mixed Reality project. For example, it will replace the standard Unity camera with one optimized for HoloLens and immersive headsets.
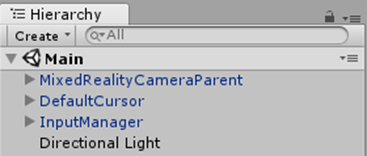
At the end of the process, you should see your scene configured like this in the Hierarchy panel:
Adding two-hand manipulation
Now that we have created a basic Mixed Reality scene, we can add some content and implement the manipulation. You can use any kind of prefab but, since I didn’t want to use the typical boring sphere or cube ![]() , I’ve downloaded a free asset from the Store provided directly by Unity: https://assetstore.unity.com/packages/3d/characters/robots/space-robot-kyle-4696 It’s called Space Robot Kyle and it’s a 3D model of a robot. You can either search for it directly in the Unity’s Asset Store or download it from the web store and then manually import it.
, I’ve downloaded a free asset from the Store provided directly by Unity: https://assetstore.unity.com/packages/3d/characters/robots/space-robot-kyle-4696 It’s called Space Robot Kyle and it’s a 3D model of a robot. You can either search for it directly in the Unity’s Asset Store or download it from the web store and then manually import it.
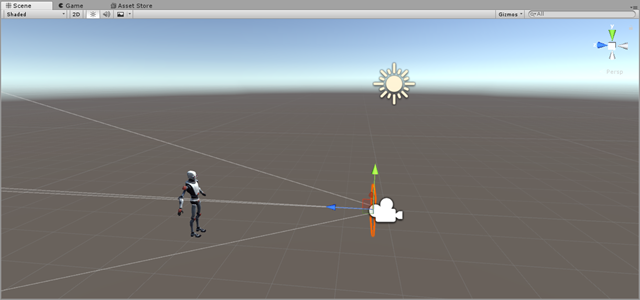
Either ways, in your Project panel you will find a new folder called Robot Kyle. The model that can be dragged inside the scene can be found inside the Model folder. Just drag it into the scene and position it in a way that can be easily seen by the user, based on the camera’s position (which is 0, 0, 0). In my sample project, I’ve placed it at position 0, –1, 5, with a rotation on the Y axis of 180° (so that the user is front facing compared to the robot).
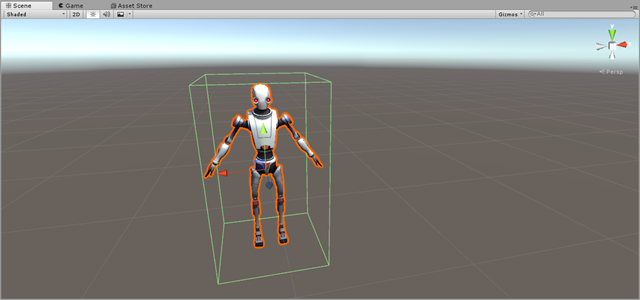
By default, the robot doesn’t come with a collider. We need one, otherwise the manipulation events aren’t able to affect the model in the scene. Choose the Robot Kyle element in the Hierarchy panel, press Add component and add a Box Collider. Since the robot has a peculiar shape, by default the collider won’t fill all the space used by the model. As such, press the Edit Collider button and, by using the mouse, make sure that the whole robot fits inside the collider, as in the below image:
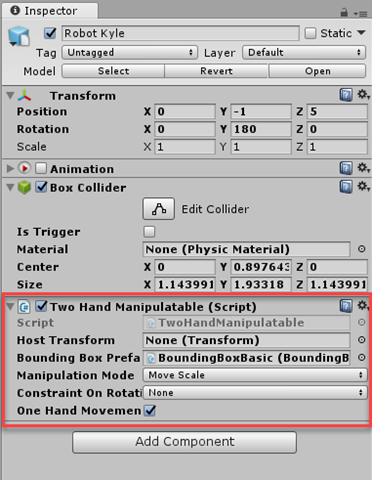
Now that you have a collider, you can add the two-hand manipulation. Thanks to the toolkit, the operation is incredibly easy. Just make sure that the Robot Kyle object is selected and press again the Add component button. This time, we’re going to add a script called Two Hand Manipulatable.
In the panel you can configure a few important settings:
- Host Transform is the game object we want to manipulate. Most of the times we can leave this property empty, because we want to enable manipulation on the game object where we have attached the script (in our case, the robot model).
- Bounding Box Prefab can be used to enable or disable displaying the bounding box around the object during the manipulation. If we leave it empty, it won’t be displayed; if we want to display it, instead, we can leverage a prefab included in the Mixed Reality Toolkit. We can find it in the path Assets –> HoloToolkit –> UX–> Prefabs –> BoundingBoxes and it’s called BoundingBoxBasic. Just drag it from the Project panel and drop it on this property.
- Manipulation Mode can be used to set which kind of manipulations we want to enable between move, scale and rotate.
- Constraint On Rotation can be used to limit the rotation on a single axis.
- One Hand Movement can be enabled if we want to allow basic drag and drop of the object in the space using a single hand.
That’s all! You can easily try this directly in the editor: just press Play and notice how, by using the simulated hands (which can be moved by pressing the SHIFT and SPACE keys on your keyboard), you’ll be able to drag and drop the robot in your environment.
Of course, you will see the best results while testing the project on a real HoloLens or on a real immersive headset. In this case, you’ll be able to experiment more easily the two-hand gesture and, other than moving the robot around, you’ll be able to resize and rotate it, based on the Manipulation Mode you have set in the script.
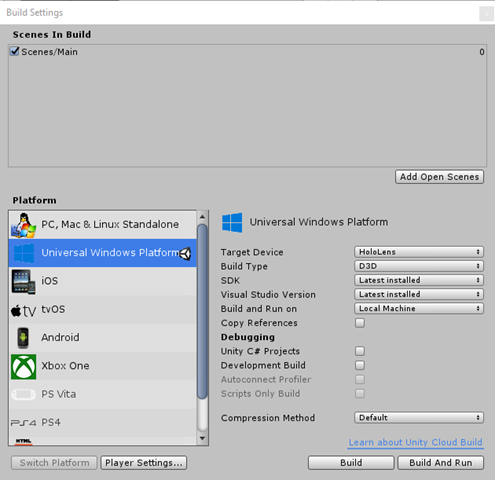
If you want to test the project on a real device just choose File –> Build Settings, press Add Open Scenes to add the current scene and press Build. Thanks to the configuration we did in the beginning, all the right options should already be selected.
At the end of the build process, you’ll get a Visual Studio project that you’ll need to compile using the Release – x86 configuration and deploy using:
- The Local Machine option if you’re going to test the experience on an immersive headset
- The Remote machine or Device option if you’re going to test the experience on a HoloLens (connected through Wi-Fi or directly to the PC via USB)
Wrapping up
In this post we’ve seen how easy it is to implement two-hand manipulation in a Mixed Reality project thanks to the latest additions to the Mixed Reality Toolkit. You can find the sample used for this blog post on GitHub. You will need Unity 2017.4.1f1 to open it. Alternatively, you can find a testing scene also in the official Mixed Reality toolkit samples. To try it, you will need to download the Examples package from here, import it into a Unity project and open the scene in the path Assets –> HoloToolkit-Examples –> Input –> Scenes –> TwoHandManipulationTest.unity.
Happy coding!
