Lab Ops 6 – Setup VDI in Windows Server 2012R2
VDI bridges the world of the client and the server, and that can mean that in a world where IT professionals are either experts in one or the other (Simon and I being a case in point), most of us have a partial knowledge of how VDI works.
There are other reasons why you might be forgiven that VDI isn’t a Microsoft strength for two reasons:
- It has been hidden behind offerings from third parties like Citrix, and those partners are still important for larger implementations and because in the past those partners made the only decent remote desktop clients for all sorts of platforms such as Android and IOS. That all changed on 7th October and to quote the official press release:
“.. with Windows Server 2012 R2 Microsoft is introducing the Microsoft Remote Desktop app, available for download in application stores later this month, to provide easy access to PCs and virtual desktops on a variety of devices and platforms, including Windows, Windows RT, iOS, OS X and Android.”
- VDI isn’t referred to as such in TechNet or in the Windows Server interfaces such as Server Manager as VDI – it’s called Remote Desktop Services which also includes the traditional terminal services way of providing a remote desktop, but also includes using pooled or personal client VMs as well.
However since Windows Server 2012 it has been pretty easy to setup a secure and resilient VDI environment just using Windows client and server, that offers your users a rich and personalised experience.
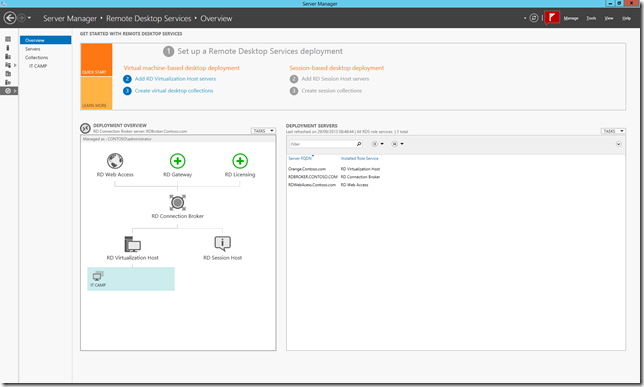
So before I go into how to build a lab what are the moving parts? The easiest way to see this is post deployment as there’s an overview in server manager..
The green objects have yet to be configured; The RD Gateway for external access to my VDI environment and the licensing server.
The grey objects are configured and go blue when in hover on them:
- the RD Web Access Server is the web server that users connect in from.
- The RD Connection Broker is the middle tier which orchestrates the whole setup; what servers are performing which functions, where the VDI VMs are to control their state , and handling security to limit who can access which desktop and applications.
- The RD Virtualization Host are the physical server(s) that that the VDI VMs run from.
- Optionally there is also an RD Session Host for Remote Desktop Services (Terminal Services as was)
Notice the IT Camp collection. A collection is a pool of client VMs. The idea is to manage the collection as one VM and I’ll describe the options and how to configure collections in my next post.
One thing to note about RDS/VDI is that highly availability (HA) is going to be very important as no one will get any work done if there are no desktop to work on. For this reason my lab setup needs to be tagged with “don’t try this at work! ” Of course there’s no point in evaluating this unless you are sure that you can enable HA and this is the sort of setup that would allow for that..
Notes:
- The web access servers need to be load balanced as for any web site
- The broker role can be clustered and not the use of SQL Server to store metadata about the environment when this is the case. Of course that SQL Server database would need to reside on resilient shared storage or it becomes a single point of failure. Also note that Broker1 and Broker 2 can handle connection requests i.e. this is an active active scenario and that’s why there’s a shared database in the mix.
- The virtualization hosts have no special settings for HA it’s just that there’s more than one of them and typically you’ll want to ensure you have enough spare server resources to able to run your collection of VMs if one of the servers is not longer available.
- The VMs virtual hard disks could be on shared storage but actually this doesn’t matter too much, what matters is where the user’s data is and the parent disk of the VDI collection. RDS in Windows Server 2012 has special user profile disks and it is these that should be on shared storage and when you configure RDS you get to specify where these are stored as distinct from the virtual hard disks for each VDI VM.
At this point you might be wondering what happens if one of the Virtualization Hosts fails. It’s really simple - for those users that had open desktops that were based on VMs on that failed server, then those users will loose their session. However given that the shared storage behind all of the VMs is still there then when the user connects in again they won’t have lost any saved work. So a bit like a real desktop crash except that they can immediately sign back in and continue where they left off as the broker will assign them an unused VM on a running server, and that will be quick as the VDI VMs are left in a saved state to be ready for immediate use
Anyway on with my lab setup which builds on earlier posts in this series..
As I’ve already said I need at least one physical host to be the RD Virtualization Host and my laptop in the diagram above is the “Orange” session host. The other roles in the diagram above can all be one or more VMs themselves and those roles can be combined. A production environment will need to have use multiple VMs on different hosts but you might not need to scale out the roles to dedicated VMs in smaller deployments.
For my demo I am going to use a VM for the Broker role (RDBroker) , another for Web Access (RDWebAccess) and a third as a Session Host (RDSHost). To create all of these vms I have adapted the setup scripts described in part 2 of this series so I can create these with a line of PowerShell for each..
Create-VM -Name RDWebAccess -VmPath ($labfilespath) -SysPrepVHDX ("E:\WS2012RTM SysPrep.VHDX") -Network "FabricNet" -VMMemory 2GB -UnattendXML $unattendxml -IPAddr "192.168.10.20" -DnsSvr "192.168.10.2" -Domain "contoso.com"
Create-VM -Name RDBroker -VmPath ($labfilespath) -SysPrepVHDX ("E:\WS2012RTM SysPrep.VHDX") -Network "FabricNet" -VMMemory 2GB -UnattendXML $unattendxml -IPAddr "192.168.10.21" -DnsSvr "192.168.10.2" -Domain "contoso.com"
Create-VM -Name RDSHost -VmPath ($labfilespath) -SysPrepVHDX ("E:\WS2012RTM SysPrep.VHDX") -Network "FabricNet" -VMMemory 2GB -UnattendXML $unattendxml -IPAddr "192.168.10.22" -DnsSvr "192.168.10.2" -Domain "contoso.com"
Note: My sysprepped image used to create these vms is based on the download from msdn , so I am asked for a license key which I can skip, but it’s a manual step. When an evaluation edition of Windows Server 2012 R2 is available this won’t be a problem.
I can now configure these blank vms through Server Manager from one machine, provided you have already added them as servers to be managed as I have (the servers in the yellow box)..
The first step is to add the roles and features to each of my server VMs, and since Windows Server 2012 this has been a special installation option, Remote Desktop Services Installation. As I mentioned before Remote Desktop Services is a generic term in Windows Server to cover both VDI and Remote Desktop Sessions (what was terminal services). and so the wizard asks you which one you want. For this post I am going for VDI. In the following screens for this wizard I can assign each role to one of my servers and the wizard will deploy the whole environment for me, and then show me that overview screen at the start of this post.
There’s a couple of things you’ll want to check before you actually create a VDI collection:
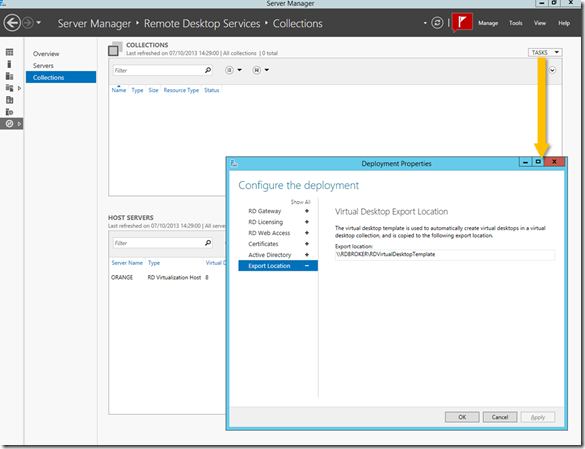
Check the Deployment settings:
For example you can add in your licensing server, specify the Web Access URL to use and in my case I don’t the export location for my template to be on the the RDBroker server as it’s a VM so I’ll use a share somewhere else. You’ll also want to setup certificates for this, and when I have that properly researched I’ll cover it off in this series.
Increase the VM Build Concurrency on your Hosts
By default Hyper-V builds VMs one at a time which might be a good if cautious move for heavily used production hosts but on my laptop(s) I want to up this, and this is the PowerShell to hack the appropriate registry setting and reboot the hosts for this to take effect..
#replace “server1”,”server2” with your list of servers
$CompNames =@("Server1",”Server2”)
foreach ($CompName in $CompNames)
{
Invoke-Command -ComputerName $CompName -ScriptBlock {
Set-ItemProperty -Path "HKLM:\SYSTEM\CurrentControlSet\Services\VmHostAgent\Parameters"`
-Name "Concurrency" -value 5
Restart-Computer -force}
}
Now I am ready to build “collections” of virtual machines and that’s coming up in the next post.
Comments
- Anonymous
December 23, 2013
Pingback from Windows Server 2012 R2: Lab Ops–Building a VDI environment with powershell | MS Tech BLOG


