演练:Python 中的必应广告 API Web 应用程序
本教程探讨如何使用必应广告 Python SDK、Visual Studio Code IDE 和 Django Web 框架开始运行 Microsoft Advertising Web 应用程序。
本教程不探讨有关 Django 本身的各种详细信息,例如使用数据模型和创建管理界面。 有关这些方面的指导,请参阅 Django 文档。 有关如何在 VS Code 终端、编辑器和调试器中使用 Django 的更多详细信息,请参阅在 Visual Studio Code 中使用 Django。 本教程大量借鉴了在 Visual Studio Code 中使用 Django 中的设置说明。
示例 Web 应用程序概述
在本教程结束时,你将在上运行 http://localhost 一个 Web 应用程序,该应用程序将对 Microsoft Advertising 用户凭据进行身份验证,并显示你的用户和帐户信息。 然后,可以添加多个 Web 应用程序用户,用户可以为应用程序启用访问权限,以使用其 Microsoft Advertising 凭据。 此 Web 应用程序提供 Web 应用程序用户的一对一映射,例如 ContosoUser 到 Microsoft Advertising 用户。 有关如何修改数据模型的信息,请参阅 Django 文档 了解详细信息。 如果 Web 应用程序用户允许使用 Microsoft 帐户访问其 Microsoft Advertising 帐户,则刷新令牌将存储在 Web 服务器上的 SQL Lite 数据库中。
先决条件
需要安装Visual Studio Code才能遵循本教程。 若要运行 Django Web 应用,可以使用Visual Studio Community或Visual Studio Professional;但是,设置步骤与本教程中的步骤不同。
需要从 python.org 安装 Python 3;通常使用页面上首先显示的 “下载 Python 3.7.0 ”按钮 (或任何最新版本) 。 在 Windows 上,请确保 PYTHON 解释器的位置包含在 PATH 环境变量中。 可以通过在命令提示符下运行path来检查此项。 如果未包含 Python 解释器的文件夹,请打开“Windows 设置”,搜索“环境”, 选择“编辑你的帐户的环境变量”,然后编辑 路径 变量以包含该文件夹。
需要安装必应广告 Python SDK,本教程将指导你完成安装。
需要安装 Django Web 框架 才能在本地部署应用程序,本教程将指导你完成安装。
需要至少一个具有 Microsoft Advertising 凭据和 开发人员令牌的用户。
需要注册应用程序,并记下已注册应用程序 ID (客户端 ID) 和客户端密码 (注册的密码) 。 对于此示例,你需要注册一个 Web 应用 (不是本机) 。 系统将要求注册一个或多个重定向 URL,在本教程中,应注册 http://localhost/callback。 在部署到生产服务器时,应改用 https 。 有关注册应用程序和授权代码授予流的详细信息,请参阅 使用 OAuth 进行身份验证。
本教程是在 Windows 上开发的。 虽然运行示例不需要 Windows,但如果使用其他操作系统(例如 Linux 或 MacOS),下面的一些步骤会有所不同。
为 Django 创建项目环境
在本部分中,将创建一个安装 Django 的虚拟环境。 使用虚拟环境可避免将 Django 安装到全局 Python 环境中,并让你可以精确控制应用程序中使用的库。
在文件系统上,为本教程创建项目文件夹,例如
hello_django。在
hello_django文件夹中,打开 Powershell 或你最喜欢的脚本 shell,并使用以下命令根据当前解释器创建名为 的env虚拟环境:py -3 -m venv envhello_django通过运行 、或运行code .VS Code 并使用“文件打开文件夹”>命令,在 VS Code 中打开项目文件夹。
在 VS Code 中,打开命令面板 (视图>命令面板 或
Ctrl+Shift+P) 。 然后选择 “Python:选择解释器” 命令。命令提供 VS Code 可自动查找的可用解释器列表。 你的列表会有所不同:如果未看到所需的解释器,请参阅 配置 Python 环境。 从列表中,选择以 或
.\env开头的项目文件夹中的./env虚拟环境: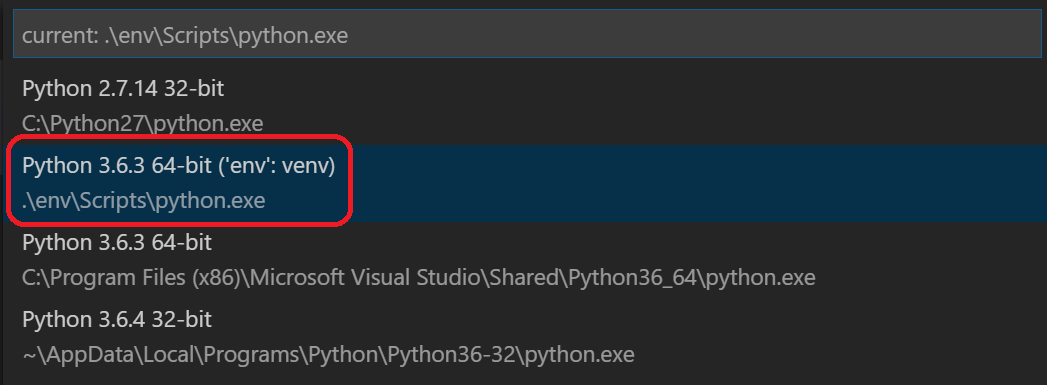
运行 终端:新的终端 (
Ctrl+Shift+ `命令面板) ,该面板创建终端并通过运行其激活脚本自动激活虚拟环境。注意
在 Windows 上,如果默认终端类型为 PowerShell,你可能会看到一个错误,指出它无法运行 activate.ps1,因为在系统上禁用了正在运行的脚本。 此错误应提供一个链接,用于了解如何允许脚本。 否则,请使用 终端:选择“默认 Shell” 设置首选默认值。
所选环境显示在 VS Code 状态栏的左下角。 请注意 (venv) 指示器,指示你使用的是虚拟环境:

在 VS Code 终端中通过 pip 在虚拟环境中安装 Django:
python -m pip install django在虚拟环境中通过 VS Code 终端中的 pip 安装必应广告 Python SDK:
python -m pip install bingads
现在,你已准备好编写 Django 和 Microsoft Advertising 代码的独立虚拟环境。
创建并运行 Django 应用
在 Django 术语中,“Django 项目”由多个站点级配置文件以及部署到 Web 主机以创建完整 Web 应用程序的一个或多个“应用”组成。 一个 Django 项目可以包含多个应用,其中每个应用通常在项目中具有一个独立的函数,并且同一个应用可以位于多个 Django 项目中。 就其而言,应用只是遵循 Django 预期的某些约定的 Python 包。
若要创建 Django 应用,首先需要创建 Django 项目作为应用的容器,然后创建应用本身。 出于这两个目的, django-admin请使用安装 Django 包时安装的 Django 管理实用工具 。
创建 Django 项目
在激活虚拟环境的 VS Code 终端中,运行以下命令:
django-admin startproject web_project .此命令
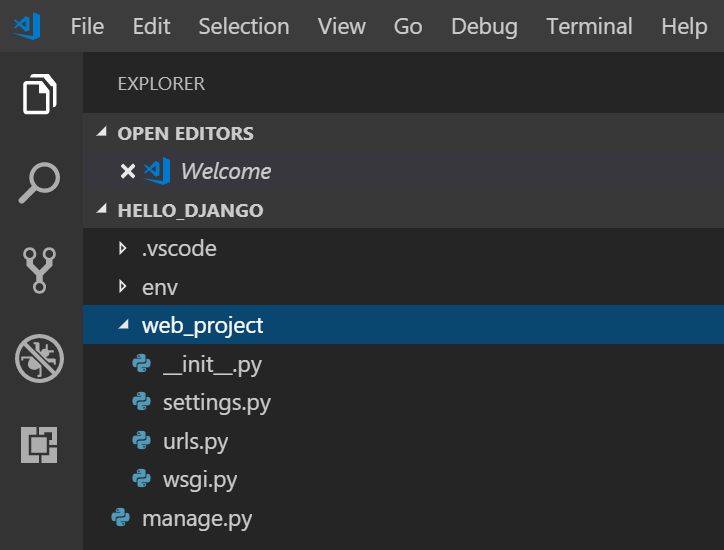
startproject假定在末尾使用.() 当前文件夹是项目文件夹,并在其中创建以下内容:manage.py:项目的 Django 命令行管理实用工具。 使用python manage.py <command> [options]为项目运行管理命令。名为 的
web_project子文件夹,其中包含以下文件:-
__init__.py:一个空文件,告知 Python 此文件夹是 Python 包。 -
wsgi.py:用于为项目提供服务的 WSGI 兼容 Web 服务器的入口点。 通常将此文件保留原样,因为它为生产 Web 服务器提供挂钩。 -
settings.py:包含 Django 项目的设置,可在开发 Web 应用的过程中对其进行修改。 -
urls.py:包含 Django 项目的目录,在开发过程中也会对其进行修改。
-
若要验证 Django 项目,请确保虚拟环境已激活,然后使用 命令
python manage.py runserver启动 Django 的开发服务器。 服务器在默认端口 8000 上运行,可在 VS Code 终端输出窗口中看到如下所示的输出:Performing system checks... System check identified no issues (0 silenced). You have 15 unapplied migration(s). Your project may not work properly until you apply the migrations for app(s): admin, auth, contenttypes, sessions. Run 'python manage.py migrate' to apply them. October 18, 2018 - 05:38:23 Django version 2.1.2, using settings 'web_project.settings' Starting development server at http://127.0.0.1:8000/ Quit the server with CTRL-BREAK.首次运行服务器时,它会在 文件中
db.sqlite3创建一个默认的 SQLite 数据库,该数据库通常用于开发目的,但在生产环境中可用于小批量 Web 应用。 此外,Django 的内置 Web 服务器 仅用于 本地开发目的。 但是,部署到 Web 主机时,Django 会改用主机的 Web 服务器。wsgi.pyDjango 项目中的模块负责连接到生产服务器。如果要使用与默认 8000 不同的端口,只需在命令行上指定端口号,例如
python manage.py runserver 5000。Ctrl+click在http://127.0.0.1:8000/VS Code 终端输出窗口中打开该地址的默认浏览器的 URL。 如果 Django 安装正确且项目有效,则会看到如下所示的默认页面。 “VS Code 输出”窗口还显示服务器日志。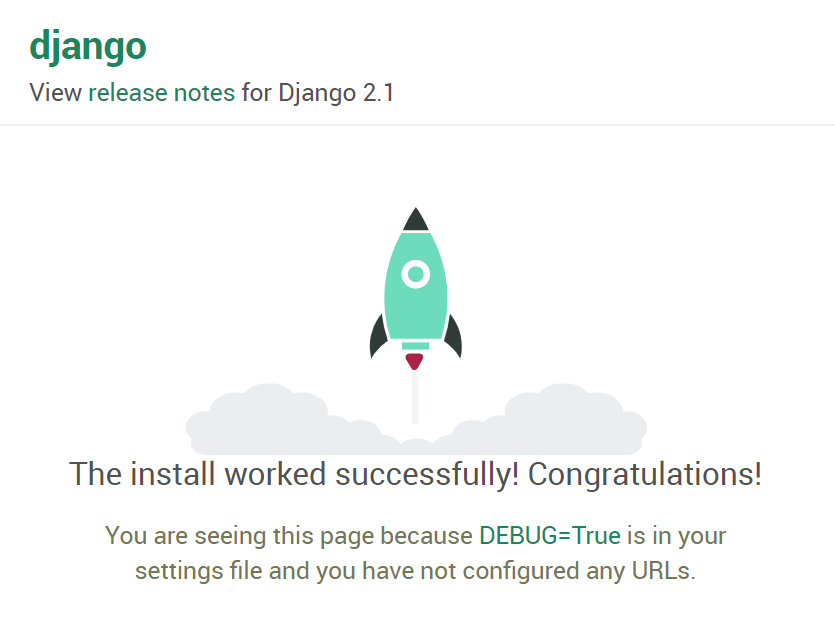
完成后,关闭浏览器窗口,并使用 在 VS Code 终端
Ctrl+C输出窗口中停止服务器。
创建适用于 Microsoft Advertising 的 Django 应用
在激活虚拟环境的 VS Code 终端中,在项目文件夹中运行管理实用工具的
startapp命令, (驻留manage.py) :python manage.py startapp app命令创建一个名为
app的文件夹,其中包含大量代码文件和一个子文件夹。 其中,你经常使用views.py(,其中包含在 Web 应用中定义页面的函数) ,以及models.py包含定义数据对象) 类的 (。migrationsDjango 的管理实用工具使用该文件夹来管理数据库版本,如本教程稍后所述。 还有 (应用配置) 的文件apps.py、admin.py用于创建管理界面) (,以及tests.py用于单元测试) 的 (,此处未介绍这些文件。在 中添加
app/settings.py以下代码并设置自己的 CLIENT_ID、 CLIENT_SECRET、 DEVELOPER_TOKEN和 ENVIRONMENT 值。""" Bing Ads API settings Edit with your credentials. """ REDIRECTION_URI = "http://localhost:8000/callback" CLIENT_ID = "ClientIdGoesHere" # Your registered App ID CLIENT_SECRET="ClientSecretGoesHere" # Your registered App Password DEVELOPER_TOKEN = "DeveloperTokenGoesHere" # Your production developer token ENVIRONMENT = 'production' API_VERSION=13在
app/settings.py“添加到app已安装的应用” 列表中。INSTALLED_APPS = [ 'django.contrib.admin', 'django.contrib.auth', 'django.contrib.contenttypes', 'django.contrib.sessions', 'django.contrib.messages', 'django.contrib.staticfiles', 'app', ]在 VS Code 终端中创建
app/static/app和app/templates/app文件夹:(env) PS C:\dev\hello_django> mkdir app/static/app (env) PS C:\dev\hello_django> mkdir app/templates/app在
app/static/app文件夹中创建名为 site.css 的新文件并添加以下内容。.message { font-weight: 600; color: blue; } .message_list th,td { text-align: left; padding-right: 15px; } .navbar { background-color: lightslategray; font-size: 1em; font-family: 'Trebuchet MS', 'Lucida Sans Unicode', 'Lucida Grande', 'Lucida Sans', Arial, sans-serif; color: white; padding: 8px 5px 8px 5px; } .navbar a { text-decoration: none; color: inherit; } .navbar-brand { font-size: 1.2em; font-weight: 600; } .navbar-item { font-variant: small-caps; margin-left: 30px; } .body-content { padding: 5px; font-family:'Segoe UI', Tahoma, Geneva, Verdana, sans-serif; } input[name=message] { width: 80%; }在
app/templates/app文件夹中,index.html使用以下内容创建一个文件。{% extends "app/layout.html" %} {% block content %} {% if errors %} <div class="jumbotron"> <section id="errors"> <h1>Errors occurred in your last request to Bing Ads API.</h1> <table class="message_list"> <tr> <th>Code</th> <th>ErrorCode</th> <th>Message</th> </tr> {% for error in errors %} <tr> <td>{{ error.Code }}</td> <td>{{ error.ErrorCode }}</td> <td>{{ error.Message }}</td> </tr> {% endfor %} </table> </section> </div> {% endif %} {% if user.is_authenticated %} {% if bingadsuser %} <div class="jumbotron"> <section id="enabled"> <h1>Your credentials have access to Microsoft Advertising.</h1> <table class="message_list"> <tr> <th>Id</th> <th>UserName</th> <th>First Name</th> <th>Last Name</th> </tr> <tr> <td>{{ bingadsuser.Id }}</td> <td>{{ bingadsuser.UserName }}</td> <td>{{ bingadsuser.Name.FirstName }}</td> <td>{{ bingadsuser.Name.LastName }}</td> </tr> </table> </section> </div> <div class="jumbotron"> <section id="revoke"> <p class="lead">Click here to revoke access for this app to your Microsoft Advertising accounts. You will then be able to login with a different Microsoft Advertising user. </p> <form id="revokeForm" action="/revoke" method="post" class="navbar-left"> {% csrf_token %} <p><a href="javascript:document.getElementById('revokeForm').submit()" class="btn btn-primary btn-large">Delete Refresh Token</a></p> </form> </section> </div> <div class="jumbotron"> <section id="accounts"> <h1>Account Details</h1> <table class="message_list"> <thead> <tr> <th>Id</th> <th>Name</th> </tr> </thead> <tbody> {% for account in accounts %} <tr> <td>{{ account.Id }}</td> <td>{{ account.Name }}</td> </tr> {% endfor %} </tbody> </table> </section> </div> {% else %} <div class="jumbotron"> <section id="enable"> <h1>Enable Microsoft Advertising Access</h1> <p class="lead"> You are logged into the Django web application, but not yet signed in with your Microsoft Advertising credentials. You can sign in with Microsoft Advertising credentials below. </p> </section> </div> <div> <div class="col-md-6"> <section id="socialLoginForm"> <h1>Microsoft Account Login</h1> <p class="lead"> Click here to authenticate your Microsoft Account. If you don't have Microsoft Advertising credentials, you can go to the <a href="https://ads.microsoft.com/customer/Signup.aspx">Microsoft Advertising Sign Up</a> page. </p> <p><a href="/callback" class="btn btn-primary btn-large">Authenticate Microsoft Account »</a></p> </section> </div> </div> {% endif %} {% else %} <div class="jumbotron"> <div class="col-md-6"> <section id="socialLoginForm"> <h1>Microsoft Advertising Example Web Application</h1> <p class="lead"> Before you can provide your Microsoft Advertising user credentials and access Microsoft Advertising data, you must <a href="{% url 'login' %}">login</a> to the Django web application. </p> <p class="lead">Use your site's Django admin portal to add web app users.</p> <p><a href="/admin" class="btn btn-primary btn-large">Django Admin »</a></p> </section> </div> </div> {% endif %} <div> <div class="col-md-4"> <h2>Get Started Using Python with Bing Ads API</h2> <p>The Bing Ads Python Software Development Kit (SDK) simplifies workflows such as OAuth authentication and report file parsing.</p> <p><a class="btn btn-default" href="https://learn.microsoft.com/advertising/guides/get-started-python">Learn more »</a></p> </div> <div class="col-md-4"> <h2>Django</h2> <p>Django is a free web framework for building Web sites and Web applications using HTML, CSS and JavaScript.</p> <p><a class="btn btn-default" href="https://www.djangoproject.com/">Learn more »</a></p> </div> <div class="col-md-4"> <h2>Microsoft Azure</h2> <p>You can publish your web app to Microsoft Azure. Find out how you can host your application with a free trial today.</p> <p><a class="btn btn-default" href="https://azure.microsoft.com">Learn more »</a></p> </div> </div> {% endblock %} {% block scripts %} {% load static %} <link rel="stylesheet" type="text/css" href="{% static 'app/site.css' %}"/> {% endblock %}在
app/templates/app文件夹中,layout.html使用以下内容创建一个文件。<!DOCTYPE html> <html> <head> <meta charset="utf-8" /> <meta name="viewport" content="width=device-width, initial-scale=1.0"> <title>{{ title }} - My Django Application</title> {% load static %} <link rel="stylesheet" type="text/css" href="{% static 'app/site.css' %}"/> <script src="{% static 'app/scripts/modernizr-2.6.2.js' %}"></script> </head> <body> <div class="navbar navbar-inverse navbar-fixed-top"> <div class="container"> <div class="navbar-header"> <button type="button" class="navbar-toggle" data-toggle="collapse" data-target=".navbar-collapse"> <span class="icon-bar"></span> <span class="icon-bar"></span> <span class="icon-bar"></span> </button> <a href="/" class="navbar-brand">Microsoft Advertising App via Django</a> </div> <div class="navbar-collapse collapse"> <ul class="nav navbar-nav"> <li><a href="{% url 'home' %}">Home</a></li> </ul> {% include 'app/loginpartial.html' %} </div> </div> </div> <div class="container body-content"> {% block content %}{% endblock %} <hr/> <footer> <p>© {{ year }} - My Django Application</p> </footer> </div> {% block scripts %}{% endblock %} </body> </html>在
app/templates/app文件夹中,login.html使用以下内容创建一个文件。{% extends "app/layout.html" %} {% block content %} <h2>{{ title }}</h2> <div class="row"> <div class="col-md-8"> <section id="loginForm"> <form action="." method="post" class="form-horizontal"> {% csrf_token %} <h4>Use a local account to log in.</h4> <hr /> <div class="form-group"> <label for="id_username" class="col-md-2 control-label">User name</label> <div class="col-md-10"> {{ form.username }} </div> </div> <div class="form-group"> <label for="id_password" class="col-md-2 control-label">Password</label> <div class="col-md-10"> {{ form.password }} </div> </div> <div class="form-group"> <div class="col-md-offset-2 col-md-10"> <input type="hidden" name="next" value="/" /> <input type="submit" value="Log in" class="btn btn-default" /> </div> </div> {% if form.errors %} <p class="validation-summary-errors">Please enter a correct user name and password.</p> {% endif %} </form> </section> </div> </div> {% endblock %} {% block scripts %} {% load static %} <link rel="stylesheet" type="text/css" href="{% static 'app/site.css' %}"/> {% endblock %}在
app/templates/app文件夹中,loginpartial.html使用以下内容创建一个文件。{% if user.is_authenticated %} <form id="logoutForm" action="/applogout" method="post" class="navbar-right"> {% csrf_token %} <ul class="nav navbar-nav navbar-right"> <li><span class="navbar-brand">Hello {{ user.username }}!</span></li> <li><a href="javascript:document.getElementById('logoutForm').submit()">Log off</a></li> </ul> </form> {% else %} <ul class="nav navbar-nav navbar-right"> <li><a href="{% url 'login' %}">Log in</a></li> </ul> {% endif %}在
app文件夹中,forms.py使用以下内容创建一个文件。from django import forms from django.contrib.auth.forms import AuthenticationForm from django.utils.translation import ugettext_lazy as _ class BootstrapAuthenticationForm(AuthenticationForm): """Authentication form which uses boostrap CSS.""" username = forms.CharField(max_length=254, widget=forms.TextInput({ 'class': 'form-control', 'placeholder': 'User name'})) password = forms.CharField(label=_("Password"), widget=forms.PasswordInput({ 'class': 'form-control', 'placeholder':'Password'}))修改
app/models.py以匹配以下代码。from django.db import models from django.contrib.auth.models import User # In this web app a Microsoft Advertising user maps a Django web user to a refresh token. class BingAdsUser(models.Model): user = models.OneToOneField(User, on_delete=models.PROTECT) refresh_token = models.CharField(max_length=200) # def __unicode__(self): # __unicode__ on Python 2 # return self.refresh_token def __str__(self): # __str__ on Python 3 return self.refresh_token修改
app/views.py以匹配以下代码。from django.http import HttpRequest, HttpResponse from django.shortcuts import render from django.template.loader import get_template, render_to_string from web_project import settings from datetime import datetime from django.shortcuts import redirect from django.contrib.auth import authenticate, login, logout, get_user_model from django.contrib.auth.models import User from app.models import BingAdsUser from bingads import * # import logging # logging.basicConfig(level=logging.INFO) # logging.getLogger('suds.client').setLevel(logging.DEBUG) # logging.getLogger('suds.transport').setLevel(logging.DEBUG) authorization_data = AuthorizationData( account_id=None, customer_id=None, developer_token=None, authentication=None) customer_service=None def home(request): """ If an authenticated user returns to this page after logging in, the appropriate context is provided to index.html for rendering the page. """ assert isinstance(request, HttpRequest) # If the Django user has a refresh token stored, # try to use it to get Microsoft Advertising data. if user_has_refresh_token(request.user.username): return redirect('/callback') else: return render( request, 'app/index.html' ) def callback(request): """Handles OAuth authorization, either via callback or direct refresh request.""" assert isinstance(request, HttpRequest) authentication = OAuthWebAuthCodeGrant( client_id=settings.CLIENT_ID, client_secret=settings.CLIENT_SECRET, redirection_uri=settings.REDIRECTION_URI, env=settings.ENVIRONMENT) return authorize_bing_ads_user(request, authentication) def authorize_bing_ads_user(request, authentication): assert isinstance(request, HttpRequest) global customer_service bingadsuser = None try: Users = get_user_model() user = User.objects.get(username=request.user.username) except User.DoesNotExist: return render( request, 'app/index.html' ) try: bingadsuser = user.bingadsuser except BingAdsUser.DoesNotExist: bingadsuser = BingAdsUser() bingadsuser.user = user pass try: # If we have a refresh token let's refresh the access token. if(bingadsuser is not None and bingadsuser.refresh_token != ""): authentication.request_oauth_tokens_by_refresh_token(bingadsuser.refresh_token) bingadsuser.refresh_token = authentication.oauth_tokens.refresh_token # If the current HTTP request is a callback from the Microsoft Account authorization server, # use the current request url containing authorization code to request new access and refresh tokens. elif (request.GET.get('code') is not None): authentication.request_oauth_tokens_by_response_uri(response_uri = request.get_full_path()) bingadsuser.refresh_token = authentication.oauth_tokens.refresh_token except OAuthTokenRequestException: bingadsuser.refresh_token = "" user.save() bingadsuser.save() # If there is no refresh token saved and no callback from the authorization server, # then connect to the authorization server and request user consent. if (bingadsuser.refresh_token == ""): return redirect(authentication.get_authorization_endpoint()) set_session_data(request, authentication) # At this point even if the user has valid Django web application credentials, # we don't know whether they have access to Microsoft Advertising. # Let's test to see if they can call Bing Ads API service operations. bing_ads_user = None accounts=[] errors=[] try: bing_ads_user = get_user(None) accounts = search_accounts_by_user_id(bing_ads_user.Id)['AdvertiserAccount'] except WebFault as ex: errors=get_webfault_errors(ex) pass context = { 'bingadsuser': bing_ads_user, 'accounts': accounts, 'errors': errors, } return render( request, 'app/index.html', context ) def revoke(request): """Deletes the refresh token for the user authenticated in the current session.""" assert isinstance(request, HttpRequest) try: Users = get_user_model() user = User.objects.get(username=request.user.username) bingadsuser = user.bingadsuser if(bingadsuser is not None): bingadsuser.refresh_token = "" bingadsuser.save() except User.DoesNotExist: pass except BingAdsUser.DoesNotExist: pass clear_session_data(request) return render( request, 'app/index.html' ) def user_has_active_session(request): try: return True if request.session['is_authenticated'] else False except KeyError: return False def user_has_refresh_token(username): try: Users = get_user_model() user = User.objects.get(username=username) bingadsuser = user.bingadsuser if(bingadsuser is not None and bingadsuser.refresh_token != ""): return True except User.DoesNotExist: return False except BingAdsUser.DoesNotExist: return False def set_session_data(request, authentication): global authorization_data global customer_service try: request.session['is_authenticated'] = True authorization_data.authentication = authentication authorization_data.developer_token = settings.DEVELOPER_TOKEN customer_service = ServiceClient( service='CustomerManagementService', version=settings.API_VERSION, authorization_data=authorization_data, environment=settings.ENVIRONMENT ) except KeyError: pass return None def clear_session_data(request): global authorization_data global customer_service request.session['is_authenticated'] = False authorization_data = AuthorizationData(account_id=None, customer_id=None, developer_token=None, authentication=None) customer_service = None def applogout(request): logout(request) clear_session_data(request) return redirect('/') def get_user(user_id): ''' Gets a Microsoft Advertising User object by the specified user ID. :param user_id: The Microsoft Advertising user identifier. :type user_id: long :return: The Microsoft Advertising user. :rtype: User ''' global customer_service return customer_service.GetUser(UserId = user_id).User def search_accounts_by_user_id(user_id): ''' Search for account details by UserId. :param user_id: The Microsoft Advertising user identifier. :type user_id: long :return: List of accounts that the user can manage. :rtype: Dictionary of AdvertiserAccount ''' predicates={ 'Predicate': [ { 'Field': 'UserId', 'Operator': 'Equals', 'Value': user_id, }, ] } accounts=[] page_index = 0 PAGE_SIZE=100 found_last_page = False while (not found_last_page): paging=set_elements_to_none(customer_service.factory.create('ns5:Paging')) paging.Index=page_index paging.Size=PAGE_SIZE search_accounts_response = customer_service.SearchAccounts( PageInfo=paging, Predicates=predicates ) if search_accounts_response is not None and hasattr(search_accounts_response, 'AdvertiserAccount'): accounts.extend(search_accounts_response['AdvertiserAccount']) found_last_page = PAGE_SIZE > len(search_accounts_response['AdvertiserAccount']) page_index += 1 else: found_last_page=True return { 'AdvertiserAccount': accounts } def set_elements_to_none(suds_object): for (element) in suds_object: suds_object.__setitem__(element[0], None) return suds_object def get_webfault_errors(ex): errors=[] if not hasattr(ex.fault, "detail"): raise Exception("Unknown WebFault") error_attribute_sets = ( ["ApiFault", "OperationErrors", "OperationError"], ["AdApiFaultDetail", "Errors", "AdApiError"], ["ApiFaultDetail", "BatchErrors", "BatchError"], ["ApiFaultDetail", "OperationErrors", "OperationError"], ["EditorialApiFaultDetail", "BatchErrors", "BatchError"], ["EditorialApiFaultDetail", "EditorialErrors", "EditorialError"], ["EditorialApiFaultDetail", "OperationErrors", "OperationError"], ) for error_attribute_set in error_attribute_sets: errors = get_api_errors(ex.fault.detail, error_attribute_set) if errors is not None: return errors return None def get_api_errors(error_detail, error_attribute_set): api_errors = error_detail for field in error_attribute_set: api_errors = getattr(api_errors, field, None) if api_errors is None: return None errors=[] if type(api_errors) == list: for api_error in api_errors: errors.append(api_error) else: errors.append(api_errors) return errors将 的内容
web_project/urls.py替换为以下内容。 该文件urls.py是指定模式以将不同 URL 路由到其相应视图的位置。 例如,下面的代码将应用 ()""的根 URL 映射到home刚刚添加到app/views.py的函数:from django.contrib import admin from django.urls import path from app import views as app_views from django.contrib.auth import views as auth_views from datetime import datetime from django.conf.urls import include, url from app.forms import BootstrapAuthenticationForm from django.contrib.auth.views import HttpResponseRedirect from django.contrib import admin admin.autodiscover() urlpatterns = [ url(r'^applogout', app_views.applogout, name='applogout'), url(r'^callback', app_views.callback, name='callback'), url(r'^revoke', app_views.revoke, name='revoke'), url(r'^$', app_views.home, name='home'), url(r'^login/$', auth_views.LoginView.as_view( template_name='app/login.html', authentication_form=BootstrapAuthenticationForm, extra_context= { 'title':'Log in', 'year':datetime.now().year, } ), name='login'), url(r'^logout$', auth_views.LogoutView.as_view(), { 'next_page': '/', }, name='logout'), url(r'^admin/', admin.site.urls), ]使用
Ctrl+K S保存所有修改的文件。运行
python manage.py makemigrations以在迁移文件夹中生成脚本,用于将数据库从当前状态迁移到新状态。运行
python manage.py migrate以将脚本应用于实际数据库。 迁移脚本可有效地记录对数据模型所做的所有增量更改, (models.py随时间推移) 。 通过应用迁移,Django 会更新数据库以匹配模型。 由于每个增量更改都有自己的脚本,因此 Django 可以自动迁移任何以前版本的数据库 (包括新数据库) 到当前版本。 因此,只需关注 models.py 中的模型,而不要关注基础数据库架构或迁移脚本。 你让 Django 做那个部分!通过在虚拟环境的 VS Code 中打开终端,然后运行 命令
python manage.py createsuperuser --username=<username> --email=<email>(当然)将 和<email>替换为<username>你的个人信息,在应用中创建一个超级用户帐户。 运行命令时,Django 会提示输入并确认密码。重要
请务必记住用户名和密码组合。 这些是用于在 Web 应用的管理门户中进行身份验证的凭据。
在 VS Code 终端中,在激活虚拟环境的情况下,使用
python manage.py runserver运行开发服务器并打开浏览器http://127.0.0.1:8000/以查看呈现“Hello, Django”的页面。在 Web 浏览器中,转到
http://127.0.0.1:8000/admin/“ 用户”下创建新的 Django Web 用户。 这与 Microsoft Advertising 用户凭据不同,因此多个 Microsoft Advertising 用户可以单独登录到你的应用。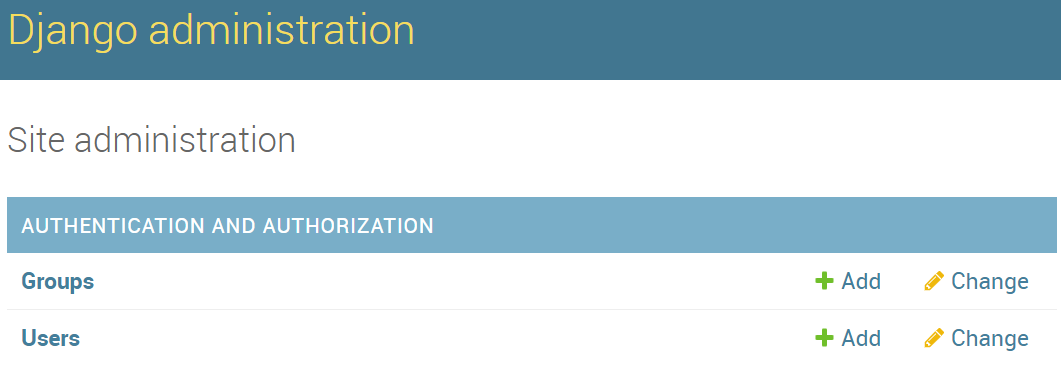
使用新用户登录 (而不是超级管理员) ,你应该会看到使用 Microsoft 帐户进行身份验证的选项。
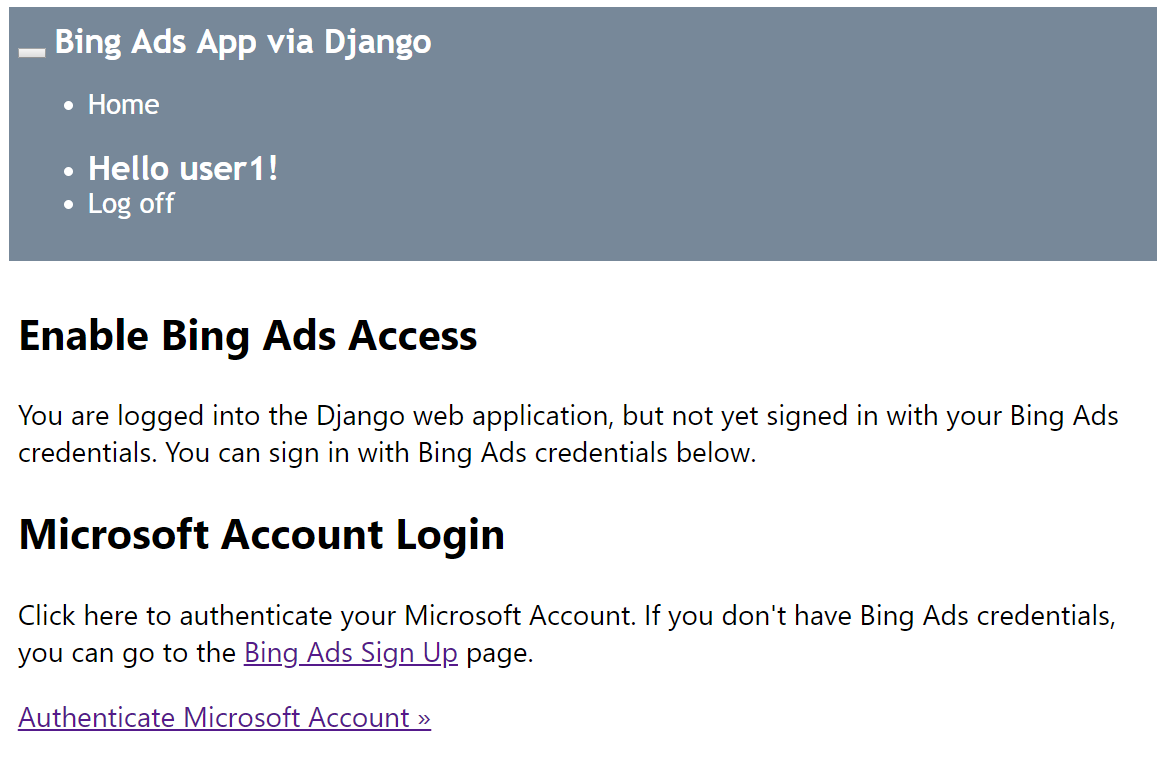
单击“ 对 Microsoft 帐户进行身份验证 ”后,系统会提示授予自己的 Web 应用管理 Microsoft Advertising 帐户的权限。 如果你同意并且你有权访问 Microsoft Advertising 帐户,则应重定向到帐户名称的视图, () 和 ID () 。