验证端口镜像
适用于:高级威胁分析版本 1.9
注意
仅当部署 ATA 网关而不是 ATA 轻型网关时,本文才相关。 若要确定是否需要使用 ATA 网关,请参阅 为部署选择正确的网关。
以下步骤将指导你完成验证端口镜像是否正确配置的过程。 若要使 ATA 正常工作,ATA 网关必须能够查看传入和传出域控制器的流量。 ATA 使用的main数据源是对传入和传出域控制器的网络流量进行深度数据包检查。 若要使 ATA 查看网络流量,需要配置端口镜像。 端口镜像将流量从源端口 () 的一个端口复制到目标端口) (另一个端口。
使用Windows PowerShell脚本验证端口镜像
- 将此脚本的文本保存到名为 ATAdiag.ps1的文件中。
- 在要验证的 ATA 网关上运行此脚本。 该脚本生成从 ATA 网关到域控制器的 ICMP 流量,并在域控制器上的捕获 NIC 上查找该流量。 如果 ATA 网关看到 ICMP 流量的目标 IP 地址与在 ATA 控制台中输入的 DC IP 地址相同,则认为已配置端口镜像。
有关如何运行脚本的示例:
# ATAdiag.ps1 -CaptureIP n.n.n.n -DCIP n.n.n.n -TestCount n
param([parameter(Mandatory=$true)][string]$CaptureIP, [parameter(Mandatory=$true)][string]$DCIP, [int]$PingCount = 10)

# Set variables
$ErrorActionPreference = "stop"
$starttime = get-date
$byteIn = new-object byte[] 4
$byteOut = new-object byte[] 4
$byteData = new-object byte[] 4096  # size of data

$byteIn[0] = 1  # for promiscuous mode
$byteIn[1-3] = 0
$byteOut[0-3] = 0

# Convert network data to host format
function NetworkToHostUInt16 ($value)
{
    [Array]::Reverse($value)
    [BitConverter]::ToUInt16($value,0)
}
function NetworkToHostUInt32 ($value)
{
    [Array]::Reverse($value)
    [BitConverter]::ToUInt32($value,0)
}
function ByteToString ($value)
{
    $AsciiEncoding = new-object system.text.asciiencoding
    $AsciiEncoding.GetString($value)
}

Write-Host "Testing Port Mirroring..." -ForegroundColor Yellow
Write-Host ""
Write-Host "Here is a summary of the connection we will test." -ForegroundColor Yellow

# Initialize a first ping connection
Test-Connection -Count 1 -ComputerName $DCIP -ea SilentlyContinue
Write-Host ""
Write-Host "Press any key to continue..." -ForegroundColor Red
[void][System.Console]::ReadKey($true)
Write-Host ""
Write-Host "Sending ICMP and Capturing data..." -ForegroundColor Yellow

# Open a socket
$socket = new-object system.net.sockets.socket([Net.Sockets.AddressFamily]::InterNetwork,[Net.Sockets.SocketType]::Raw,[Net.Sockets.ProtocolType]::IP)

# Include the IP header
$socket.setsocketoption("IP","HeaderIncluded",$true)
$socket.ReceiveBufferSize = 10000
$ipendpoint = new-object system.net.ipendpoint([net.ipaddress]"$CaptureIP",0)
$socket.bind($ipendpoint)

# Enable promiscuous mode
[void]$socket.iocontrol([net.sockets.iocontrolcode]::ReceiveAll,$byteIn,$byteOut)

# Initialize test variables
$tests = 0
$TestResult = "Noise"
$OneSuccess = 0

while ($tests -le $PingCount)
{
    if (!$socket.Available)  # see if any packets are in the queue
    {
        start-sleep -milliseconds 500
        continue
    }

    # Capture traffic
    $rcv = $socket.receive($byteData,0,$byteData.length,[net.sockets.socketflags]::None)

    # Decode the header so we can read ICMP
    $MemoryStream = new-object System.IO.MemoryStream($byteData,0,$rcv)
    $BinaryReader = new-object System.IO.BinaryReader($MemoryStream)

    # Set IP version & header length
    $VersionAndHeaderLength = $BinaryReader.ReadByte()

    # TOS
    $TypeOfService= $BinaryReader.ReadByte()

    # More values, and the Protocol Number for ICMP traffic
    # Convert network format of big-endian to host format of little-endian
    $TotalLength = NetworkToHostUInt16 $BinaryReader.ReadBytes(2)
    $Identification = NetworkToHostUInt16 $BinaryReader.ReadBytes(2)
    $FlagsAndOffset = NetworkToHostUInt16 $BinaryReader.ReadBytes(2)
    $TTL = $BinaryReader.ReadByte()
    $ProtocolNumber = $BinaryReader.ReadByte()
    $Checksum = [Net.IPAddress]::NetworkToHostOrder($BinaryReader.ReadInt16())

    # The source and destination IP addresses
    $SourceIPAddress = $BinaryReader.ReadUInt32()
    $DestinationIPAddress = $BinaryReader.ReadUInt32()

    # The source and destimation ports
    $sourcePort = [uint16]0
    $destPort = [uint16]0

    # Close the stream reader
    $BinaryReader.Close()
    $memorystream.Close()

    # Cast DCIP into an IPaddress type
    $DCIPP = [ipaddress] $DCIP
    $DestinationIPAddressP = [ipaddress] $DestinationIPAddress

    #Ping the DC at the end after starting the capture
    Test-Connection -Count 1 -ComputerName $DCIP -ea SilentlyContinue | Out-Null

    # This is the match logic - check to see if Destination IP from the Ping sent matches the DCIP entered by in the ATA Console
    # The only way the ATA Gateway should see a destination of the DC is if Port Spanning is configured

    if ($DestinationIPAddressP -eq $DCIPP)  # is the destination IP eq to the DC IP?
    {
        $TestResult = "Port Spanning success!"
        $OneSuccess = 1
    } else {
        $TestResult = "Noise"
    }

    # Put source, destination, test result in Powershell object
    new-object psobject | add-member -pass noteproperty CaptureSource $([system.net.ipaddress]$SourceIPAddress) | add-member -pass noteproperty CaptureDestination $([system.net.ipaddress]$DestinationIPAddress) | Add-Member -pass NoteProperty Result $TestResult | Format-List | Out-Host
    #Count tests
    $tests ++
}

if ($OneSuccess -eq 1)
{
    Write-Host "Port Spanning Success!" -ForegroundColor Green
    Write-Host ""
    Write-Host "At least one packet which was addressed to the DC, was picked up by the Gateway." -ForegroundColor Yellow
    Write-Host "A little noise is OK, but if you don't see a majority of successes, you might want to re-run." -ForegroundColor Yellow
} else {
    Write-Host "No joy, all noise.  You may want to re-run, increase the number of Ping Counts, or check your config." -ForegroundColor Red
}

Write-Host ""
Write-Host "Press any key to continue..." -ForegroundColor Red
[void][System.Console]::ReadKey($true)
使用 Net Mon 验证端口镜像
在要验证的 ATA 网关上安装 Microsoft网络监视器 3.4 。
重要
请勿在 ATA 网关上安装Microsoft消息分析器或任何其他流量捕获软件。
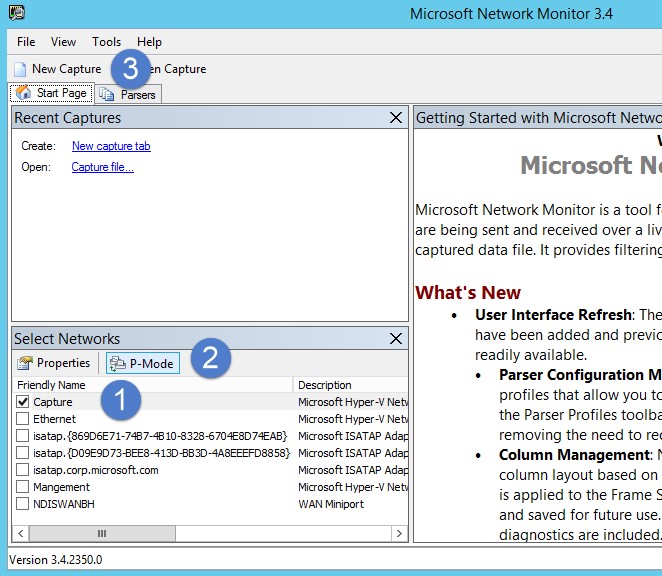
打开网络监视器并创建新的捕获选项卡。
仅选择 捕获 网络适配器或连接到配置为端口镜像目标的交换机端口的网络适配器。
确保已启用 P 模式。
单击“ 新建捕获”。

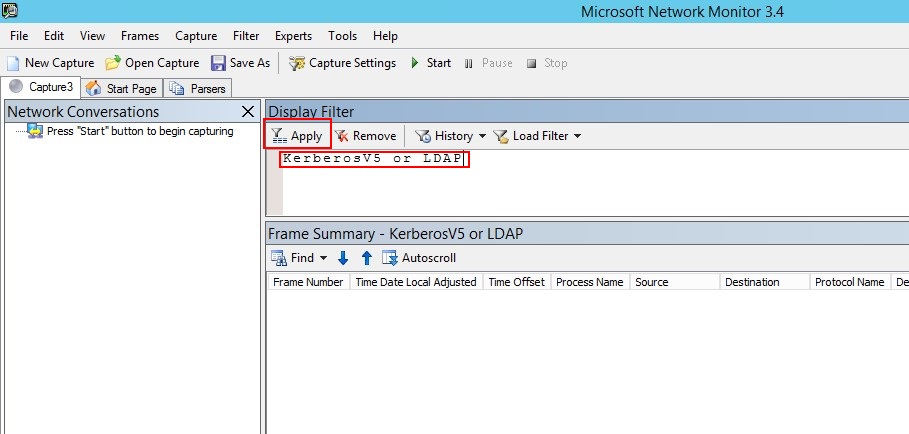
在“显示筛选器”窗口中,输入以下筛选器: KerberosV5 或 LDAP ,然后单击“ 应用”。

单击“ 开始 ”以启动捕获会话。 如果未看到传入和传出域控制器的流量,请查看端口镜像配置。

注意
请务必确保看到传入和传出域控制器的流量。
如果只看到一个方向的流量,则应与网络或虚拟化团队合作,以帮助排查端口镜像配置问题。