使用 Microsoft Entra ID 在 SharePoint Server 中设置 OIDC 身份验证
适用于: 2013
2013  2016
2016  2019
2019  Subscription Edition
  SharePoint in Microsoft 365
先决条件
使用 Microsoft Entra ID 配置 OpenID Connect (OIDC) 时,需要以下资源:
SharePoint Server 订阅版 (SPSE) 场
Microsoft Entra M365 租户的全局管理员角色
本文对 Microsoft Entra OIDC 设置使用以下示例值:
| 值 | 链接 |
|---|---|
| SharePoint 网站统一资源定位符 (URL) | https://spsites.contoso.local/ |
| OIDC 站点 URL | https://sts.windows.net/<tenantid>/ |
| Microsoft Entra OIDC 身份验证终结点 | https://login.microsoftonline.com/<tenantid>/oauth2/authorize |
| Microsoft Entra OIDC RegisteredIssuerName URL | https://sts.windows.net/<tenantid>/ |
| Microsoft Entra OIDC SignoutURL | https://login.microsoftonline.com/<tenantid>/oauth2/logout |
| 标识声明类型 | http://schemas.xmlsoap.org/ws/2005/05/identity/claims/emailaddress |
| Windows 网站集管理员 | contoso\yvand |
| Email联合网站集管理员的值 | yvand@contoso.local |
重要
Microsoft 建议使用权限最少的角色。 使用权限较低的帐户有助于提高组织的安全性。 全局管理员是一个权限很高的角色,应仅限于在无法使用现有角色的紧急情况下使用。
步骤 1:设置标识提供者
执行以下步骤,使用 Microsoft Entra ID 设置 OIDC:
浏览到 Entra ID 管理门户,并使用具有全局管理员角色的帐户登录。
在“应用程序”下,选择“应用注册”。
选择“新注册”。
转到 “注册应用程序 ”页
https://portal.azure.com/#blade/Microsoft_AAD_IAM/ActiveDirectoryMenuBlade/RegisteredApps。在 “重定向 URI ”部分下,选择“Web”作为平台,然后输入 SharePoint Server Web 应用程序 URL,例如:
https://spsites.contoso.local/并选择“ 注册”。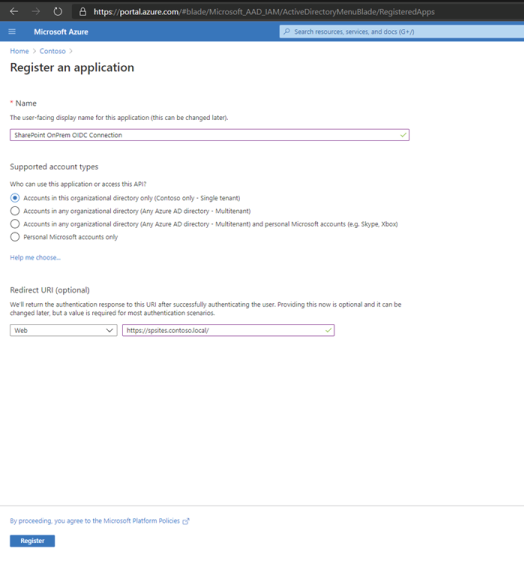
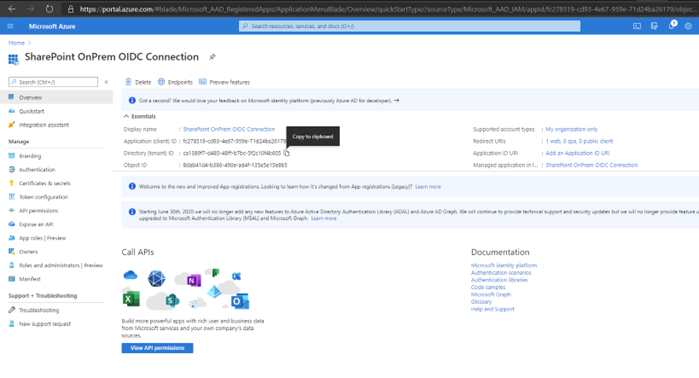
保存 目录 (租户) ID 值,因为租户 ID 将在后续步骤中使用。 此外,保存 应用程序 (客户端) ID, 我们在 SharePoint 设置中将其用作 DefaultClientIdentifier 。
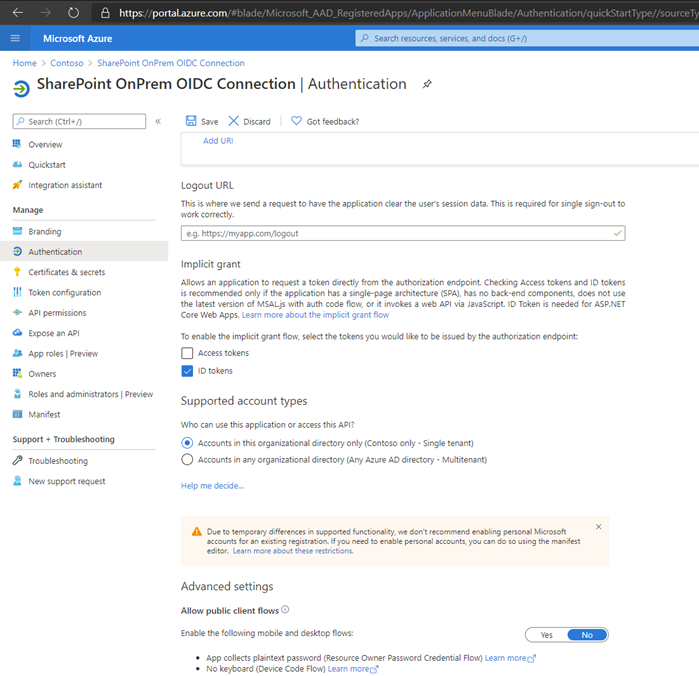
注册应用程序后,转到“身份验证”选项卡,选择“ID 令牌检查”框,然后选择“保存”。
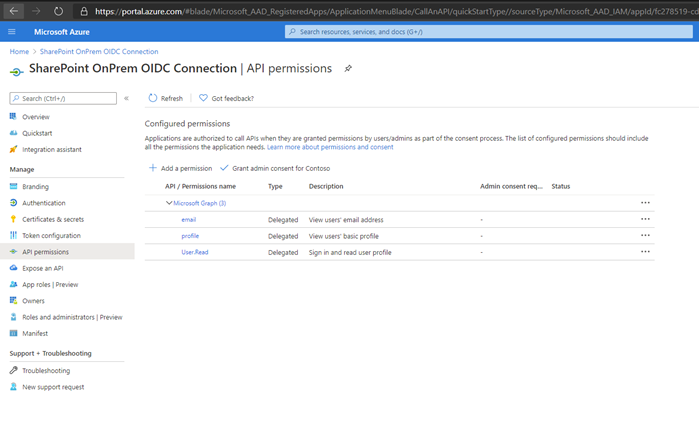
转到“ API 权限 ”选项卡,然后选择“添加权限”。 选择 “Microsoft Graph”,然后选择“ 委托的权限”。 选择“添加 电子邮件 和 配置文件 权限”,然后选择“ 添加权限”。
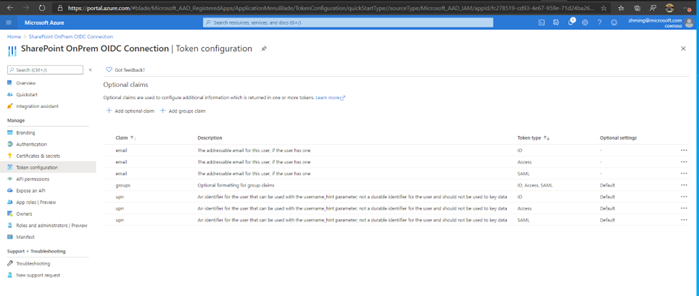
转到“ 令牌配置 ”选项卡,然后选择“ 添加可选声明”。 对于每种令牌类型, (ID、Access、SAML) 、添加 电子邮件和 upn 声明。
此外,在“ 令牌配置 ”选项卡上,选择“ 添加组声明”。 安全组是最常见的,但选择的组类型取决于要用于授予 SharePoint Web 应用程序访问权限的组类型。 有关详细信息,请参阅配置组可选声明和使用Microsoft Entra ID为应用程序配置组声明。
转到“ 清单 ”选项卡,在“Microsoft Graph 应用清单”下,将 redirectUris 的值从
https://spsites.contoso.local/更改为https://spsites.contoso.local/*。 然后选择“保存”。 对 redirectUriSettings 下列出的“uri”值执行相同操作,然后再次选择“ 保存 ”。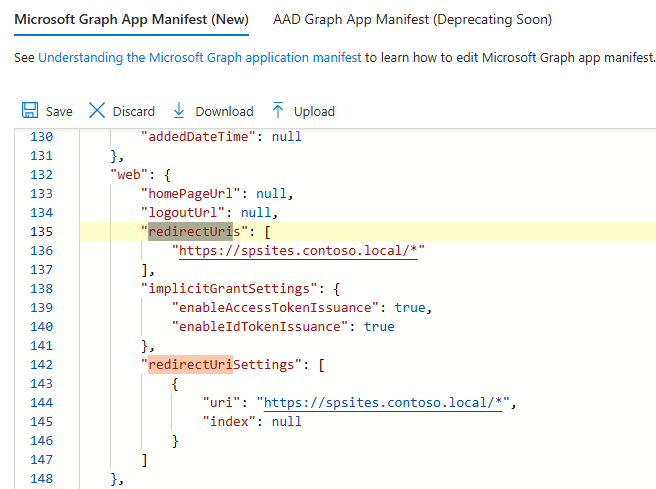
步骤 2:更改 SharePoint 场属性
在此步骤中,需要根据 SharePoint Server 场的版本修改 SharePoint Server 场属性。
- 有关为 SharePoint Server 订阅版 版本 24H1 配置 SharePoint 场属性的详细信息,请参阅配置 SPSE 版本 24H1 或更高版本。
- 有关为 24H1 之前的 SharePoint Server 订阅版 版本配置 SharePoint 场属性的详细信息,请参阅配置版本 24H1 之前的 SPSE。
使用早期发布功能首选项配置SharePoint Server 订阅版版本 24H1 或更高版本
从 SharePoint Server 订阅版 版本 24H1 () 2024 年 3 月起,如果为 SharePoint 场配置了提前发布功能首选项,则可以通过使用 SharePoint 证书管理来管理 nonce Cookie 证书来配置 SharePoint 服务器场属性。 nonce Cookie 证书是确保 OIDC 身份验证令牌安全的基础结构的一部分。 运行以下 PowerShell 脚本进行配置:
重要
若要使用此脚本,SharePoint 场必须设置为“早期发布”,如上所述。 否则,脚本将完成且不会出错,但调用$farm。UpdateNonceCertificate () 不会执行任何操作。 如果不想为早期版本配置服务器场,则必须改用 “在版本 24H1 之前配置 SPSE ”步骤。
注意
以场管理员身份启动 SharePoint 命令行管理程序以运行以下脚本。 请仔细阅读以下 PowerShell 脚本中提到的说明。 需要在某些位置输入自己的特定于环境的值。
# Set up farm properties to work with OIDC

# Create the Nonce certificate
$cert = New-SelfSignedCertificate -CertStoreLocation Cert:\LocalMachine\My -Provider 'Microsoft Enhanced RSA and AES Cryptographic Provider' -Subject "CN=SharePoint Cookie Cert"

# Import certificate to Certificate Management
$certPath = "<path and file name to save the exported cert.  ex: c:\certs\nonce.pfx>"
$certPassword = ConvertTo-SecureString -String "<password>" -Force -AsPlainText
Export-PfxCertificate -Cert $cert -FilePath $certPath -Password $certPassword
$nonceCert = Import-SPCertificate -Path $certPath -Password $certPassword -Store "EndEntity" -Exportable:$true

# Update farm property
$farm = Get-SPFarm
$farm.UpdateNonceCertificate($nonceCert,$true)
配置版本 24H1 之前的SharePoint Server 订阅版
在 2024 年 3 月 24H1 () 更新之前,必须手动管理 nonce Cookie 证书。 这包括在场中的每个服务器上手动安装它,以及设置对私钥的权限。 可以使用以下 PowerShell 脚本来完成此操作。
注意
以场管理员身份启动 SharePoint 命令行管理程序以运行以下脚本。 请仔细阅读以下 PowerShell 脚本中提到的说明。 需要在某些位置输入自己的特定于环境的值。
# Set up farm properties to work with OIDC
$cert = New-SelfSignedCertificate -CertStoreLocation Cert:\LocalMachine\My -Provider 'Microsoft Enhanced RSA and AES Cryptographic Provider' -Subject "CN=SharePoint Cookie Cert"
$rsaCert = [System.Security.Cryptography.X509Certificates.RSACertificateExtensions]::GetRSAPrivateKey($cert)
$fileName = $rsaCert.key.UniqueName

# If you have multiple SharePoint servers in the farm, you need to export the certificate by Export-PfxCertificate and import the certificate to all other SharePoint servers in the farm by Import-PfxCertificate.

# After the certificate is successfully imported to SharePoint Server, we will need to grant access permission to the certificate's private key.

$path = "$env:ALLUSERSPROFILE\Microsoft\Crypto\RSA\MachineKeys\$fileName"
$permissions = Get-Acl -Path $path

# Replace the <web application pool account> with the real application pool account of your web application
$access_rule = New-Object System.Security.AccessControl.FileSystemAccessRule(<Web application pool account>, 'Read', 'None', 'None', 'Allow')
$permissions.AddAccessRule($access_rule)
Set-Acl -Path $path -AclObject $permissions

# Then update farm properties
$farm = Get-SPFarm
$farm.Properties['SP-NonceCookieCertificateThumbprint']=$cert.Thumbprint
$farm.Properties['SP-NonceCookieHMACSecretKey']='seed'
$farm.Update()
重要
必须在场中的所有 SharePoint 服务器上安装带有私钥的 nonce Cookie 证书。 此外,必须向每个服务器上的 Web 应用程序池服务帐户授予对私钥的权限。 未能完成此步骤将导致 OIDC 身份验证失败。 建议使用上面的 PowerShell 示例来设置对私钥文件的权限,以确保正确完成。
步骤 3:将 SharePoint 配置为信任标识提供者
在此步骤中,将创建一个SPTrustedTokenIssuer存储 SharePoint 需要信任的配置Microsoft Entra OIDC 作为 OIDC 提供程序。
可以通过以下任一方式将 SharePoint 配置为信任标识提供者:
- 使用元数据终结点将 SharePoint 配置为信任 Microsoft Entra ID 作为 OIDC 提供程序。
- 通过使用元数据终结点,会自动从元数据终结点检索所需的多个参数。
- 将 SharePoint 配置为手动信任Microsoft Entra ID作为 OIDC 提供程序。
注意
请遵循手动配置步骤或元数据终结点步骤,但不能同时执行这两个步骤。
建议使用元数据终结点,因为它简化了过程。
使用元数据终结点将 SharePoint 配置为信任Microsoft Entra ID
SharePoint Server 订阅版现在支持在创建受信任的标识令牌颁发者时使用 OIDC 元数据发现功能。
在 Microsoft Entra ID 中,有两个版本的 OIDC 发现终结点:
- V1.0:
https://login.microsoftonline.com/<TenantID>/.well-known/openid-configuration - V2.0:
https://login.microsoftonline.com/<TenantID>/v2.0/.well-known/openid-configuration
重要
目前,SharePoint Server 仅在用于创建受信任的标识令牌颁发者时支持 v1.0 元数据终结点。 下面的示例 PowerShell 脚本使用 V1.0 终结点。
使用 OIDC 标识提供者提供的元数据终结点时,会直接从 OIDC 提供程序元数据终结点检索某些配置,包括:
- 证书
- 颁发者
- 授权终结点
- SignoutURL
这可以简化 OIDC 令牌颁发者的配置。
通过以下 PowerShell 示例,可以使用 Microsoft Entra ID 中的元数据终结点将 SharePoint 配置为信任 Microsoft Entra OIDC。
注意
请仔细阅读以下 PowerShell 脚本中提到的说明。 需要在某些位置输入自己的特定于环境的值。 例如,将 tenantid> 替换为<自己的目录 (租户) ID。
# Define claim types
# In this example, we're using Email Address as the Identity claim.
$emailClaimMap = New-SPClaimTypeMapping -IncomingClaimType "http://schemas.xmlsoap.org/ws/2005/05/identity/claims/emailaddress" -IncomingClaimTypeDisplayName "Email" -SameAsIncoming

# Set the AAD metadata endpoint URL. Please replace <TenantID> with the value saved in step #3 in the Entra ID setup section
$metadataendpointurl = "https://login.microsoftonline.com/<TenantID>/.well-known/openid-configuration"

# Please replace <Application (Client) ID> with the value saved in step #3 in the Entra ID setup section
$clientIdentifier = "<Application (Client)ID>"

# Create a new SPTrustedIdentityTokenIssuer in SharePoint
New-SPTrustedIdentityTokenIssuer -Name "contoso.local" -Description "contoso.local" -ClaimsMappings $emailClaimMap -IdentifierClaim $emailClaimMap.InputClaimType -DefaultClientIdentifier $clientIdentifier -MetadataEndPoint $metadataendpointurl -Scope "openid profile"
| 参数 | 说明 |
|---|---|
| 名称 | 为新令牌颁发者提供名称。 |
| 说明 | 为新的令牌颁发者提供说明。 |
| ImportTrustCertificate | 用于从 OIDC 标识符进行验证 id_token 的证书。 |
| ClaimsMappings | 一个 SPClaimTypeMapping 对象,用于标识 在 SharePoint 中 id_token 将 中的哪个声明视为标识符。 |
| IdentifierClaim | 指定标识符的类型。 |
| DefaultClientIdentifier | 指定 client_id SharePoint 服务器的 ,该服务器由 OIDC 标识提供者分配。 这是针对 中的 id_tokenaud 声明进行验证的。 |
| MetadataEndPoint | 指定来自 OIDC 标识提供者的已知元数据终结点,该终结点可用于检索最新的证书、颁发者、授权终结点和注销终结点。 |
将 SharePoint 配置为手动信任Microsoft Entra ID作为 OIDC 提供程序
手动配置时,必须指定多个附加参数。 可以从 OIDC 发现终结点检索值。
在 Microsoft Entra ID 中,有两个版本的 OIDC 身份验证终结点。 因此,OIDC 发现终结点有两个版本:
- V1.0:
https://login.microsoftonline.com/<TenantID>/.well-known/openid-configuration - V2.0:
https://login.microsoftonline.com/<TenantID>/v2.0/.well-known/openid-configuration
将 TenantID 替换为步骤 1:设置标识提供者中保存的 Directory (租户) ID,并通过浏览器连接到终结点。 然后,保存以下信息:
| 值 | 链接 |
|---|---|
| authorization_endpoint | https://login.microsoftonline.com/<tenantid>/oauth2/authorize |
| end_session_endpoint | https://login.microsoftonline.com/<tenantid>/oauth2/logout |
| 发行 | https://sts.windows.net/<tenantid>/ |
| jwks_uri | https://login.microsoftonline.com/common/discovery/keys |
打开jwks_uri (https://login.microsoftonline.com/common/discovery/keys) 并保存所有 x5c 证书字符串,以供以后在 SharePoint 设置中使用。
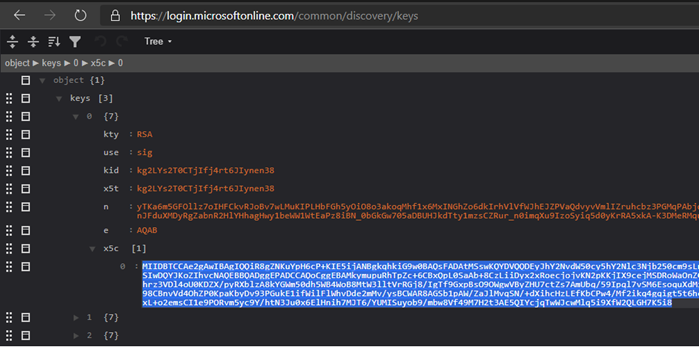
以场管理员身份启动 SharePoint 命令行管理程序,输入上面获取的值后,运行以下脚本来创建受信任的标识令牌颁发者:
注意
请仔细阅读以下 PowerShell 脚本中提到的说明。 需要在某些位置输入自己的特定于环境的值。 例如,将 tenantid> 替换为<自己的目录 (租户) ID。
# Define claim types
# In this example, we're using Email Address as the identity claim.
$emailClaimMap = New-SPClaimTypeMapping -IncomingClaimType "http://schemas.xmlsoap.org/ws/2005/05/identity/claims/emailaddress" -IncomingClaimTypeDisplayName "Email" -SameAsIncoming

# Public key of the AAD OIDC signing certificate. Please replace <x5c cert string> with the encoded cert string which you get from x5c certificate string of the keys of jwks_uri from Step #1
$encodedCertStrs = @()
$encodedCertStrs += <x5c cert string 1>
$encodedCertStrs += <x5c cert string 2>
...
$certificates = @()
foreach ($encodedCertStr in $encodedCertStrs) {
     $certificates += New-Object System.Security.Cryptography.X509Certificates.X509Certificate2 @(,[System.Convert]::FromBase64String($encodedCertStr))
}

# Set the AAD OIDC URL where users are redirected to authenticate. Please replace <tenantid> accordingly
$authendpointurl = "https://login.microsoftonline.com/<tenantid>/oauth2/authorize"
$registeredissuernameurl = "https://sts.windows.net/<tenantid>/"
$signouturl = "https://login.microsoftonline.com/<tenantid>/oauth2/logout"

# Please replace <Application (Client) ID> with the value saved in step #3 in AAD setup section
$clientIdentifier = "<Application (Client)ID>"

# Create a new SPTrustedIdentityTokenIssuer in SharePoint
New-SPTrustedIdentityTokenIssuer -Name "contoso.local" -Description "contoso.local" -ImportTrustCertificate $certificates -ClaimsMappings emailClaimMap -IdentifierClaim $emailClaimMap.InputClaimType -RegisteredIssuerName $registeredissuernameurl -AuthorizationEndPointUri $authendpointurl -SignOutUrl $signouturl -DefaultClientIdentifier $clientIdentifier -Scope "openid profile"
此处, New-SPTrustedIdentityTokenIssuer 通过使用以下参数扩展了 PowerShell cmdlet 以支持 OIDC:
| 参数 | 说明 |
|---|---|
| 名称 | 为新令牌颁发者提供名称。 |
| 说明 | 为新的令牌颁发者提供说明。 |
| ImportTrustCertificate | 导入 X509 证书的列表,该列表用于从 OIDC 标识符进行验证 id_token 。 如果 OIDC 标识提供者 (IDP) 使用多个证书对 进行数字签名 id_token,则导入这些证书,SharePoint 会通过匹配使用这些证书生成的数字签名进行验证 id_token 。 |
| ClaimsMappings | 一个 SPClaimTypeMapping 对象,用于标识 在 SharePoint 中 id_token 将 中的哪个声明视为标识符。 |
| IdentifierClaim | 指定标识符的类型。 |
| RegisteredIssuerName | 指定颁发者标识符,该标识符颁发 。id_token 它用于验证 id_token。 |
| AuthorizationEndPointUrl | 指定 OIDC 标识提供者的授权终结点。 |
| SignoutUrl | 指定 OIDC 标识提供者的注销终结点。 |
| DefaultClientIdentifier | 指定 client_id SharePoint 服务器的 ,该服务器由 OIDC 标识提供者分配。 这是针对 中的 id_tokenaud 声明进行验证的。 |
| ResponseTypesSupported | 指定此令牌颁发者接受的 IDP 的响应类型。 它可以接受两个字符串: id_token 和 code id_token。 如果未提供此参数,则使用 code id_token 作为默认值。 |
步骤 4:配置 SharePoint Web 应用程序
在此步骤中,使用在上一步中创建的 将 SharePoint 中的 Web 应用程序配置为与 Microsoft Entra OIDC SPTrustedIdentityTokenIssuer 联合。
重要
- SharePoint Web 应用程序的默认区域必须启用Windows 身份验证。 这是搜索爬网程序所必需的。
- 必须使用Microsoft Entra OIDC 联合身份验证的 SharePoint URL 配置超文本传输协议安全 (HTTPS) 。
可以通过以下任一方式完成此配置:
- 在默认区域中创建新的 Web 应用程序并使用 Windows 和 Microsoft Entra OIDC 身份验证。
- 扩展现有 Web 应用程序以在新区域中设置Microsoft Entra OIDC 身份验证。
若要 创建新的 Web 应用程序,请执行以下操作:
启动 SharePoint 命令行管理程序并运行以下脚本以创建新的
SPAuthenticationProvider:# This script creates a trusted authentication provider for OIDC $sptrust = Get-SPTrustedIdentityTokenIssuer "contoso.local" $trustedAp = New-SPAuthenticationProvider -TrustedIdentityTokenIssuer $sptrust按照 在 SharePoint Server 中创建 Web 应用程序 ,在 contoso.local 上创建一个名为 SharePoint - OIDC 的新 Web 应用程序,以启用 HTTPS/安全套接字层 (SSL) 。
打开 SharePoint 管理中心网站。
选择创建的 Web 应用程序,在功能区中选择“身份验证提供程序”,单击默认区域的链接,并选择 contoso.local 作为 受信任的标识提供者。
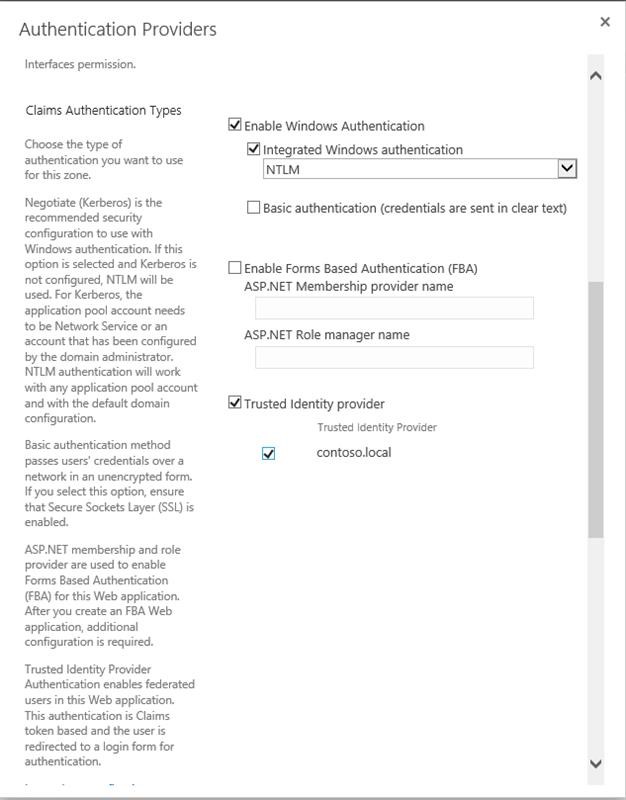
在 SharePoint 管理中心网站中,导航到“系统设置配置>备用访问映射备用访问映射>集合”。
使用新的 Web 应用程序筛选显示,并确认看到以下信息:

若要 扩展现有 Web 应用程序 并将其配置为使用“contoso.local”受信任的提供程序,请执行以下操作:
启动 SharePoint 命令行管理程序并运行 PowerShell 以扩展 Web 应用程序。 以下示例将 Web 应用程序扩展到 Intranet 区域,并将该区域配置为使用“Contoso.local”受信任的提供程序进行身份验证。
注意
若要执行此操作,必须将名为“SharePoint OIDC 网站”的有效证书导入服务器场。 有关详细信息,请参阅 SSL 证书管理操作 。
# Get the trusted provider
$sptrust = Get-SPTrustedIdentityTokenIssuer "Contoso.local"
$ap = New-SPAuthenticationProvider -TrustedIdentityTokenIssuer $sptrust
# Get the web app
$wa = Get-SPWebApplication http://spsites
# Extend the web app to the "Intranet" zone using trusted provider (OIDC) auth and a SharePoint managed certificate called "SharePoint OIDC Site"
New-SPWebApplicationExtension -Identity $wa -Name "spsites" -port 443 -HostHeader 'spsites.contoso.local'-AuthenticationProvider $ap -SecureSocketsLayer -UseServerNameIndication -Certificate 'SharePoint OIDC Site' -Zone 'Intranet' -URL 'https://spsites.contoso.local'
在 SharePoint 管理中心网站中,导航到“系统设置配置>备用访问映射备用访问映射>集合”。
使用已扩展的 Web 应用程序筛选显示,并确认看到以下信息:

步骤 5:确保 Web 应用程序配置了 SSL 证书
由于 OIDC 1.0 身份验证只能使用 HTTPS 协议,因此必须在相应的 Web 应用程序上设置证书。 如果尚未配置,请执行以下步骤来设置证书:
生成站点证书:
注意
如果已生成证书,则可以跳过此步骤。
打开 SharePoint PowerShell 控制台。
运行以下脚本以生成自签名证书并将其添加到 SharePoint 场:
New-SPCertificate -FriendlyName "Contoso SharePoint (2021)" -KeySize 2048 -CommonName spsites.contoso.local -AlternativeNames extranet.contoso.local, onedrive.contoso.local -OrganizationalUnit "Contoso IT Department" -Organization "Contoso" -Locality "Redmond" -State "Washington" -Country "US" -Exportable -HashAlgorithm SHA256 -Path "\\server\fileshare\Contoso SharePoint 2021 Certificate Signing Request.txt"
Move-SPCertificate -Identity "Contoso SharePoint (2021)" -NewStore EndEntity
重要
自签名证书仅适用于测试目的。 在生产环境中,强烈建议改用证书颁发机构颁发的证书。
设置证书:
可以使用以下 PowerShell cmdlet 将证书分配给 Web 应用程序:
Set-SPWebApplication -Identity https://spsites.contoso.local -Zone Default -SecureSocketsLayer -Certificate "Contoso SharePoint (2021)"
步骤 6:创建网站集
在此步骤中,你将创建一个包含两个管理员的团队网站集:一个作为 Windows 管理员,一个作为联合 (Microsoft Entra ID) 管理员。
打开 SharePoint 管理中心网站。
导航到 “应用程序管理>”“创建网站集>”“创建网站集”。
键入标题、URL,然后选择模板“工作组网站”。
在“主网站集管理员”部分中,选择“
 (书籍) ”图标以打开“人员选取器”对话框。
在“人员选取器”对话框中,键入 Windows 管理员帐户,例如 yvand。
选择“ 组织”,筛选左侧的列表。 下面是示例输出:
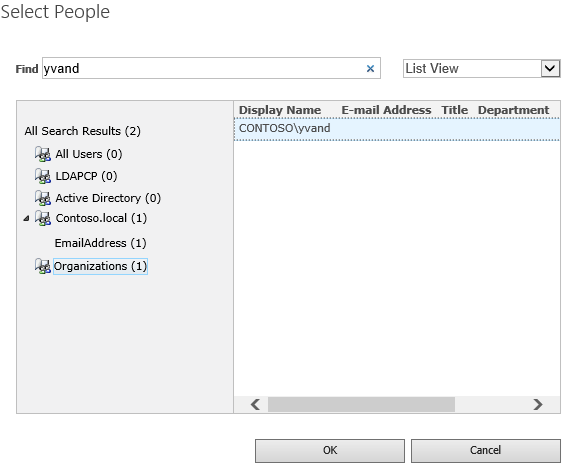
转到帐户并选择“ 确定”。
在“辅助网站集管理员”部分中,选择书籍图标以打开“人员选取器”对话框。
在“人员选取器”对话框中,键入Microsoft Entra管理员帐户的确切电子邮件值,例如 yvand@contoso.local。
选择 “contoso.local”,筛选左侧的列表。 下面是示例输出:
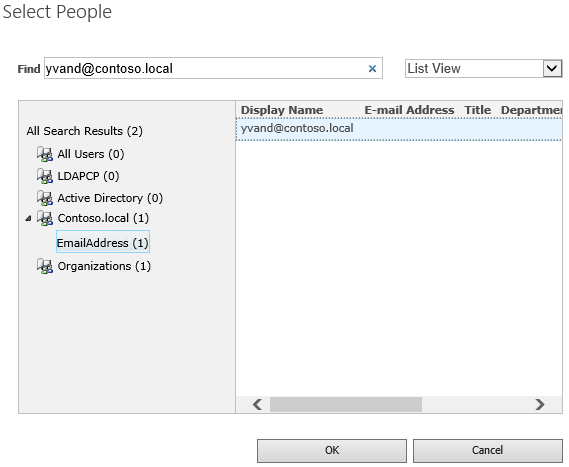
转到帐户并选择“确定”以关闭“人员选取器”对话框。
再次选择“ 确定” 以创建网站集。
创建网站集后,你应该能够使用 Windows 或联合网站集管理员帐户登录。
步骤 7:设置人员选取器
在 OIDC 身份验证中,人员选取器不会验证输入,这可能会导致拼写错误或用户意外选择了错误的声明类型。 可以通过使用自定义声明提供程序或使用SharePoint Server 订阅版中包含的新 UPA 支持的声明提供程序来解决此问题。 若要配置 UPA 支持的声明提供程序,请参阅用于新式身份验证的增强人员选取器。