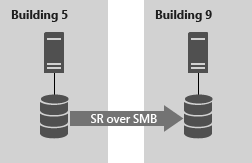
Set up server-to-server storage replication by using Storage Replica
You can use Storage Replica to configure two servers to sync data so that each has an identical copy of the same volume. This article describes the server-to-server replication configuration and how to set up and manage the environment.
To manage Storage Replica, you can use Windows Admin Center or PowerShell.
For an overview of how to use Storage Replica in Windows Admin Center, see the following video:
Prerequisites
An Active Directory Domain Services forest. (You don't need to run Windows Server 2016.)
Two servers running Windows Server 2019 or Windows Server 2016 Datacenter.
If you're running Windows Server 2019, you can instead use Standard Edition if replicating only a single volume up to 2 TB in size is suitable for your scenario.
Two sets of storage that can include Serial Attached SCSI (SAS) "just a bunch of disk" enclosures (JBODs), a Fibre Channel Storage Area Network (FC SAN), Internet Small Computer Systems Interface (iSCSI) target, or local SCSI or Serial Advanced Technology Attachment (SATA) storage. The storage should contain a mix of hard disk drive (HDD) and solid-state drive (SSD) media. You make each storage set available only to each of the servers, with no shared access.
Each set of storage must support creating at least two virtual disks, one for replicated data and one for logs. The physical storage must have the same sector sizes on all the data disks. The physical storage must have the same sector sizes on all the log disks.
At least one Ethernet/TCP connection on each server for synchronous replication, but Remote Direct Memory Access (RDMA) is preferred.
Appropriate firewall and router rules to allow Internet Control Message Protocol (ICMP), Server Message Block (SMB) (port 445, and port 5445 for SMB Direct), and Web Services Management (WS-Man) (port 5985) bidirectional traffic between all nodes.
A network between servers that has enough bandwidth to contain your input/output (I/O) write workload and an average of 5-ms roundtrip latency for synchronous replication. Asynchronous replication doesn't have a latency recommendation.
If you replicate between on-premises servers and Azure virtual machines (VMs), you must create a network link between the on-premises servers and the Azure VMs. To create the link, use Azure ExpressRoute, use a site-to-site VPN gateway connection, or install VPN software in your Azure VMs to connect them with your on-premises network.
The replicated storage can't be located on the drive that contains the Windows operating system folder.
Important
In this scenario, each server must be at a different physical site or in a different logical site. Each server must be able to communicate with the other server via a network.
You can verify many of these requirements by using the Test-SRTopology cmdlet. You get access to this tool if you install Storage Replica or install the Storage Replica Management Tools features on at least one server. To use the tool, just install and run the cmdlet. More information is included later in the article.
Windows Admin Center requirements
To use Storage Replica and Windows Admin Center together, you need the following items:
| System | Operating system | Required for |
|---|---|---|
| Two servers (any mix of on-premises hardware, VMs, and cloud VMs, including Azure VMs) |
Windows Server 2019, Windows Server 2016, or Windows Server (Semi-Annual Channel) | Storage Replica |
| One PC | Windows 10 | Windows Admin Center |
Note
Currently, you can't use Windows Admin Center on a server to manage Storage Replica.
Terms
This walkthrough uses the following environment as an example:
Two servers: SR-SRV05 and SR-SRV06
A pair of logical "sites" that represent two different datacenters: Redmond and Bellevue
Step 1: Install and configure Windows Admin Center on your PC
If you're using Windows Admin Center to manage Storage Replica, use the following steps to set up your PC to manage Storage Replica.
Download and install Windows Admin Center.
Download and install the Remote Server Administration Tools.
If you use Windows 10 version 1809 or later, install the feature RSAT: Storage Replica Module for Windows PowerShell from Features on Demand.
Open a PowerShell session as administrator:
- Select Start.
- Enter PowerShell.
- Right-click Windows PowerShell.
- Select Run as administrator.
Enter the following command to enable the WS-Man protocol on the local computer and set up the default configuration for remote management on the client:
winrm quickconfigEnter Y to enable WinRM services and to enable a WinRM firewall exception.
Step 2: Provision the operating system, features, roles, storage, and the network
Install Windows Server on both server nodes by using the installation type Windows Server (Desktop Experience).
You can use an Azure VM that is connected to your network via ExpressRoute.
Note
Starting in Windows Admin Center version 1910, you can configure a destination server automatically in Azure. If you choose that option, install Windows Server on the source server and then skip to Step 3: Set up server-to-server replication.
Add network information, join the servers to the same domain as your Windows 10 management PC (if you're using one), and then restart the servers.
Note
For the remaining steps, log on as a domain user who is a member of the built-in Administrator group on all servers. Be sure to elevate your PowerShell and command prompts in the remaining steps if you're running a graphical server installation or on a Windows 10 computer.
Connect the first set of JBOD storage enclosures, iSCSI target, FC SAN, or local fixed disk direct-attached storage (DAS) to the server in site Redmond.
Connect the second set of storage to the server in site Bellevue.
As relevant, install the latest vendor storage and enclosure firmware and drivers, the latest vendor host bus adapter (HBA) drivers, the latest vendor BIOS/UEFI firmware, the latest vendor network drivers, and the latest motherboard chipset drivers on both nodes. Restart nodes as needed.
Note
Consult your hardware vendor documentation to configure shared storage and networking hardware.
Ensure that BIOS/UEFI settings for servers enable high performance, such as disabling C-state, setting QPI speed, enabling nonuniform memory access (NUMA), and setting the highest memory frequency. Ensure power management in Windows Server is set to High Performance. Restart as required.
Configure roles as described in the following sections:
Windows Admin Center method
- In Windows Admin Center, go to Server Manager, and then select one of the servers.
- Go to Roles & Features.
- Select Features > Storage Replica, and then select Install.
- Repeat these steps on the other server.
Server Manager method
Run ServerManager.exe and create a server group. Add all server nodes.
Install the File Server and Storage Replica roles and features on each of the nodes. Then restart the nodes.
Windows PowerShell method
On SR-SRV06 or a remote management computer, run the following command in a Windows PowerShell console to install the required features and roles. Then restart the nodes.
In Server Manager, select Create a server group, then add all server nodes.
Install the File Server role and Storage Replica feature on each of the nodes and restart them. To learn more, see Install or Uninstall Roles, Role Services, or Features
For more information on these steps, see Install or uninstall roles, role services, or features
Configure storage as described in the following steps.
Important
- You must create two volumes on each enclosure: one for data and one for logs.
- Log and data disks must be initialized as GUID Partition Table (GPT), not as Master Boot Record (MBR).
- The two data volumes must be the identical size.
- The two log volumes should be the identical size.
- All replicated data disks must have the same sector sizes.
- All log disks must have the same sector sizes.
- The log volumes should use flash-based storage, such as SSD. We recommend log storage that is faster data storage. Log volumes must never be used for other workloads.
- The data disks can use HDD, SSD, or a tiered combination and can use either mirrored or parity spaces or RAID 1, RAID 10, RAID 5, or RAID 50.
- The log volume must be at least 9 GB by default. It can be larger or smaller based on log requirements.
- The File Server role is necessary only for Test-SRTopology to operate. It opens required firewall ports for testing.
For JBOD enclosures:
Ensure that each server can see only that site's storage enclosures and that the SAS connections are correctly configured.
Provision the storage by using Storage Spaces: Complete steps 1 to 3 in Deploy Storage Spaces on a Stand-Alone Server by using Windows PowerShell or Server Manager.
For iSCSI storage:
Ensure that each cluster can see only that site's storage enclosures. You should use more than a single network adapter if you use iSCSI.
Provision the storage by using your vendor documentation. If you use Windows-based iSCSI Targeting, consult iSCSI Target Block Storage, How To.
For FC SAN storage:
Ensure that each cluster can see only that site's storage enclosures and that you properly zoned the hosts.
Provision the storage by using your vendor documentation.
For local fixed disk storage:
Ensure the storage doesn't contain a system volume, a page file, or dump files.
Provision the storage by using your vendor documentation.
Start Windows PowerShell and use the
Test-SRTopologycmdlet to determine if you meet all the Storage Replica requirements. You can use the cmdlet in a requirements-only mode for a quick test or in a long-running performance evaluation mode.For example, to validate that the proposed nodes each have an F: volume and a G: volume and to run the test for 30 minutes, use this command:
MD c:\tempImportant
If you use a test server with no write I/O load on the specified source volume during the evaluation period, consider adding a workload to generate a useful report. You should test with production-like workloads to see real numbers and recommended log sizes. Alternatively, copy some files into the source volume during the test or download and run DISKSPD to generate write I/Os. For example, copy a sample with a low write I/O workload that runs for 10 minutes to the D: volume:
Diskspd.exe -c1g -d600 -W5 -C5 -b8k -t2 -o2 -r -w5 -i100 -j100 d:\testExamine the TestSrTopologyReport.html report to ensure that you meet the Storage Replica requirements.

Step 3: Set up server-to-server replication
Using Windows Admin Center
Add the source server:
- Select Add.
- Select Add server connection.
- Enter the name of the server, and then select Submit.
On the All Connections pane, select the source server.
On the Tools pane, select Storage Replica.
Select New to create a new partnership.
To create a new Azure VM to use as the destination for the partnership:
Under Replicate with another server, select Use a New Azure VM, and then select Next. If you don't see this option, make sure that you're using Windows Admin Center version 1910 or a later version.
Specify your source server information and replication group name, and then select Next.
This step begins a process that automatically selects a Windows Server 2019 or Windows Server 2016 Azure VM as a destination for the migration source. Storage Migration Service recommends VM sizes that match your source, but you can override this limitation by selecting See all sizes. Inventory data is used to automatically configure your managed disks and their file systems, and to join your new Azure VM to your Active Directory domain.
After Windows Admin Center creates the Azure VM, provide a replication group name, and then select Create. Windows Admin Center then begins the normal Storage Replica initial synchronization process to start protecting your data.
Here's a video that shows how to use Storage Replica to migrate to Azure VMs:
Provide the details of the partnership, and then select Create.

Note
Removing the partnership from Storage Replica in Windows Admin Center doesn't remove the replication group name.
Using Windows PowerShell
Next, configure server-to-server replication by using Windows PowerShell. You must perform all the following steps directly on the nodes or from a remote management computer that contains Windows Server Remote Server Administration Tools.
Check to ensure that you're using an elevated PowerShell console as an administrator.
Configure the server-to-server replication. Specify the source and destination disks, the source and destination logs, the source and destination nodes, and the log size.
New-SRPartnership -SourceComputerName sr-srv05 -SourceRGName rg01 -SourceVolumeName f: -SourceLogVolumeName g: -DestinationComputerName sr-srv06 -DestinationRGName rg02 -DestinationVolumeName f: -DestinationLogVolumeName g: -LogType RawHere's example output:
DestinationComputerName : SR-SRV06
DestinationRGName       : RG02
SourceComputerName      : SR-SRV05
PSComputerName          :
Important
The default log size is 8 GB. Depending on the results of the
Test-SRTopologycmdlet, you might choose to use the-LogSizeInBytesparameter to set a higher or lower value.To get the replication source and destination state, use the
Get-SRGroupandGet-SRPartnershipcmdlets:Get-SRGroup Get-SRPartnership (Get-SRGroup).replicasHere's example output:
CurrentLsn             : 0
DataVolume             : F:\
LastInSyncTime         :
LastKnownPrimaryLsn    : 1
LastOutOfSyncTime      :
NumOfBytesRecovered    : 37731958784
NumOfBytesRemaining    : 30851203072
PartitionId            : c3999f10-dbc9-4a8e-8f9c-dd2ee6ef3e9f
PartitionSize          : 68583161856
ReplicationMode        : synchronous
ReplicationStatus      : InitialBlockCopy
PSComputerName         :
Determine the replication progress as described in the following steps.
On the source server, run the following command and examine event IDs 5015, 5002, 5004, 1237, 5001, and 2200:
Get-WinEvent -ProviderName Microsoft-Windows-StorageReplica -Max 20On the destination server, run the following command to see the Storage Replica events that show partnership creation. This event states the number of copied bytes and how long it took to create the partnership.
For example:
Get-WinEvent -ProviderName Microsoft-Windows-StorageReplica | Where-Object {$_.ID -eq "1215"} | flHere's example output:
TimeCreated  : 4/8/2016 4:12:37 PM
ProviderName : Microsoft-Windows-StorageReplica
Id           : 1215
Message      : Block copy completed for replica.

> [!NOTE]
> By design, Storage Replica dismounts the destination volumes and their drive letters or mount points.
Alternatively, the destination server group for the replica always states the number of byte remaining to copy. You can use PowerShell to query the information.
For example:
(Get-SRGroup).Replicas | Select-Object numofbytesremainingHere's a progress sample (that doesn't terminate):
while($true) {

$v = (Get-SRGroup -Name "RG02").replicas | Select-Object numofbytesremaining
[System.Console]::Write("Number of bytes remaining: {0}`r", $v.numofbytesremaining)
Start-Sleep -s 5
}
On the destination server, run the following command and examine event IDs 5009, 1237, 5001, 5015, 5005, and 2200 to understand the processing progress. There should be no warnings of errors in this sequence. There will be many 1237 event IDs, which indicate processing progress.
Get-WinEvent -ProviderName Microsoft-Windows-StorageReplica | FL
Step 4: Manage replication
Finally, manage and operate your server-to-server replicated infrastructure. You can perform all the following steps directly on the nodes directly or from a remote management computer that contains Windows Server Remote Server Administration Tools.
Use the
Get-SRPartnershipandGet-SRGroupcmdlets to determine the current source and destination of replication and their status.To measure replication performance, use the
Get-Countercmdlet on both the source and destination nodes. The counter names are:\Storage Replica Partition I/O Statistics(*)\Number of times flush paused
\Storage Replica Partition I/O Statistics(*)\Number of pending flush I/O
\Storage Replica Partition I/O Statistics(*)\Number of requests for last log write
\Storage Replica Partition I/O Statistics(*)\Avg. Flush Queue Length
\Storage Replica Partition I/O Statistics(*)\Current Flush Queue Length
\Storage Replica Partition I/O Statistics(*)\Number of Application Write Requests
\Storage Replica Partition I/O Statistics(*)\Avg. Number of requests per log write
\Storage Replica Partition I/O Statistics(*)\Avg. App Write Latency
\Storage Replica Partition I/O Statistics(*)\Avg. App Read Latency
\Storage Replica Statistics(*)\Target RPO
\Storage Replica Statistics(*)\Current RPO
\Storage Replica Statistics(*)\Avg. Log Queue Length
\Storage Replica Statistics(*)\Current Log Queue Length
\Storage Replica Statistics(*)\Total Bytes Received
\Storage Replica Statistics(*)\Total Bytes Sent
\Storage Replica Statistics(*)\Avg. Network Send Latency
\Storage Replica Statistics(*)\Replication State
\Storage Replica Statistics(*)\Avg. Message Round Trip Latency
\Storage Replica Statistics(*)\Last Recovery Elapsed Time
\Storage Replica Statistics(*)\Number of Flushed Recovery Transactions
\Storage Replica Statistics(*)\Number of Recovery Transactions
\Storage Replica Statistics(*)\Number of Flushed Replication Transactions
\Storage Replica Statistics(*)\Number of Replication Transactions
\Storage Replica Statistics(*)\Max Log Sequence Number
\Storage Replica Statistics(*)\Number of Messages Received
\Storage Replica Statistics(*)\Number of Messages Sent
For more information on performance counters in Windows PowerShell, see Get-Counter.
To move the replication direction from one site, use the
Set-SRPartnershipcmdlet:$params = @{ NewSourceComputerName = 'SR-SRV06' SourceRGName = 'RG02' DestinationComputerName = 'SR-SRV05' DestinationRGName = 'RG01' } Set-SRPartnership @paramsWarning
Windows Server prevents role switching when the initial sync is ongoing. Data loss might occur if you attempt to switch before allowing initial replication to complete. Don't force-switch directions until the initial sync is complete.
Check the event logs to see the direction of replication change and recovery mode, and then reconcile. Write I/Os can then write to the storage of the new source server. Changing the replication direction blocks write I/Os on the originating source computer.
To remove replication, use
Get-SRGroup,Get-SRPartnership,Remove-SRGroup, andRemove-SRPartnershipon each node. Ensure you run theRemove-SRPartnershipcmdlet only on the current source of replication, not on the destination server. RunRemove-SRGroupon both servers.For example, to remove all replication from two servers, run these commands:
Get-SRPartnership
Get-SRPartnership | Remove-SRPartnership
Get-SRGroup | Remove-SRGroup
Replace DFS Replication with Storage Replica
Many Microsoft customers deploy the Windows service DFS Replication as a disaster recovery solution for unstructured user data like home folders and departmental shares. DFS Replication ships in all versions since Windows Server 2003 R2 and operates on low-bandwidth networks. It's an appealing alternative for high-latency and low-change environments that have many nodes.
However, DFS Replication has notable limitations as a data replication solution:
- It doesn't replicate in-use or open files.
- It doesn't replicate synchronously.
- Its asynchronous replication latency can be many minutes, hours, or even days.
- It relies on a database that can require lengthy consistency checks after a power interruption.
- It generally is configured as multi-master, which allows changes to flow in both directions, and it might overwrite newer data.
Storage Replica has none of these limitations.
Storage Replica does, however, have several limitations that might make it less appealing in some environments:
- It only allows one-to-one replication between volumes. It's possible to replicate different volumes between multiple servers.
- Although it supports asynchronous replication, it isn't designed for low-bandwidth, high-latency networks.
- It doesn't allow users to access protected data on the destination server while replication is ongoing.
If these factors aren't blocking in your scenario, you can use Storage Replica to replace DFS Replication servers with the more recent Storage Replica technology.
The process, at a high level, has these steps:
Install Windows Server on two servers and configure your storage. You might be required to upgrade an existing set of servers or do clean installations of the operating system.
Ensure that any data you want to replicate exists on one or more data volumes and not on the C: drive.
- You can also seed the data on the other server to save time, using a backup or file copies, or use thin provisioned storage. Making the metadata-like security match perfectly is unnecessary, unlike in DFS Replication.
Share the data on your source server and make it accessible through a DFS Namespaces namespace. This step is important to ensure that users can still access it if the server name changes to a DFS namespace in a disaster site.
- You can create matching shares on the destination server, which is unavailable during normal operations.
- Don't add the destination server to the DFS Namespaces namespace. If you do, ensure that all its folder targets are disabled.
Enable Storage Replica replication and complete initial sync. Replication can be either synchronous or asynchronous.
- We recommend synchronous replication to guarantee I/O data consistency on the destination server.
- We strongly recommend enabling Volume Shadow Copies and periodically taking snapshots by using vssadmin or another tool. This action guarantees that applications flush their data files to disk consistently. If a disaster occurs, you can recover files from snapshots on the destination server that might be partially replicated asynchronously. Snapshots replicate along with files.
Operate normally until there's a disaster.
Switch the destination server to be the new source, which surfaces its replicated volumes to users.
If you choose to use synchronous replication, no data restore is necessary unless a user was using an application that was writing data without transaction protection (replication has no effect in this scenario) when the source server is lost. If you choose to use asynchronous replication, the need for a Volume Shadow Copy Service (VSS) snapshot mount is higher, but consider using VSS in all circumstances for application-consistent snapshots.
Add the server and its shares as a DFS Namespaces folder target.
Users can then access their data.
Note
Disaster recovery planning is a complex subject and requires significant and detailed attention to plan. We highly recommend that you create runbooks and perform annual live failover drills. When an actual disaster strikes, chaos rules, and experienced personnel might be unavailable.
Add an Azure VM that is connected to your network via ExpressRoute
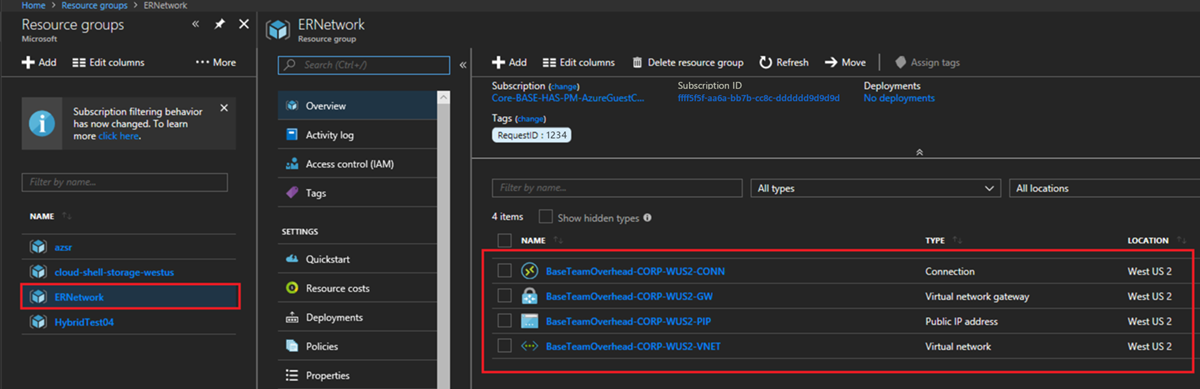
In the Azure portal, create an instance of ExpressRoute.
After the ExpressRoute is approved, a resource group is added to the subscription. To view this new group, go to Resource groups. Note the virtual network name.
Create a new resource group.
Add a network security group. When you create the network security group, select the subscription ID that is associated with the instance of ExpressRoute you created, and select the resource group that is associated with ExpressRoute.
Add any inbound and outbound security rules you need to the network security group. For example, you might want to allow Remote Desktop access to the VM.
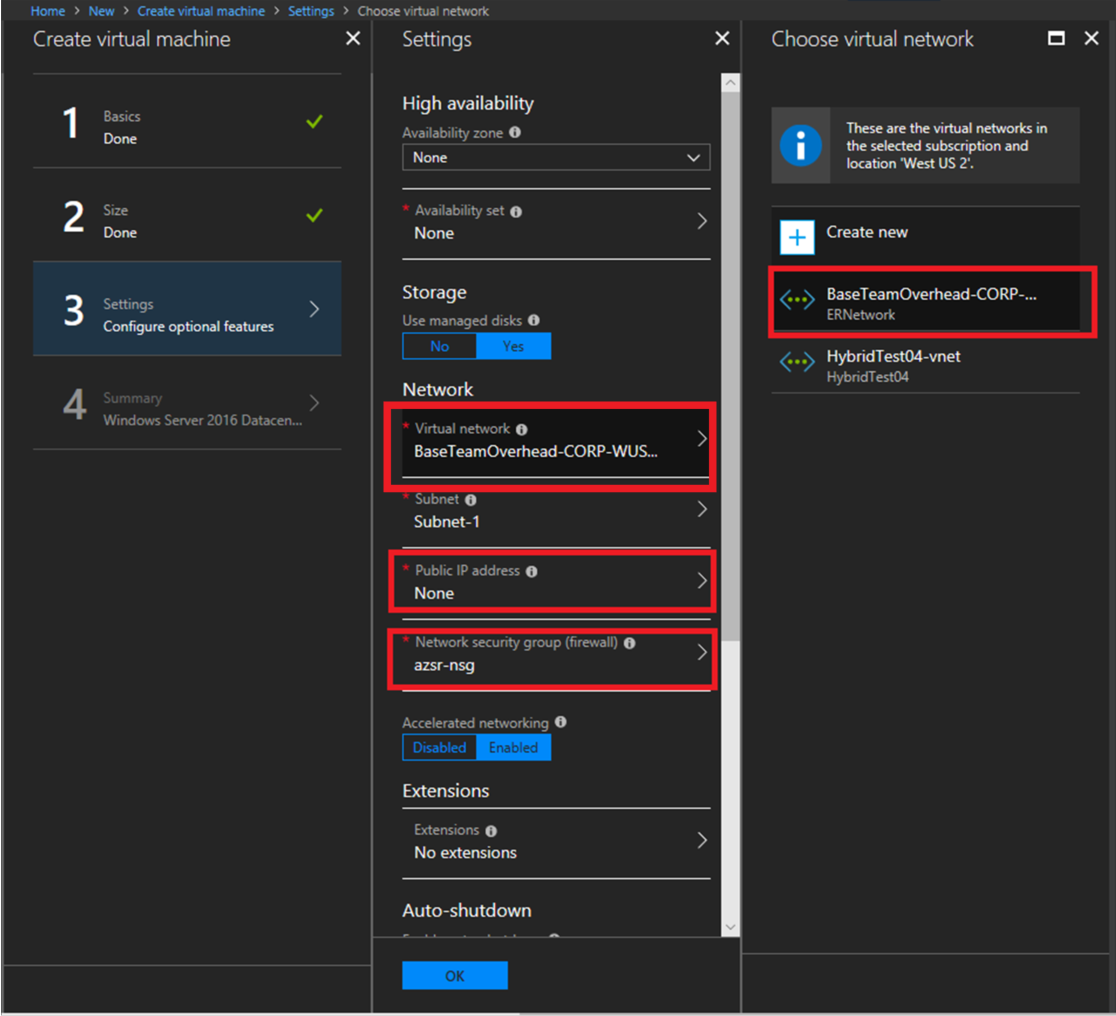
Create an Azure VM that has the following settings:
- Public IP address: None
- Virtual network: Select the virtual network name you noted from the resource group added with the ExpressRoute instance.
- Network security group (firewall): Select the network security group you created.
After the VM is created, see Step 2: Provision the operating system, features, roles, storage, and a network.
